Set up a Python development environment for Azure Machine Learning (v1)
Learn how to configure a Python development environment for Azure Machine Learning.
The following table shows each development environment covered in this article, along with pros and cons.
| Environment | Pros | Cons |
|---|---|---|
| Local environment | Full control of your development environment and dependencies. Run with any build tool, environment, or IDE of your choice. | Takes longer to get started. Necessary SDK packages must be installed, and an environment must also be installed if you don't already have one. |
| The Data Science Virtual Machine (DSVM) | Similar to the cloud-based compute instance (Python and the SDK are pre-installed), but with other popular data science and machine learning tools pre-installed. Easy to scale and combine with other custom tools and workflows. | A slower getting started experience compared to the cloud-based compute instance. |
| Azure Machine Learning compute instance | Easiest way to get started. The entire SDK is already installed in your workspace VM, and notebook tutorials are pre-cloned and ready to run. | Lack of control over your development environment and dependencies. Extra cost incurred for Linux VM (VM can be stopped when not in use to avoid charges). See pricing details. |
| Azure Databricks | Ideal for running large-scale intensive machine learning workflows on the scalable Apache Spark platform. | Overkill for experimental machine learning, or smaller-scale experiments and workflows. Extra cost incurred for Azure Databricks. See pricing details. |
This article also provides usage tips for the following tools:
Jupyter Notebooks: If you're already using Jupyter Notebooks, the SDK has some extras that you should install.
Visual Studio Code: If you use Visual Studio Code, the Azure Machine Learning extension includes extensive language support for Python and features to make working with the Azure Machine Learning much more convenient and productive.
Prerequisites
- Azure Machine Learning workspace. If you don't have one, you can create an Azure Machine Learning workspace through the Azure portal, Azure CLI, and Azure Resource Manager templates.
Local and DSVM only: Create a workspace configuration file
The workspace configuration file is a JSON file that tells the SDK how to communicate with your Azure Machine Learning workspace. The file is named config.json, and it has the following format:
{
    "subscription_id": "<subscription-id>",
    "resource_group": "<resource-group>",
    "workspace_name": "<workspace-name>"
}
This JSON file must be in the directory structure that contains your Python scripts or Jupyter Notebooks. It can be in the same directory, a subdirectory named .azureml, or in a parent directory.
To use this file from your code, use the Workspace.from_config method. This code loads the information from the file and connects to your workspace.
Create a workspace configuration file in one of the following methods:
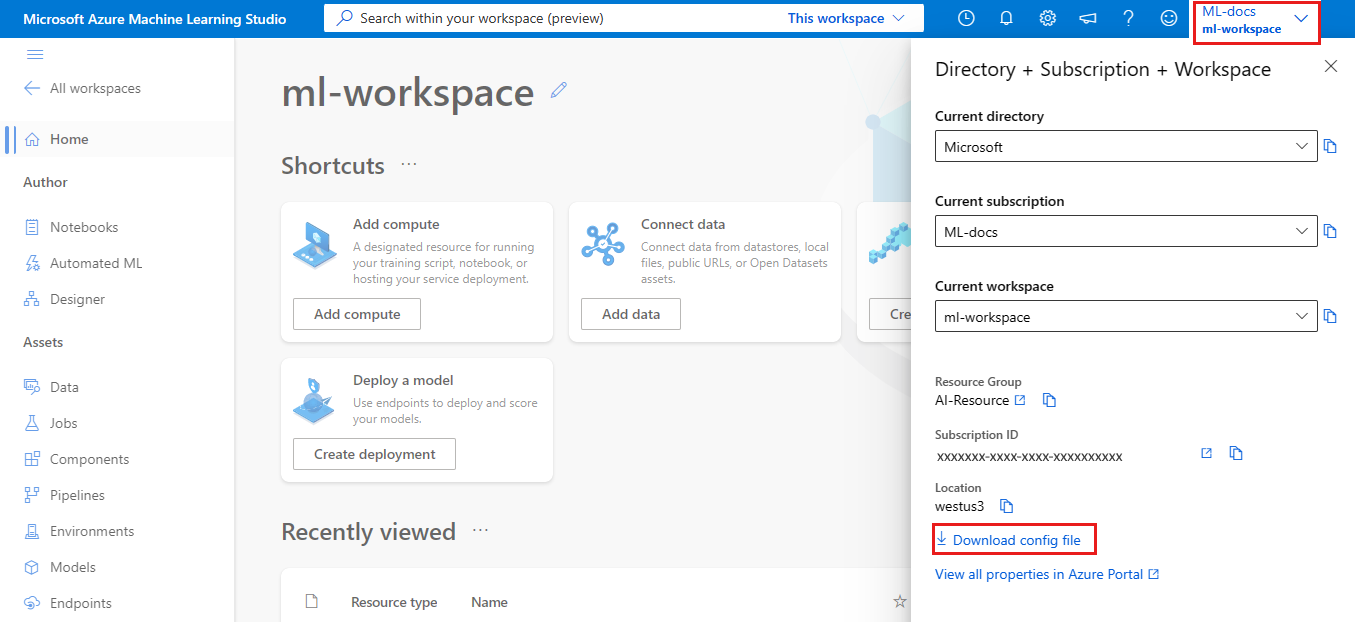
Azure portal
Download the file: In the Azure portal, select Download config.json from the Overview section of your workspace.
Azure Machine Learning Python SDK
Create a script to connect to your Azure Machine Learning workspace and use the
write_configmethod to generate your file and save it as .azureml/config.json. Make sure to replacesubscription_id,resource_group, andworkspace_namewith your own.APPLIES TO:
 Python SDK azureml v1
from azureml.core import Workspace

subscription_id = '<subscription-id>'
resource_group  = '<resource-group>'
workspace_name  = '<workspace-name>'

try:
    ws = Workspace(subscription_id = subscription_id, resource_group = resource_group, workspace_name = workspace_name)
    ws.write_config()
    print('Library configuration succeeded')
except:
    print('Workspace not found')
Local computer or remote VM environment
You can set up an environment on a local computer or remote virtual machine, such as an Azure Machine Learning compute instance or Data Science VM.
To configure a local development environment or remote VM:
Create a Python virtual environment (virtualenv, conda).
Note
Although not required, it's recommended you use Anaconda or Miniconda to manage Python virtual environments and install packages.
Important
If you're on Linux or macOS and use a shell other than bash (for example, zsh) you might receive errors when you run some commands. To work around this problem, use the
bashcommand to start a new bash shell and run the commands there.Activate your newly created Python virtual environment.
Install the Azure Machine Learning Python SDK.
To configure your local environment to use your Azure Machine Learning workspace, create a workspace configuration file or use an existing one.
Now that you have your local environment set up, you're ready to start working with Azure Machine Learning. See the Azure Machine Learning Python getting started guide to get started.
Jupyter Notebooks
When running a local Jupyter Notebook server, it's recommended that you create an IPython kernel for your Python virtual environment. This helps ensure the expected kernel and package import behavior.
Enable environment-specific IPython kernels
conda install notebook ipykernelCreate a kernel for your Python virtual environment. Make sure to replace
<myenv>with the name of your Python virtual environment.ipython kernel install --user --name <myenv> --display-name "Python (myenv)"Launch the Jupyter Notebook server
See the Azure Machine Learning notebooks repository to get started with Azure Machine Learning and Jupyter Notebooks. Also see the community-driven repository, AzureML-Examples.
Visual Studio Code
To use Visual Studio Code for development:
Install Visual Studio Code.
Install the Azure Machine Learning Visual Studio Code extension (preview).
Important
This feature is currently in public preview. This preview version is provided without a service-level agreement, and we don't recommend it for production workloads. Certain features might not be supported or might have constrained capabilities.
For more information, see Supplemental Terms of Use for Microsoft Azure Previews.
Once you have the Visual Studio Code extension installed, use it to:
- Manage your Azure Machine Learning resources
- Launch Visual Studio Code remotely connected to a compute instance (preview)
- Run and debug experiments
- Deploy trained models (CLI v2).
Azure Machine Learning compute instance
The Azure Machine Learning compute instance is a secure, cloud-based Azure workstation that provides data scientists with a Jupyter Notebook server, JupyterLab, and a fully managed machine learning environment.
There's nothing to install or configure for a compute instance.
Create one anytime from within your Azure Machine Learning workspace. Provide just a name and specify an Azure VM type. Try it now with Create resources to get started.
To learn more about compute instances, including how to install packages, see Create and manage an Azure Machine Learning compute instance.
Tip
To prevent incurring charges for an unused compute instance, stop the compute instance. Or enable idle shutdown for the compute instance.
In addition to a Jupyter Notebook server and JupyterLab, you can use compute instances in the integrated notebook feature inside of Azure Machine Learning studio.
You can also use the Azure Machine Learning Visual Studio Code extension to connect to a remote compute instance using VS Code.
Data Science Virtual Machine
The Data Science VM is a customized virtual machine (VM) image you can use as a development environment. It's designed for data science work that's pre-configured tools and software like:
- Packages such as TensorFlow, PyTorch, Scikit-learn, XGBoost, and the Azure Machine Learning SDK
- Popular data science tools such as Spark Standalone and Drill
- Azure tools such as the Azure CLI, AzCopy, and Storage Explorer
- Integrated development environments (IDEs) such as Visual Studio Code and PyCharm
- Jupyter Notebook Server
For a more comprehensive list of the tools, see the Data Science VM tools guide.
Important
If you plan to use the Data Science VM as a compute target for your training or inferencing jobs, only Ubuntu is supported.
To use the Data Science VM as a development environment:
Create a Data Science VM using one of the following methods:
Use the Azure CLI
To create an Ubuntu Data Science VM, use the following command:
# create a Ubuntu Data Science VM in your resource group
# note you need to be at least a contributor to the resource group in order to execute this command successfully
# If you need to create a new resource group use: "az group create --name YOUR-RESOURCE-GROUP-NAME --location YOUR-REGION (For example: westus2)"
az vm create --resource-group YOUR-RESOURCE-GROUP-NAME --name YOUR-VM-NAME --image microsoft-dsvm:linux-data-science-vm-ubuntu:linuxdsvmubuntu:latest --admin-username YOUR-USERNAME --admin-password YOUR-PASSWORD --generate-ssh-keys --authentication-type password
To create a Windows DSVM, use the following command:
# create a Windows Server 2016 DSVM in your resource group
# note you need to be at least a contributor to the resource group in order to execute this command successfully
az vm create --resource-group YOUR-RESOURCE-GROUP-NAME --name YOUR-VM-NAME --image microsoft-dsvm:dsvm-windows:server-2016:latest --admin-username YOUR-USERNAME --admin-password YOUR-PASSWORD --authentication-type password
Activate the conda environment containing the Azure Machine Learning SDK.
For Ubuntu Data Science VM:
conda activate py36For Windows Data Science VM:
conda activate AzureML
To configure the Data Science VM to use your Azure Machine Learning workspace, create a workspace configuration file or use an existing one.
Similar to local environments, you can use Visual Studio Code and the Azure Machine Learning Visual Studio Code extension to interact with Azure Machine Learning.
For more information, see Data Science Virtual Machines.
Next steps
- Train and deploy a model on Azure Machine Learning with the MNIST dataset.
- See the Azure Machine Learning SDK for Python reference.
Feedback
Coming soon: Throughout 2024 we will be phasing out GitHub Issues as the feedback mechanism for content and replacing it with a new feedback system. For more information see: https://aka.ms/ContentUserFeedback.
Submit and view feedback for