Manage labeling projects
Learn how to manage a labeling project in Azure Machine Learning. This article is for project managers who are responsible for managing text or image labeling projects. For information about how to create the project, see Set up a text labeling project or Set up an image labeling project.
Important
Items marked (preview) in this article are currently in public preview. The preview version is provided without a service level agreement, and it's not recommended for production workloads. Certain features might not be supported or might have constrained capabilities. For more information, see Supplemental Terms of Use for Microsoft Azure Previews.
Run and monitor the project
After you initialize the project, Azure begins to run it. To manage a project, select the project on the main Data Labeling page.
To pause or restart the project, on the project command bar, toggle the Running status. You can label data only when the project is running.
Monitor progress
The Dashboard tab shows the progress of the labeling task.

The progress charts show how many items were labeled, skipped, need review, or aren't yet complete. Hover over the chart to see the number of items in each section.
A distribution of the labels for completed tasks is shown below the chart. In some project types, an item can have multiple labels. The total number of labels can exceed the total number of items.
A distribution of labelers and how many items they labeled also are shown.
The middle section shows a table that has a queue of unassigned tasks. When ML-assisted labeling is off, this section shows the number of manual tasks that are awaiting assignment.
When ML-assisted labeling is on, this section also shows:
- Tasks that contain clustered items in the queue.
- Tasks that contain prelabeled items in the queue.
Additionally, when ML-assisted labeling is enabled, you can scroll down to see the ML-assisted labeling status. The Jobs sections give links for each of the machine learning runs.
- Training: Trains a model to predict the labels.
- Validation: Determines whether item prelabeling uses the prediction of this model.
- Inference: Prediction run for new items.
- Featurization: Clusters items (only for image classification projects).

Review data and labels
On the Data tab, preview the dataset and review labeled data.
Tip
Before you review, coordinate with any other possible reviewers. Otherwise, you might both be trying to approve the same label at the same time, which will keep one of you from updating it.
Scroll through the labeled data to see the labels. If you see data that's incorrectly labeled, select it and choose Reject to remove the labels and return the data to the unlabeled queue.
Skipped items
A set of filters apply to the items you're reviewing. By default, you review labeled data. Select the Asset type filter to switch the type to *Skipped to review items that were skipped.

If you think the skipped data should be labeled, select Reject to put in back into the unlabeled queue. If you think the skipped data isn't relevant to your project, select Accept to remove it from the project.
Consensus labeling
If your project uses consensus labeling, review images that have no consensus:
Select the Data tab.
On the left menu, select Review labels.
On the command bar above Review labels, select All filters.

Under Labeled datapoints, select Consensus labels in need of review to show only images for which the labelers didn't come to a consensus.
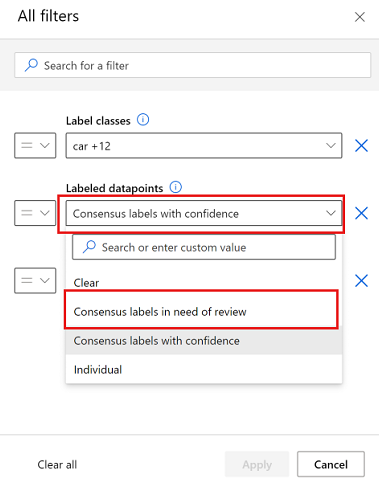
For each image to review, select the Consensus label dropdown to view the conflicting labels.
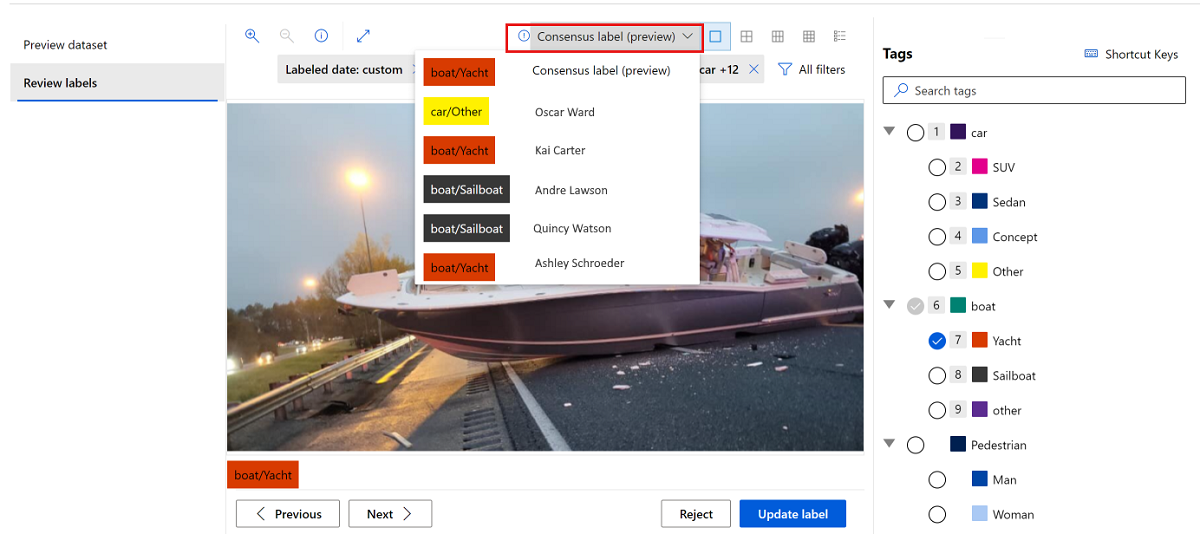
Although you can select an individual labeler to see their labels, to update or reject the labels, you must use the top choice, Consensus label (preview).


Change project details
View and change details of your project on the Details tab. On this tab, you can:
- View project details and input datasets.
- Set or clear the Enable incremental refresh at regular intervals option, or request an immediate refresh.
- View details of the storage container that's used to store labeled outputs in your project.
- Add labels to your project.
- Edit instructions you give to your labels.
- Change settings for ML-assisted labeling and kick off a labeling task.
Projects created in Azure AI services
If your labeling project was created from Vision Studio or Language Studio, you'll see an extra tab on the Details page. The tab allows you to switch between labeling in Azure Machine Learning and labeling in Vision Studio or Language Studio.
If your project was created from Vision Studio, you'll also see a Vision Studio tab. Select Go to Vision Studio to return to Vision Studio. Once you return to Vision Studio, you'll be able to import your labeled data.
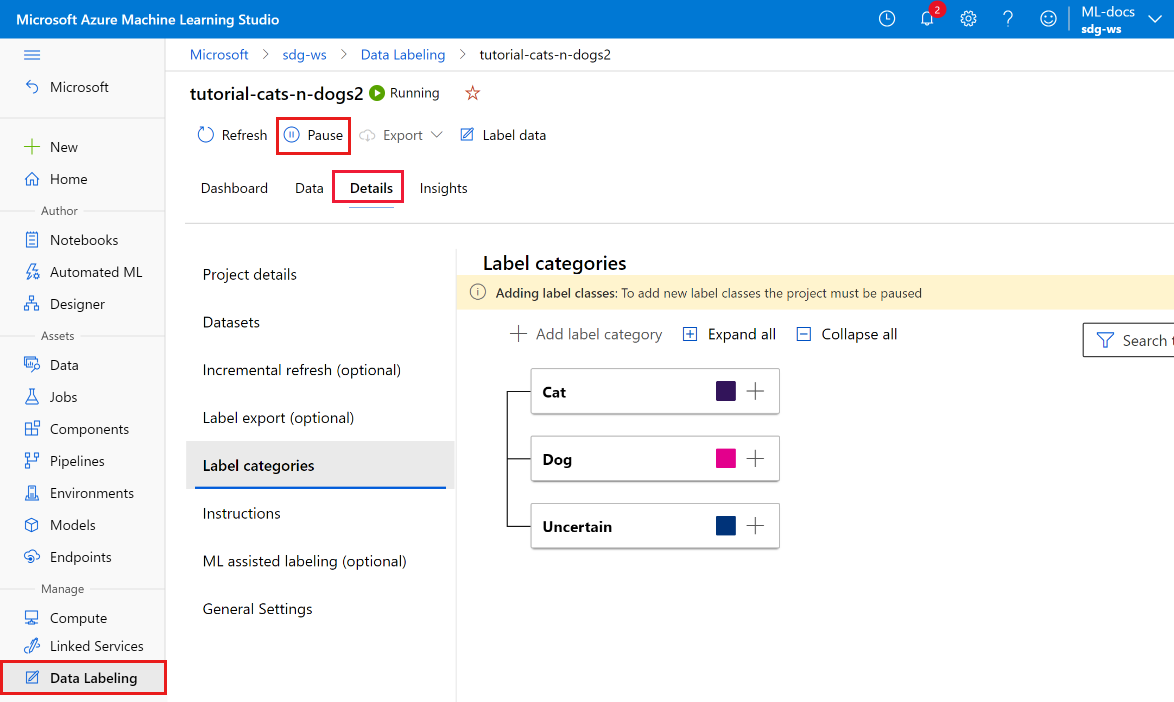
Add new labels to a project
During the data labeling process, you might want to add more labels to classify your items. For example, you might want to add an Unknown or Other label to indicate confusion.
To add one or more labels to a project:
On the main Data Labeling page, select the project.
On the project command bar, toggle the status from Running to Paused to stop labeling activity.
Select the Details tab.
In the list on the left, select Label categories.
Modify your labels.
In the form, add your new label. Then choose how to continue the project. Because you changed the available labels, choose how to treat data that's already labeled:
- Start over, and remove all existing labels. Choose this option if you want to start labeling from the beginning by using the new full set of labels.
- Start over, and keep all existing labels. Choose this option to mark all data as unlabeled, but keep the existing labels as a default tag for images that were previously labeled.
- Continue, and keep all existing labels. Choose this option to keep all data already labeled as it is, and start using the new label for data that's not yet labeled.
Modify your instructions page as necessary for new labels.
After you've added all new labels, toggle Paused to Running to restart the project.
Start an ML-assisted labeling task
ML-assisted labeling starts automatically after some items have been labeled. This automatic threshold varies by project. You can manually start an ML-assisted training run if your project contains at least some labeled data.
Note
On-demand training is not available for projects created before December 2022. To use this feature, create a new project.
To start a new ML-assisted training run:
- At the top of your project, select Details.
- On the left menu, select ML assisted labeling.
- Near the bottom of the page, for On-demand training, select Start.
Export the labels
To export the labels, on the project command bar, select the Export button. You can export the label data for Machine Learning experimentation at any time.
If your project type is Semantic segmentation (Preview), an Azure MLTable data asset is created.
For all other project types, you can export an image label as:
- A CSV file. Azure Machine Learning creates the CSV file in a folder inside Labeling/export/csv.
- A COCO format file. Azure Machine Learning creates the COCO file in a folder inside Labeling/export/coco.
- An Azure Machine Learning dataset with labels.
- A CSV file. Azure Machine Learning creates the CSV file in a folder inside Labeling/export/csv.
- A COCO format file. Azure Machine Learning creates the COCO file in a folder inside Labeling/export/coco.
- An Azure MLTable data asset.
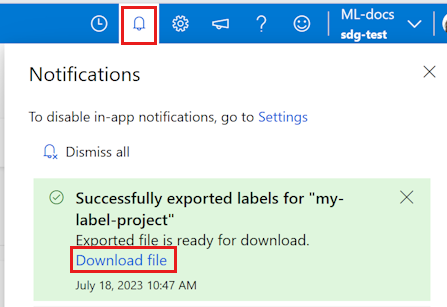
When you export a CSV or COCO file, a notification appears briefly when the file is ready to download. Select the Download file link to download your results. You can also find the notification in the Notification section on the top bar:
Access exported Azure Machine Learning datasets and data assets in the Data section of Machine Learning. The data details page also provides sample code you can use to access your labels by using Python.
After you export your labeled data to an Azure Machine Learning dataset, you can use AutoML to build computer vision models that are trained on your labeled data. Learn more at Set up AutoML to train computer vision models by using Python.
Import labels (preview)
If you have an Azure MLTable data asset or COCO file that contains labels for your current data, you can import these labels into your project. For example, you might have labels that were exported from a previous labeling project using the same data. The import labels feature is available for image projects only.
To import labels, on the project command bar, select the Import button. You can import labeled data for Machine Learning experimentation at any time.
Import from either a COCO file or an Azure MLTable data asset.
Data mapping
You must specify a column that maps to the Image field. You can also optionally map other columns that are present in the data. For example, if your data contains a Label column, you can map it to the Category field. If your data contains a Confidence column, you can map it to the Confidence field.
If you're importing labels from a previous project, the labels must be in the same format as the labels you're creating. For example, if you're creating bounding box labels, the labels you import must also be bounding box labels.
Import options
Choose how to treat the imported labels:
- As prelabeled data - choose this option to use the imported labels as prelabeled data. Your labeler can then review the prelabeled data and correct any errors before submitting the labels.
- As final labels - choose this option to import the labels as final labels. Only data that doesn't yet contain a label is presented as tasks to your labelers.
Access for labelers
Anyone who has Contributor or Owner access to your workspace can label data in your project.
You can also add users and customize the permissions so that they can access labeling but not other parts of the workspace or your labeling project. For more information, see Add users to your data labeling project.
Troubleshoot issues
Use these tips if you see any of the following issues while managing your project:
| Issue | Resolution |
|---|---|
| Only datasets created on blob datastores can be used. | This issue is a known limitation of the current release. |
| Removing data from the dataset your project uses causes an error in the project. | Don't remove data from the version of the dataset you used in a labeling project. Create a new version of the dataset to use to remove data. |
| After a project is created, the project status is Initializing for an extended time. | Manually refresh the page. Initialization should complete at roughly 20 data points per second. No automatic refresh is a known issue. |
| Newly labeled items aren't visible in data review. | To load all labeled items, select the First button. The First button takes you back to the front of the list, and it loads all labeled data. |
| You can't assign a set of tasks to a specific labeler. | This issue is a known limitation of the current release. |
Troubleshoot object detection
| Issue | Resolution |
|---|---|
| If you select the Esc key when you label for object detection, a zero-size label is created and label submission fails. | To delete the label, select the X delete icon next to the label. |
If you have problems creating the project, see Troubleshoot problems during creation of a data labeling project
Next step
Feedback
Coming soon: Throughout 2024 we will be phasing out GitHub Issues as the feedback mechanism for content and replacing it with a new feedback system. For more information see: https://aka.ms/ContentUserFeedback.
Submit and view feedback for