Quickstart - Create an Azure Modeling and Simulation Workbench (preview) in the Azure portal
Get started with Azure Modeling and Simulation Workbench (preview) by using the Azure portal. The Azure portal is a browser-based user interface to create Azure resources. This quickstart shows you how to use the Azure portal to deploy an Azure Modeling and Simulation Workbench, and perform initial setup to get users started on their development or collaboration activity.
Prerequisites
An Azure account with an active subscription. Create an account for free.
The Azure account must have permission to manage resource providers and to manage resources for the subscription. The permission is included in the Contributor and Owner roles.
The Azure account must have permission to manage applications in Microsoft Entra ID. The following Microsoft Entra roles include the required permissions:
A Microsoft Entra tenant.
Sign in to Azure portal
Open your web browser and go to the Azure portal. Enter your credentials to sign in to the portal.
Register Azure Modeling and Simulation Workbench resource provider
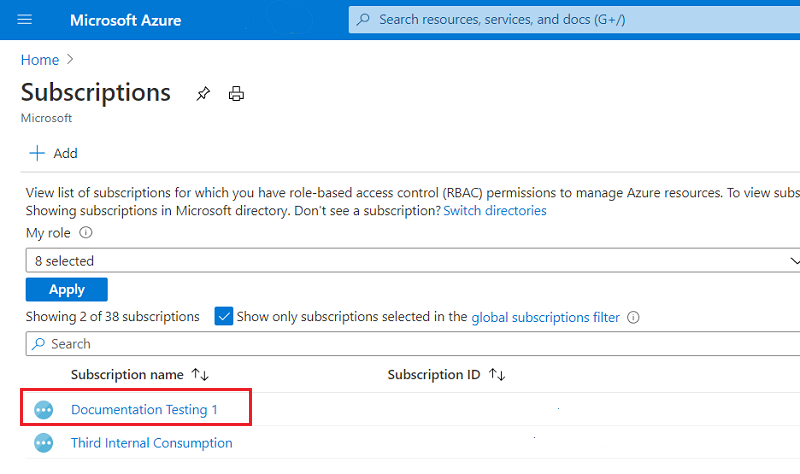
On the Azure portal menu, search for Subscriptions. Select it from the available options.

On the Subscriptions page, select the subscription you want to view. In the screenshot below, 'Documentation Testing 1' is shown as an example.
On the left menu, under Settings, select Resource providers.
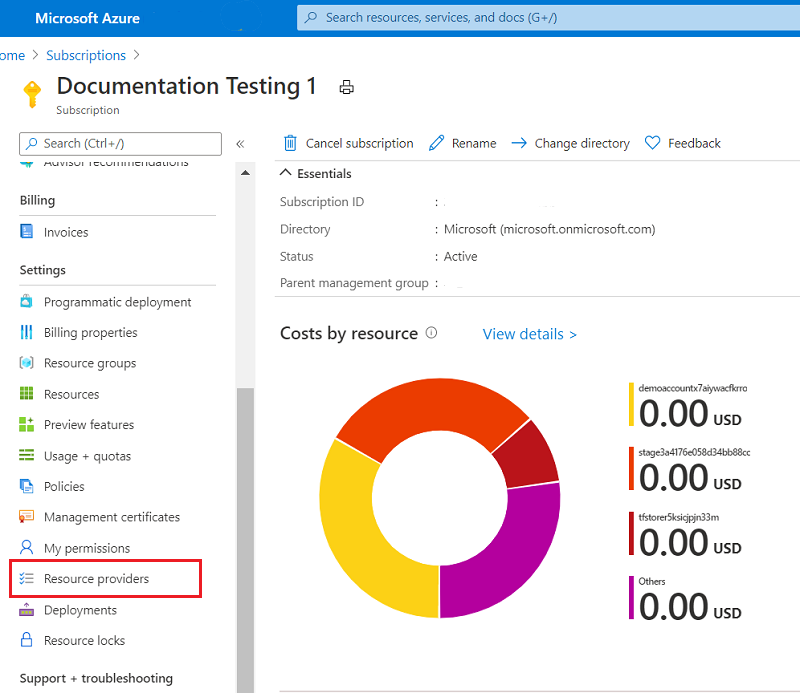
Select the Microsoft.ModSimWorkbench resource provider. Then select Register.

Important
To maintain the least privileges in your subscription, only register the resource providers you're ready to use.
To allow your application to continue sooner than waiting for all regions to complete, don't block the creation of resources for a resource provider in the registering state.
Create an application in Microsoft Entra ID
To create an application in Microsoft Entra ID, you first register the application and add a client secret. Then you create a Key Vault, set up Key Vault role assignments, and add client secrets to the Key Vault.
Register an application
Registering your application establishes a trust relationship between Modeling and Simulation Workbench remote desktop authentication and the Microsoft identity platform. The trust is unidirectional: your app trusts the Microsoft identity platform, and not the other way around.
Follow these steps to create the app registration:
If you have access to multiple tenants, use the Directories + subscriptions** filter
 in the top menu to switch to the tenant in which you want to register the application.
Search for and select Microsoft Entra ID.
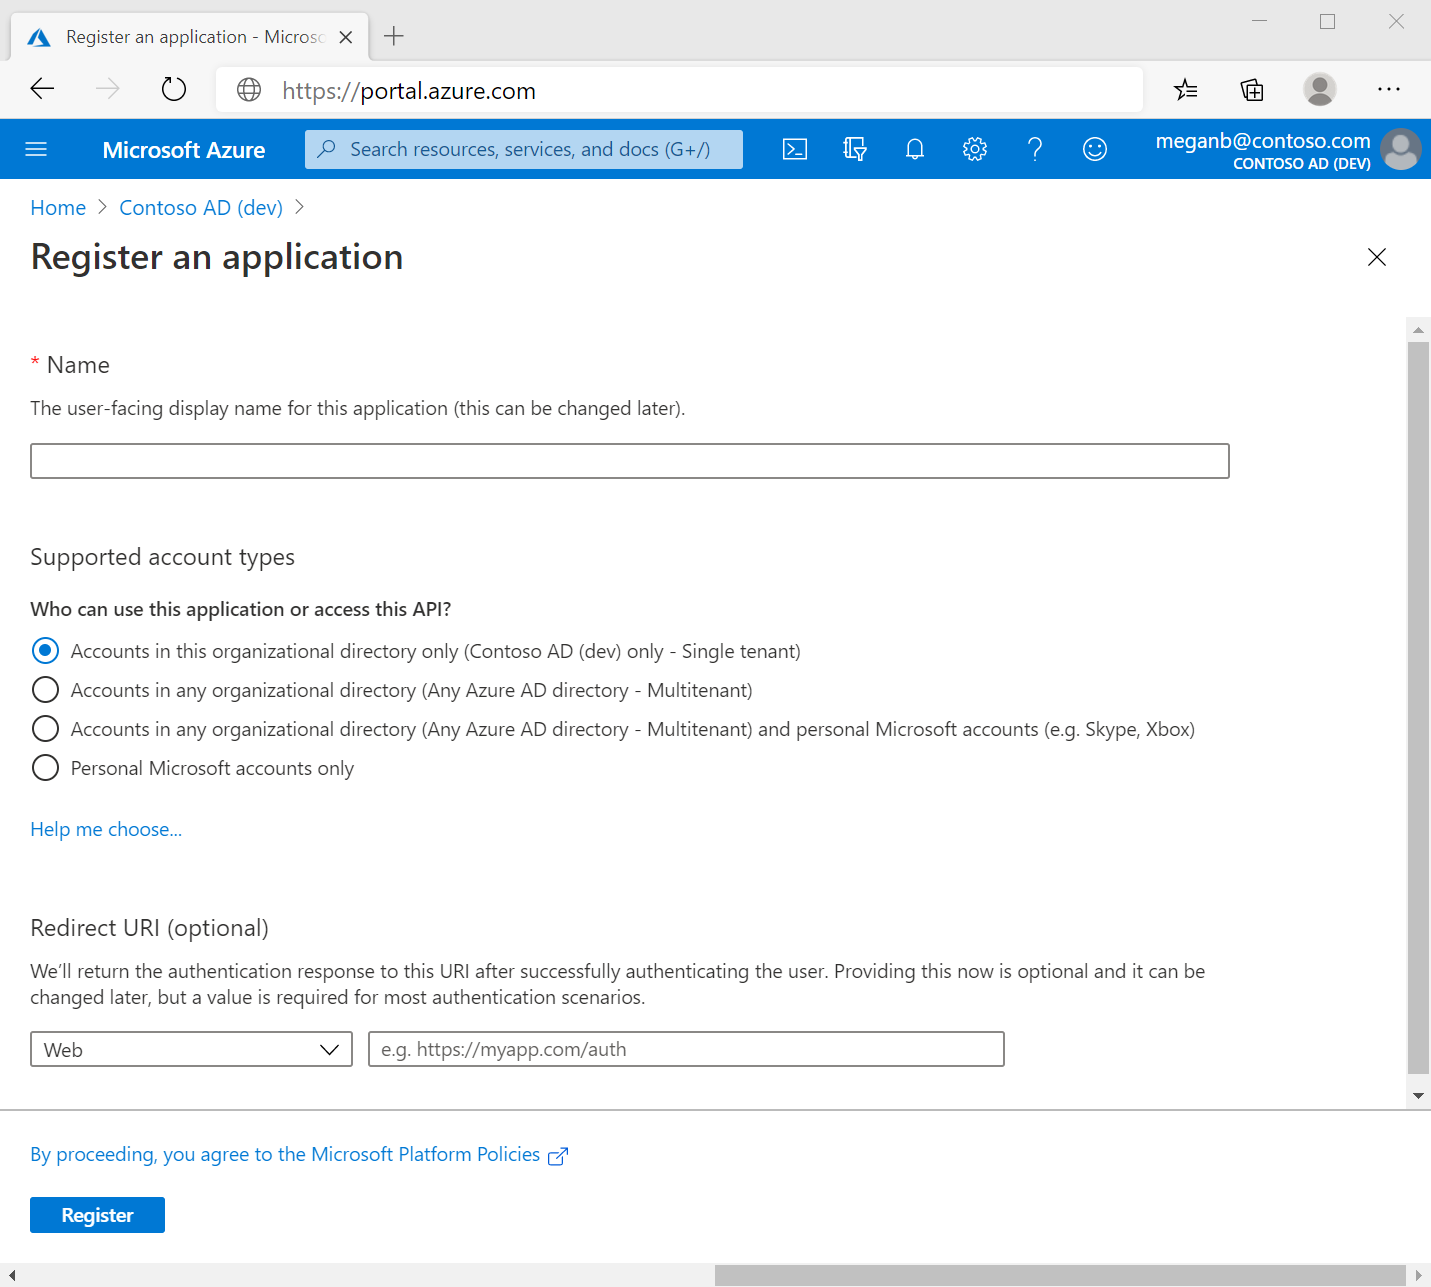
Under Manage, select App registrations > New registration.
Enter QuickstartModSimWorkbenchApp for the Name.
Select Accounts in this organizational directory only (Single tenant) for the Supported account types.
Don't enter anything for Redirect URI (optional). You'll configure a redirect URI in the next section.
Select Register to complete the initial app registration.
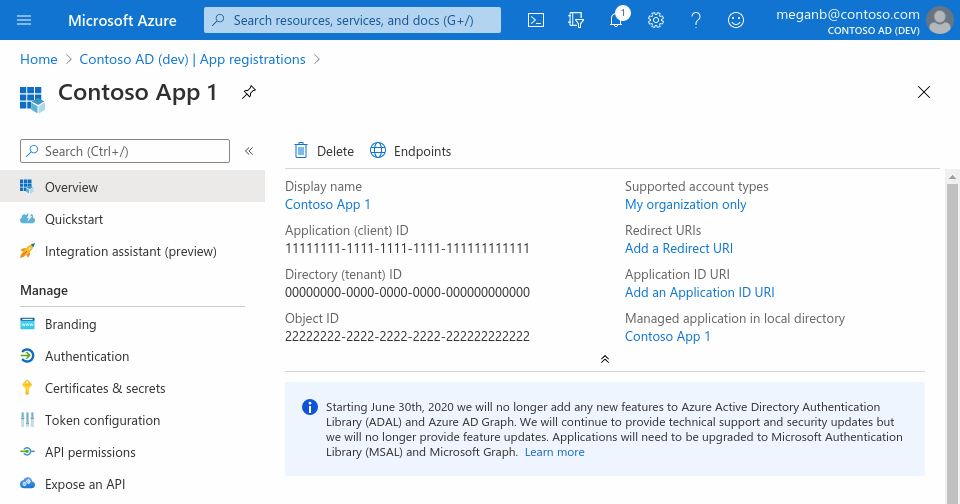
The application properties display. Locate and document the Application (client) ID - a Microsoft identity platform unique identifier for the application. You need the Application (client) ID when you create your Key Vault.
Add a client secret
Creating a client secret allows the Azure Modeling and Simulation Workbench to redirect Microsoft Entra sign-in requests directly to your organization's Microsoft Entra ID, as the only identity provider. This integration provides a single sign-on experience for your design team. The secret's lifetime should last the workbench's lifetime. However, if the secret does expire, your design team loses access to the chamber. To address an expired secret, you need to create a new secret and update the Azure Modeling and Simulation Workbench with the new values.
- In App registrations, select your application QuickstartModSimWorkbenchApp.
- Select Certificates & secrets > Client secrets > New client secret.
- Add a description for your client secret.
- Select Recommended: 6 months for the Expires.
- Select Add.
- The application properties display. Locate the Client secret value and document it. You need the Client secret value when you create your Key Vault. Make sure you write it down now, as it will never be displayed again once you leave this page.
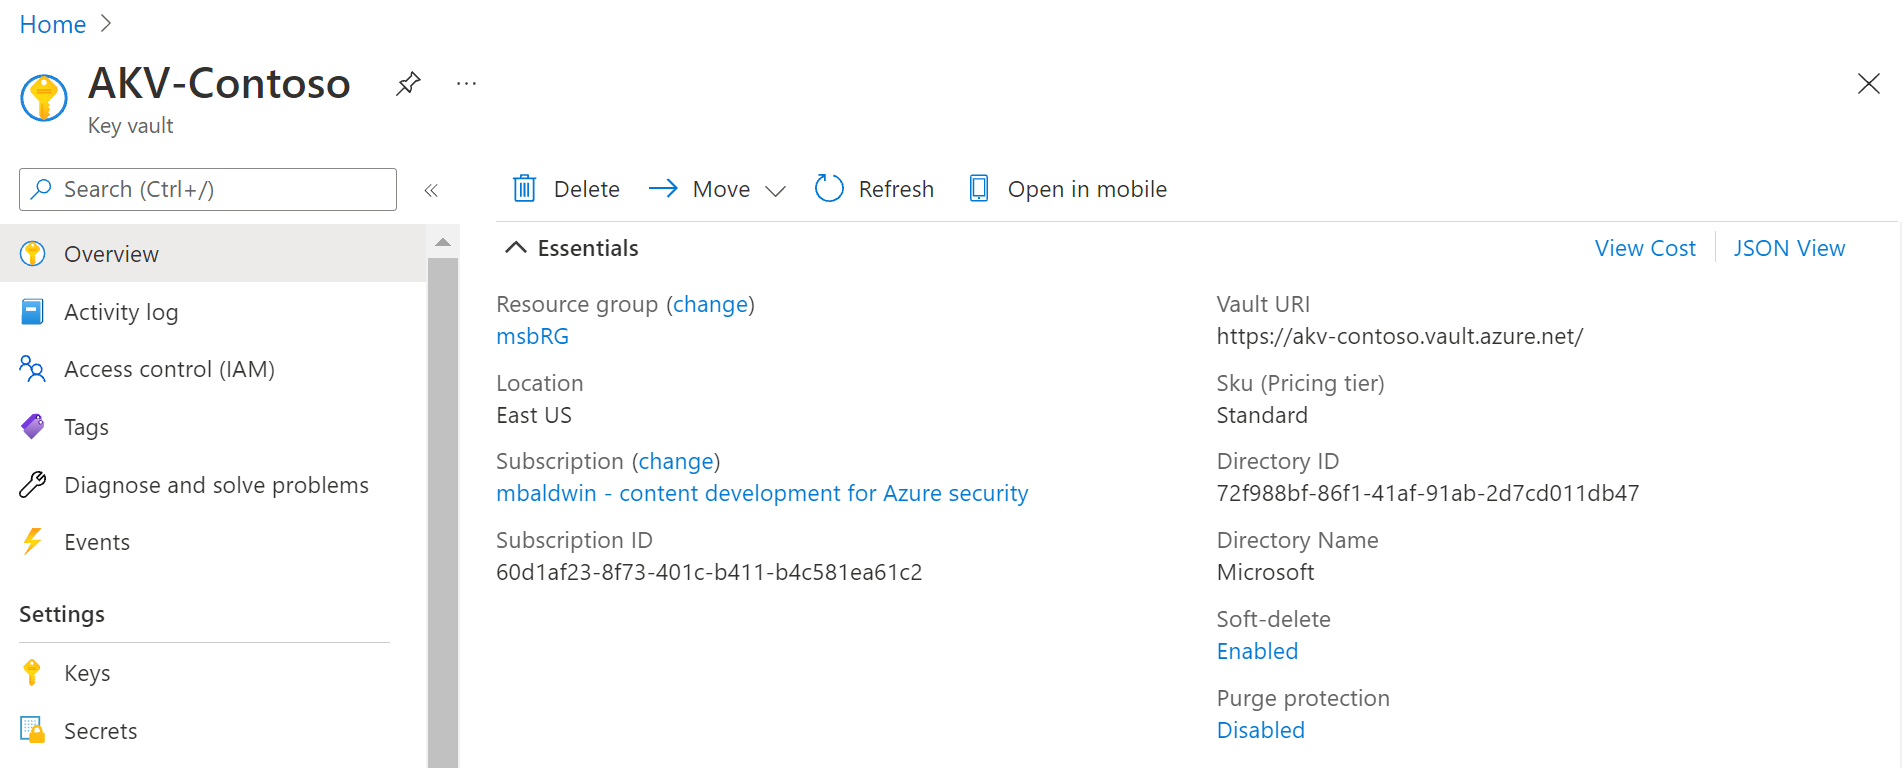
Create a Key Vault
From the Azure portal menu or Home page, select Create a resource.
In the Search box, enter Key Vault.
From the results list, select Key Vault.
On the Key Vault section, select Create.
On the Create key vault section, provide the following information:
Name: A unique name is required. For this quickstart, we use QuickstartVault-<numbers>.
Subscription: Choose a subscription.
Under Resource Group, select Create new to create a new resource group. Enter QuickstartCreateModSimWorkbench-rg for the Name.
In the Location pull-down menu, choose a location.
In Access policy, select Azure role-based access control under Permission model.

Leave the other options to their defaults.
After providing the information as instructed, select Create.
Set up Key Vault role assignment
Open the Key Vault you already created by selecting it from the list of resources shown in your Resource Group. Then select Access control (IAM).
Select Add > Add role assignment to open the Add role assignment page.
Assign the following roles.
Setting Value Role Key Vault Secrets User Assign access to User, group, or service principal Members Azure Modeling and Simulation Workbench Setting Value Role Key Vault Secrets Officer Assign access to User, group, or service principal Members <your Azure account>
Add secrets to Key Vault
- Navigate to your key vault QuickstartVault-<numbers> in the Azure portal.
- On the Key Vault settings pages, select Secrets.
- Select Generate/Import.
- On the Create a secret screen, provide the following information and select Create:
- Upload options: Select Manual.
- Name: Enter QuickstartModSimWorkbenchAppClientId
- Value: Enter the Application (client) ID you documented in the Register an application step.
- Leave the other values to their defaults.
- Create another secret and provide the following information:
- Upload options: Select Manual.
- Name: Enter QuickstartModSimWorkbenchAppSecretValue
- Value: Enter the Client secret value you documented in the Add a client secret step.
- Leave the other values to their defaults.
- Locate and document the two secret identifiers:
- Select secret.
- Select the latest version.
- Copy/document the secret identifier shown.
- Remove the version from the secret identifier URL shown. Example:
https://quickstartvault.vault.azure.net/secrets/quickstartmodsimworkbenchappclientidwould be your secret identifier for the App Registration Client ID, nothttps://quickstartvault.vault.azure.net/secrets/quickstartmodsimworkbenchappclientid/95e7cae001f612345468abcd1c109b3a.
Create an Azure Modeling and Simulation Workbench (preview)
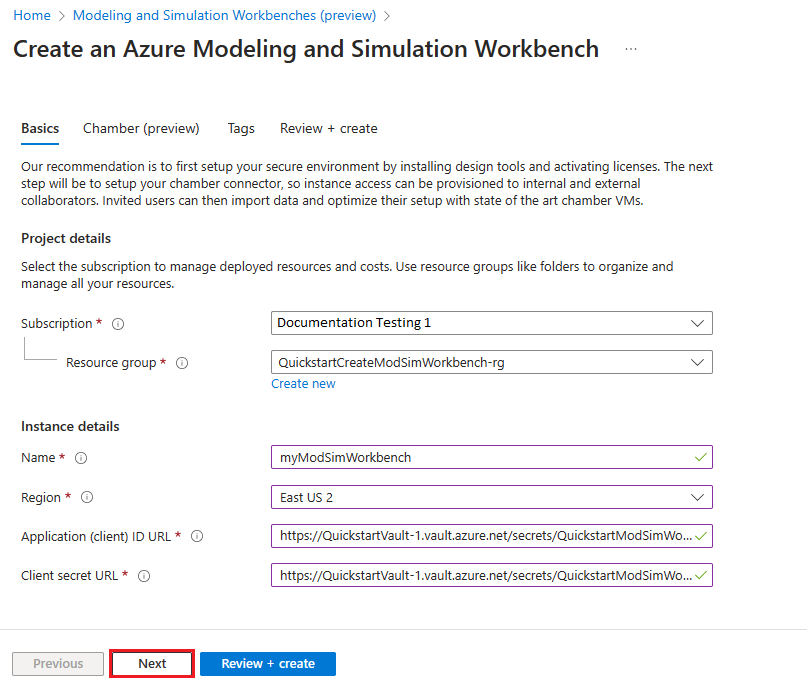
To create an Azure Modeling and Simulation Workbench, you first fill out the Azure portal wizard fields for naming and connectivity preferences. Then you submit the form to create a Workbench.
While you're signed in the Azure portal, go to https://<AzurePortalUrl>/#blade/HubsExtension/BrowseResource/resourceType/Microsoft.ModSimWorkbench%2Fworkbenches. For example, go to https://portal.azure.com/#blade/HubsExtension/BrowseResource/resourceType/Microsoft.ModSimWorkbench%2Fworkbenches for Azure public cloud.
On the Modeling and Simulation Workbenches (preview) page, select Create. The Create an Azure Modeling and Simulation Workbench page opens.

On the Project details > Basics tab, select your subscription in the Subscription field. Then select QuickstartCreateModSimWorkbench-rg for the Resource group.
Provide the following information for the Workbench details:
- Name: Enter myModSimWorkbench.
- Region: Select East US.
- Application (client) ID URL: Enter the secret identifier Key Vault URL for QuickstartModSimWorkbenchAppClientId you documented in the Add secrets to Key Vault step.
- Client secret value URL: Enter the secret identifier Key Vault URL for QuickstartModSimWorkbenchAppSecretValue you documented in the Add secrets to Key Vault step.
Select Next button at the bottom of the page.
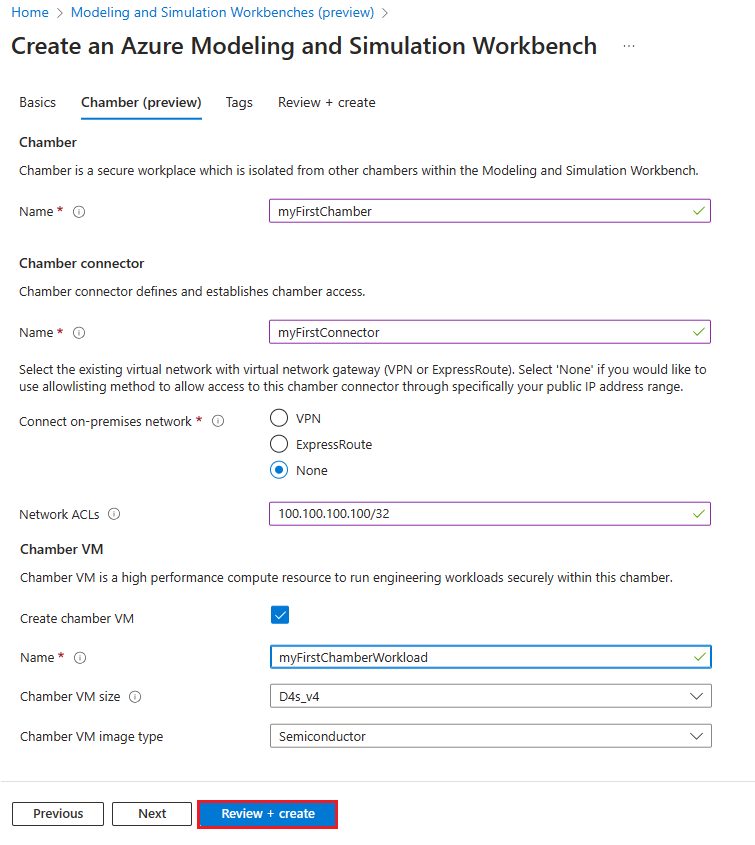
Provide the following information for the Chamber in the Chamber tab:
- Chamber name: Enter myFirstChamber.
Provide the following information for the Chamber connector:
Connector name: Enter myfirstconnector.
Connect on-premises network: Select None.
Note
Select ExpressRoute when you have Azure ExpressRoute connected, select VPN when you have VPN gateway setup, select None when you don't have or don't use ExpressRoute/VPN.
Network ACLs: Enter your public IP address using CIDR notation (for example, 100.100.100.100/32).
Note
A range of IP addresses from the same subnet can be masked using CIDR notation. /32 is a single IP address. If you have chamber users with host addresses 100.100.100.1 – 100.100.100.6, then the Network ACLs entry is 100.100.100.0/29.
Provide the following information for the Chamber VM:
- Chamber VM name: Enter myFirstChamberWorkload.
- Chamber VM size: Select E2s_v5.
Select Review + create button at the bottom of the page.
On the Review + create page, you can see the details about the Azure Modeling and Simulation Workbench you're about to create. When you're ready, select Create.
Assign user roles for a Modeling and Simulation Workbench chamber
Enter quickstart in the global search and select myFirstChamber.
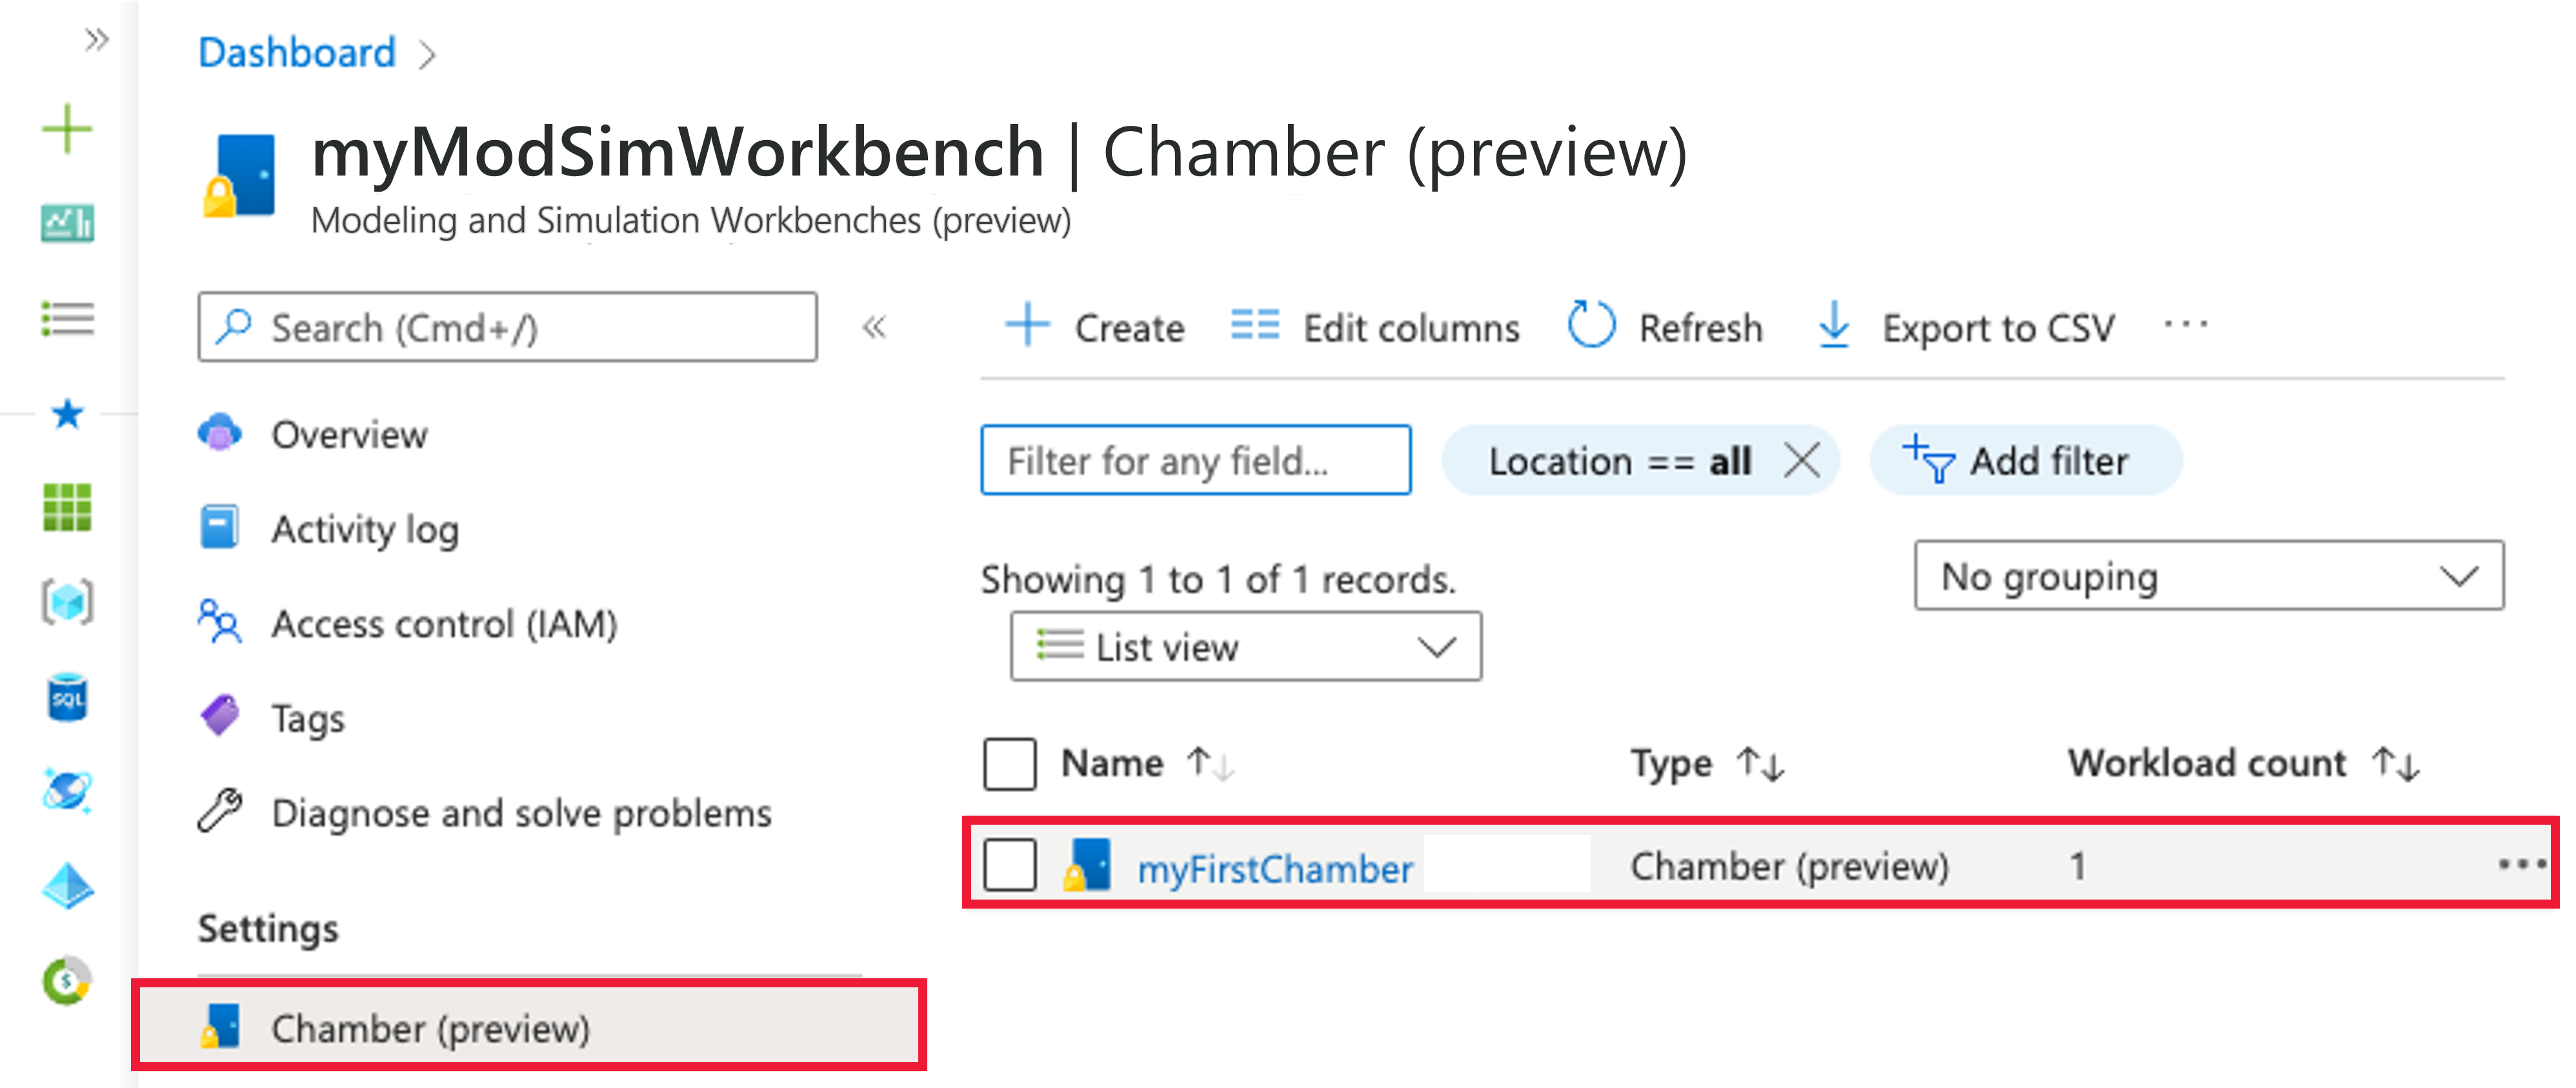
Select Access control (IAM) from the left side menu of myFirstChamber.
Select Add > Add role assignment. If you don't have permissions to assign roles, the Add role assignment option is disabled.
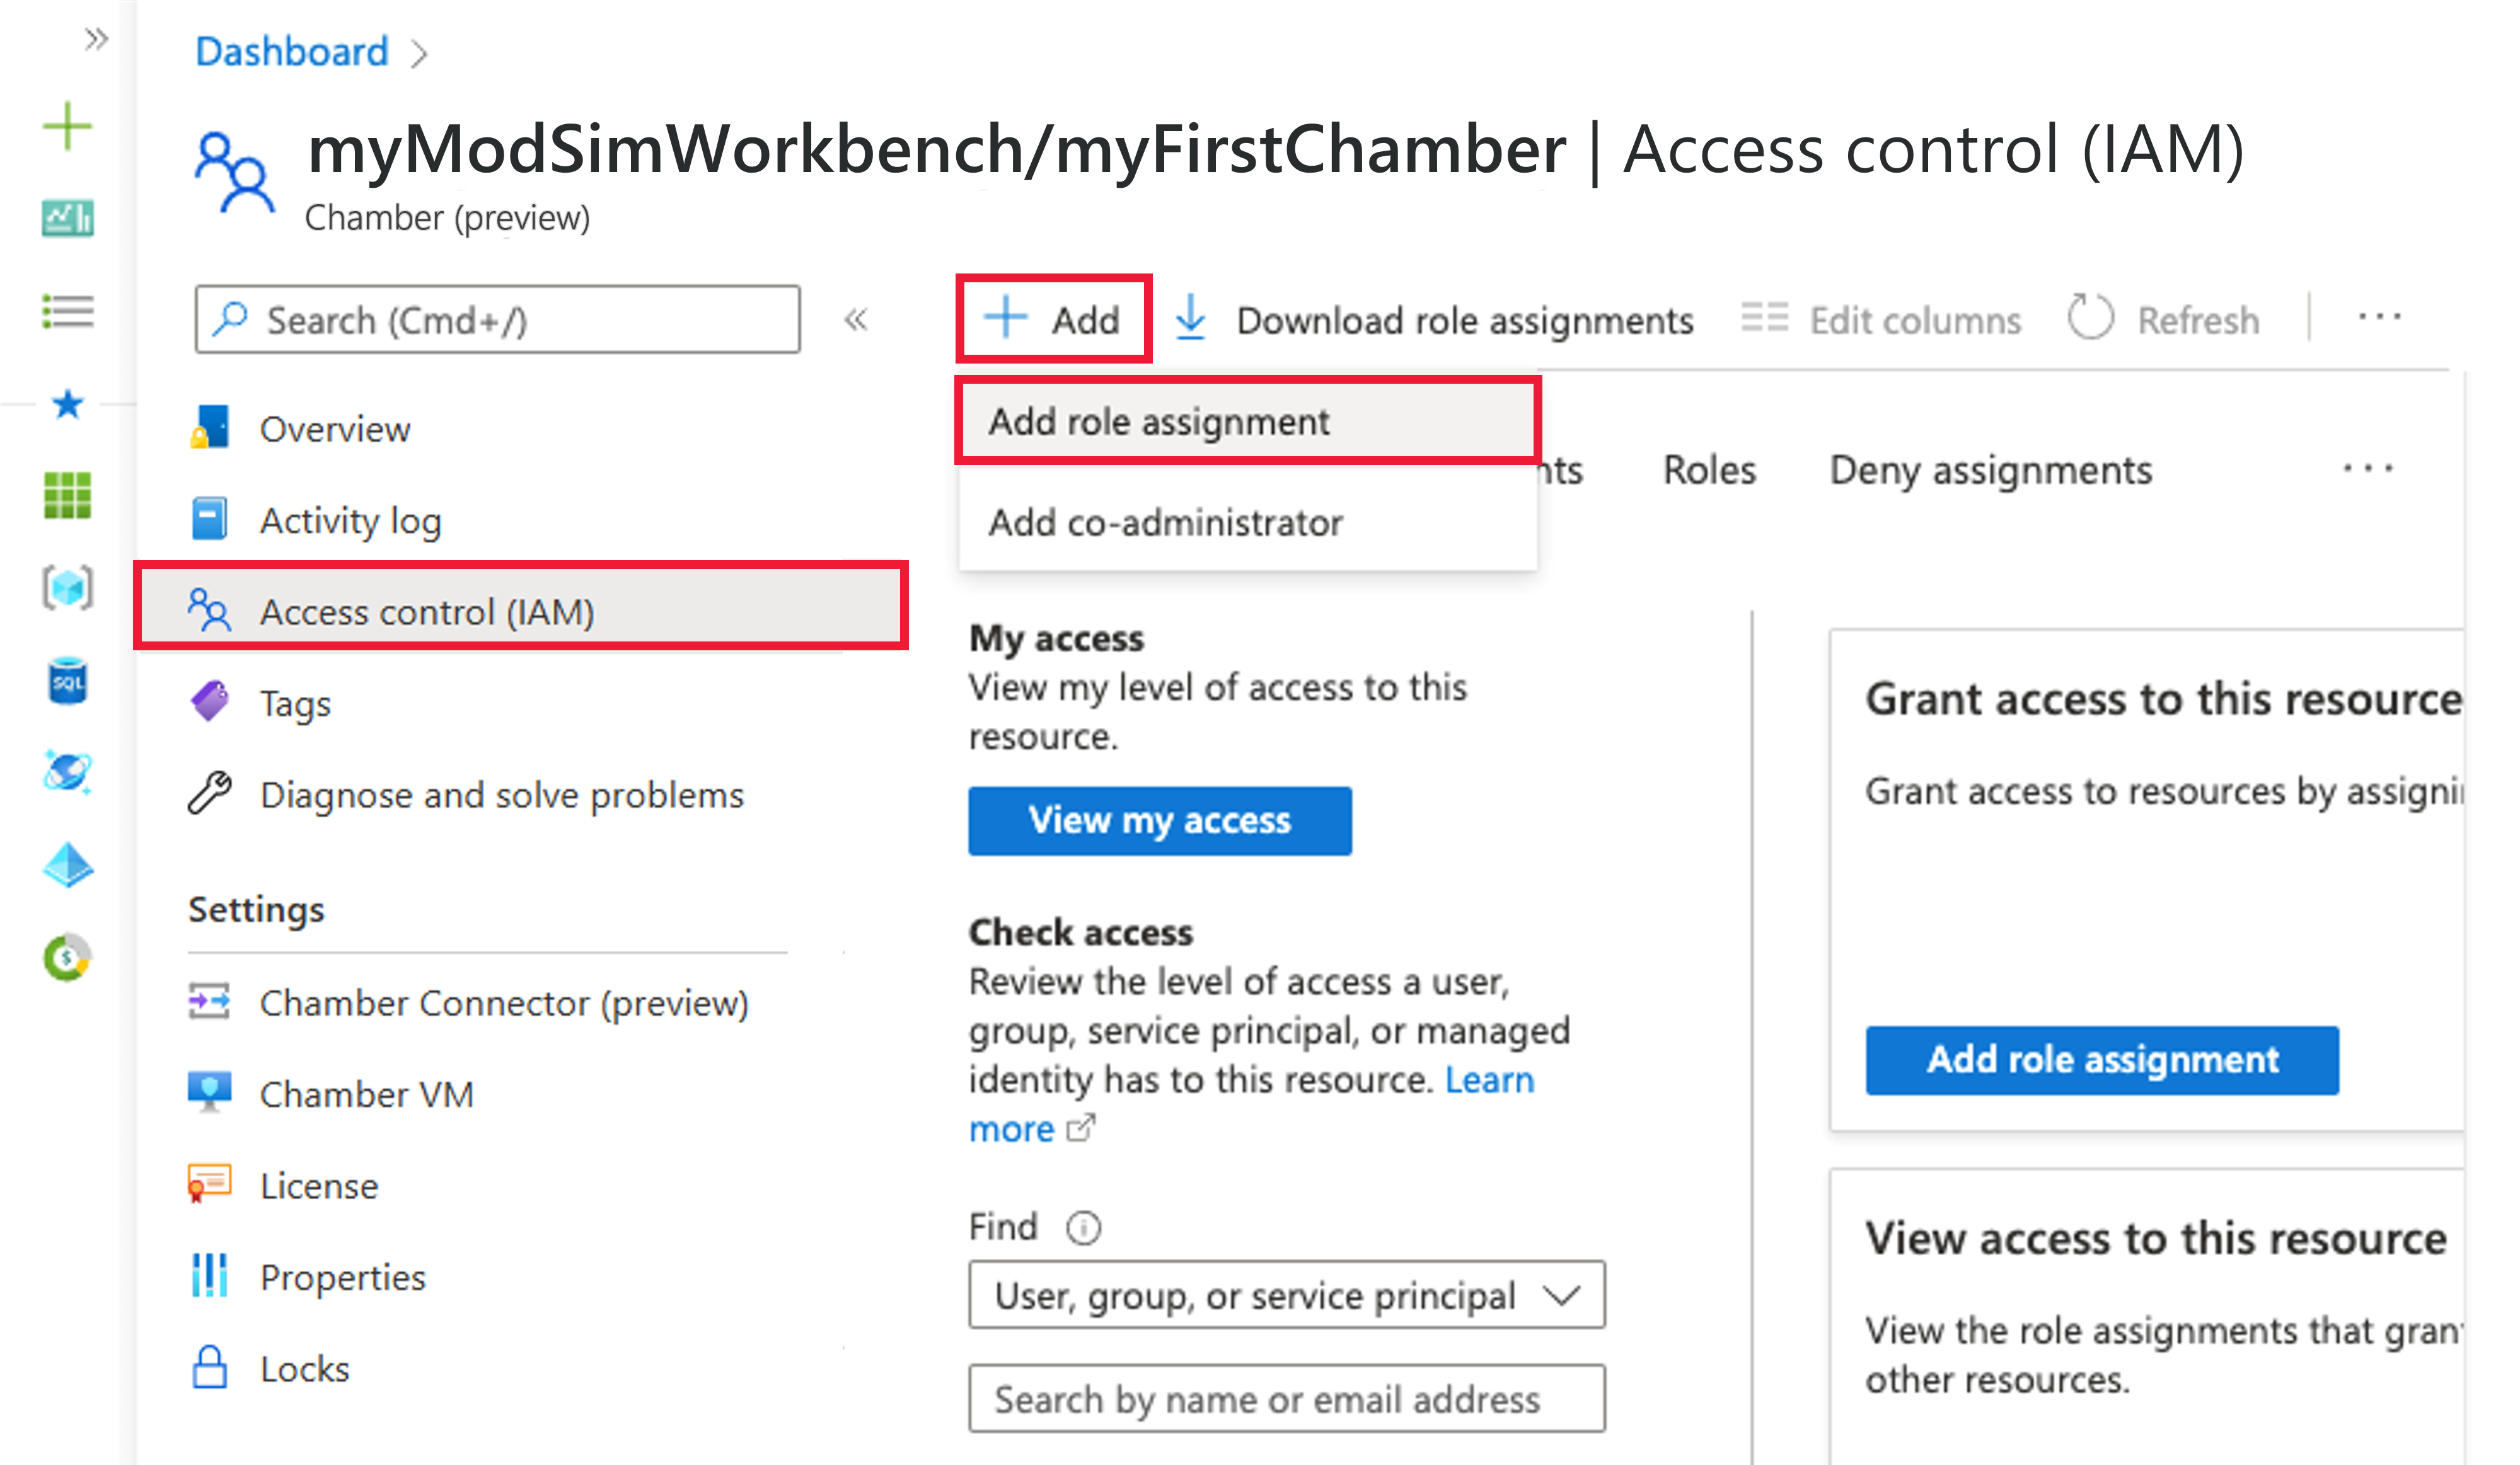
The Add role assignment pane opens. Search or scroll for the Chamber Admin role in the role list and select it. Then select Next.
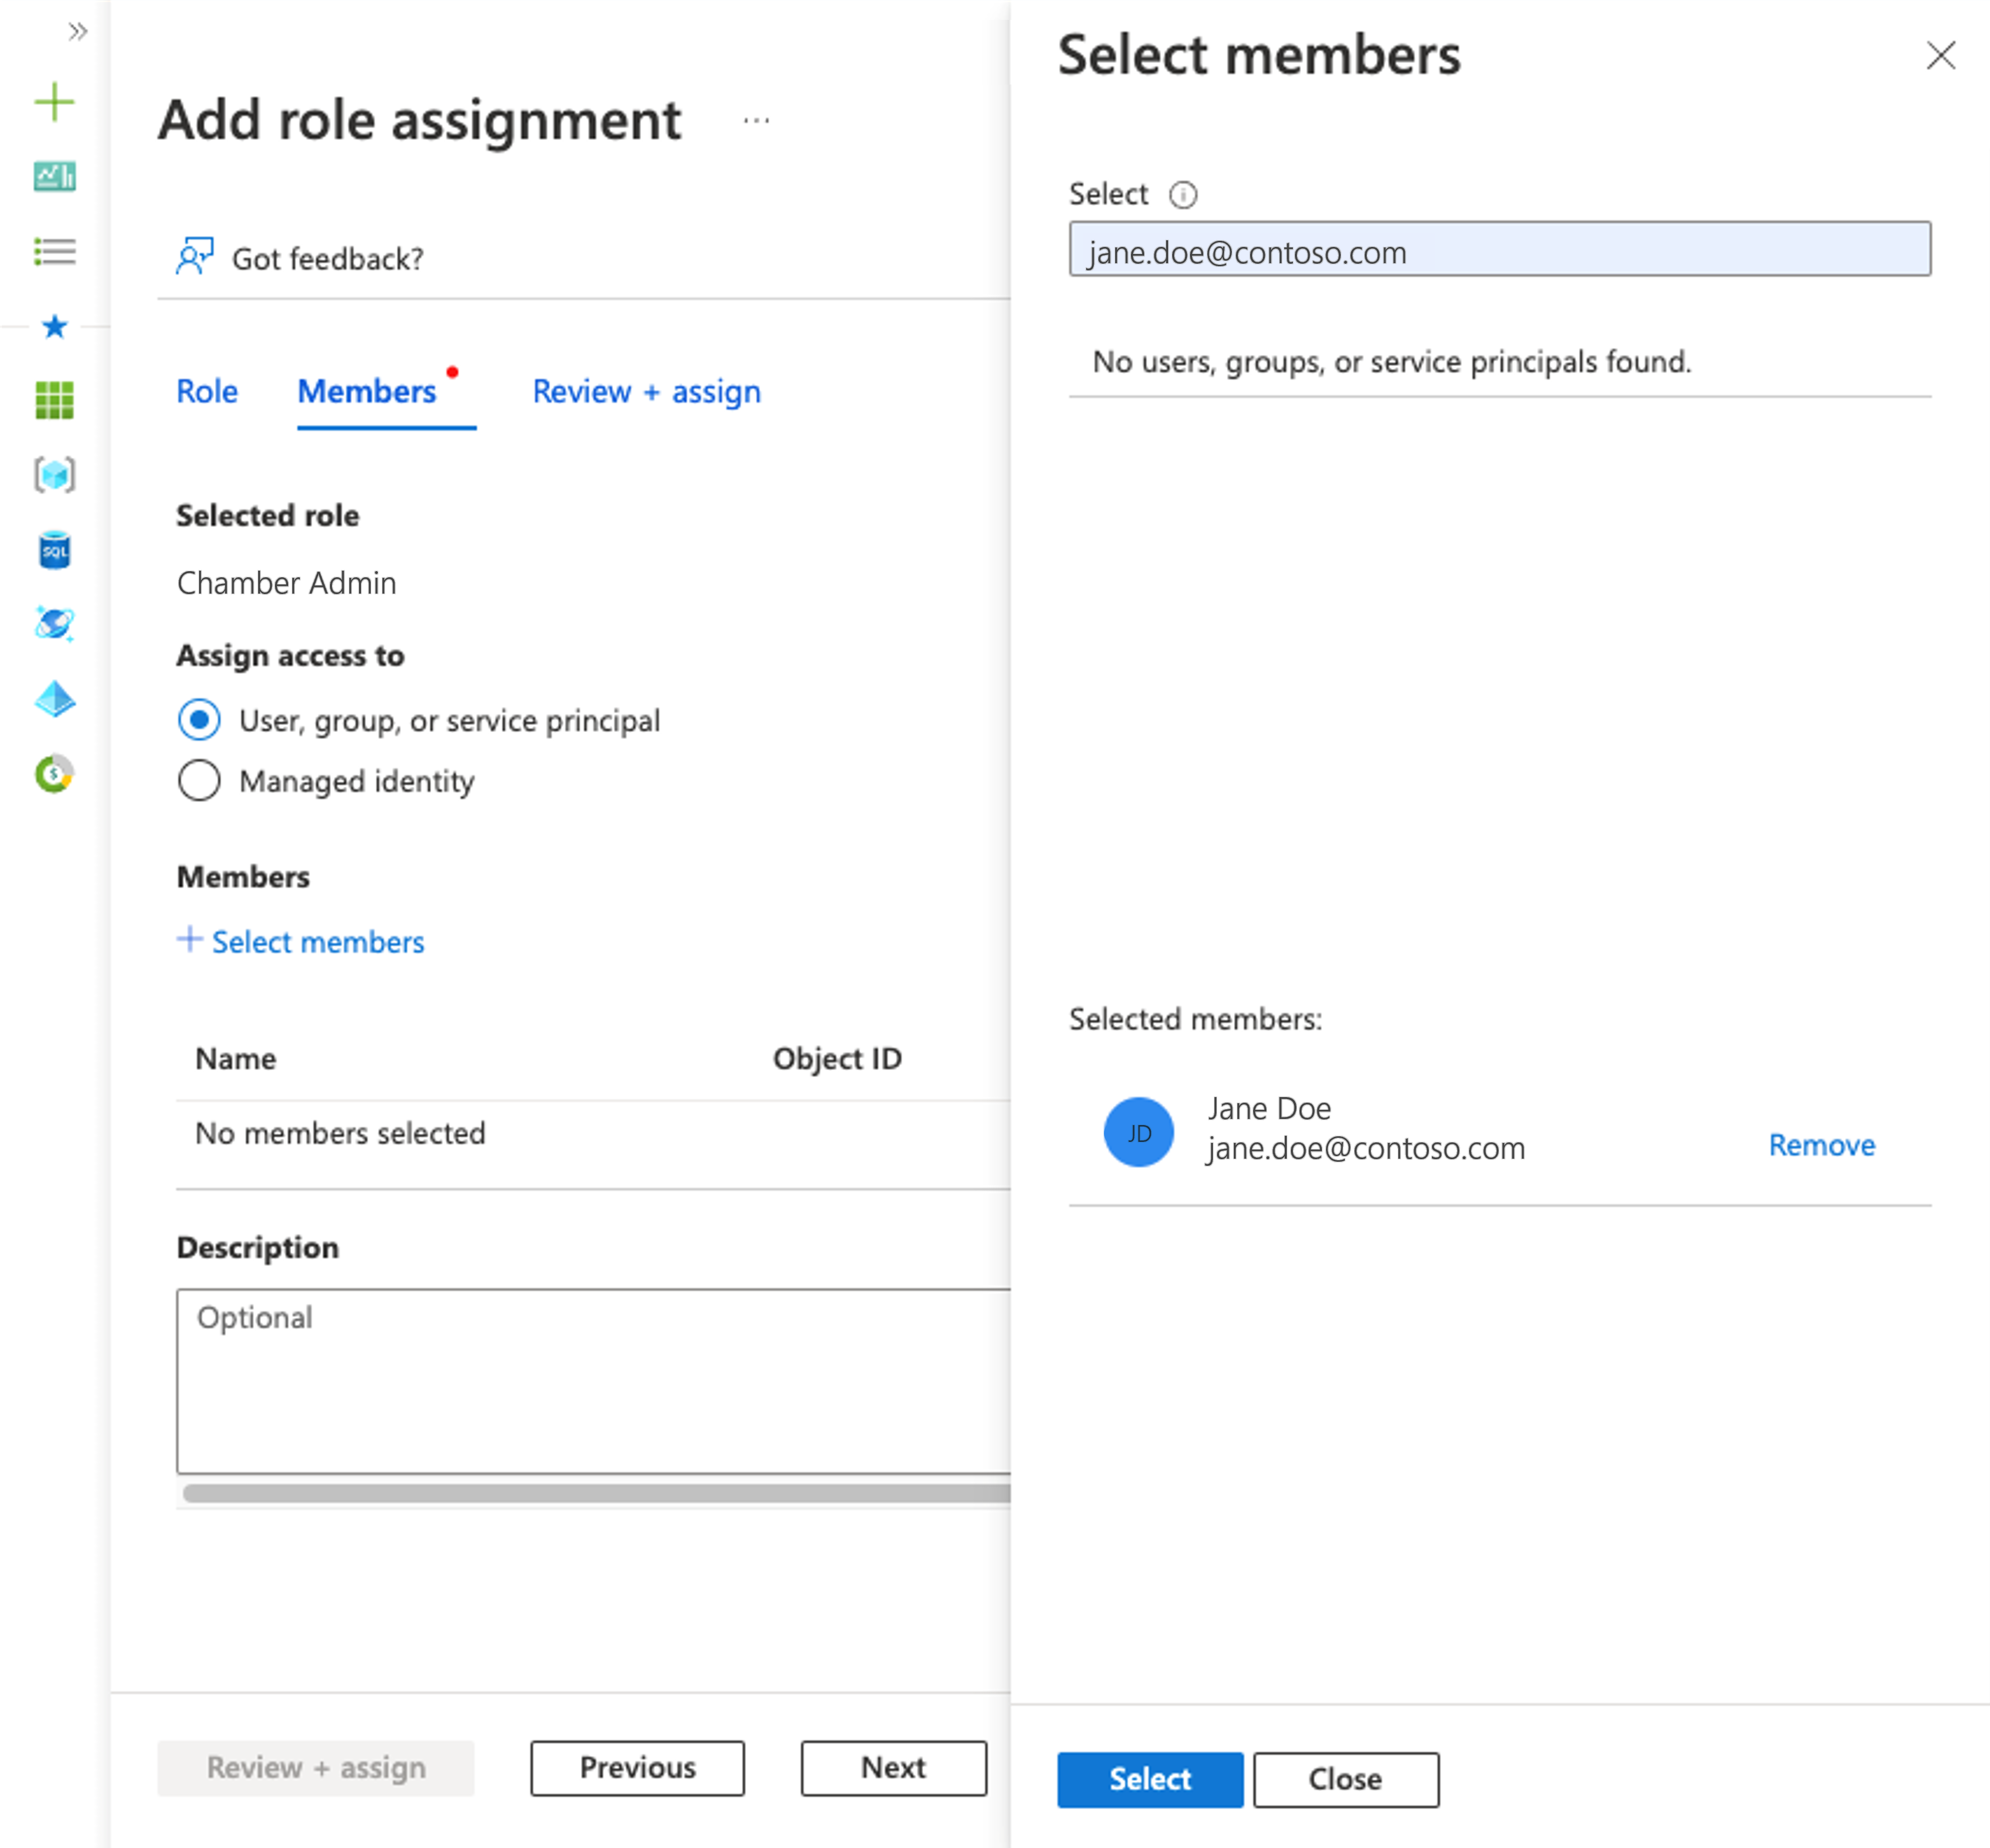
Leave the Assign access to default User, group, or service principal. Select + Select members. In the Select members blade on the left side of the screen, search for your security principal by entering a string or scrolling through the list. Select your security principal. Select Select to save the selections.
Note
Chamber Admins and Chamber Users MUST have an alias set within their Microsoft Entra profile email field, or they can't log into the environment.

Select Review + assign to assign the selected role.
Repeat steps 3-6 to assign the Chamber User role to other users who need to work on the chamber.
Add redirect URIs for the application in Microsoft Entra ID
A redirect URI is the location where the Microsoft identity platform redirects a user's client and sends security tokens after authentication.
Follow these steps to get redirect URIs:
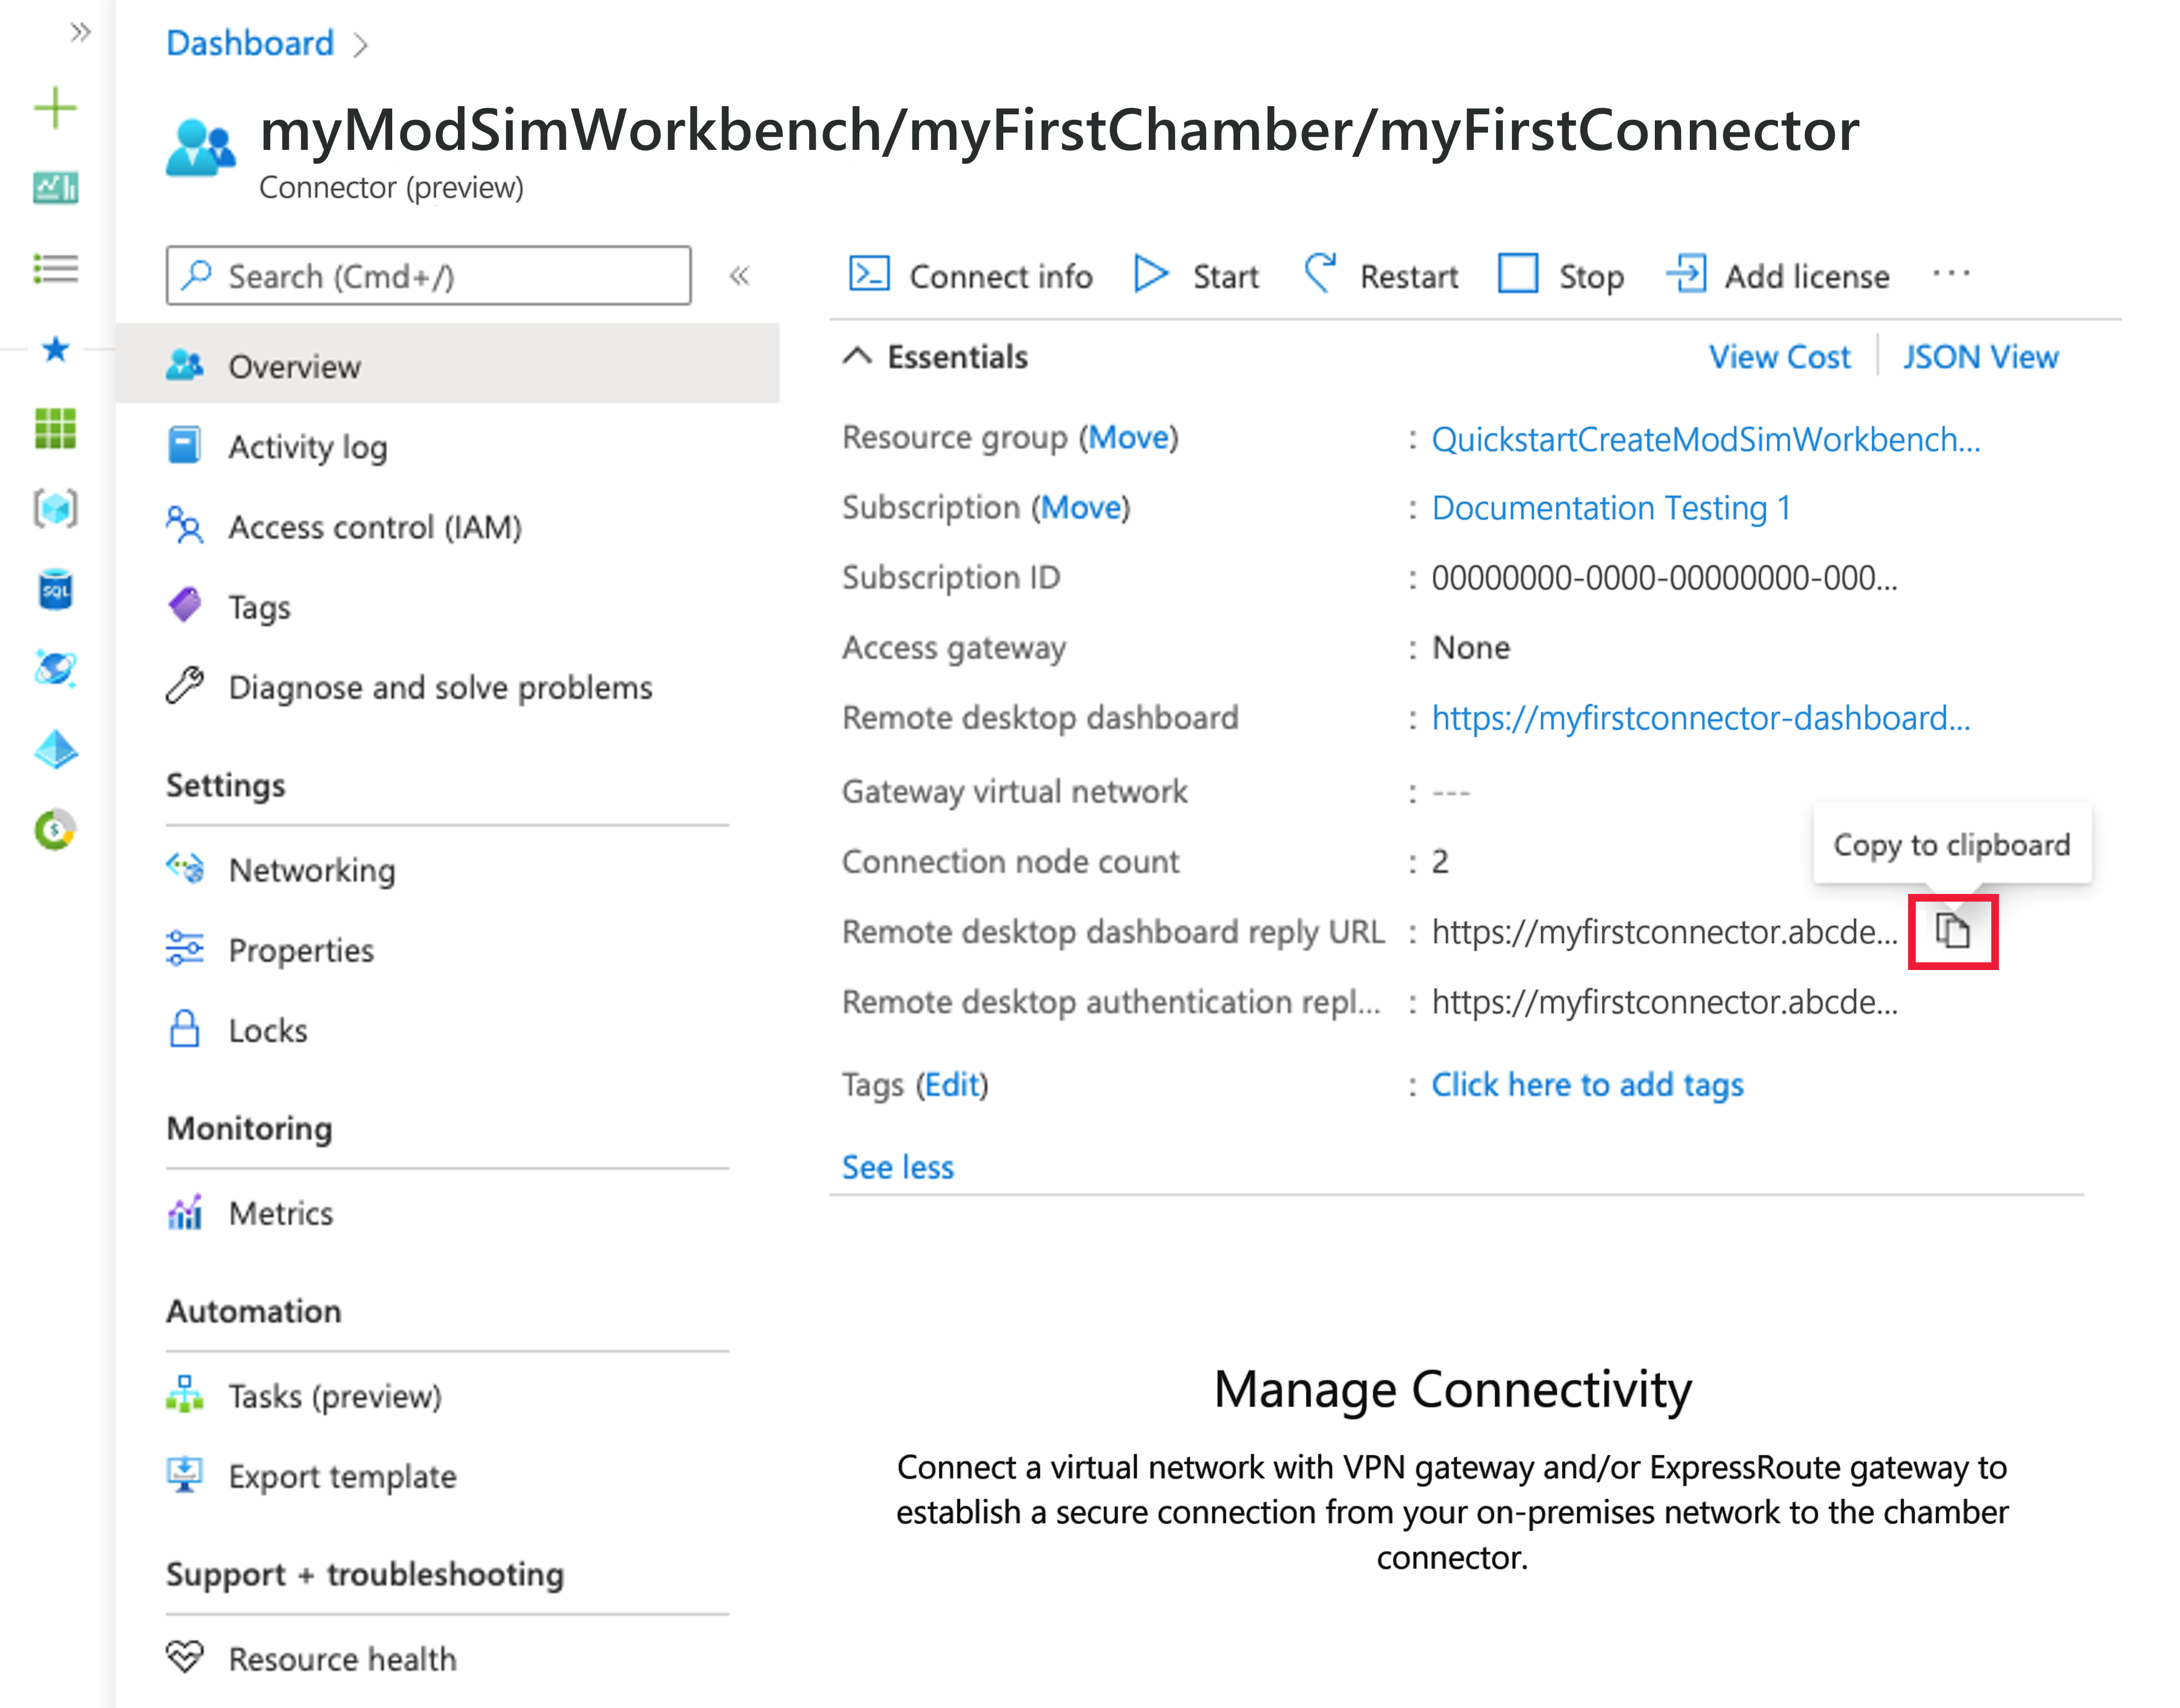
On the page for your new Modeling and Simulation Workbench workbench, myModSimWorkbench, select the left side menu Connector. Then select myfirstconnector from the right side resource list.
On the Overview page, locate and document the two connector properties, Dashboard reply URL and Authentication reply URL, using the copy to clipboard icon. If these properties aren't visible, select the See More button on page to expand the window.
- Dashboard reply URL: For example, https://<dashboardFqdn>/etx/oauth2/code
- Authentication reply URL: For example, https://<authenticationFqdn>/otdsws/login?authhandler=AzureOIDC
Follow these steps to add redirect URIs:
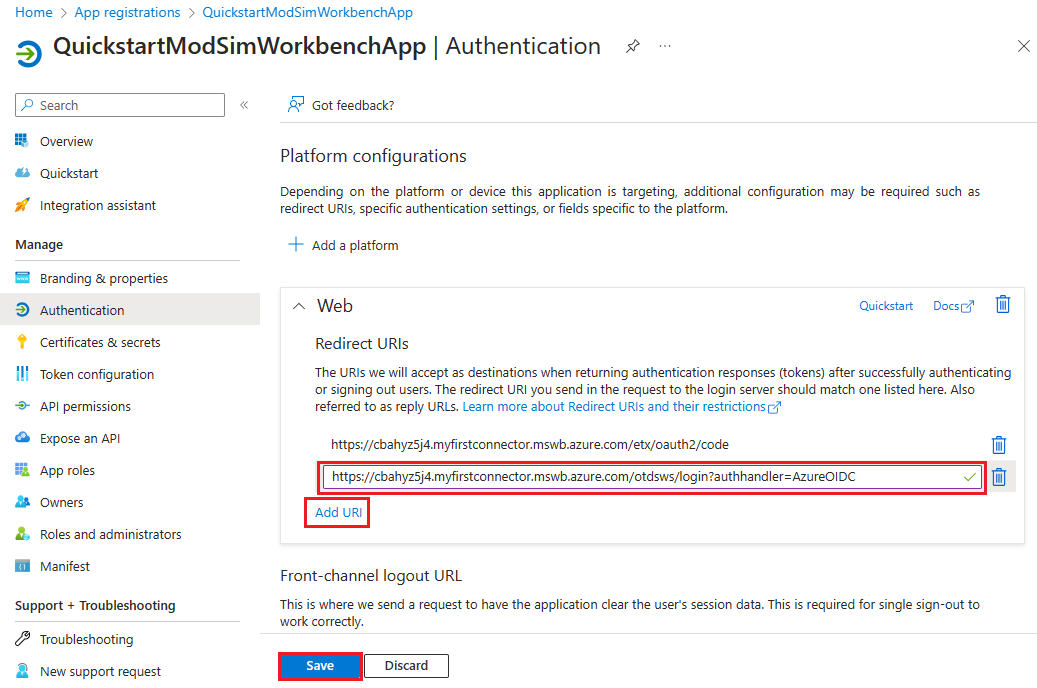
In the Azure portal, in Microsoft Entra ID > App registrations, select your application created in Register an application step.
Under Manage, select Authentication.
Under Platform configurations, select Add a platform.
Under Configure platforms, select Web tile.
On the Configure Web pane, paste the Dashboard reply URL you documented in the previous step in the Redirect URI field. Then select Configure.

Under Platform configurations > Web > Redirect URIs, select Add URI.
Paste the Authentication reply URL you documented in the previous step. Then select Save.
Connect to chamber with remote desktop
Chamber Admins and Chamber Users can now connect into the chamber with remote desktop access. The remote desktop dashboard URL is available in the connector overview page. These users must be on the appropriate network set up for the connector, so for this quickstart their Public IP address needs to be included in the connector Network ACLs range.
On the page for your new Modeling and Simulation Workbench workbench, myModSimWorkbench, select the left side menu Connector. Then select myfirstconnector from the right side resource list.
On the Overview page, select the Desktop Dashboard URL to launch the remote desktop dashboard. You shouldn't be prompted for credentials. From within this dashboard, you should be able to see all workloads within your chambers and be able to launch a session into any of those workloads.
Clean up resources
There are two methods to clean up resources created in this quickstart. You can delete the Azure resource group, which includes all the resources in the resource group, or you can delete the Modeling and Simulation Workbench resources individually.
Tip
Other articles in this collection build upon this quickstart. If you plan to work with the subsequent quickstarts, don't clean up the resources created here. If you don't plan to continue, use the following steps to delete resources created by this quickstart in the Azure portal.
To delete the entire resource group, including the newly created Modeling and Simulation Workbench:
In the Azure portal, select Resource groups from the left side menu. Then select the name of your resource group. For example, in this quickstart we used QuickstartCreateModSimWorkbench-rg as the name of the resource group. Then select Delete.
On your resource group page, select Delete and enter the name of your resource group in the text box to confirm deletion. In this quickstart, we used QuickstartCreateModSimWorkbench-rg as the name of the resource group. Then select Delete.
Or instead, to delete the newly created Modeling and Simulation Workbench resources:
Open your Modeling and Simulation Workbench in the Azure portal and select All resources from the left side menu. Then search for the Modeling and Simulation Workbench you created. For example, in this quickstart, we used myModSimWorkbench as the name of the Workbench.
To delete a resource, select the Delete button located on the top pane of the Overview page for each resource. You must delete the child resources before deleting their parents. For example, first delete any Chamber VMs and Connectors. Then delete Storages. Then delete Chambers. Delete Workbenches last.
Next steps
In this quickstart, you deployed a Modeling and Simulation Workbench and assigned user roles to allow others to use your Modeling and Simulation Workbench chamber. To learn how to manage users in a Modeling and Simulation Workbench chamber, continue to the next article.
Feedback
Coming soon: Throughout 2024 we will be phasing out GitHub Issues as the feedback mechanism for content and replacing it with a new feedback system. For more information see: https://aka.ms/ContentUserFeedback.
Submit and view feedback for