Tutorial: Initial configuration to receive push notification from Azure Notification Hubs
This tutorial shows you how to use Azure Notification Hubs to send push notifications to an iOS application, using the Azure Notification Hubs SDK for Apple.
This tutorial covers the following steps:
- Create a sample iOS app.
- Connect your iOS app to Azure Notification Hubs.
- Send test push notifications.
- Verify that your app receives notifications.
You can download the complete code for this tutorial from GitHub.
Prerequisites
To complete this tutorial, you’ll need the following prerequisites:
- A Mac running Xcode, along with a valid developer certificate installed into your Keychain.
- An iPhone or iPad running iOS version 10 or later.
- Your physical device registered in the Apple Portal, and associated with your certificate.
Before you proceed, be sure to go through the previous tutorial on getting started with Azure Notification Hubs for iOS apps, to set up and configure push credentials in your notification hub. Even if you have no prior experience with iOS development, you should be able to follow these steps.
Note
Because of configuration requirements for push notifications, you must deploy and test push notifications on a physical iOS device (iPhone or iPad), instead of the iOS emulator.
Connect your iOS app to Notification Hubs
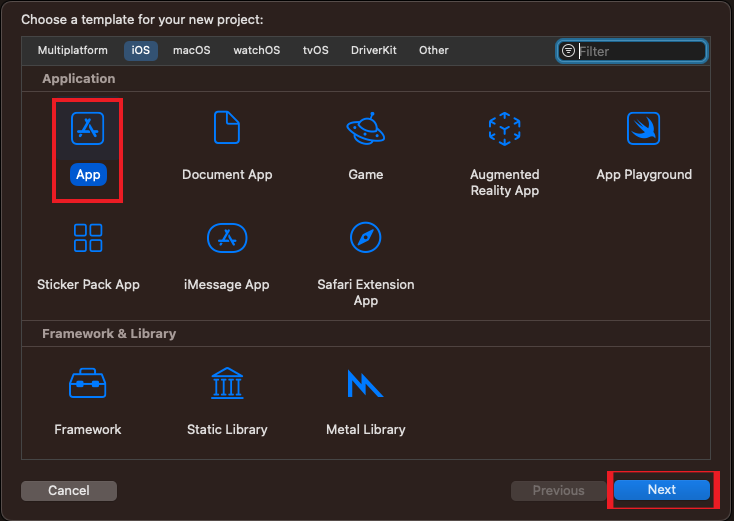
In Xcode, create a new Xcode project and select the iOS Tab and App template.
When setting the options for your new project, make sure to use the same Product Name and Organization Identifier that you used when you set the bundle identifier in the Apple Developer portal. The Bundle Identified in the new project window should populate to match the bundle identified in the Apple Developer portal. This is case sensitive.
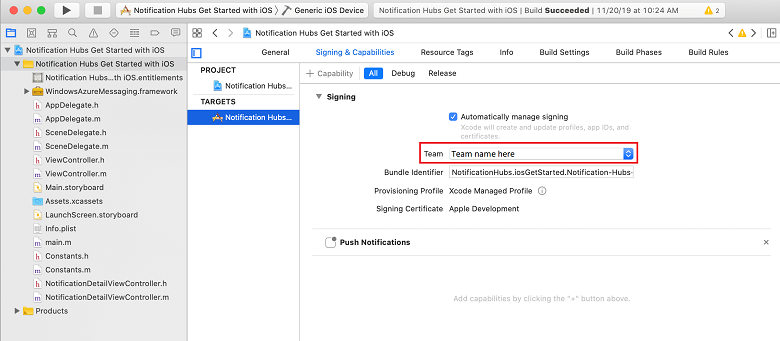
Under Project Navigator, select your project name under Targets, then select the Signing & Capabilities tab. Make sure you select the appropriate Team for your Apple Developer account. XCode should automatically pull down the Provisioning Profile you created previously based on your bundle identifier.
If you don't see the new provisioning profile that you created in Xcode, try refreshing the profiles for your signing identity. Click Xcode on the menu bar, click Preferences, click the Account tab, click the View Details button, click your signing identity, and then click the refresh button in the bottom-right corner.
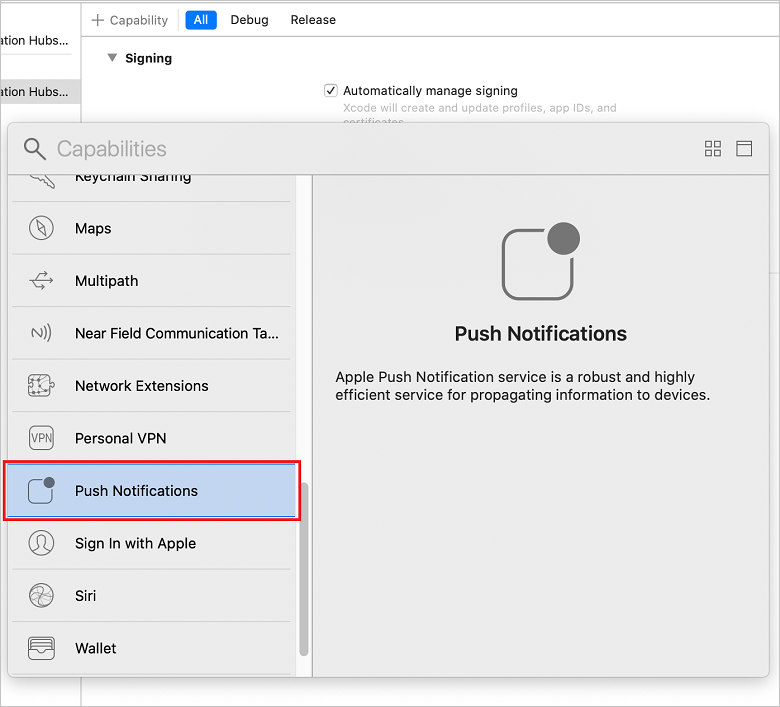
In the Signing & Capabilities tab, select + Capability. Double-click Push Notifications to enable it.
Add the Azure Notification Hubs SDK modules.
You can integrate the Azure Notification Hubs SDK into your app by using Cocoapods or by manually adding the binaries to your project.
Integration via Cocoapods: Add the following dependencies to your podfile to include Azure Notification Hubs SDK in your app:
pod 'AzureNotificationHubs-iOS'Run pod install to install your newly defined pod and open your .xcworkspace.
If you see an error such as Unable to find a specification for AzureNotificationHubs-iOS while running pod install, run
pod repo updateto get the latest pods from the Cocoapods repository, and then run pod install.
Integration via Carthage: Add the following dependencies to your Cartfile to include the Azure Notification Hubs SDK in your app:
github "Azure/azure-notificationhubs-ios"- Next, update build dependencies:
$ carthage updateFor more information about using Carthage, see the Carthage GitHub repository.
Integration by copying the binaries into your project:
You can integrate by copying the binaries into your project, as follows:
Download the Azure Notification Hubs SDK framework provided as a zip file, and unzip it.
In Xcode, right-click your project and click the Add Files to option to add the WindowsAzureMessaging.framework folder to your Xcode project. Select Options and make sure Copy items if needed is selected, and then click Add.

Add or edit a file called DevSettings.plist which contains two properties,
CONNECTION_STRINGfor the connection string to the Azure Notification Hub, andHUB_NAMEfor the Azure Notification Hub name.Add the information for connecting to Azure Notification Hubs in the appropriate
<string></string>section. Replace the string literal placeholders--HUB-NAME--and--CONNECTION-STRING--with the hub name and the DefaultListenSharedAccessSignature, respectively, as you previously obtained from the portal:<?xml version="1.0" encoding="UTF-8"?> <!DOCTYPE plist PUBLIC "-//Apple//DTD PLIST 1.0//EN" "http://www.apple.com/DTDs/PropertyList-1.0.dtd"> <plist version="1.0"> <dict> <key>HUB_NAME</key> <string>--HUB-NAME--</string> <key>CONNECTION_STRING</key> <string>--CONNECTION-STRING--</string> </dict> </plist>In the same AppDelegate.m file, replace all the code after
didFinishLaunchingWithOptionswith the following code:#import <WindowsAzureMessaging/WindowsAzureMessaging.h> #import <UserNotifications/UserNotifications.h> // Extend the AppDelegate to listen for messages using MSNotificationHubDelegate and User Notification Center @interface AppDelegate () <MSNotificationHubDelegate> @end @implementation AppDelegate @synthesize notificationPresentationCompletionHandler; @synthesize notificationResponseCompletionHandler; - (BOOL)application:(UIApplication *)application didFinishLaunchingWithOptions:(NSDictionary *)launchOptions { NSString *path = [[NSBundle mainBundle] pathForResource:@"DevSettings" ofType:@"plist"]; NSDictionary *configValues = [NSDictionary dictionaryWithContentsOfFile:path]; NSString *connectionString = [configValues objectForKey:@"CONNECTION_STRING"]; NSString *hubName = [configValues objectForKey:@"HUB_NAME"]; if([connectionString length] != 0 && [hubName length] != 0) { [[UNUserNotificationCenter currentNotificationCenter] setDelegate:self]; [MSNotificationHub setDelegate:self]; [MSNotificationHub initWithConnectionString:connectionString withHubName:hubName]; return YES; } NSLog(@"Please setup CONNECTION_STRING and HUB_NAME in DevSettings.plist and restart application"); exit(-1); } - (void)notificationHub:(MSNotificationHub *)notificationHub didReceivePushNotification:(MSNotificationHubMessage *)message { // Send message using NSNotificationCenter with the message NSDictionary *userInfo = [NSDictionary dictionaryWithObject:message forKey:@"message"]; [[NSNotificationCenter defaultCenter] postNotificationName:@"MessageReceived" object:nil userInfo:userInfo]; } @endThis code connects to the notification hub using the connection information you specified in DevSettings.plist. It then gives the device token to the notification hub, so that the hub can send notifications.
Create NotificationDetailViewController header file
Similar to the previous instructions, add another header file named SetupViewController.h. Replace the contents of the new header file with the following code:
#import <UIKit/UIKit.h>

NS_ASSUME_NONNULL_BEGIN

@interface SetupViewController : UIViewController

@end

NS_ASSUME_NONNULL_END
Add the implementation file SetupViewController.m. Replace the contents of the file with the following code, which implements the UIViewController methods:
#import "SetupViewController.h"

 static NSString *const kNHMessageReceived = @"MessageReceived";

 @interface SetupViewController ()

 @end

 @implementation SetupViewController

 - (void)viewDidLoad {
     [super viewDidLoad];

     // Listen for messages using NSNotificationCenter
     [[NSNotificationCenter defaultCenter] addObserver:self selector:@selector(didReceivePushNotification:) name:kNHMessageReceived object:nil];
 }

 - (void)dealloc {
     // Clean up subscription to NSNotificationCenter
     [[NSNotificationCenter defaultCenter] removeObserver:self name:kNHMessageReceived object:nil];
 }

 - (void)didReceivePushNotification:(NSNotification *)notification {
     MSNotificationHubMessage *message = [notification.userInfo objectForKey:@"message"];

     // Create UI Alert controller with message title and body
     UIAlertController *alertController = [UIAlertController alertControllerWithTitle:message.title
                          message:message.body
                   preferredStyle:UIAlertControllerStyleAlert];
     [alertController addAction:[UIAlertAction actionWithTitle:@"OK" style:UIAlertActionStyleCancel handler:nil]];
     [self presentViewController:alertController animated:YES completion:nil];

     // Dismiss after 2 seconds
     dispatch_after(dispatch_time(DISPATCH_TIME_NOW, (int64_t)(2.0 * NSEC_PER_SEC)), dispatch_get_main_queue(), ^{
         [alertController dismissViewControllerAnimated:YES completion: nil];
     });

 }

 @end
To verify there are no failures, build and run the app on your device.
Send test push notifications
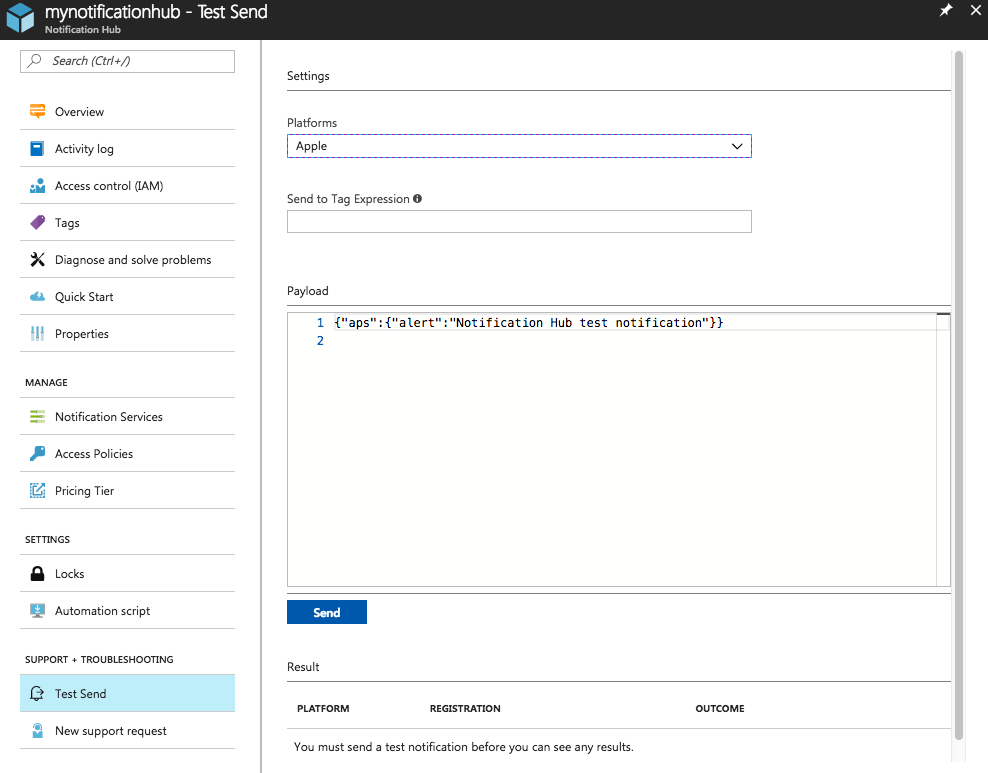
You can test receiving notifications in your app with the Test Send option in the Azure portal. It sends a test push notification to your device.
Push notifications are normally sent in a back-end service like Mobile Apps or ASP.NET using a compatible library. If a library isn't available for your back end, you can also use the REST API directly to send notification messages.
Here is a list of some other tutorials you might want to review for sending notifications:
- Azure Mobile Apps: For an example of how to send notifications from a Mobile Apps back end integrated with Notification Hubs, see Add Push Notifications to your iOS App.
- ASP.NET: Use Notification Hubs to send push notifications to users.
- Azure Notification Hubs Java SDK: See How to use Notification Hubs from Java for sending notifications from Java. This has been tested in Eclipse for Android Development.
- PHP: How to use Notification Hubs from PHP.
Verify that your app receives push notifications
To test push notifications on iOS, you must deploy the app to a physical iOS device. You cannot send Apple push notifications by using the iOS simulator.
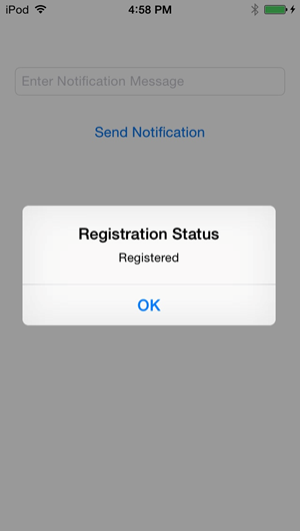
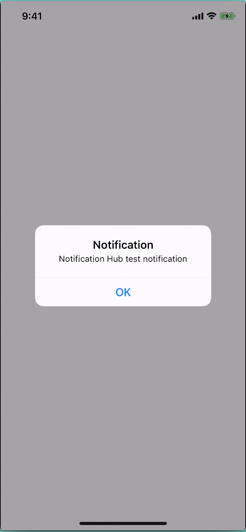
Run the app and verify that registration succeeds, and then press OK.
Next, send a test push notification from the Azure portal, as described in the previous section.
The push notification is sent to all devices that are registered to receive the notifications from the given notification hub.
Next steps
In this simple example, you broadcast push notifications to all your registered iOS devices. To learn how to send push notifications to specific iOS devices, advance to the following tutorial:
Tutorial: Push notifications to specific devices
For more information, see the following articles:
- Azure Notification Hubs overview
- Notification Hubs REST APIs
- Notification Hubs SDK for back-end operations
- Notification Hubs SDK on GitHub
- Register with application back end
- Registration management
- Working with tags
- Working with custom templates
- Service Bus access control with shared access signatures
- Programmatically generate SAS tokens
- Apple security: common crypto
- UNIX Epoch time
- HMAC
Feedback
Coming soon: Throughout 2024 we will be phasing out GitHub Issues as the feedback mechanism for content and replacing it with a new feedback system. For more information see: https://aka.ms/ContentUserFeedback.
Submit and view feedback for