Configure a custom DNS resolver for your Azure Red Hat OpenShift (ARO) cluster
This article provides the necessary details that allow you to configure your Azure Red Hat OpenShift cluster (ARO) to use a custom DNS server. It contains the cluster requirements for a basic ARO deployment.
Before you begin
This article assumes that you're creating a new cluster or have an existing cluster with latest updates applied. If you need an ARO cluster, see the ARO quickstart for a public cluster, or the private cluster tutorial for a private cluster. These steps to configure your cluster to use a custom DNS server are the same for both private and public clusters.
Confirm cluster compatibility with custom DNS
Confirm your cluster is eligible to support this feature by validating the existence of the 99-master-aro-dns and 99-worker-aro-dns machineconfigs.
oc get machineconfig
If the results of the above command include the following machineconfigs, your cluster is eligible for custom DNS support.
NAME                 GENERATEDBYCONTROLLER                      IGNITIONVERSION   AGE
...
99-master-aro-dns                                               2.2.0             54d
99-worker-aro-dns                                               2.2.0             54d
...
DNS architecture overview
As each node in the Azure Red Hat OpenShift cluster powers on and joins the network, DHCP configures the virtual machine with information such as IP address and which DNS server to use.
Below is the process flow overview of how the configuration is obtained:
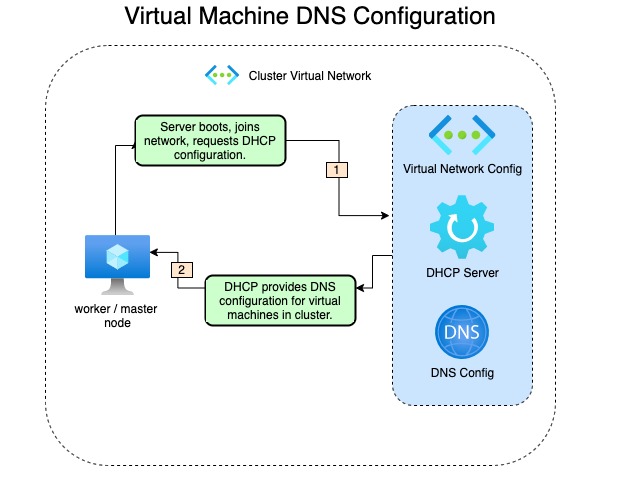
An important trade-off of using your own DNS server instead of the default DNS server in the virtual network is that you lose the configuration that DNS server provided. The virtual machine names will no longer resolve through DNS on the network.
Update process overview
Configuring a custom dns server for the cluster is broken down into two steps.
- Modifying the Virtual Network DNS Servers configuration setting.
- Restarting nodes in cluster to take changes.
Configure a custom DNS server
The following steps can be performed through the command line as well, but this documentation will be walking through using the portal web interface.
Update DNS configuration in virtual network
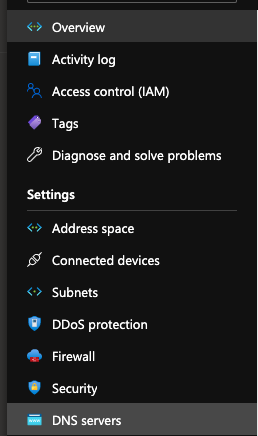
Log into the Azure portal and navigate to the desired virtual network you want to update. Select DNS servers from the virtual networks settings list.
Once you are at the DNS configuration screen, select Custom from the radial button configuration. Enter in the IP addresses for your DNS servers.
Important
If you choose to specify a custom DNS server, you will no longer be able to resolve node names in the virtual network via DNS. Nodes will only be reachable via IP address.
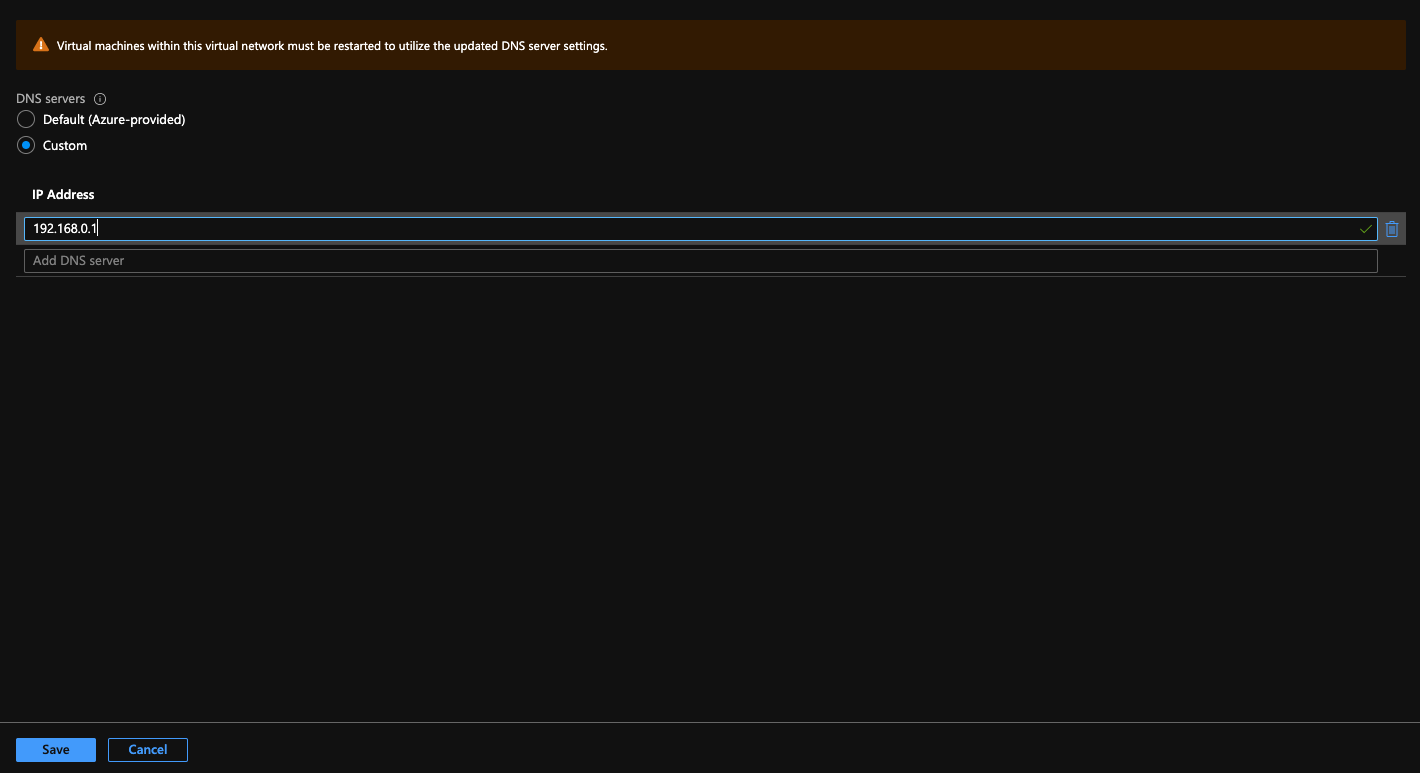
Select Save.
Note
As shown in the portal interface, you must reboot all virtual machines for the changes to be in place.
You should receive a notification that your update was successful.

Gracefully reboot your cluster
These steps require having a valid kubeconfig to your cluster, see this tutorial for details on how to obtain a kubeconfig.
The following code snippets create noop machineconfig's for master and worker nodes. This allows you to initiate rolling reboots for either the worker or master nodes. For more information about the Machine Config Operator (MCO), please see either the source code or the OpenShift docs for MCO
.
MachineConfig definitions
Worker restarts:
apiVersion: machineconfiguration.openshift.io/v1
kind: MachineConfig
metadata:
  labels:
    machineconfiguration.openshift.io/role: worker
  name: 25-machineconfig-worker-reboot
spec:
  config:
    ignition:
      version: 2.2.0
    storage:
      files:
      - contents:
          source: data:text/plain;charset=utf-8;base64,cmVzdGFydAo=
        filesystem: root
        mode: 0644
        path: /etc/mco-noop-worker-restart.txt
Master restarts:
apiVersion: machineconfiguration.openshift.io/v1
kind: MachineConfig
metadata:
  labels:
    machineconfiguration.openshift.io/role: master
  name: 25-machineconfig-master-reboot
spec:
  config:
    ignition:
      version: 2.2.0
    storage:
      files:
      - contents:
          source: data:text/plain;charset=utf-8;base64,cmVzdGFydAo=
        filesystem: root
        mode: 0644
        path: /etc/mco-master-noop-restart.txt
Reboot worker nodes
Create the worker restart file, this example calls the file worker-restarts.yml, and apply it.
[user@bastion ~]$ vim worker-restarts.yml
[user@bastion ~]$ oc apply -f worker-restarts.yml
machineconfig.machineconfiguration.openshift.io/25-machineconfig-worker-reboot created
The MCO moves workloads and then reboots each node one at a time. Once the workers have come back online, we'll follow the same procedure to reboot the master nodes. You can verify the status of the workers by querying the nodes and validate they're all in the Ready state.
Note
Depending on the size of the workload the cluster has, it can take several minutes for each node to reboot.
Example worker nodes not fully ready:
NAME                                  STATUS                     ROLES    AGE     VERSION
dns-docs-tm45t-master-0               Ready                      master   5h40m   v1.19.0+a5a0987
dns-docs-tm45t-master-1               Ready                      master   5h40m   v1.19.0+a5a0987
dns-docs-tm45t-master-2               Ready                      master   5h40m   v1.19.0+a5a0987
dns-docs-tm45t-worker-eastus1-8t6q8   Ready                      worker   5h35m   v1.19.0+a5a0987
dns-docs-tm45t-worker-eastus2-ln2kq   Ready,SchedulingDisabled   worker   5h34m   v1.19.0+a5a0987
dns-docs-tm45t-worker-eastus3-gg75h   Ready                      worker   5h35m   v1.19.0+a5a0987
As the node reboots, you'll see it change to the NotReady state:
dns-docs-tm45t-worker-eastus2-ln2kq NotReady,SchedulingDisabled worker 5h38m v1.19.0+a5a0987
Fully ready:
[user@bastion ~]$ oc get nodes
NAME                                  STATUS   ROLES    AGE     VERSION
dns-docs-tm45t-master-0               Ready    master   5h45m   v1.19.0+a5a0987
dns-docs-tm45t-master-1               Ready    master   5h46m   v1.19.0+a5a0987
dns-docs-tm45t-master-2               Ready    master   5h46m   v1.19.0+a5a0987
dns-docs-tm45t-worker-eastus1-8t6q8   Ready    worker   5h41m   v1.19.0+a5a0987
dns-docs-tm45t-worker-eastus2-ln2kq   Ready    worker   5h40m   v1.19.0+a5a0987
dns-docs-tm45t-worker-eastus3-gg75h   Ready    worker   5h41m   v1.19.0+a5a0987
Reboot master nodes
Now, repeat the same process for the master nodes:
[user@bastion ~]$ vim master-restarts.yml
[user@bastion ~]$ oc apply -f master-restarts.yml
machineconfig.machineconfiguration.openshift.io/25-machineconfig-master-reboot created
Confirm all nodes have returned to the Ready state:
[user@bastion ~]$ oc get nodes
NAME                                  STATUS   ROLES    AGE    VERSION
dns-docs-tm45t-master-0               Ready    master   6h8m   v1.19.0+a5a0987
dns-docs-tm45t-master-1               Ready    master   6h8m   v1.19.0+a5a0987
dns-docs-tm45t-master-2               Ready    master   6h8m   v1.19.0+a5a0987
dns-docs-tm45t-worker-eastus1-8t6q8   Ready    worker   6h3m   v1.19.0+a5a0987
dns-docs-tm45t-worker-eastus2-ln2kq   Ready    worker   6h2m   v1.19.0+a5a0987
dns-docs-tm45t-worker-eastus3-gg75h   Ready    worker   6h3m   v1.19.0+a5a0987
Confirm changes on a node (optional)
To validate the new DNS server on a node, we will use the oc debug pod.
[user@bastion ~]$ oc debug node/dns-docs-tm45t-worker-eastus2-ln2kq
Starting pod/dns-docs-tm45t-worker-eastus2-ln2kq-debug ...
To use host binaries, run `chroot /host`
chroot Pod IP: 10.0.2.6
If you don't see a command prompt, try pressing enter.
sh-4.4# chroot /host
sh-4.4# uptime
 18:40:16 up 1 min,  0 users,  load average: 0.82, 0.32, 0.12
sh-4.4# cat /etc/resolv.conf.dnsmasq
# Generated by NetworkManager
search reddog.microsoft.com
nameserver 192.168.0.1
Modifying the custom DNS server
The procedure for modifying the custom DNS on a cluster that already has custom DNS in place follows the same process.
Modify DNS
Follow the procedure outlined here to update the DNS configuration on the virtual network.
Reboot nodes
Instead of creating the machineconfig, we will instead delete the machineconfigs we created the first time. We'll start with the worker nodes.
oc delete machineconfig 25-machineconfig-worker-reboot
The output:
machineconfig.machineconfiguration.openshift.io "25-machineconfig-worker-reboot" deleted
Wait for all of the worker nodes to reboot. This is similar to the reboot of worker nodes above.
Now we'll reboot the master nodes.
oc delete machineconfig 25-machineconfig-master-reboot
The output:
machineconfig.machineconfiguration.openshift.io "25-machineconfig-master-reboot" deleted
Wait for all of the master nodes to reboot and return to a Ready state.
Feedback
Coming soon: Throughout 2024 we will be phasing out GitHub Issues as the feedback mechanism for content and replacing it with a new feedback system. For more information see: https://aka.ms/ContentUserFeedback.
Submit and view feedback for