Quickstart: Create an automatic response to a specific security alert using an ARM template or Bicep
In this quickstart, you'll learn how to use an Azure Resource Manager template (ARM template) or a Bicep file to create a workflow automation. The workflow automation will trigger a logic app when specific security alerts are received by Microsoft Defender for Cloud.
Prerequisites
If you don't have an Azure subscription, create a free account before you begin.
For a list of the roles and permissions required to work with Microsoft Defender for Cloud's workflow automation feature, see workflow automation.
The examples in this quickstart assume you have an existing Logic App. To deploy the example, you pass in parameters that contain the logic app name and resource group. For information about deploying a logic app, see Quickstart: Create and deploy a Consumption logic app workflow in multi-tenant Azure Logic Apps with Bicep or Quickstart: Create and deploy a Consumption logic app workflow in multi-tenant Azure Logic Apps with an ARM template.
ARM template tutorial
An Azure Resource Manager template is a JavaScript Object Notation (JSON) file that defines the infrastructure and configuration for your project. The template uses declarative syntax. You describe your intended deployment without writing the sequence of programming commands to create the deployment.
If your environment meets the prerequisites and you're familiar with using ARM templates, select the Deploy to Azure button. The template will open in the Azure portal.

Review the template
The template used in this quickstart is from Azure Quickstart Templates.
{
  "$schema": "https://schema.management.azure.com/schemas/2019-04-01/deploymentTemplate.json#",
  "contentVersion": "1.0.0.0",
  "metadata": {
    "_generator": {
      "name": "bicep",
      "version": "0.5.6.12127",
      "templateHash": "5191074894407113732"
    }
  },
  "parameters": {
    "automationName": {
      "type": "string",
      "maxLength": 24,
      "minLength": 3
    },
    "location": {
      "type": "string",
      "defaultValue": "[resourceGroup().location]",
      "metadata": {
        "description": "Location for the automation"
      }
    },
    "logicAppName": {
      "type": "string",
      "minLength": 3
    },
    "logicAppResourceGroupName": {
      "type": "string",
      "minLength": 3
    },
    "subscriptionId": {
      "type": "string",
      "defaultValue": "[subscription().subscriptionId]",
      "metadata": {
        "description": "The Azure resource GUID id of the subscription"
      }
    },
    "alertSettings": {
      "type": "object",
      "metadata": {
        "description": "The alert settings object used for deploying the automation"
      }
    }
  },
  "variables": {
    "automationDescription": "automation description for subscription {0}",
    "scopeDescription": "automation scope for subscription {0}"
  },
  "resources": [
    {
      "type": "Microsoft.Security/automations",
      "apiVersion": "2019-01-01-preview",
      "name": "[parameters('automationName')]",
      "location": "[parameters('location')]",
      "properties": {
        "description": "[format(variables('automationDescription'), parameters('subscriptionId'))]",
        "isEnabled": true,
        "actions": [
          {
            "actionType": "LogicApp",
            "logicAppResourceId": "[resourceId('Microsoft.Logic/workflows', parameters('logicAppName'))]",
            "uri": "[listCallbackURL(resourceId(parameters('subscriptionId'), parameters('logicAppResourceGroupName'), 'Microsoft.Logic/workflows/triggers', parameters('logicAppName'), 'manual'), '2019-05-01').value]"
          }
        ],
        "scopes": [
          {
            "description": "[format(variables('scopeDescription'), parameters('subscriptionId'))]",
            "scopePath": "[subscription().id]"
          }
        ],
        "sources": [
          {
            "copy": [
              {
                "name": "ruleSets",
                "count": "[length(range(0, length(parameters('alertSettings').alertSeverityMapping)))]",
                "input": {
                  "rules": [
                    {
                      "propertyJPath": "[parameters('alertSettings').alertSeverityMapping[range(0, length(parameters('alertSettings').alertSeverityMapping))[copyIndex('ruleSets')]].jpath]",
                      "propertyType": "String",
                      "expectedValue": "[parameters('alertSettings').alertSeverityMapping[range(0, length(parameters('alertSettings').alertSeverityMapping))[copyIndex('ruleSets')]].expectedValue]",
                      "operator": "[parameters('alertSettings').alertSeverityMapping[range(0, length(parameters('alertSettings').alertSeverityMapping))[copyIndex('ruleSets')]].operator]"
                    },
                    {
                      "propertyJPath": "Severity",
                      "propertyType": "String",
                      "expectedValue": "[parameters('alertSettings').alertSeverityMapping[range(0, length(parameters('alertSettings').alertSeverityMapping))[copyIndex('ruleSets')]].severity]",
                      "operator": "Equals"
                    }
                  ]
                }
              }
            ],
            "eventSource": "Alerts"
          }
        ]
      }
    }
  ]
}
Relevant resources
- Microsoft.Security/automations: The automation that will trigger the logic app, upon receiving a Microsoft Defender for Cloud alert that contains a specific string.
- Microsoft.Logic/workflows: An empty triggerable Logic App.
For other Defender for Cloud quickstart templates, see these community contributed templates.
Deploy the template
PowerShell:
New-AzResourceGroup -Name <resource-group-name> -Location <resource-group-location> #use this command when you need to create a new resource group for your deployment New-AzResourceGroupDeployment -ResourceGroupName <resource-group-name> -TemplateUri https://raw.githubusercontent.com/Azure/azure-quickstart-templates/master/quickstarts/microsoft.security/securitycenter-create-automation-for-alertnamecontains/azuredeploy.jsonCLI:
az group create --name <resource-group-name> --location <resource-group-location> #use this command when you need to create a new resource group for your deployment az deployment group create --resource-group <my-resource-group> --template-uri https://raw.githubusercontent.com/Azure/azure-quickstart-templates/master/quickstarts/microsoft.security/securitycenter-create-automation-for-alertnamecontains/azuredeploy.jsonPortal:
To find more information about this deployment option, see Use a deployment button to deploy templates from GitHub repository.
Review deployed resources
Use the Azure portal to check the workflow automation has been deployed.
Sign in to the Azure portal.
Search for and select Microsoft Defender for Cloud.
Select filter.
Select the specific subscription on which you deployed the new workflow automation.
From Microsoft Defender for Cloud's menu, open workflow automation and check for your new automation.
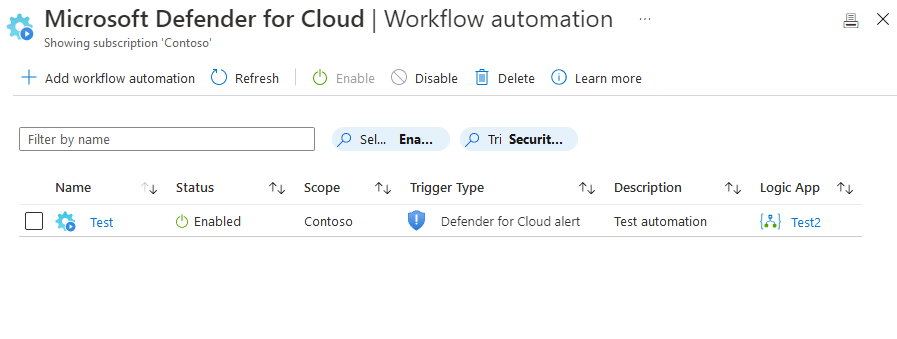
Tip
If you have many workflow automations on your subscription, use the filter by name option.

Clean up resources
When no longer needed, delete the workflow automation using the Azure portal.
Sign in to the Azure portal.
Search for and select Microsoft Defender for Cloud.
Select filter.
Select the specific subscription on which you deployed the new workflow automation.
From Microsoft Defender for Cloud's menu, open workflow automation and find the automation to be deleted.
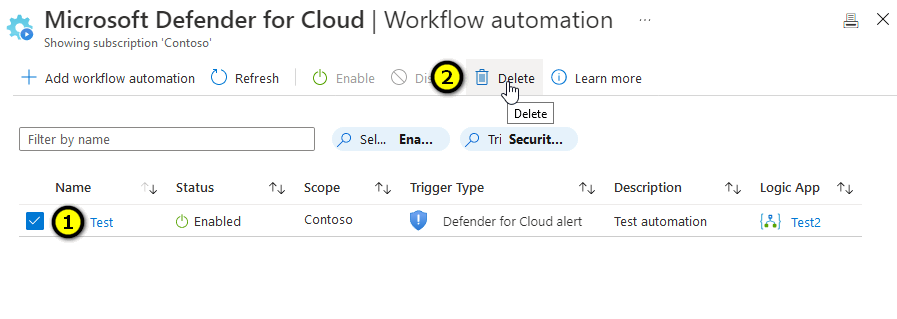
Select the checkbox for the item to be deleted.
From the toolbar, select Delete.

Bicep tutorial
Bicep is a domain-specific language (DSL) that uses declarative syntax to deploy Azure resources. It provides concise syntax, reliable type safety, and support for code reuse. Bicep offers the best authoring experience for your infrastructure-as-code solutions in Azure.
Review the Bicep file
The Bicep file used in this quickstart is from Azure Quickstart Templates.
@minLength(3)
@maxLength(24)
param automationName string

@description('Location for the automation')
param location string = resourceGroup().location

@minLength(3)
param logicAppName string

@minLength(3)
param logicAppResourceGroupName string

@description('The Azure resource GUID id of the subscription')
param subscriptionId string = subscription().subscriptionId

@description('The alert settings object used for deploying the automation')
param alertSettings object

var automationDescription = 'automation description for subscription {0}'
var scopeDescription = 'automation scope for subscription {0}'

resource automation 'Microsoft.Security/automations@2019-01-01-preview' = {
  name: automationName
  location: location
  properties: {
    description: format(automationDescription, subscriptionId)
    isEnabled: true
    actions: [
      {
        actionType: 'LogicApp'
        logicAppResourceId: resourceId('Microsoft.Logic/workflows', logicAppName)
        uri: listCallbackURL(resourceId(subscriptionId, logicAppResourceGroupName, 'Microsoft.Logic/workflows/triggers', logicAppName, 'manual'), '2019-05-01').value
      }
    ]
    scopes: [
      {
        description: format(scopeDescription, subscriptionId)
        scopePath: subscription().id
      }
    ]
    sources: [
      {
        eventSource: 'Alerts'
        ruleSets: [for j in range(0, length(alertSettings.alertSeverityMapping)): {
          rules: [
            {
              propertyJPath: alertSettings.alertSeverityMapping[j].jpath
              propertyType: 'String'
              expectedValue: alertSettings.alertSeverityMapping[j].expectedValue
              operator: alertSettings.alertSeverityMapping[j].operator
            }
            {
              propertyJPath: 'Severity'
              propertyType: 'String'
              expectedValue: alertSettings.alertSeverityMapping[j].severity
              operator: 'Equals'
            }
          ]
        }]
      }
    ]
  }
}
Relevant resources
- Microsoft.Security/automations: The automation that will trigger the logic app, upon receiving a Microsoft Defender for Cloud alert that contains a specific string.
- Microsoft.Logic/workflows: An empty triggerable Logic App.
For other Defender for Cloud quickstart templates, see these community contributed templates.
Deploy the Bicep file
Save the Bicep file as main.bicep to your local computer.
Deploy the Bicep file using either Azure CLI or Azure PowerShell.
az group create --name exampleRG --location eastus az deployment group create --resource-group exampleRG --template-file main.bicep --parameters automationName=<automation-name> logicAppName=<logic-name> logicAppResourceGroupName=<group-name> alertSettings={alert-settings}You're required to enter the following parameters:
- automationName: Replace <automation-name> with the name of the automation. It has a minimum length of three characters and a maximum length of 24 characters.
- logicAppName: Replace <logic-name> with the name of the logic app. It has a minimum length of three characters.
- logicAppResourceGroupName: Replace <group-name> with the name of the resource group in which the resources are located. It has a minimum length of three characters.
- alertSettings: Replace {alert-settings} with the alert settings object used for deploying the automation.
Note
When the deployment finishes, you should see a message indicating the deployment succeeded.
Review deployed resources
Use the Azure portal, Azure CLI, or Azure PowerShell to list the deployed resources in the resource group.
az resource list --resource-group exampleRG
Clean up resources
When no longer needed, use the Azure portal, Azure CLI, or Azure PowerShell to delete the resource group and all of its resources.
az group delete --name exampleRG
Next steps
For step-by-step tutorials that guide you through the process of creating an ARM template or a Bicep file, see:
Feedback
Coming soon: Throughout 2024 we will be phasing out GitHub Issues as the feedback mechanism for content and replacing it with a new feedback system. For more information see: https://aka.ms/ContentUserFeedback.
Submit and view feedback for