Enable enrichment widgets in Microsoft Sentinel
Enrichment widgets are dynamic components that provide you with in-depth, actionable intelligence about entities. They integrate external and internal content and data from various sources, allowing you a better understanding of potential security threats.
This article shows you how to enable the enrichment widgets experience, allowing you to take advantage of this new capability and helping you make better, faster decisions.
Important
Enrichment widgets are currently in PREVIEW. See the Supplemental Terms of Use for Microsoft Azure Previews for additional legal terms that apply to Azure features that are in beta, preview, or otherwise not yet released into general availability.
Enable enrichment widgets
Widgets require using credentials to access and maintain connections to their data sources. These credentials can be in the form of API keys, username/password, or other secrets, and they are stored in a dedicated Azure Key Vault that you create for this purpose.
You must have the Contributor role for the workspace’s resource group to create this Key Vault in your environment.
Microsoft Sentinel has automated the process of creating a Key Vault for enrichment widgets. To enable the widgets experience, take the following two steps:
Step 1: Create a dedicated Key Vault to store credentials
From the Microsoft Sentinel navigation menu, select Entity behavior.
On the Entity behavior page, select Enrichment widgets (preview) from the toolbar.

On the Widgets Onboarding Page, select Create Key Vault.

You will see an Azure portal notification when the Key Vault deployment is in progress, and again when it has completed.
At that point you will also see that the Create Key Vault button is now grayed out, and beside it, the name of your new key vault appears as a link. You can access the key vault's page by selecting the link.
Also, the section labeled Step 2 - Add credentials, previously grayed out, is now available.


Step 2: Add relevant credentials to your widgets' Key Vault
The data sources accessed by all the available widgets are listed on the Widgets Onboarding Page, under Step 2 - Add credentials. You need to add each data source's credentials one at a time. To do so, take the following steps for each data source:
See the instructions in the section below for finding or creating credentials for a given data source. (Alternatively, you can select the Find your credentials link on the Widgets Onboarding Page for a given data source, which will redirect you to the same instructions below.) When you have the credentials, copy them aside and proceed to the next step.
Select Add credentials for that data source. The Custom deployment wizard will open in a side panel on the right side of the page.
The Subscription, Resource group, Region, and Key Vault name fields are all pre-populated, and there should be no reason for you to edit them.
Enter the credentials you saved into the relevant fields in the Custom deployment wizard (API key, Username, Password, and so on).
Select Review + create.
The Review + create tab will present a summary of the configuration, and possibly the terms of the agreement.

Note
Before you select Create to approve the terms and create the secret, it's a good idea to duplicate the current browser tab, and then select Create in the new tab. This is recommended because creating the secret will, for now, take you outside of the Microsoft Sentinel context and into the Key Vault context, with no direct way back. This way, you'll have the old tab remain on the Widgets Onboarding Page, and the new tab for managing your key vault secrets.
Select Create to approve the terms and create the secret.
A new page will be displayed for your new secret, with a message that the deployment is complete.

Return to the Widgets Onboarding Page (in your original browser tab).
(If you didn't duplicate the browser tab as directed in the Note above, open a new browser tab and return to the widgets onboarding page.)
Verify that your new secret was added to the key vault:
- Open the key vault dedicated for your widgets.
- Select Secrets from the key vault navigation menu.
- See that the widget source’s secret has been added to the list.


Find your credentials for each widget source
This section contains instructions for creating or finding your credentials for each of your widgets' data sources.
Note
Not all widget data sources require credentials for Microsoft Sentinel to access them.
Credentials for Virus Total
Enter the API key defined in your Virus Total account. You can sign up for a free Virus Total account to get an API key.
After you select Create and deploy the template as described in paragraph 6 of Step 2 above, a secret named "Virus Total" will be added to your key vault.
Credentials for AbuseIPDB
Enter the API key defined in your AbuseIPDB account. You can sign up for a free AbuseIPDB account to get an API key.
After you select Create and deploy the template as described in paragraph 6 of Step 2 above, a secret named "AbuseIPDB" will be added to your key vault.
Credentials for Anomali
Enter the username and API key defined in your Anomali account.
After you select Create and deploy the template as described in paragraph 6 of Step 2 above, a secret named "Anomali" will be added to your key vault.
Credentials for Recorded Future
Enter your Recorded Future API key. Contact your Recorded Future representative to get your API key. You can also apply for a 30-day free trial especially for Sentinel users.
After you select Create and deploy the template as described in paragraph 6 of Step 2 above, a secret named "Recorded Future" will be added to your key vault.
Credentials for Microsoft Defender Threat Intelligence
The Microsoft Defender Threat Intelligence widget should fetch the data automatically if you have the relevant Microsoft Defender Threat Intelligence license. There is no need for credentials.
If you don't have the proper license, contact the Microsoft Security team for guidance.
Add new widgets when they become available
Microsoft Sentinel aspires to offer a broad collection of widgets, making them available as they are ready. As new widgets become available, their data sources will be added to the list on the Widgets Onboarding Page, if they aren't already there. When you see announcements of newly available widgets, check back on the Widgets Onboarding Page for new data sources that don't yet have credentials configured. To configure them, follow Step 2 above.
Remove the widgets experience
To remove the widgets experience from Microsoft Sentinel, simply delete the Key Vault that you created in Step 1 above.
Troubleshooting
Errors in widget configuration
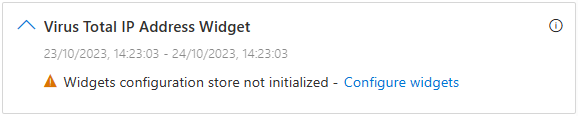
If in one of your widgets you see an error message about the widget configuration, for example as shown in the following screenshot, check that you followed the configuration instructions above and the specific instructions for your widget.
Failure to create Key Vault
If you receive an error message when creating the Key Vault, there could be multiple reasons:
You don't have the Contributor role on your resource group.
Your subscription is not registered to the Key Vault resource provider.
Failure to deploy secrets to your Key Vault
If you receive an error message when deploying a secret for your widget data source, check the following:
Check that you entered the source credentials correctly.
The provided ARM template may have changed.
Next steps
In this article, you learned how to enable widgets for data visualization on entity pages. For more information about entity pages and other places where entity information appears:
Feedback
Coming soon: Throughout 2024 we will be phasing out GitHub Issues as the feedback mechanism for content and replacing it with a new feedback system. For more information see: https://aka.ms/ContentUserFeedback.
Submit and view feedback for