Replicate Azure Stack VMs to Azure
Caution
This article references CentOS, a Linux distribution that is nearing End Of Life (EOL) status. Please consider your use and planning accordingly. For more information, see the CentOS End Of Life guidance.
This article shows you how to set up disaster recovery Azure Stack VMs to Azure, using the Azure Site Recovery service.
Site Recovery contributes to your business continuity and disaster recovery (BCDR) strategy. The service ensures that your VM workloads remain available when expected and unexpected outages occur.
- Site Recovery orchestrates and manages replication of VMs to Azure storage.
- When an outage occurs in your primary site, you use Site Recovery to fail over to Azure.
- On failover, Azure VMs are created from the stored VM data, and users can continue accessing workloads running on those Azure VMs.
- When everything's up and running again, you can fail back Azure VMs to your primary site, and start replicating to Azure storage again.
In this article, you learn how to:
- Step 1: Prepare Azure stack VMs for replication. Check that VMs comply with Site Recovery requirements, and prepare for installation of the Site Recovery Mobility service. This service is installed on each VM you want to replicate.
- Step 2: Set up a Recovery Services vault. Set up a vault for Site Recovery, and specify what you want to replicate. Site Recovery components and actions are configured and managed in the vault.
- Step 3: Set up the source replication environment. Set up a Site Recovery configuration server. The configuration server is a single Azure Stack VM that runs all the components needed by Site Recovery. After you've set up the configuration server, you register it in the vault.
- Step 4: Set up the target replication environment. Select your Azure account, and the Azure storage account and network that you want to use. During replication, VM data is copied to Azure storage. After failover, Azure VMs are joined to the specified network.
- Step 5: Enable replication. Configure replication settings, and enable replication for VMs. The Mobility service will be installed on a VM when replication is enabled. Site Recovery performs an initial replication of the VM, and then ongoing replication begins.
- Step 6: Run a disaster recovery drill: After replication is up and running, you verify that failover will work as expected by running a drill. To initiate the drill, you run a test failover in Site Recovery. The test failover doesn't impact your production environment.
With these steps complete, you can then run a full failover to Azure as and when you need to.
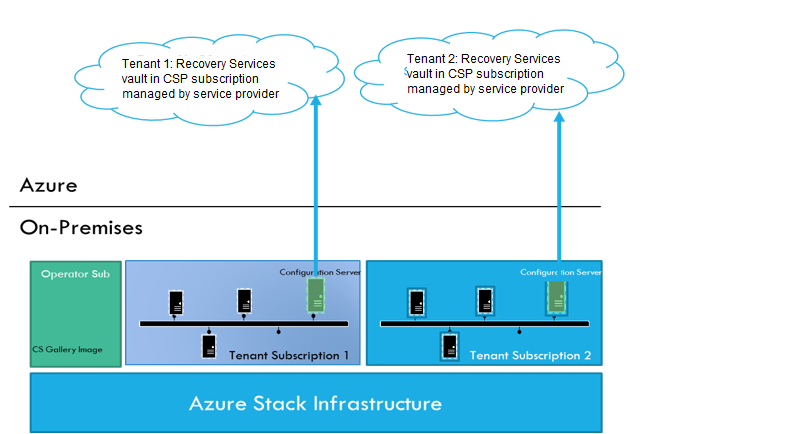
Architecture
| Location | Component | Details |
|---|---|---|
| Configuration server | Runs on a single Azure Stack VM. | In each subscription you set up a configuration server VM. This VM runs the following Site Recovery components: - Configuration server: Coordinates communications between on-premises and Azure, and manages data replication. - Process server: Acts as a replication gateway. It receives replication data, optimizes with caching, compression, and encryption; and sends it to Azure storage. If VMs you want to replicate exceed the limits stated below, you can set up a separate standalone process server. Learn more. |
| Mobility service | Installed on each VM you want to replicate. | In the steps in this article, we prepare an account so that the Mobility service is installed automatically on a VM when replication is enabled. If you don't want to install the service automatically, there are a number of other methods you can use. Learn more. |
| Azure | In Azure you need a Recovery Services vault, a storage account, and a virtual network. | Replicated data is stored in the storage account. Azure VMs are added to the Azure network when failover occurs. |
Replication works as follows:
- In the vault, you specify the replication source and target, set up the configuration server, create a replication policy, and enable replication.
- The Mobility service is installed on the machine (if you've used push installation), and machines begin replication in accordance with the replication policy.
- An initial copy of the server data is replicated to Azure storage.
- After initial replication finishes, replication of delta changes to Azure begins. Tracked changes for a machine are held in an .hrl file.
- The configuration server orchestrates replication management with Azure (port HTTPS 443 outbound).
- The process server receives data from source machines, optimizes and encrypts it, and sends it to Azure storage (port 443 outbound).
- Replicated machines communicate with the configuration server (port HTTPS 443 inbound, for replication management. Machines send replication data to the process server (port HTTPS 9443 inbound - can be modified).
- Traffic is replicated to Azure storage public endpoints, over the internet. Alternately, you can use Azure ExpressRoute public peering. Replicating traffic over a site-to-site VPN from an on-premises site to Azure isn't supported.
Prerequisites
Here's what you need to set up this scenario.
| Requirement | Details |
|---|---|
| Azure subscription account | If you don't have an Azure subscription, create a free account. |
| Azure account permissions | The Azure account you use needs permissions to: - Create a Recovery Service vault - Create a virtual machine in the resource group and virtual network you use for the scenario - Write to the storage account you specify Note that: -If you create an account, you're the administrator of your subscription and can perform all actions. - If you use an existing subscription and you're not the administrator, you need to work with the admin to assign you Owner or Contributor permissions. - If you need more granular permissions, review this article. |
| Azure Stack VM | You need an Azure Stack VM in the tenant subscription, that will be deployed as the Site Recovery configuration server. |
Prerequisites for the configuration server
Configuration/Process server requirements for physical server replication
| Component | Requirement |
|---|---|
| HARDWARE SETTINGS | |
| CPU cores | 8 |
| RAM | 16 GB |
| Number of disks | 3, including the OS disk, process server cache disk, and retention drive for failback |
| Free disk space (process server cache) | 600 GB |
| Free disk space (retention disk) | 600 GB |
| SOFTWARE SETTINGS | |
| Operating system | Windows Server 2012 R2 Windows Server 2016 |
| Operating system locale | English (en-us) |
| Windows Server roles | Don't enable these roles: - Active Directory Domain Services - Internet Information Services - Hyper-V |
| Group policies | Don't enable these group policies: - Prevent access to the command prompt. - Prevent access to registry editing tools. - Trust logic for file attachments. - Turn on Script Execution. Learn more |
| IIS | - No preexisting default website - No preexisting website/application listening on port 443 - Enable anonymous authentication - Enable FastCGI setting. |
| IP address type | Static |
| ACCESS SETTINGS | |
| MYSQL | MySQL should be installed on the configuration server. You can install manually, or Site Recovery can install it during deployment. For Site Recovery to install, check that the machine can reach http://cdn.mysql.com/archives/mysql-5.5/mysql-5.5.37-win32.msi. |
| URLs | The configuration server needs access to these URLs (directly or via proxy): Microsoft Entra ID: login.microsoftonline.com; login.microsoftonline.us; *.accesscontrol.windows.netReplication data transfer: *.backup.windowsazure.com; *.backup.windowsazure.usReplication management: *.hypervrecoverymanager.windowsazure.com; *.hypervrecoverymanager.windowsazure.us; https://management.azure.com; *.services.visualstudio.comStorage access: *.blob.core.windows.net; *.blob.core.usgovcloudapi.netTime synchronization: time.nist.gov; time.windows.comTelemetry (optional): dc.services.visualstudio.com |
| Firewall | IP address-based firewall rules should allow communication to Azure URLs. To simplify and limit the IP ranges, we recommend using URL filtering. For commercial IPs: - Allow the Azure Datacenter IP Ranges, and the HTTPS (443) port. - Allow IP address ranges for the West US (used for Access Control and Identity Management). - Allow IP address ranges for the Azure region of your subscription, to support the URLs needed for Microsoft Entra ID, backup, replication, and storage. For government IPs: - Allow the Azure Government Datacenter IP Ranges, and the HTTPS (443) port. - Allow IP address ranges for all US Gov Regions (Virginia, Texas, Arizona, and Iowa), to support the URLs needed for Microsoft Entra ID, backup, replication, and storage. |
| Ports | Allow 443 (Control channel orchestration) Allow 9443 (Data transport) |
Configuration/Process server sizing requirements
| CPU | Memory | Cache disk | Data change rate | Replicated machines |
|---|---|---|---|---|
| 8 vCPUs 2 sockets * 4 cores @ 2.5 GHz |
16GB | 300 GB | 500 GB or less | < 100 machines |
| 12 vCPUs 2 socks * 6 cores @ 2.5 GHz |
18 GB | 600 GB | 500 GB-1 TB | 100 to 150 machines |
| 16 vCPUs 2 socks * 8 cores @ 2.5 GHz |
32 GB | 1 TB | 1-2 TB | 150 -200 machines |
Step 1: Prepare Azure Stack VMs
Verify the operating system
Make sure that the VMs are running one of the operating systems summarized in the table.
| Operating system | Details |
|---|---|
| 64-bit Windows | Windows Server 2019, Windows Server 2016, Windows Server 2012 R2, Windows Server 2012, Windows Server 2008 R2 (from SP1) |
| CentOS | 5.2 to 5.11, 6.1 to 6.9, 7.0 to 7.3 |
| Ubuntu | 14.04 LTS server, 16.04 LTS server. Review supported kernels |
Prepare for Mobility service installation
Every VM you want to replicate must have the Mobility service installed. In order for the process server to install the service automatically on the VM when replication is enabled, verify the VM settings.
Windows machines
- You need network connectivity between the VM on which you want to enable replication, and the machine running the process server (by default this is the configuration server VM).
- You need an account with admin rights (domain or local) on the machine for which you enable replication.
- You specify this account when you set up Site Recovery. Then the process server uses this account to install the Mobility service when replication is enabled.
- This account will only be used by Site Recovery for the push installation, and to update the Mobility service.
- If you're not using a domain account, you need to disable Remote User Access control on the VM:
- In the registry, create DWORD value LocalAccountTokenFilterPolicy under HKEY_LOCAL_MACHINE\SOFTWARE\Microsoft\Windows\CurrentVersion\Policies\System.
- Set the value to 1.
- To do this at the command prompt, type the following: REG ADD HKEY_LOCAL_MACHINE\SOFTWARE\Microsoft\Windows\CurrentVersion\Policies\System /v LocalAccountTokenFilterPolicy /t REG_DWORD /d 1.
- In the Windows Firewall on the VM you want to replicate, allow File and Printer Sharing, and WMI.
- To do this, run wf.msc to open the Windows Firewall console. Right click Inbound Rules > New Rule. Select Predefined, and choose File and Printer sharing from the list. Complete the wizard, select to allow the connection > Finish.
- For domain computers, you can use a GPO to do this.
Linux machines
- Ensure that there's network connectivity between the Linux computer and the process server.
- On the machine for which you enable replication, you need an account that's a root user on the source Linux server:
- You specify this account when you set up Site Recovery. Then the process server uses this account to install the Mobility service when replication is enabled.
- This account will only be used by Site Recovery for the push installation, and to update the Mobility service.
- Check that the /etc/hosts file on the source Linux server has entries that map the local hostname to IP addresses associated with all network adapters.
- Install the latest openssh, openssh-server, and openssl packages on the computer that you want to replicate.
- Ensure that Secure Shell (SSH) is enabled and running on port 22.
- Enable SFTP subsystem and password authentication in the sshd_config file:
To do this, sign in as root.
Find the line that begins with PasswordAuthentication, in the /etc/ssh/sshd_config file. Uncomment the line and change the value to yes.
Find the line that begins with Subsystem and uncomment the line.

Restart the sshd service.
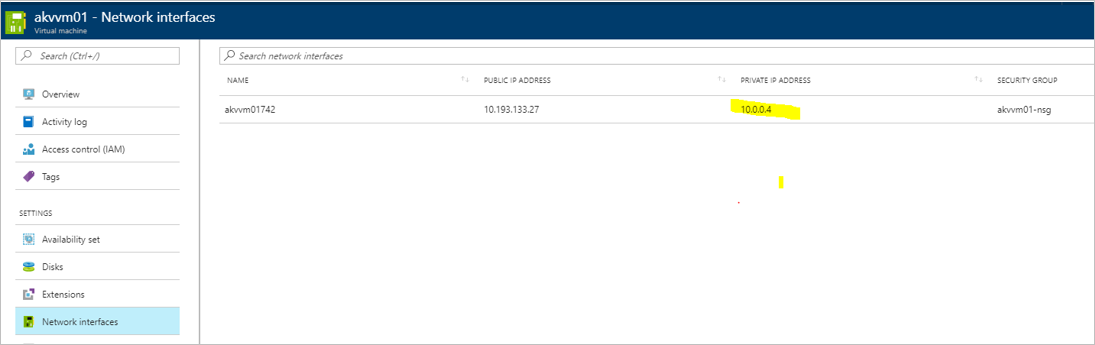
Note the VM private IP address
For each machine you want to replicate, find the IP address:
In the Azure Stack Portal, click on the VM.
On the Resource menu, click Network Interfaces.
Note down the private IP address.
Step 2: Create a vault and select a replication goal
In the Azure portal, select Create a resource > Management Tools > Backup and Site Recovery.
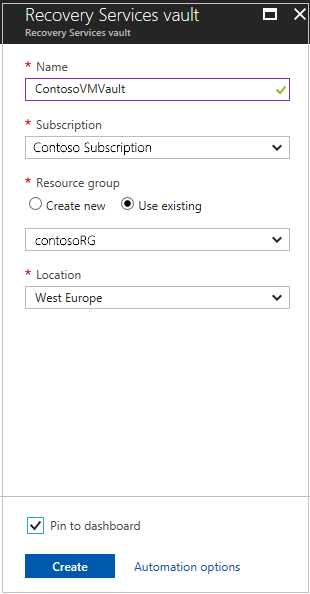
In Name, enter a friendly name to identify the vault.
In Resource group, create or select a resource group. We're using contosoRG.
In Location, enter the Azure region. We're using West Europe.
To quickly access the vault from the dashboard, select Pin to dashboard > Create.
The new vault appears on Dashboard > All resources, and on the main Recovery Services vaults page.
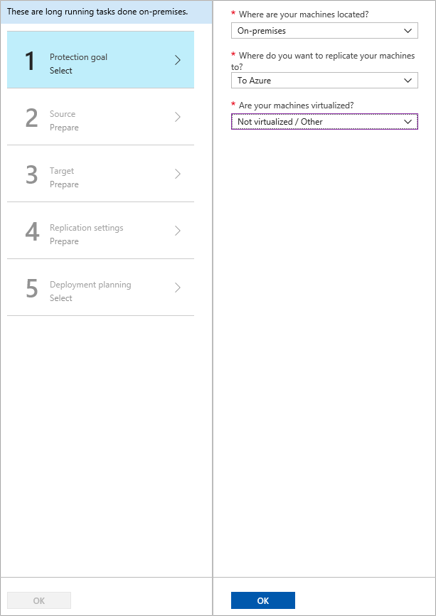
Select a replication goal
In Recovery Services vaults > specify a vault name. We're using ContosoVMVault.
In Getting Started, select Site Recovery. Then select Prepare Infrastructure.
In Protection goal > Where are your machines located, select On-premises.
In Where do you want to replicate your machines, select To Azure.
In Are your machines virtualized, select Not virtualized/Other. Then select OK.
Step 3: Set up the source environment
Set up the configuration server machine, register it in the vault, and discover machines you want to replicate.
Click Prepare Infrastructure > Source.
In Prepare source, click +Configuration server.
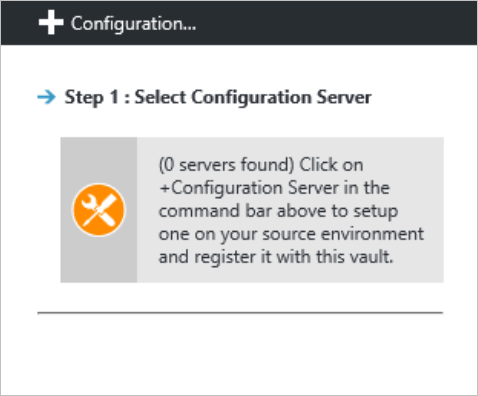
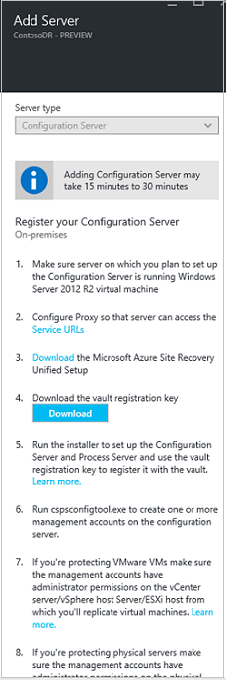
In Add Server, check that Configuration Server appears in Server type.
Download the Site Recovery Unified Setup installation file.
Download the vault registration key. You need the registration key when you run Unified Setup. The key is valid for five days after you generate it.
Run Azure Site Recovery Unified Setup
To install and register the configuration server, do an RDP connection to the VM you want to use for the configuration server, and run Unified Setup.
Before you start, make sure that the clock is synchronized with a time server on the VM before you start. Installation fails if the time is more than five minutes off local time.
Now install the configuration server:
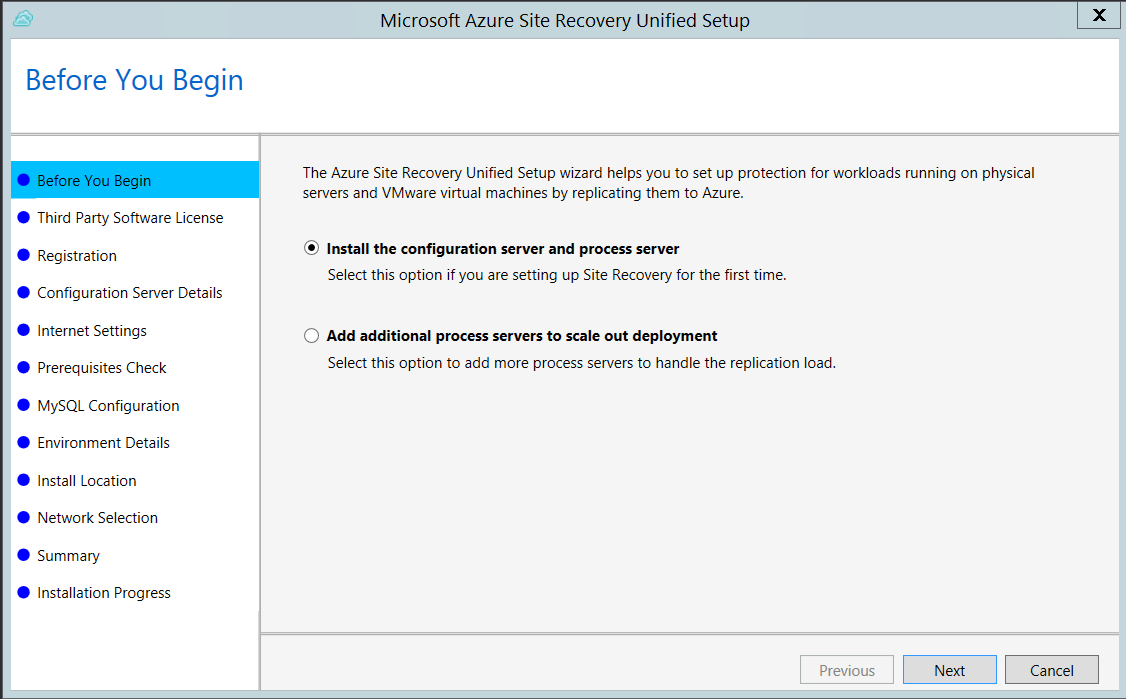
Run the Unified Setup installation file.
In Before You Begin, select Install the configuration server and process server.
In Third Party Software License, click I Accept to download and install MySQL.

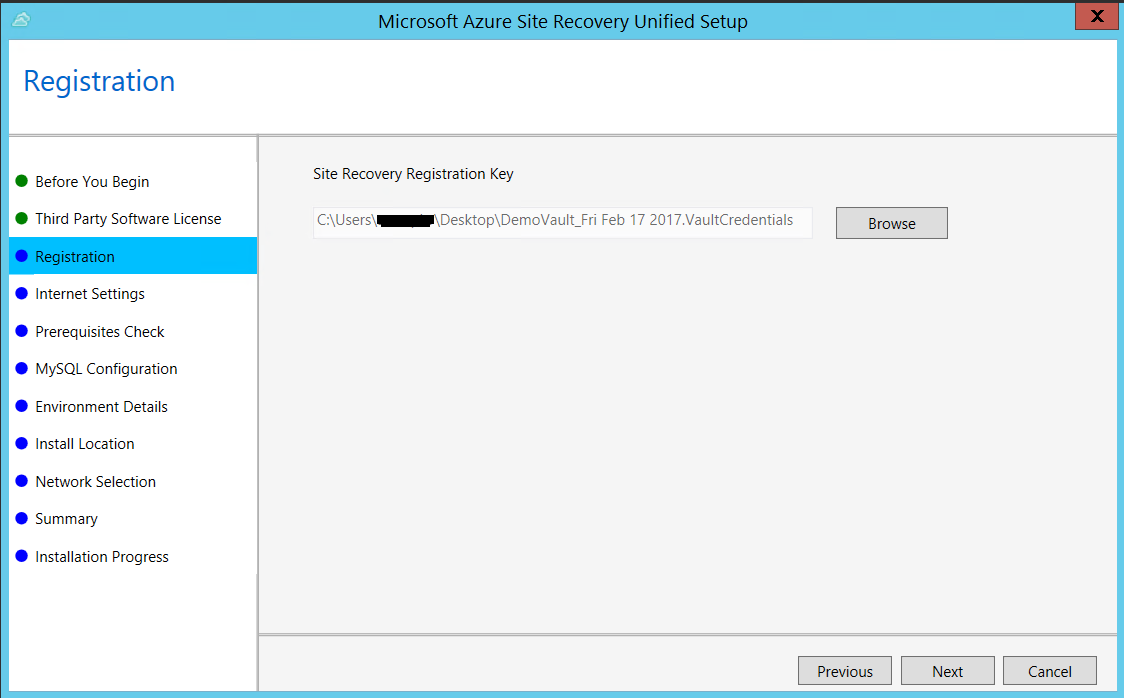
In Registration, select the registration key you downloaded from the vault.
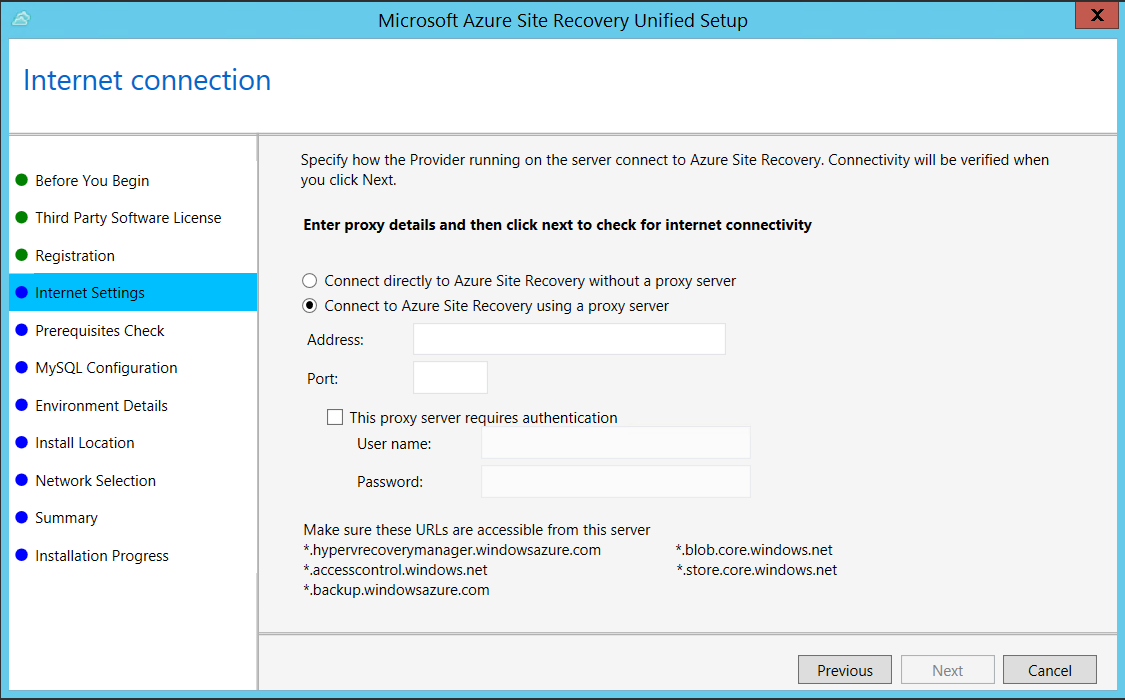
In Internet Settings, specify how the Provider running on the configuration server connects to Azure Site Recovery over the Internet. Make sure you've allowed the required URLs.
- If you want to connect with the proxy that's currently set up on the machine, select Connect to Azure Site Recovery using a proxy server.
- If you want the Provider to connect directly, select Connect directly to Azure Site Recovery without a proxy server.
- If the existing proxy requires authentication, or if you want to use a custom proxy for the Provider connection, select Connect with custom proxy settings, and specify the address, port, and credentials.
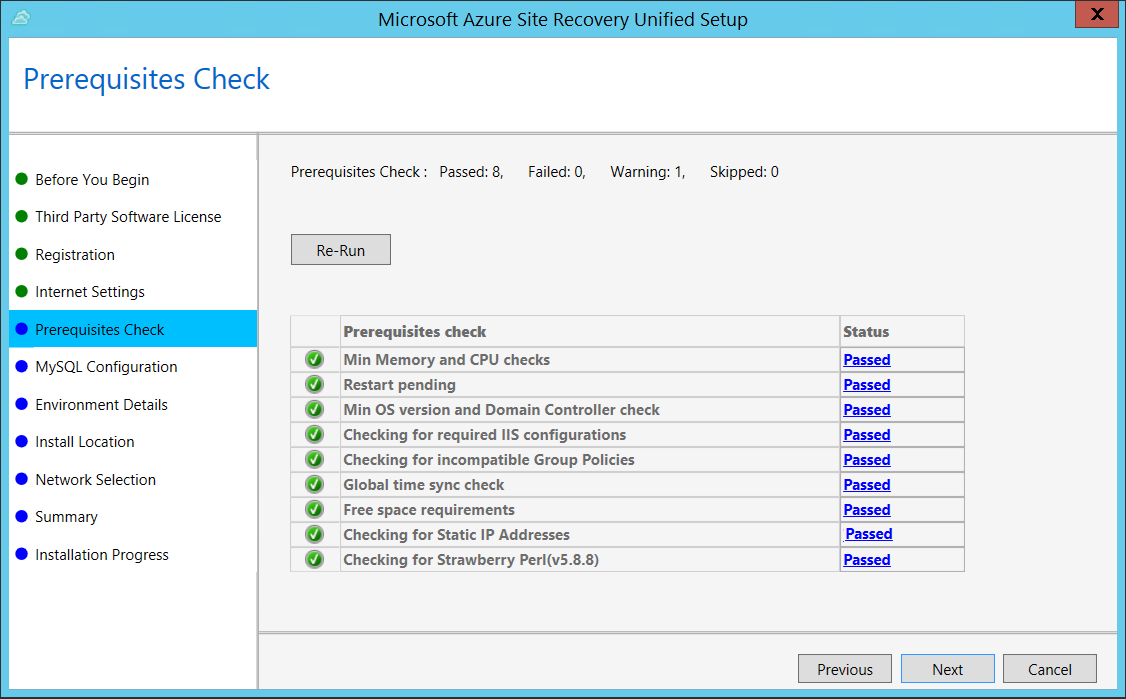
In Prerequisites Check, Setup runs a check to make sure that installation can run. If a warning appears about the Global time sync check, verify that the time on the system clock (Date and Time settings) is the same as the time zone.
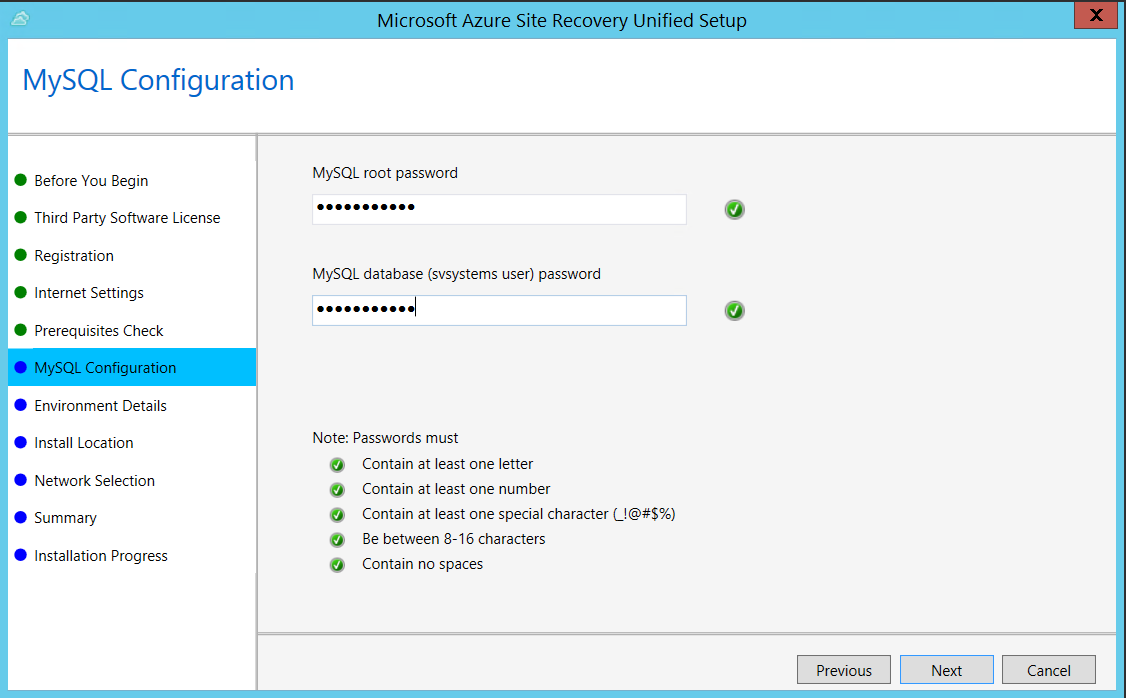
In MySQL Configuration, create credentials for logging on to the MySQL server instance that is installed.
In Environment Details, select No if you're replicating Azure Stack VMs or physical servers.
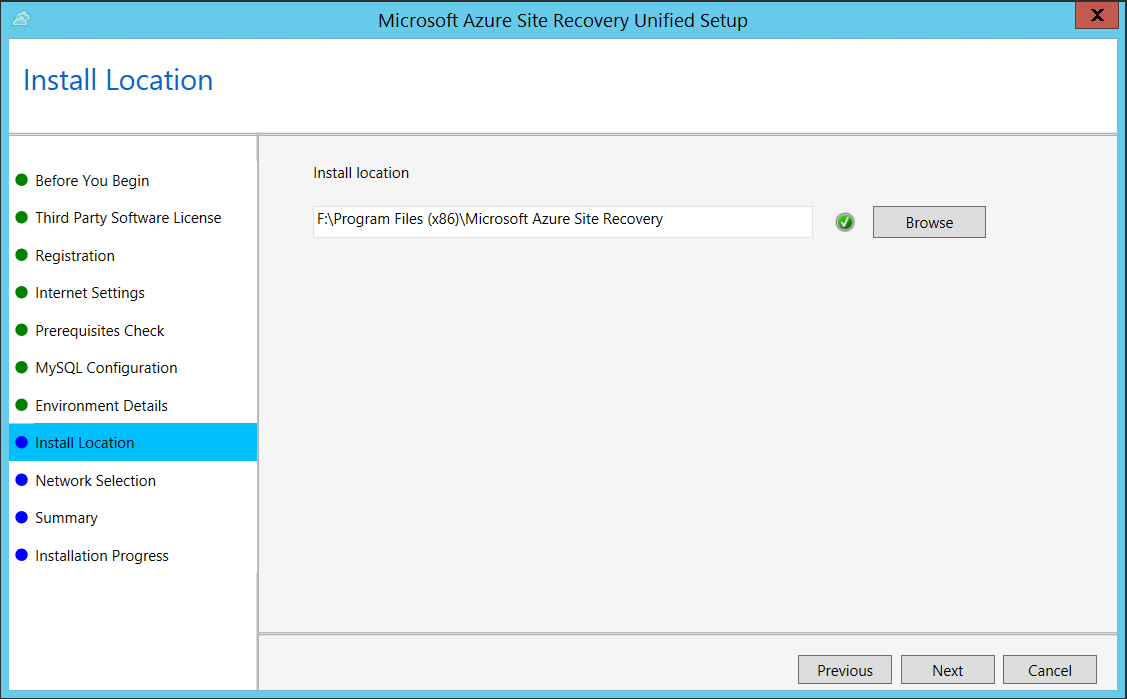
In Install Location, select where you want to install the binaries and store the cache. The drive you select must have at least 5 GB of disk space available, but we recommend a cache drive with at least 600 GB of free space.
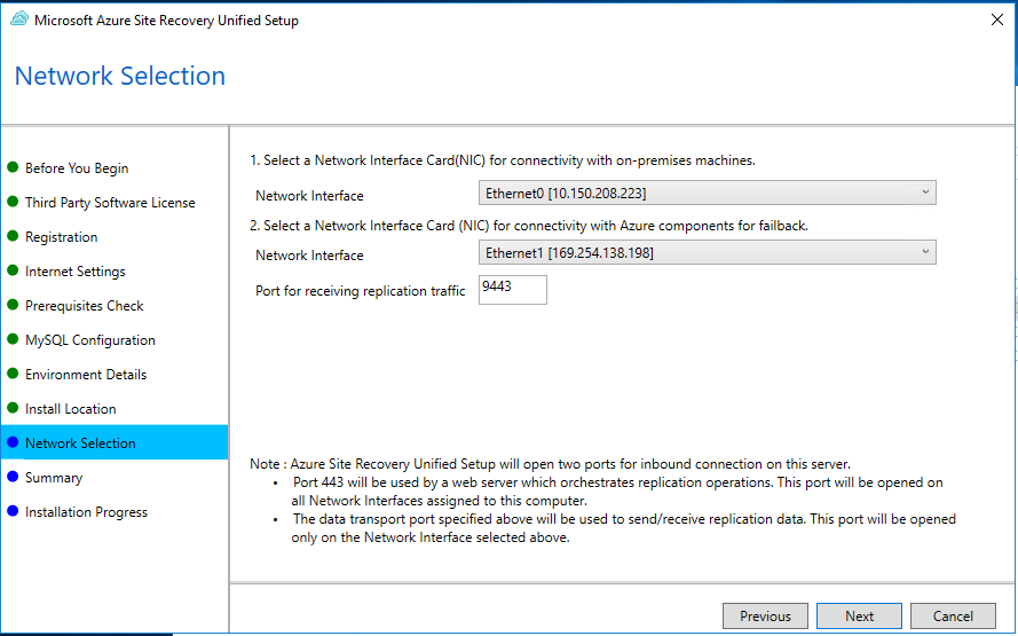
In Network Selection, first select the NIC that the in-built process server uses for discovery and push installation of mobility service on source machines, and then select the NIC that Configuration Server uses for connectivity with Azure. Port 9443 is the default port used for sending and receiving replication traffic, but you can modify this port number to suit your environment's requirements. In addition to the port 9443, we also open port 443, which is used by a web server to orchestrate replication operations. Do not use port 443 for sending or receiving replication traffic.
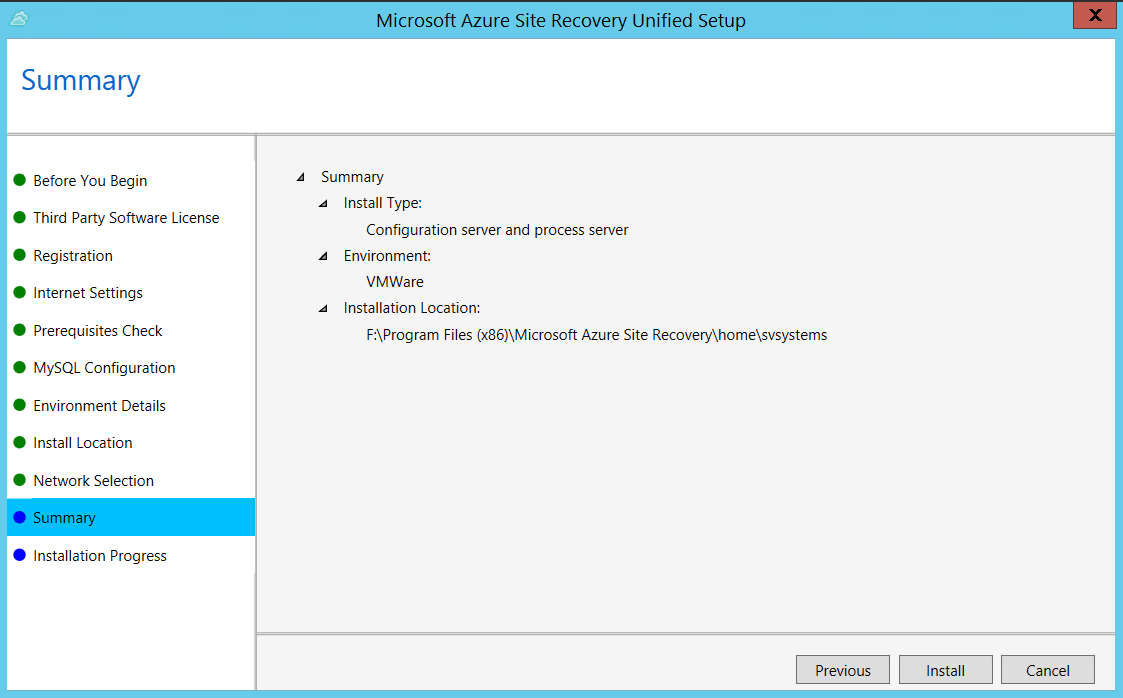
In Summary, review the information and click Install. When installation finishes, a passphrase is generated. You will need this when you enable replication, so copy it and keep it in a secure location.
After registration finishes, the server is displayed on the Settings > Servers blade in the vault.
Note
The configuration server can also be installed from the command line. Learn more.
It can take 15 minutes or more for the account name to appear in the portal. To update immediately, select Configuration Servers > server name > Refresh Server.
Step 4: Set up the target environment
Select and verify target resources.
- In Prepare infrastructure > Target, select the Azure subscription you want to use.
- Specify the target deployment model.
- Site Recovery checks that you have one or more compatible Azure storage accounts and networks. If it doesn't find them, you need to create at least one storage account and virtual network, in order to complete the wizard.
Step 5: Enable replication
Create a replication policy
Click Prepare Infrastructure > Replication Settings.
In Create replication policy, specify a policy name.
In RPO threshold, specify the recovery point objective (RPO) limit.
- Recovery points for replicated data are created in accordance with the time set.
- This setting does not affect replication, which is continuous. It simply issues an alert if the threshold limit is reached without a recovery point being created.
In Recovery point retention, specify how long each recovery point is kept. Replicated VMs can be recovered to any point in the specified time window.
In App-consistent snapshot frequency, specify how often application-consistent snapshots are created.
- An app-consistent snapshot is a point-in-time snapshot of the app data inside the VM.
- Volume Shadow Copy Service (VSS) ensures that apps on the VM are in a consistent state when the snapshot is taken.
Select OK to create the policy.
Confirm deployment planning
You can skip this step right now. In Deployment Planning dropdown list, click Yes, I have done it.
Enable replication
Make sure you've completed all the tasks in Step 1: Prepare machine. Then enable replication as follows:
Select Replicate application > Source.
In Source, select the configuration server.
In Machine type, select Physical machines.
Select the process server (configuration server). Then click OK.
In Target, select the subscription and the resource group in which you want to create the VMs after failover. Choose the deployment model that you want to use for the failed-over VMs.
Select the Azure storage account in which you want to store the replicated data.
Select the Azure network and subnet to which Azure VMs connect when they're created after failover.
Select Configure now for selected machines to apply the network setting to all machines you select for protection. Select Configure later if you want to select the Azure network separately for each machine.
In Physical Machines, click +Physical machine. Specify the name, IP address and OS type of each machine you want to replicate.
- Use the internal IP address of the machine.
- If you specify the public IP address, replication may not work as expected.
In Properties > Configure properties, select the account that the process server will use to automatically install Mobility Service on the machine.
In Replication settings > Configure replication settings, check that the correct replication policy is selected.
Click Enable Replication.
Track progress of the Enable Protection job in Settings > Jobs > Site Recovery Jobs. After the Finalize Protection job runs, the machine is ready for failover.
Note
Site Recovery installs Mobility Service when replication is enabled for a VM.
It can take 15 minutes or longer for changes to take effect and appear in the portal.
To monitor VMs you add, check the last discovered time for VMs in Configuration Servers > Last Contact At. To add VMs without waiting for the scheduled discovery, highlight the configuration server (don't select it) and select Refresh.
Step 6: Run a disaster recovery drill
You run a test failover to Azure to make sure that everything's working as expected. This failover won't affect your production environment.
Verify machine properties
Before you run a test failover, verify the machine properties, and make sure that they comply with Azure requirements. You can view and modify properties as follows:
In Protected Items, click Replicated Items > VM.
In the Replicated item pane, there's a summary of VM information, health status, and the latest available recovery points. Click Properties to view more details.
In Compute and Network settings, modify settings as needed.
- You can modify the Azure VM name, resource group, target size, availability set, and managed disk settings.
- You can also view and modify network settings. These include the network/subnet to which the Azure VM is joined after failover, and the IP address that will be assigned to the VM.
In Disks, view information about the operating system and data disks on the VM.
Run a test failover
When you run a test failover, the following happens:
A prerequisites check runs to make sure all of the conditions required for failover are in place.
Failover processes the data using the specified recovery point:
- Latest processed: The machine fails over to the latest recovery point processed by Site Recovery. The time stamp is shown. With this option, no time is spent processing data, so it provides a low RTO (recovery time objective).
- Latest app-consistent: The machine fails over to the latest app-consistent recovery point.
- Custom: Select the recovery point used for failover.
An Azure VM is created using the processed data.
Test failover can automatically clean up Azure VMs created during the drill.
Run a test failover for a VM as follows:
- In Settings > Replicated Items, click the VM > +Test Failover.
- For this walkthrough, we'll select to use the Latest processed recovery point.
- In Test Failover, select the target Azure network.
- Click OK to begin the failover.
- Track progress by clicking on the VM to open its properties. Or, click the Test Failover job in vault name > Settings > Jobs >Site Recovery jobs.
- After the failover finishes, the replica Azure VM appears in the Azure portal > Virtual Machines. Check that the VM is the appropriate size, connected to the right network, and running.
- You should now be able to connect to the replicated VM in Azure. Learn more.
- To delete Azure VMs created during the test failover, click Cleanup test failover on the VM. In Notes, save any observations associated with the test failover.
Fail over and fail back
After you've set up replication, and run a drill to make sure everything's working, you can fail machines over to Azure as required.
Before you run a failover, if you want to connect to the machine in Azure after the failover, then prepare to connect before you start.
Then run a failover as follows:
- In Settings > Replicated Items, click the machine > Failover.
- Select the recovery point that you want to use.
- In Test Failover, select the target Azure network.
- Select Shut down machine before beginning failover. With this setting, Site Recovery tries to shut down the source machine before starting the failover. However failover continues even if shutdown fails.
- Click OK to begin the failover. You can follow the failover progress on the Jobs page.
- After the failover finishes, the replica Azure VM appears in the Azure portal > Virtual Machines. If you prepared to connect after failover, check that the VM is the appropriate size, connected to the right network, and running.
- After verifying the VM, click Commit to finish the failover. This deletes all available recovery points.
Warning
Don't cancel a failover in progress: Before failover is started, VM replication is stopped. If you cancel a failover in progress, failover stops, but the VM won't replicate again.
Fail back to Azure Stack
When your primary site is up and running again, you can fail back from Azure to Azure Stack. To do this, follow the steps listed out here.
Conclusion
In this article we replicated Azure Stack VMs to Azure. With replication in place, we ran a disaster recovery drill to make sure failover to Azure worked as expected. The article also included steps for running a full failover to Azure, and failing back to Azure Stack.
Next steps
After failing back, you can reprotect the VM and start replicating it to Azure again. To do this, repeat the steps in this article.
Feedback
Coming soon: Throughout 2024 we will be phasing out GitHub Issues as the feedback mechanism for content and replacing it with a new feedback system. For more information see: https://aka.ms/ContentUserFeedback.
Submit and view feedback for