Replicate virtual machines running in a proximity placement group to another region
Caution
This article references CentOS, a Linux distribution that is nearing End Of Life (EOL) status. Please consider your use and plan accordingly. For more information, see the CentOS End Of Life guidance.
This article describes how to replicate, fail over, and fail back Azure virtual machines (VMs) running in a proximity placement group to a secondary region.
Proximity placement groups are a logical grouping capability in Azure Virtual Machines. You can use them to decrease the inter-VM network latency associated with your applications.
When VMs are deployed within the same proximity placement group, they're physically located as close as possible to each other. Proximity placement groups are useful to address the requirements of latency-sensitive workloads.
Disaster recovery with proximity placement groups
In a typical scenario, you might have your virtual machines running in a proximity placement group to avoid the network latency between the tiers of your application. Although this approach can provide optimal network latency for your application, you might want to protect these applications by using Azure Site Recovery for any region-level failure.
Site Recovery replicates the data from one Azure region to another region. It brings up the machines in disaster recovery (DR) region in a failover event.
Considerations
- The best effort will be to fail over and fail back the virtual machines into a proximity placement group. If there is am OverconstrainedAllocationRequest error due to which we are unable to bring up the VMs inside a proximity placement group, the failover and failback will still execute, but VMs will be created outside the proximity placement group.
- If an availability set is pinned to a proximity placement group and VMs in the availability set have an allocation constraint during failback or failover, the VMs will be created outside both the availability set and the proximity placement group.
- Site Recovery for proximity placement groups is not supported for unmanaged disks.
Note
Azure Site Recovery does not support failback from managed disks for scenarios of moving from Hyper-V to Azure. Failback from proximity placement groups in Azure to Hyper-V is not supported.
Set up disaster recovery for VMs in proximity placement groups via the Azure portal
Azure to Azure
You can choose to enable replication for a virtual machine through the VM disaster recovery page. Or you can enable replication by going to a pre-created vault, going to the Site Recovery section, and then enabling replication. Let's look at how you can set up Site Recovery VMs inside a proximity placement group through both approaches.
To select a proximity placement group in the DR region while enabling replication through the infrastructure as a service (IaaS) VM DR page:
Go to the virtual machine. On the left pane, under Operations, select Disaster Recovery.
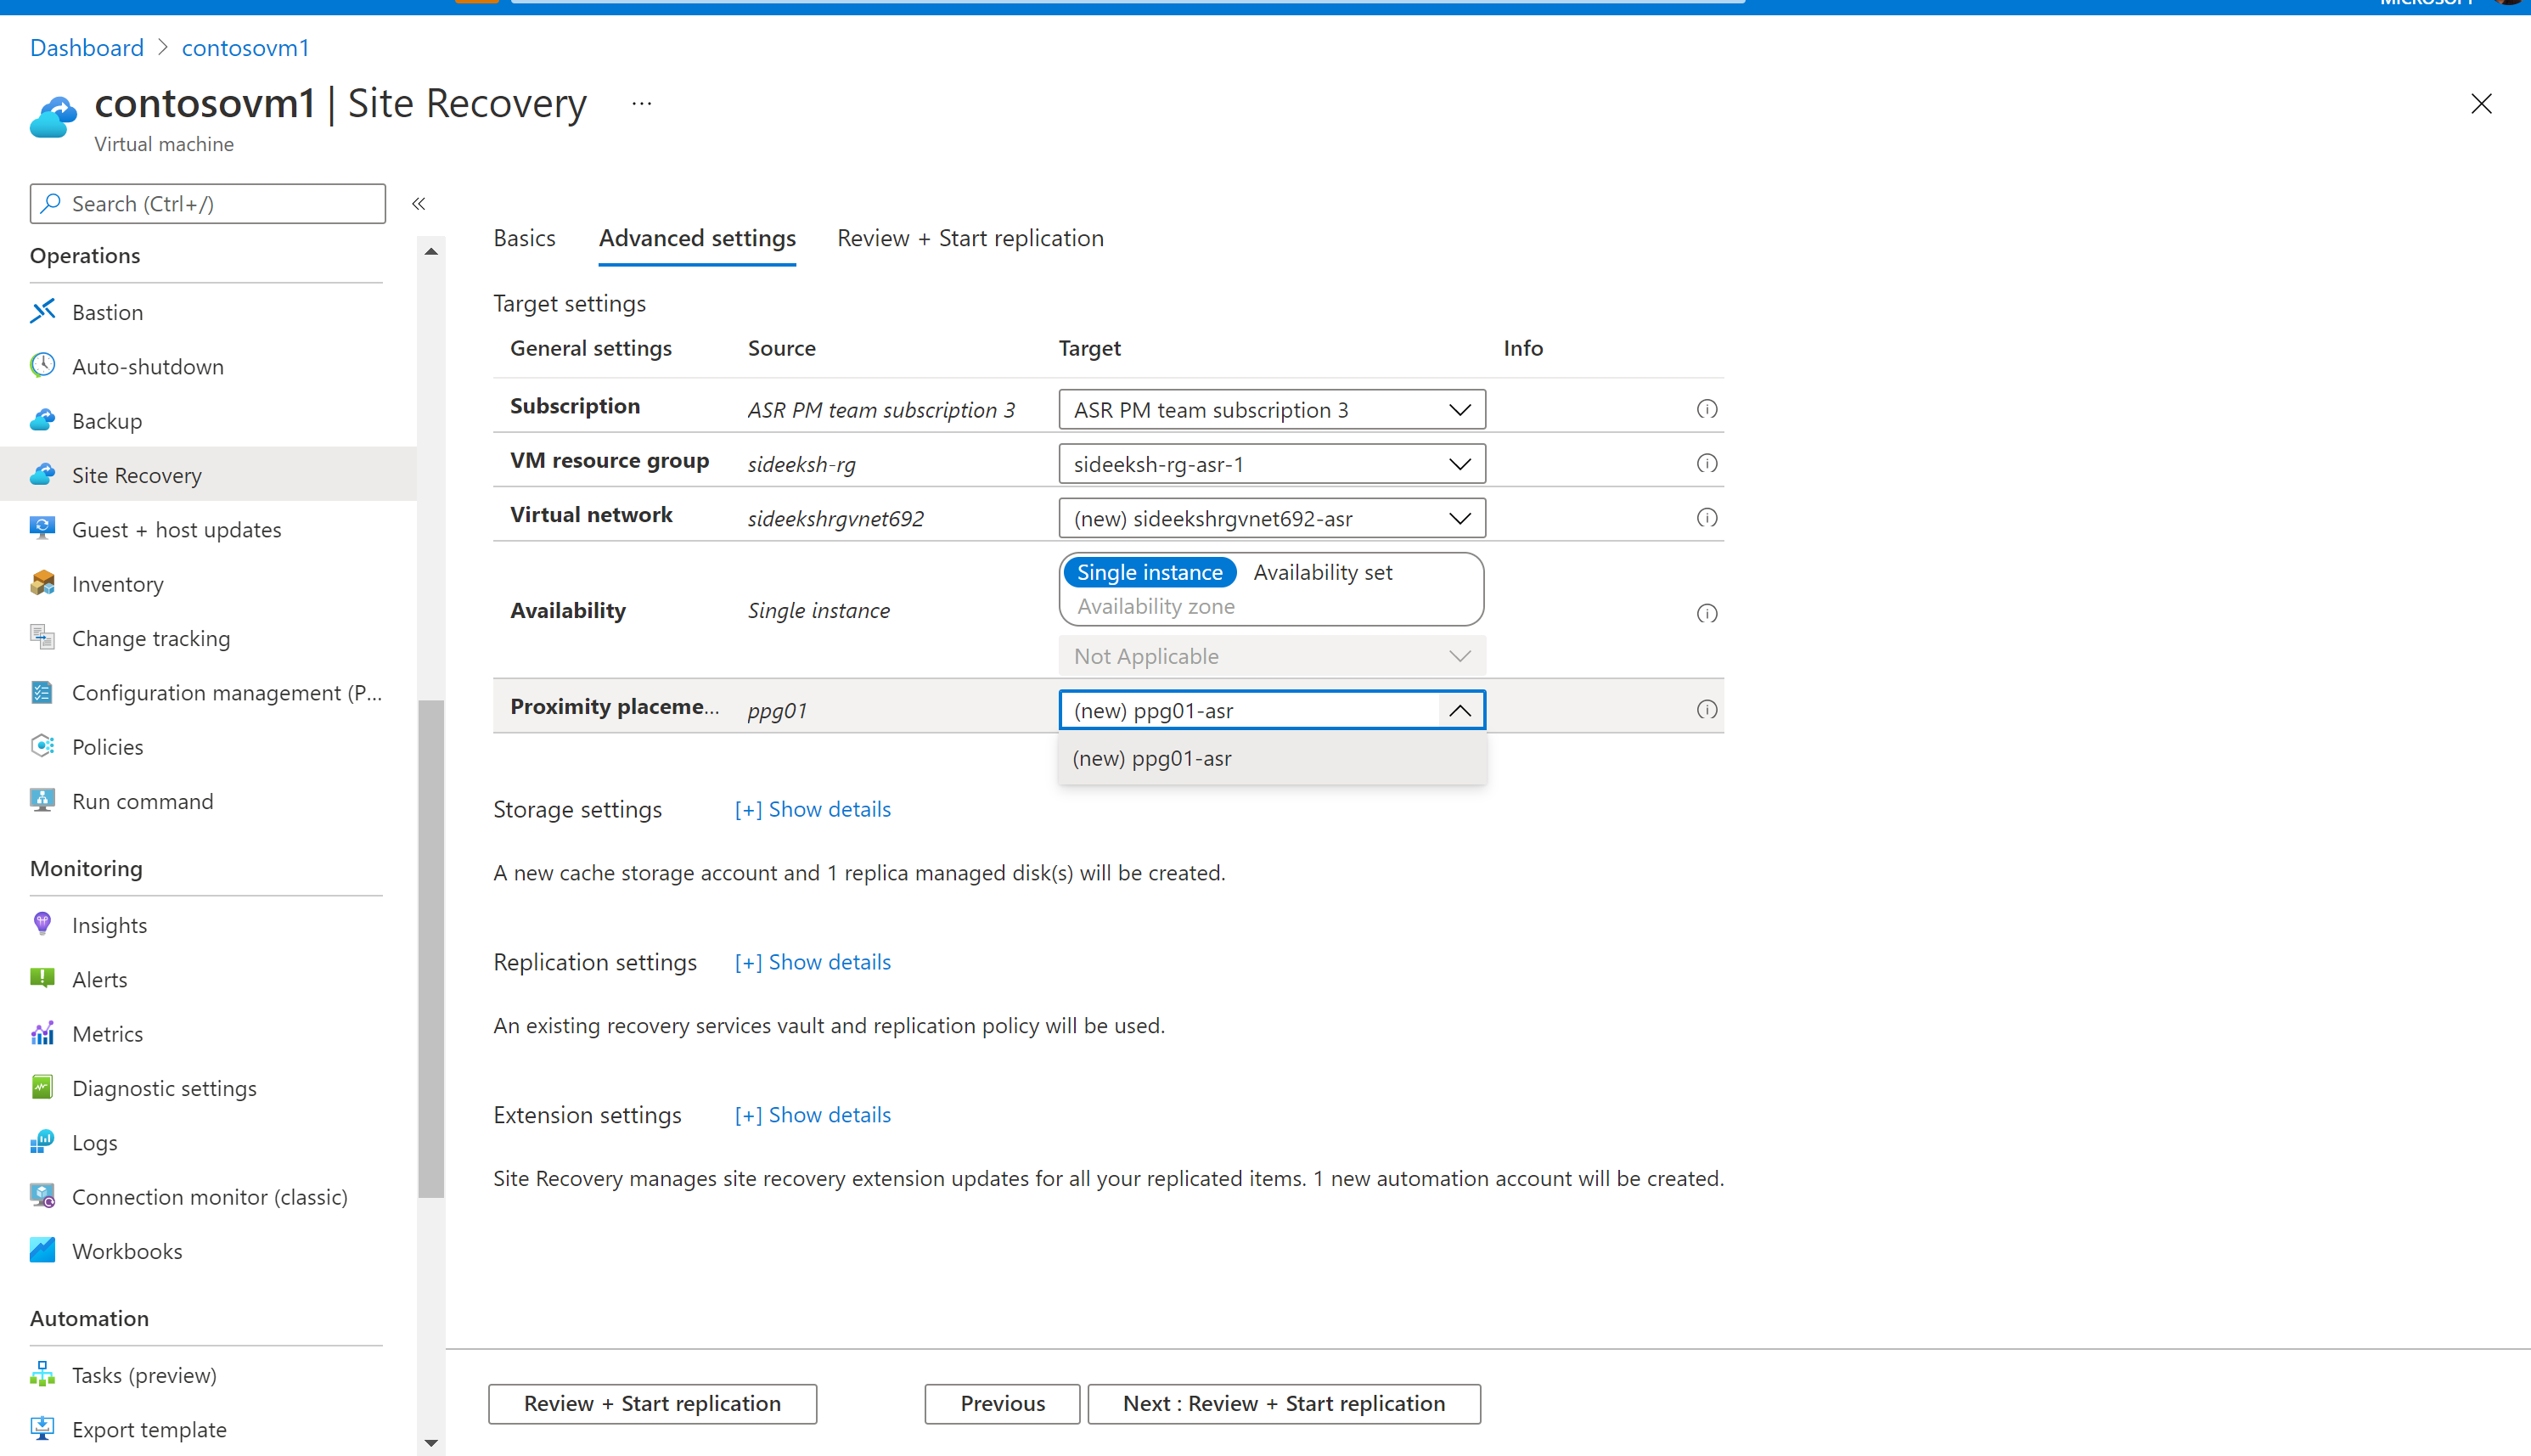
On the Basics tab, choose the DR region that you want to replicate the VM to. Go to Advanced Settings.
You can see the proximity placement group of your VM and the option to select a proximity placement group in the DR region. Site Recovery also gives you the option of using a new proximity placement group that it creates for you, if you choose to use this default option.
Choose the proximity placement group that you want. Then select Review + Start replication.
To select a proximity placement group in the DR region while enabling replication through the vault page:
Go to your Recovery Services vault, and then go to the Site Recovery tab.
Select + Enable Site Recovery. Then select 1: Enable Replication under Azure virtual machines (because you want to replicate an Azure VM).
Fill in the required fields on the Source tab, and then select Next.
Select the list of VMs that you want to enable replication for on the Virtual machines tab, and then select Next.
You can see the option to select a proximity placement group in the DR region. Site Recovery also gives you the option of using a new proximity placement group that it creates for you, if you choose to use this default option.
Choose the proximity placement group that you want, and then proceed to enabling replication.

You can easily update your selection of a proximity placement group in the DR region after replication has been enabled for the VM:
- Go to the virtual machine. On the left pane, under Operations, select Disaster Recovery.
- Go to the Compute pane and select Edit.
- You can see the options to edit multiple target settings, including the target proximity placement group. Choose the proximity placement group that you want the VM to fail over into, and then select Save.
VMware to Azure
You can set up a proximity placement group for the target VM after you enable replication for the VM. Make sure that you separately create the proximity placement group in the target region according to your requirement.
You can easily update your selection of a proximity placement group in the DR region after replication has been enabled for the VM:
Select the virtual machine from the vault. On the left pane, under Operations, select Disaster Recovery.
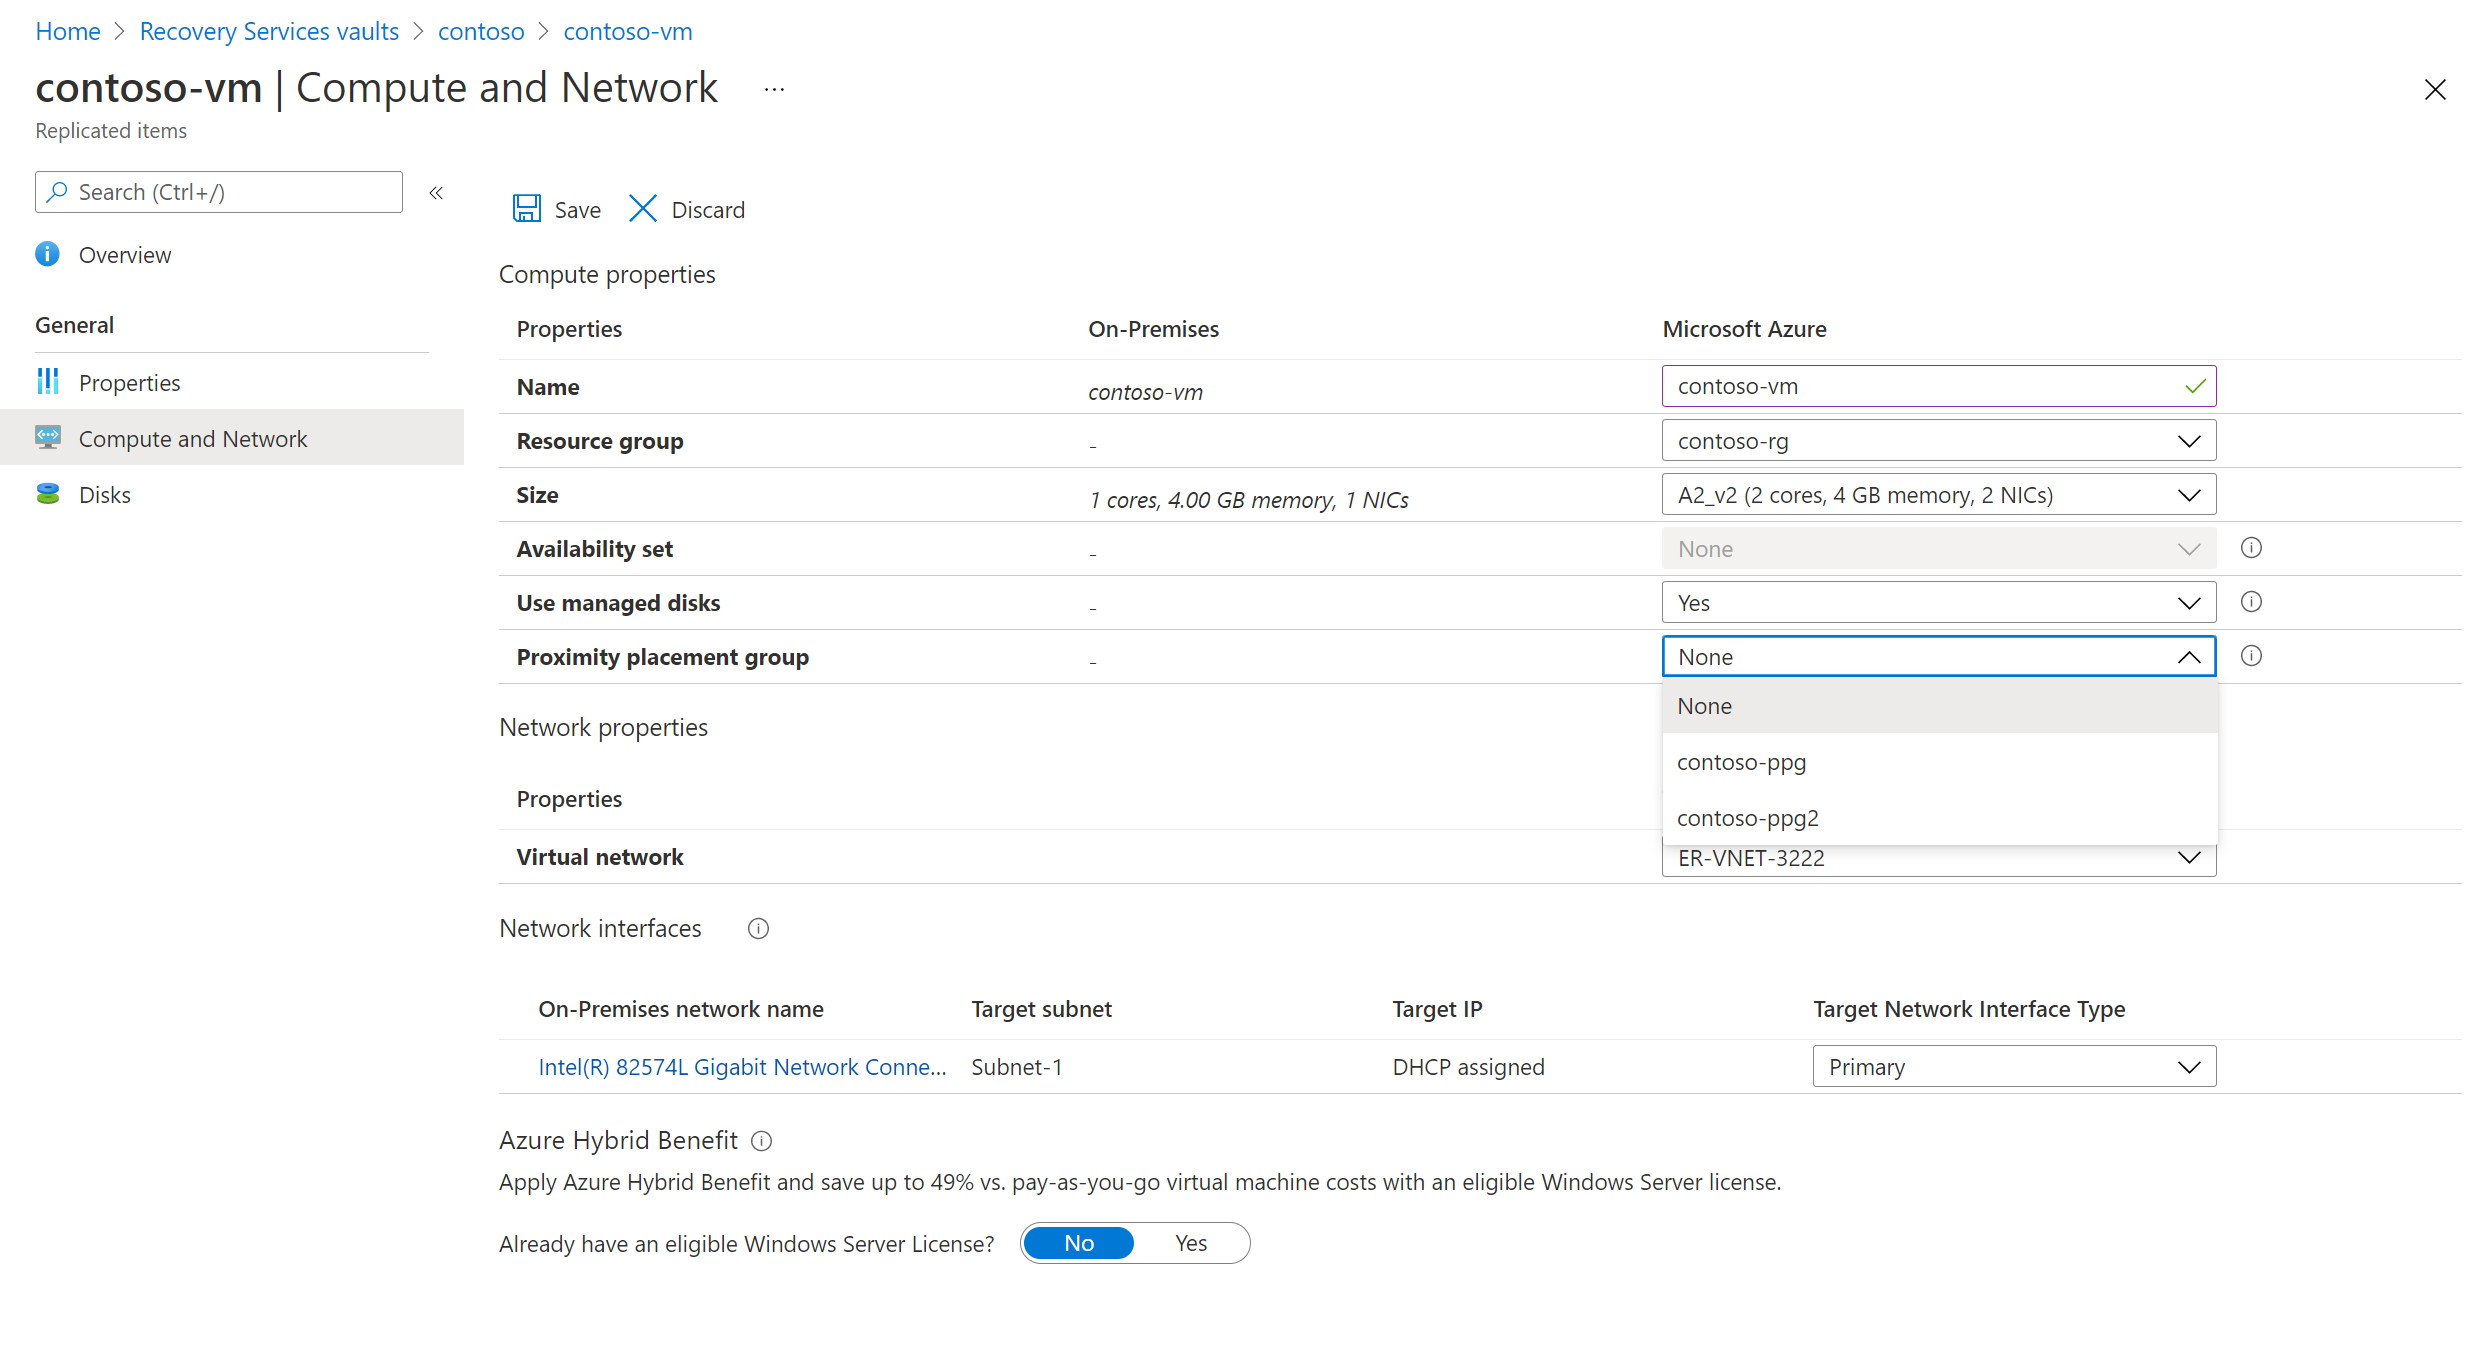
Go to the Compute and Network pane and select Edit.
You can see the options to edit multiple target settings, including the target proximity placement group. Choose the proximity placement group that you want the VM to fail over into, and then select Save.

Hyper-V to Azure
You can set up a proximity placement group for the target VM after you enable replication for the VM. Make sure that you separately create the proximity placement group in the target region according to your requirement.
You can easily update your selection of a proximity placement group in the DR region after replication has been enabled for the VM:
Select the virtual machine from the vault. On the left pane, under Operations, select Disaster Recovery.
Go to the Compute and Network pane and select Edit.
You can see the options to edit multiple target settings, including the target proximity placement group. Choose the proximity placement group that you want the VM to fail over into, and then select Save.
Set up disaster recovery for VMs in proximity placement groups via PowerShell
Prerequisites
Make sure that you have the Azure PowerShell Az module. If you need to install or upgrade Azure PowerShell, follow the guide to install and configure Azure PowerShell.
The minimum Azure PowerShell Az version should be 4.1.0. To check the current version, use the following command:
Get-InstalledModule -Name Az
Note
Make sure that you have the unique ID of the target proximity placement group handy. The command that you use depends on whether you're creating a new proximity placement group or using an existing proximity placement group.
Azure to Azure
Get the details of the virtual machine that you're planning to replicate.
Create your recovery services vault and set the vault context.
Prepare the vault to start the replication virtual machine. This step involves creating an Azure Service Fabric object for both the primary and recovery regions.
Create a Site Recovery protection container for both the primary and recovery fabrics.
Create a protection container mapping between the primary and recovery protection containers, and create a protection container mapping for failback.
Replicate an Azure virtual machine with managed disks by using the following PowerShell cmdlet:
#Get the resource group that the virtual machine must be created in when it's failed over.
$RecoveryRG = Get-AzResourceGroup -Name "a2ademorecoveryrg" -Location "West US 2"

#Specify replication properties for each disk of the VM that will be replicated (create disk replication configuration).
#Make sure to replace the variable $OSdiskName with the OS disk name.

#OS Disk
$OSdisk = Get-AzDisk -DiskName $OSdiskName -ResourceGroupName "A2AdemoRG"
$OSdiskId = $OSdisk.Id
$RecoveryOSDiskAccountType = $OSdisk.Sku.Name
$RecoveryReplicaDiskAccountType = $OSdisk.Sku.Name

$OSDiskReplicationConfig = New-AzRecoveryServicesAsrAzureToAzureDiskReplicationConfig -ManagedDisk -LogStorageAccountId $EastUSCacheStorageAccount.Id -DiskId $OSdiskId -RecoveryResourceGroupId $RecoveryRG.ResourceId -RecoveryReplicaDiskAccountType $RecoveryReplicaDiskAccountType -RecoveryTargetDiskAccountType $RecoveryOSDiskAccountType

#Make sure to replace the variable $datadiskName with the data disk name.

#Data disk
$datadisk = Get-AzDisk -DiskName $datadiskName -ResourceGroupName "A2AdemoRG"
$datadiskId1 = $datadisk[0].Id
$RecoveryReplicaDiskAccountType = $datadisk[0].Sku.Name
$RecoveryTargetDiskAccountType = $datadisk[0].Sku.Name

$DataDisk1ReplicationConfig  = New-AzRecoveryServicesAsrAzureToAzureDiskReplicationConfig -ManagedDisk -LogStorageAccountId $EastUSCacheStorageAccount.Id -DiskId $datadiskId1 -RecoveryResourceGroupId $RecoveryRG.ResourceId -RecoveryReplicaDiskAccountType $RecoveryReplicaDiskAccountType -RecoveryTargetDiskAccountType $RecoveryTargetDiskAccountType

#Create a list of disk replication configuration objects for the disks of the virtual machine that will be replicated.

$diskconfigs = @()
$diskconfigs += $OSDiskReplicationConfig, $DataDisk1ReplicationConfig

#Start replication by creating a replication protected item. Use a GUID for the name of the replication protected item to ensure uniqueness of the name.

$TempASRJob = New-AzRecoveryServicesAsrReplicationProtectedItem -AzureToAzure -AzureVmId $VM.Id -Name (New-Guid).Guid -ProtectionContainerMapping $EusToWusPCMapping -AzureToAzureDiskReplicationConfiguration $diskconfigs -RecoveryResourceGroupId $RecoveryRG.ResourceId -RecoveryProximityPlacementGroupId $targetPpg.Id
When you're enabling replication for multiple data disks, use the following PowerShell cmdlet:
#Get the resource group that the virtual machine must be created in when it's failed over.
$RecoveryRG = Get-AzResourceGroup -Name "a2ademorecoveryrg" -Location "West US 2"

#Specify replication properties for each disk of the VM that will be replicated (create disk replication configuration).
#Make sure to replace the variable $OSdiskName with the OS disk name.

#OS Disk
$OSdisk = Get-AzDisk -DiskName $OSdiskName -ResourceGroupName "A2AdemoRG"
$OSdiskId = $OSdisk.Id
$RecoveryOSDiskAccountType = $OSdisk.Sku.Name
$RecoveryReplicaDiskAccountType = $OSdisk.Sku.Name

$OSDiskReplicationConfig = New-AzRecoveryServicesAsrAzureToAzureDiskReplicationConfig -ManagedDisk -LogStorageAccountId $EastUSCacheStorageAccount.Id -DiskId $OSdiskId -RecoveryResourceGroupId $RecoveryRG.ResourceId -RecoveryReplicaDiskAccountType $RecoveryReplicaDiskAccountType -RecoveryTargetDiskAccountType $RecoveryOSDiskAccountType

$diskconfigs = @()
$diskconfigs += $OSDiskReplicationConfig

#Data disk

# Add data disks
Foreach( $disk in $VM.StorageProfile.DataDisks)
{
    $datadisk = Get-AzDisk -DiskName $datadiskName -ResourceGroupName "A2AdemoRG"
    $dataDiskId1 = $datadisk[0].Id
    $RecoveryReplicaDiskAccountType = $datadisk[0].Sku.Name
    $RecoveryTargetDiskAccountType = $datadisk[0].Sku.Name
    $DataDisk1ReplicationConfig  = New-AzRecoveryServicesAsrAzureToAzureDiskReplicationConfig -ManagedDisk -LogStorageAccountId $EastUSCacheStorageAccount.Id `
         -DiskId $dataDiskId1 -RecoveryResourceGroupId $RecoveryRG.ResourceId -RecoveryReplicaDiskAccountType $RecoveryReplicaDiskAccountType `
         -RecoveryTargetDiskAccountType $RecoveryTargetDiskAccountType
    $diskconfigs += $DataDisk1ReplicationConfig
}

#Start replication by creating a replication protected item. Use a GUID for the name of the replication protected item to ensure uniqueness of the name.

$TempASRJob = New-AzRecoveryServicesAsrReplicationProtectedItem -AzureToAzure -AzureVmId $VM.Id -Name (New-Guid).Guid -ProtectionContainerMapping $EusToWusPCMapping -AzureToAzureDiskReplicationConfiguration $diskconfigs -RecoveryResourceGroupId $RecoveryRG.ResourceId -RecoveryProximityPlacementGroupId $targetPpg.Id
When you're enabling zone-to-zone replication with a proximity placement group, the command to start replication will be exchanged with the PowerShell cmdlet:
$TempASRJob = New-AzRecoveryServicesAsrReplicationProtectedItem -AzureToAzure -AzureVmId $VM.Id -Name (New-Guid).Guid -ProtectionContainerMapping $EusToWusPCMapping -AzureToAzureDiskReplicationConfiguration $diskconfigs -RecoveryResourceGroupId $RecoveryRG.ResourceId -RecoveryProximityPlacementGroupId $targetPpg.Id -RecoveryAvailabilityZone "2"After the operation to start replication succeeds, virtual machine data is replicated to the recovery region.
The replication process starts by initially seeding a copy of the replicating disks of the virtual machine in the recovery region. This phase is called the initial replication phase.
After initial replication finishes, replication moves to the differential synchronization phase. At this point, the virtual machine is protected, and you can perform a test failover operation on it. The replication state of the replicated item that represents the virtual machine goes to the protected state after initial replication finishes.
Monitor the replication state and replication health for the virtual machine by getting details of the replication protected item that corresponds to it:
Get-AzRecoveryServicesAsrReplicationProtectedItem -ProtectionContainer $PrimaryProtContainer | Select FriendlyName, ProtectionState, ReplicationHealthReprotect and fail back to the source region by using the following PowerShell cmdlet:
#Create a cache storage account for replication logs in the primary region.
$WestUSCacheStorageAccount = New-AzStorageAccount -Name "a2acachestoragewestus" -ResourceGroupName "A2AdemoRG" -Location 'West US' -SkuName Standard_LRS -Kind Storage


#Use the recovery protection container, the new cache storage account in West US, and the source region VM resource group.
Update-AzRecoveryServicesAsrProtectionDirection -ReplicationProtectedItem $ReplicationProtectedItem -AzureToAzure -ProtectionContainerMapping $WusToEusPCMapping -LogStorageAccountId $WestUSCacheStorageAccount.Id -RecoveryResourceGroupID $sourceVMResourcegroup.ResourceId -RecoveryProximityPlacementGroupId $vm.ProximityPlacementGroup.Id
VMware to Azure
Prepare your on-premises VMware servers for disaster recovery to Azure.
Add a vCenter server and discover virtual machines, and create storage accounts for replication.
Replicate VMware virtual machines and check the details by using the following PowerShell cmdlet:
#Get the target resource group to be used.
$ResourceGroup = Get-AzResourceGroup -Name "VMwareToAzureDrPs"

#Get the target virtual network to be used.
$RecoveryVnet = Get-AzVirtualNetwork -Name "ASR-vnet" -ResourceGroupName "asrrg"

#Get the protection container mapping for the replication policy named ReplicationPolicy.
$PolicyMap = Get-AzRecoveryServicesAsrProtectionContainerMapping -ProtectionContainer $ProtectionContainer | where PolicyFriendlyName -eq "ReplicationPolicy"

#Get the protectable item that corresponds to the virtual machine CentOSVM1.
$VM1 = Get-AzRecoveryServicesAsrProtectableItem -ProtectionContainer $ProtectionContainer -FriendlyName "CentOSVM1"

# Enable replication for virtual machine CentOSVM1 by using the Az.RecoveryServices module 2.0.0 onward to replicate to managed disks.
# The name specified for the replicated item needs to be unique within the protection container. Use a random GUID to ensure uniqueness.
$Job_EnableReplication1 = New-AzRecoveryServicesAsrReplicationProtectedItem -VMwareToAzure -ProtectableItem $VM1 -Name (New-Guid).Guid -ProtectionContainerMapping $PolicyMap -ProcessServer $ProcessServers[1] -Account $AccountHandles[2] -RecoveryResourceGroupId $ResourceGroup.ResourceId -logStorageAccountId $LogStorageAccount.Id -RecoveryAzureNetworkId $RecoveryVnet.Id -RecoveryAzureSubnetName "Subnet-1" -RecoveryProximityPlacementGroupId $targetPpg.Id
Check the replication state and replication health of the virtual machine by using the
Get-ASRReplicationProtectedItemcmdlet:Get-AzRecoveryServicesAsrReplicationProtectedItem -ProtectionContainer $ProtectionContainer | Select FriendlyName, ProtectionState, ReplicationHealth
Hyper-V to Azure
Prepare your on-premises Hyper-V servers for disaster recovery to Azure.
Set up your vault and set the Recovery Services vault context.
Enable replication by using the following steps:
Retrieve the protectable item that corresponds to the VM you want to protect:
$VMFriendlyName = "Fabrikam-app"          #Name of the VM
$ProtectableItem = Get-AzRecoveryServicesAsrProtectableItem -ProtectionContainer $protectionContainer -FriendlyName $VMFriendlyName
Protect the VM. If the VM you're protecting has more than one disk attached to it, specify the operating system disk by using the
OSDiskNameparameter:$OSType = "Windows" # "Windows" or "Linux" $DRjob = New-AzRecoveryServicesAsrReplicationProtectedItem -ProtectableItem $VM -Name $VM.Name -ProtectionContainerMapping $ProtectionContainerMapping -RecoveryAzureStorageAccountId $StorageAccountID -OSDiskName $OSDiskNameList[$i] -OS $OSType -RecoveryResourceGroupId $ResourceGroupID -RecoveryProximityPlacementGroupId $targetPpg.IdWait for the VMs to reach a protected state after the initial replication. This process can take a while, depending on factors like the amount of data to be replicated and the available upstream bandwidth to Azure.
When a protected state is in place,
StateandStateDescriptionfor the job are updated as follows:$DRjob = Get-AzRecoveryServicesAsrJob -Job $DRjob $DRjob | Select-Object -ExpandProperty State $DRjob | Select-Object -ExpandProperty StateDescriptionUpdate recovery properties (such as the VM role size) and the Azure network to which to attach the VM NIC after failover:
$nw1 = Get-AzVirtualNetwork -Name "FailoverNw" -ResourceGroupName "MyRG"

$VMFriendlyName = "Fabrikam-App"

$rpi = Get-AzRecoveryServicesAsrReplicationProtectedItem -ProtectionContainer $protectionContainer -FriendlyName $VMFriendlyName

$UpdateJob = Set-AzRecoveryServicesAsrReplicationProtectedItem -InputObject $rpi -PrimaryNic $VM.NicDetailsList[0].NicId -RecoveryNetworkId $nw1.Id -RecoveryNicSubnetName $nw1.Subnets[0].Name

$UpdateJob = Get-AzRecoveryServicesAsrJob -Job $UpdateJob

$UpdateJob | Select-Object -ExpandProperty state

Get-AzRecoveryServicesAsrJob -Job $job | Select-Object -ExpandProperty state
Next steps
To perform reprotect and failback for VMware to Azure, see Prepare for reprotection and failback of VMware VMs.
To fail over from Hyper-V to Azure, see Run a failover from on-premises to Azure. To fail back, see Run a failback for Hyper-V VMs.
For more information, see Failover in Site Recovery.
Feedback
Coming soon: Throughout 2024 we will be phasing out GitHub Issues as the feedback mechanism for content and replacing it with a new feedback system. For more information see: https://aka.ms/ContentUserFeedback.
Submit and view feedback for