Tutorial: Authenticate client with Spring Cloud Gateway on Azure Spring Apps
Note
The first 50 vCPU hours and 100 GB hours of memory are free each month. For more information, see Price Reduction - Azure Spring Apps does more, costs less! on the Apps on Azure Blog.
Note
Azure Spring Apps is the new name for the Azure Spring Cloud service. Although the service has a new name, you'll see the old name in some places for a while as we work to update assets such as screenshots, videos, and diagrams.
This article applies to: ✔️ Standard consumption and dedicated (Preview)
This quickstart shows you how to secure communication between a client application and a microservice application that is hosted on Azure Spring Apps and shielded with a Spring Cloud Gateway app. The client application is verified as a security principal to initiate contact with the microservice deployed on Azure Spring Apps, using the app built with Spring Cloud Gateway. This method employs Spring Cloud Gateway's Token Relay and Spring Security's Resource Server features for the processes of authentication and authorization, realized through the execution of the OAuth 2.0 client credentials flow.
The following list shows the composition of the sample project:
- Books SPA: This Single Page Application (SPA), hosted locally, interacts with the Books microservice for adding or searching for books.
- Books microservice:
- A Spring Cloud Gateway app hosted in Azure Spring Apps. This app operates as a gateway to the Books RESTful APIs.
- A Spring Boot RESTful API app hosted in Azure Spring Apps. This app stores the book information in an H2 database. The Books service exposes two REST endpoints to write and read books.
1. Prerequisites
- An Azure subscription. If you don't have a subscription, create a free account before you begin.
- Git.
- Java Development Kit (JDK), version 17.
- A Microsoft Entra tenant. For more information on how to create a Microsoft Entra tenant, see Quickstart: Create a new tenant in Microsoft Entra ID.
- Azure CLI version 2.45.0 or higher.
- Install Node.js.
2. Prepare the Spring project
Use the following steps to clone and run the app locally:
Use the following command to clone the sample project from GitHub:
git clone https://github.com/Azure-Samples/azure-spring-apps-sso-client-credential.git -b consumption-planUse the following command to build the Books backend services:
cd azure-spring-apps-sso-client-credential
./mvnw clean package
Enter the SPA project directory, and use the following command to install the dependencies:
npm install @azure/msal-node
3. Prepare the cloud environment
The main resources required to run this sample are an Azure Spring Apps instance and an Azure Database for PostgreSQL instance. This section provides the steps to create these resources.
3.1. Sign in to the Azure portal
Open your web browser and go to the Azure portal. Enter your credentials to sign in to the Azure portal. The default view is your service dashboard.
3.2. Create an Azure Spring Apps instance
Use the following steps to create a service instance:
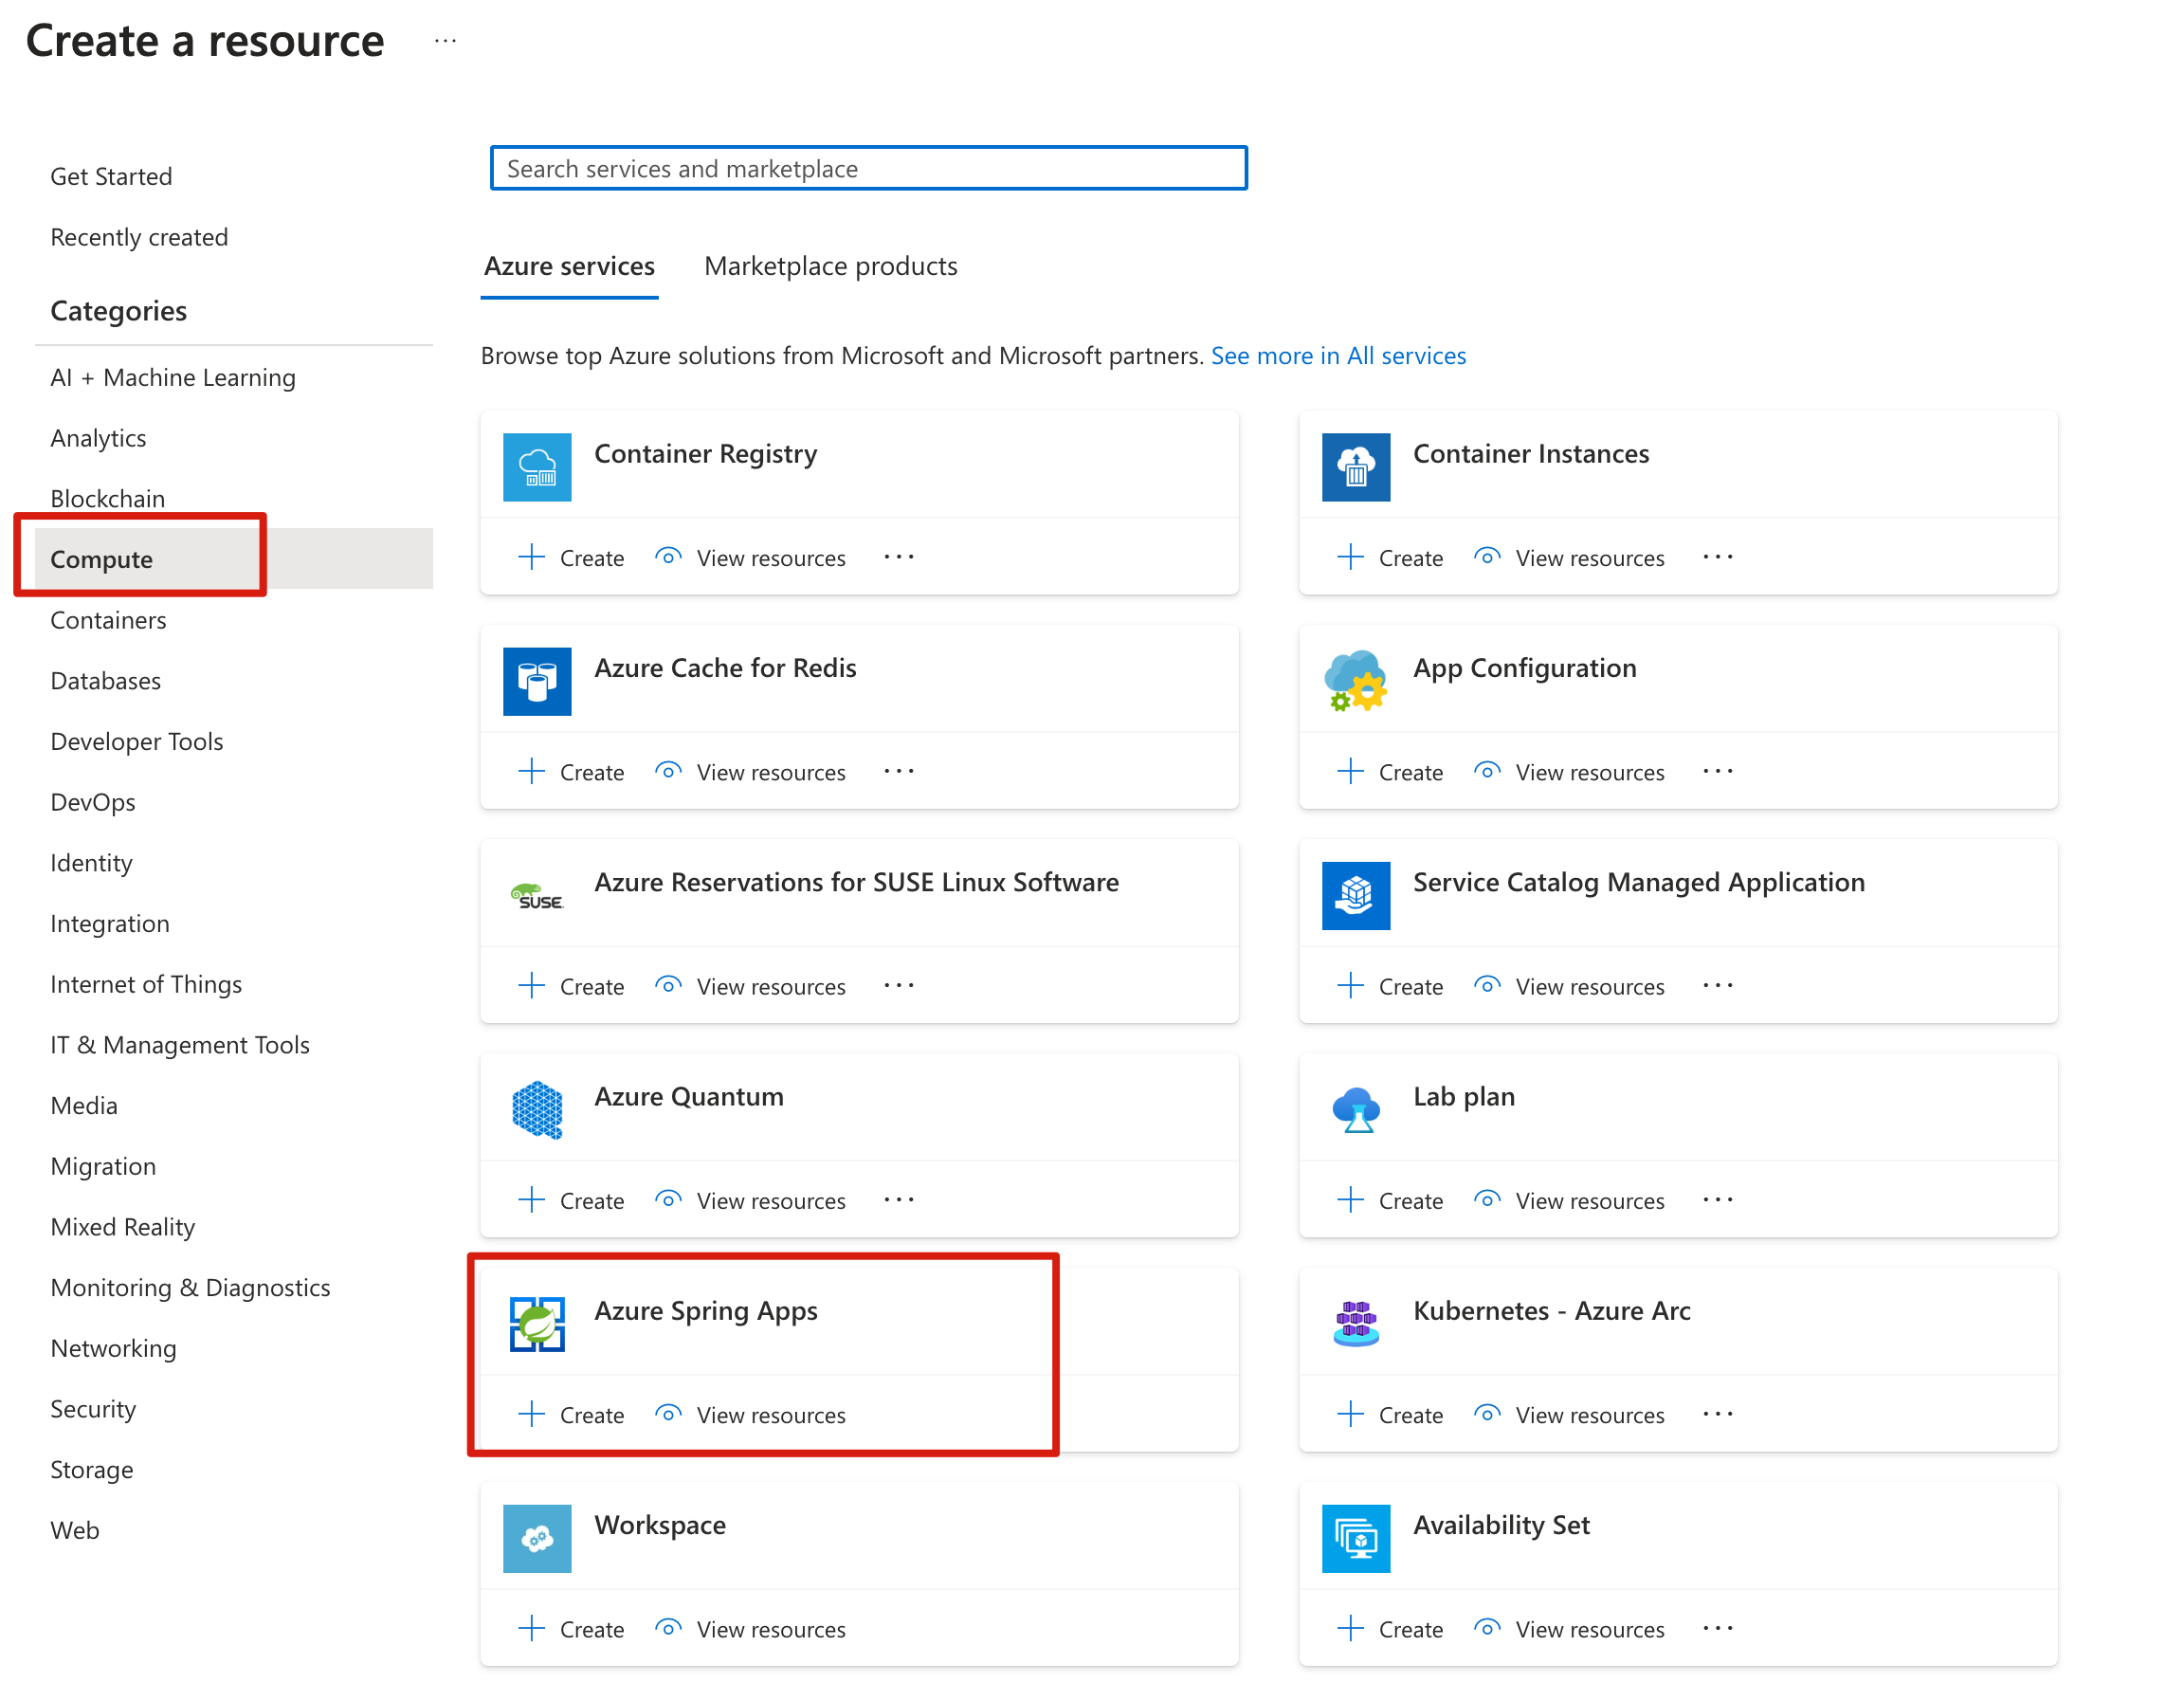
Select Create a resource in the corner of the Azure portal.
Select Compute > Azure Spring Apps.
Fill out the Basics form with the following information:
Setting Suggested value Description Subscription Your subscription name The Azure subscription that you want to use for your server. If you have multiple subscriptions, choose the subscription in which you'd like to be billed for the resource. Resource group myresourcegroup A new resource group name or an existing one from your subscription. Name myasa A unique name that identifies your Azure Spring Apps service. The name must be between 4 and 32 characters long and can contain only lowercase letters, numbers, and hyphens. The first character of the service name must be a letter and the last character must be either a letter or a number. Plan Standard consumption & dedicated (preview) The pricing plan determines the resources and cost associated with your instance. Region The region closest to your users The location that is closest to your users. Container Apps Environment myacaenv Select which Container Apps environment instance to share the same virtual network with other services and resources. 
Use the following table as a guide to create the Container Apps Environment:
Setting Suggested value Description Environment name myacaenv A unique name that identifies your Azure Container Apps Environment service. Plan Consumption The pricing plan determines the resources and cost associated with your instance. Zone Redundant Disabled Whether to create your Container Apps Environment service in an Azure availability zone. 
Important
The Consumption workload profile has a pay-as-you-go billing model, with no starting cost. You're billed for the dedicated workload profile based on the provisioned resources. For more information, see Workload profiles in Consumption + Dedicated plan structure environments in Azure Container Apps (preview) and Azure Spring Apps pricing.
Select Review and Create to review your selections. Select Create to provision the Azure Spring Apps instance.
On the toolbar, select the Notifications icon (a bell) to monitor the deployment process. After the deployment is done, you can select Pin to dashboard, which creates a tile for this service on your Azure portal dashboard as a shortcut to the service's Overview page. Select Go to resource to open the service's Overview page.

Use the following command to enable the Eureka server. Be sure to replace the placeholders with your own values you created in the previous step.
az spring eureka-server enable \
    --resource-group <resource-group-name> \
    --name <Azure-Spring-Apps-instance-name>


3.3. Register the Books application
This section provides the steps to register an application to add app roles in Microsoft Entra ID, which is used for protecting the RESTful APIs in Azure Spring Apps.
Go to the Azure portal homepage.
If you have access to multiple tenants, use the Directory + subscription filter (
 ) to select the tenant in which you want to register an application.
Search for and select Microsoft Entra ID.
Under Manage, select App registrations > New registration.
Enter a name for your application in the Name field, for example Books. Users of your app might see this name, and you can change it later.
For Supported account types, select Accounts in this organizational directory only.
Select Register to create the application.
On the app Overview page, look for the Application (client) ID value, and then record it for later use. You need it to configure the YAML configuration file for this project.
Under Manage, select Expose an API, find the Application ID URI at the beginning of the page, and then select Add.
On the Edit application ID URI page, accept the proposed Application ID URI (
api://{client ID}) or use a meaningful name instead of the client ID, such asapi://books, and then select Save.Under Manage, select App roles > Create app role, and then enter the following information:
- For Display name, enter Write.
- For Allowed member types, select Applications.
- For Value, enter Books.Write.
- For Description, enter Adding books.
Repeat the previous step to add another app role:
Books.Read.

3.4. Register the SPA application
The Books RESTful API app acts as a resource server, which is protected by Microsoft Entra ID. Before acquiring an access token, you're required to register another application in Microsoft Entra ID and grant permissions to the client application, which is named SPA.
Go back to your tenant in Microsoft Entra ID.
Under Manage, select App registrations > New registration.
Enter a name for your application in the Name field, for example
SPA.For Supported account types, use the default Accounts in this organizational directory only.
Select Register to create the application.
On the app Overview page, look for the Application (client) ID value, and then record it for later use. You need it to acquire access token.
Select API permissions > Add a permission > APIs my organization uses. Select the
Booksapplication that you registered earlier, select the permissions Books.Read and Books.Write, and then select Add permissions.Select Grant admin consent for <your-tenant-name> to grant admin consent for the permissions you added.

Navigate to Certificates & secrets and then select New client secret.
On the Add a client secret page, enter a description for the secret, select an expiration date, and then select Add.
Look for the Value of the secret and then record it for later use. You need it to acquire an access token.

3.5. Update the configuration of Books Service app
Locate books-service/src/main/resources/application.yml file for the books-service app. Update the configuration in the spring.cloud.azure.active-directory section to match the following example. Be sure to replace the placeholders with the values you created previously.
spring:
  cloud:
    azure:
      active-directory:
        credential:
          client-id: <your-application-ID-of-Books>
        app-id-uri: <your-application-ID-URI-of-Books>
Use the following command to rebuild the sample project:
./mvnw clean package
4. Deploy the apps to Azure Spring Apps
The following steps show you how to deploy the apps to Azure.
4.1. Deploy the microservice apps to Azure Spring Apps
Use the following steps to deploy the apps to Azure Spring Apps using the Maven plugin for Azure Spring Apps:
Navigate to the sample project directory and then use the following command to configure the app in Azure Spring Apps:
./mvnw com.microsoft.azure:azure-spring-apps-maven-plugin:1.18.0:configThe following list describes the command interactions:
- Select child modules to configure (input numbers separated by comma, eg: [1-2,4,6], ENTER to select ALL): Press Enter to select all.
- OAuth2 login: Authorize the login to Azure based on the OAuth2 protocol.
- Select subscription: Select the subscription list number of the Azure Spring Apps instance you created, which defaults to the first subscription in the list. If you use the default number, press Enter directly.
- Select Azure Spring Apps for deployment: Select the list number of the Azure Spring Apps instance you created. If you use the default number, press Enter directly.
- Select apps to expose public access: (input numbers separated by comma, eg: [1-2,4,6], ENTER to select NONE): Enter 1 for
gateway-service. - Confirm to save all the above configurations (Y/n): Enter y. If you enter n, the configuration isn't saved in the POM files.
Use the following command to deploy the app:
./mvnw azure-spring-apps:deployThe following list describes the command interaction:
- OAuth2 login: You need to authorize the login to Azure based on the OAuth2 protocol.
After the command is executed, you can see the following log messages, which indicate that the deployment was successful.
[INFO] Getting public url of app(gateway-service)...
[INFO] Application url: https://gateway-service.xxxxxxxxxxxxxx-xxxxxxxx.eastasia.azurecontainerapps.io

...

[INFO] Artifact(books-service-0.0.1-SNAPSHOT.jar) is uploaded and deployment(default) is successfully updated.

...
The output Application url is the base endpoint to access the ToDo RESTful API application.
4.2. Run the SPA app locally
Update the configuration in the SPA application script file spa/server.js to match the following example. Be sure to replace the placeholders with your own values you created in the previous step.
const SpringCloudGatewayURL = "<URL exposed by app gateway-service>"

const msalConfig = {
    auth: {
        clientId: "< SPA App Registration ClientId>",
        authority: "https://login.microsoftonline.com/< TenantId >/",
        clientSecret: "<SPA App Registration ClientSecret>",
    },
};

const tokenRequest = {
    scopes: ["<Application ID URI of Books>/.default"]
};
In the SPA project directory, use the following command to run locally:
node server.js
Note
The SPA app is a static web application, which can be deployed to any web server.
5. Validate the app
You can access the Books SPA app that communicates with the Books RESTful APIs through the gateway-service app.
Go to
http://localhost:3000in your browser to access the application.Enter values for Author and Title, and then select Add Book. You see a response similar to the following example:
Book added successfully: {"id":1,"author":"Jeff Black","title":"Spring In Action"}
6. Clean up resources
You can delete the Azure resource group, which includes all the resources in the resource group. Use the following steps to delete the entire resource group, including the newly created service:
Locate your resource group in the Azure portal.
Select Resource groups, and then select the name of your resource group, for example, myresourcegroup.
On your resource group page, select Delete. Enter the name of your resource group in the text box to confirm deletion.
Select Delete.
7. Next steps
For more information, see the following articles:
Feedback
Coming soon: Throughout 2024 we will be phasing out GitHub Issues as the feedback mechanism for content and replacing it with a new feedback system. For more information see: https://aka.ms/ContentUserFeedback.
Submit and view feedback for