Manage Azure Storage Mover endpoints
While the term endpoint is often used in networking, it's used in the context of the Storage Mover service to describe a storage location with a high level of detail.
A storage mover endpoint is a resource that contains the path to either a source or destination location and other relevant information. Endpoints are used in the creation of a job definition to define the source and target locations for a particular copy operation. Only certain types of endpoints can be used as a source or a target, respectively. For example, data contained within an NFS (Network File System) file share endpoint can only be copied to a blob storage container. Similarly, copy operations with an SMB-based (Server Message Block) file share target can only be migrated to an Azure file share,
This article guides you through the creation and management of Azure Storage Mover endpoints. To follow these examples, you need a top-level storage mover resource. If you haven't created one, follow the steps within the Create a Storage Mover resource article before continuing.
After you complete the steps within this article, you'll be able to create and manage endpoints using the Azure portal and Azure PowerShell.
Endpoint resource overview
Within the Azure Storage Mover resource hierarchy, a migration project is used to organize migration jobs into logical tasks or components. A migration project in turn contains at least one job definition, which describes both the source and target locations for your migration project. The Understanding the Storage Mover resource hierarchy article contains more detailed information about the relationships between a Storage Mover, its endpoints, and its projects.
Because a migration requires both a well-defined source and target, endpoints are parented to the top-level storage mover resource. This placement allows you to reuse endpoints across any number of job definitions. While only a single endpoint resource exists, the properties of each individual endpoint might vary based on its type. For example, NFS (Network File System) shares, SMB shares, and Azure Storage blob container endpoints each require fundamentally different information.
The current Azure Storage Mover release supports full-fidelity migrations for specific source-target pair combinations. Always utilize the latest agent version to benefit from these supported sources and destinations:
| Source protocol | Target | Comments |
|---|---|---|
| SMB 2.x mount | Azure file share (SMB) | SMB 1.x sources and NFS Azure file shares are currently not supported. |
| NFS 3 & 4 mount | Azure blob storage container | Containers with the "Hierarchical Namespace Service (HNS)" feature enabled, are supported and the ADLS Gen2 REST API set is used for migration. |
SMB endpoints
SMB uses the ACL (access control list) concept and user-based authentication to provide access to shared files for selected users. To maintain security, Storage Mover relies on Azure Key Vault integration to securely store and tightly control access to user credentials and other secrets. During a migration, storage mover agent resources connect to your SMB endpoints with Key Vault secrets rather than with unsecure hard-coded credentials. This approach greatly reduces the chance that secrets might be accidentally leaked.
After your local file share source is configured, add secrets for both a username and a password to your Key Vault. You need to supply both your Key Vault's name or Uniform Resource Identifier (URI), and the names or URIs of the credential secrets when creating your SMB endpoints.
Agent access to both your Key Vault and target storage resources is controlled through the Azure RBAC (role-based access control) authorization system. This system allows you to define access based on attributes associated with managed identities, security principals, and resources. It's important to note that the required RBAC role assignments are automatically applied when SMB endpoints are created within the Azure portal. However, any endpoint created programmatically requires you to make the following assignments manually:
| Role | Resource |
|---|---|
| Key Vault Secrets User | The Key Vault resource used to store your SMB source's credential |
| Storage File Data Privileged Contributor | Your target file share resource |
There are many use cases that require preserving metadata values such as file and folder timestamps, ACLs, and file attributes. Storage Mover supports the same level of file fidelity as the underlying Azure file share. Azure Files in turn supports a subset of the NTFS file properties. The following table represents common metadata that is migrated:
| Metadata property | Outcome |
|---|---|
| Directory structure | The original directory structure of the source is preserved on the target share. |
| Access permissions | Permissions on the source file or directory are preserved on the target share. |
| Symbolic links | Symbolic links on the source are preserved and mapped on the target share. |
| Create timestamp | The original create timestamp of the source file is preserved on the target share. |
| Change timestamp | The original change timestamp of the source file is preserved on the target share. |
| Modified timestamp | The original modified timestamp of the source file is preserved on the target share. |
| Last access timestamp | This last access timestamp isn't supported for a file or directory on the target share. |
| Other metadata | Other metadata of the source item is preserved if the target share is supporting it. |
NFS endpoints
Using the NFS protocol, you can transfer files between computers running Windows and other non-Windows operating systems, such as Linux or UNIX. The current Azure Storage Mover release supports migrations from NFS shares on a NAS or server device within your network to an Azure blob container only.
Unlike SMB, NFS doesn't utilize the ACL concept or user-based authentication. This difference allows NFS endpoints to be accessed without Azure Key Vault integration. In addition, Storage Mover processes metadata differently for both NFS mount sources and their blob container target counterparts. The following table identifies outcomes for common metadata encountered during migration:
| Metadata property | Outcome |
|---|---|
| Directory structure | Blob containers don't have a traditional file system, but instead support "virtual folders." The path of a file within a folder is prepended to the file name and placed in a flat list within the blob container. Empty folders are represented as an empty blob in the target container. As with files, the source folder's metadata is persisted in the custom metadata field of this blob. |
| Access permissions | Permissions on the source file are preserved in custom blob metadata but don't work as they did within the source. |
| Symbolic links | A target file is migrated if its symbolic link can be resolved. A symbolic link that can't be resolved is logged as a failed file. |
| Create timestamp | The original timestamp of the source file is preserved as custom blob metadata. The blob-native timestamp reflects the time at which the file was migrated. |
| Change timestamp | The original timestamp of the source file is preserved as custom blob metadata. There's no blob-native timestamp of this type. |
| Modified timestamp | The original timestamp of the source file is preserved as custom blob metadata. The blob-native timestamp reflects the time at which the file was migrated. |
| Last accessed timestamp | This timestamp is preserved as custom blob metadata if it exists on the source file. There's no blob-native timestamp of this type. |
| Other metadata | Other metadata is persisted in a custom metadata field of the target blob if it exists on source items. Only 4 KiB of metadata can be stored. Metadata of a larger size isn't migrated. |
Create an endpoint
Before you can create a job definition, you need to create endpoints for your source and target data sources.
Important
If you have not yet deployed a Storage Mover resource using the resource provider, you'll need to create your top level resource before attempting the steps in this example.
Azure Storage Mover supports migration scenarios using NFS and SMB protocols. The steps to create both endpoints are similar. The key differentiator between the creation of NFS- and SMB-enabled endpoints is the use of Azure Key Vault to store the shared credential for SMB resources. When a migration job is run, the agents use the shared credential stored within Key Vault. Access to Key Vault secrets are managed by granting an RBAC role assignment to the agent's managed identity.
Create a source endpoint
Source endpoints identify locations from which your data is migrated. Source endpoints are used to define the origin the data specified within your migration project. Azure Storage Mover handles source locations in the form of file shares. These locations might reside on Network Attached Storage (NAS), a server, or even on a workstation. Common protocols for file shares are SMB (Server Message Block) and NFS (Network File System).
The following steps describe the process of creating a source endpoint.
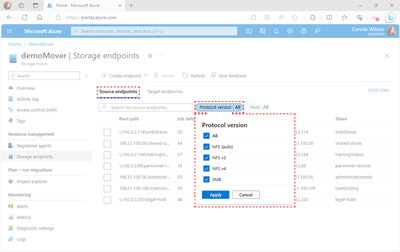
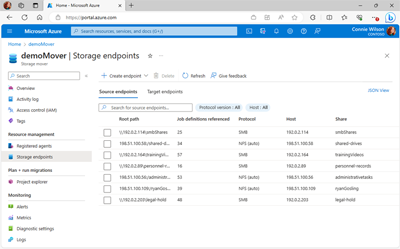
In the Azure portal, navigate to your Storage mover resource page. Select Storage endpoints from within the navigation pane to access your endpoints.
On the Storage endpoints page, the default Storage endpoints view displays the names of any provisioned source endpoints and a summary of their associated properties. You can select Target endpoints to view the corresponding destination endpoints. You can also filter the results further by selecting either the Protocol version or Host filter and selecting the appropriate option.
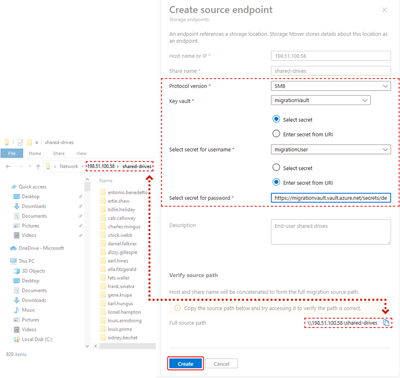
Select Create endpoint to expand the Endpoint type menu. Select Create source endpoint to open the Create source endpoint pane as shown in the following image.
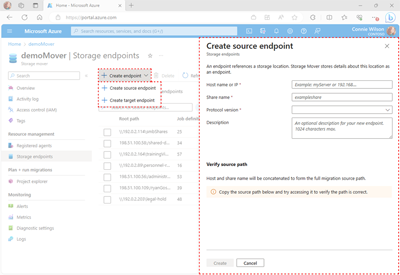
Within the Create source endpoint pane, provide values for the required Host name or IP and Share name values. The host name or IP address value must be either an IPv4 address, or fully qualified domain or host name.
Important
Depending on your DNS configuration, you may need to use your fully qualified domain name (FQDN) instead of your hostname.
You can also add an optional Description value of up to 1024 characters in length. Next, select Protocol version to expand the protocol selection menu and select the appropriate option for your source target.
Storage mover agents use secrets stored within Key Vault to connect to SMB endpoints. When you create an SMB source endpoint, you need to provide both the name of the Key Vault containing the secrets and the names of the secrets themselves.
First, select Key vault to expand the menu and select the name of the Key Vault containing your secrets. You can supply a value with which to filter the list of Key Vaults if necessary.
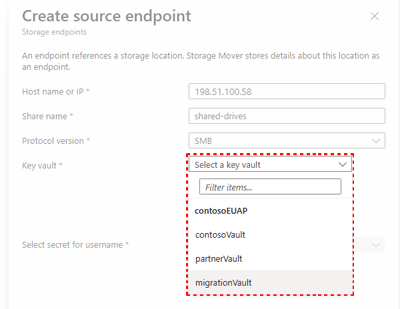
After you select the appropriate Key Vault, you can supply values for the required Select secret for username and Select secret for password fields. These values can be supplied by providing the URI to the secrets, or by selecting the secrets from a list. Select the Select secret button to enable the menu and select the username and password values. Alternatively, you can enable the Enter secret from URI option and supply the appropriate URI to the username and password secret.
The values for host and share name are concatenated to form the full migration source path. The path value is displayed in the Full source path field. Copy the path provided and verify that you're able to access it before committing your changes. Finally, after confirming that all values are correct and that you can access the source path, select Create to add your new endpoint.
Your new endpoint is deployed and now appears within the list of source endpoints as shown in the following sample image.


Create a target endpoint
Target endpoints identify locations to which your data is migrated. Azure offers various types of cloud storage. A fundamental aspect of file migrations to Azure is determining which Azure storage option is right for your data. The number of files and folders, their directory structure, access protocol, file fidelity and other aspects are important inputs into a complete cloud solution design.
If you need help with choosing the right Azure target storage for your cloud solution design, refer to the Cloud migration basics article.
The following steps describe the process of creating a target endpoint.
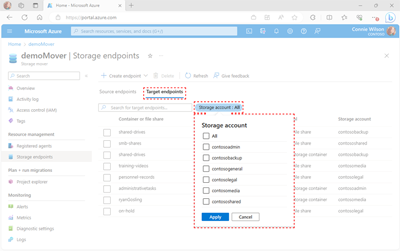
In the Azure portal, navigate to your Storage mover resource page. Select Storage endpoints from within the navigation pane to access your endpoints.
On the Storage endpoints page, the default Storage endpoints view displays the names of any provisioned source endpoints and a summary of their associated properties. Select Target endpoints to view the existing destination endpoints. You can filter the results further by selecting the Storage account filter and the appropriate option.
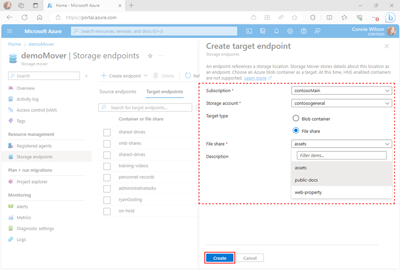
Select Create endpoint to expand the Endpoint type menu. Select Create target endpoint to open the Create target endpoint pane as shown in the following image.
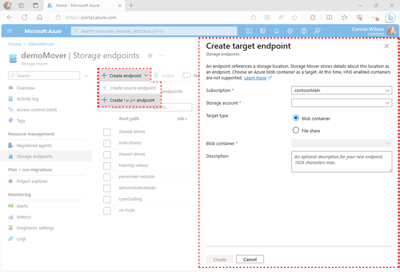
Within the Create target endpoint pane, select your subscription and destination storage account from within the Subscription and Storage account lists, respectively. Next, select the appropriate Target type option corresponding to your target endpoint.
The current Azure Storage Mover release supports full-fidelity migrations for specific source-target pair combinations. Always utilize the latest agent version to benefit from these supported sources and destinations:
Source protocol Target Comments SMB 2.x mount Azure file share (SMB) SMB 1.x sources and NFS Azure file shares are currently not supported. NFS 3 & 4 mount Azure blob storage container Containers with the "Hierarchical Namespace Service (HNS)" feature enabled, are supported and the ADLS Gen2 REST API set is used for migration. Depending on the target type you choose, select either your Blob container or your File share from the corresponding drop-down list. Finally, you can add an optional Description value for your target of up to 1024 characters in length and select Create to deploy your endpoint.


Your new endpoint is deployed and now appears within your list of endpoints as shown in the following example image.

View and edit an endpoint's properties
Depending on your use case, you might need to retrieve either a specific endpoint, or a complete list of all your endpoint resources. You might also need to add or edit an endpoint's description.
Follow the steps in this section to view endpoints accessible to your Storage Mover resource.
To create an endpoint using the Navigate to the Azure portal, navigate to the Storage mover resource page. Select Storage endpoints from within the navigation pane to access your endpoints as shown in the sample image.
On the Storage endpoints page, the default Storage endpoints view displays the names of any provisioned source endpoints and a summary of their associated properties. To view provisioned destination endpoint, select Target endpoints. You can filter the results further by selecting the Protocol or Host filters and the relevant option.
At this time, the Azure portal doesn't support the direct modification of provisioned endpoints. An endpoint's description, however, can be modified using Azure PowerShell by following this example. Endpoint resources that require updating within the Azure portal should be deleted and recreated.
Delete an endpoint
The removal of an endpoint resource should be a relatively rare occurrence in your production environment, though there might be occasions where it might be helpful. To delete a Storage Mover endpoint resource, follow the provided example.
Warning
Deleting an endpoint is a permanent action and cannot be undone. It's a good idea to ensure that you're prepared to delete the endpoint since you will not be able to restore it at a later time.
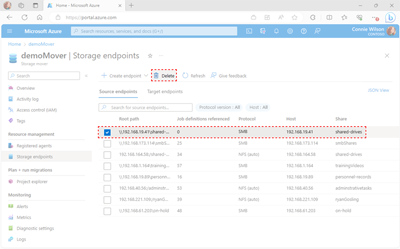
To delete an endpoint using the Azure portal, navigate to the Storage mover resource page. Select Storage endpoints from within the navigation pane to access your endpoints as indicated in the following image.
The default Source endpoints view displays the names of any provisioned source endpoints and a summary of their associated data. You can select the Destination endpoints filter to view the corresponding destination endpoints.
Locate the name of the endpoint you want to delete and select the corresponding checkbox. After verifying that you've selected the appropriate endpoint, select Delete as shown in the following image.
Your new endpoint is deleted and no longer appears within your list of endpoints as shown in the following example image.


Next steps
Create a project to collate the different source shares that need to be migrated together.
Feedback
Coming soon: Throughout 2024 we will be phasing out GitHub Issues as the feedback mechanism for content and replacing it with a new feedback system. For more information see: https://aka.ms/ContentUserFeedback.
Submit and view feedback for