Quickstart: Manage blobs with JavaScript v12 SDK in a browser
Azure Blob storage is optimized for storing large amounts of unstructured data. Blobs are objects that can hold text or binary data, including images, documents, streaming media, and archive data. In this quickstart, you learn to manage blobs by using JavaScript in a browser. You'll upload and list blobs, and you'll create and delete containers.
The example code shows you how to accomplish the following tasks with the Azure Blob storage client library for JavaScript:
- Declare fields for UI elements
- Add your storage account info
- Create client objects
- Create and delete a storage container
- List blobs
- Upload blobs
- Delete blobs
Additional resources:
API reference | Library source code | Package (npm) | Samples
Prerequisites
- An Azure account with an active subscription
- An Azure Storage account
- Node.js LTS
- Microsoft Visual Studio Code
Object model
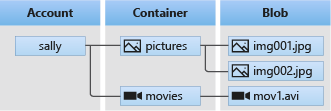
Blob storage offers three types of resources:
- The storage account
- A container in the storage account
- A blob in the container
The following diagram shows the relationship between these resources.
In this quickstart, you'll use the following JavaScript classes to interact with these resources:
- BlobServiceClient: The
BlobServiceClientclass allows you to manipulate Azure Storage resources and blob containers. - ContainerClient: The
ContainerClientclass allows you to manipulate Azure Storage containers and their blobs. - BlockBlobClient: The
BlockBlobClientclass allows you to manipulate Azure Storage blobs.
Configure storage account for browser access
To programmatically access your storage account from a web browser, you need to configure CORS access and create an SAS connection string.
Create a CORS rule
Before your web application can access blob storage from the client, you must configure your account to enable cross-origin resource sharing, or CORS.
In the Azure portal, select your storage account. To define a new CORS rule, navigate to the Settings section and select CORS. For this quickstart, you create a fully-open CORS rule:
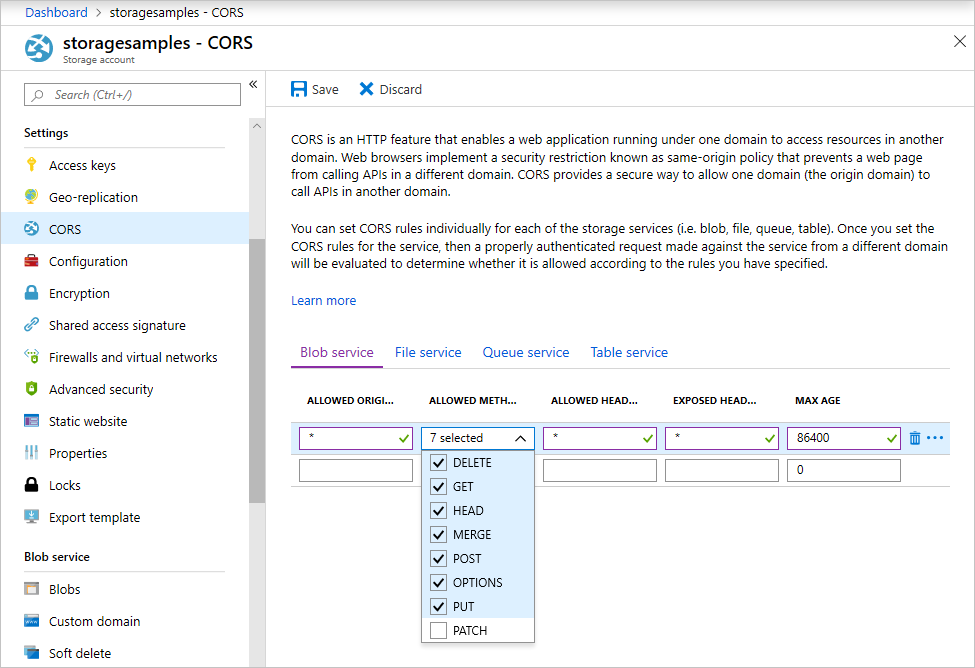
The following table describes each CORS setting and explains the values used to define the rule.
| Setting | Value | Description |
|---|---|---|
| ALLOWED ORIGINS | * | Accepts a comma-delimited list of domains set as acceptable origins. Setting the value to * allows all domains access to the storage account. |
| ALLOWED METHODS | DELETE, GET, HEAD, MERGE, POST, OPTIONS, and PUT | Lists the HTTP verbs allowed to execute against the storage account. For the purposes of this quickstart, select all available options. |
| ALLOWED HEADERS | * | Defines a list of request headers (including prefixed headers) allowed by the storage account. Setting the value to * allows all headers access. |
| EXPOSED HEADERS | * | Lists the allowed response headers by the account. Setting the value to * allows the account to send any header. |
| MAX AGE | 86400 | The maximum amount of time the browser caches the preflight OPTIONS request in seconds. A value of 86400 allows the cache to remain for a full day. |
After you fill in the fields with the values from this table, select the Save button.
Important
Ensure any settings you use in production expose the minimum amount of access necessary to your storage account to maintain secure access. The CORS settings described here are appropriate for a quickstart as it defines a lenient security policy. These settings, however, are not recommended for a real-world context.
Create a SAS connection string
The shared access signature (SAS) is used by code running in the browser to authorize Azure Blob storage requests. By using the SAS, the client can authorize access to storage resources without the account access key or connection string. For more information on SAS, see Using shared access signatures (SAS).
Follow these steps to get the Blob service SAS URL:
- In the Azure portal, select your storage account.
- Navigate to the Security + networking section and select Shared access signature.
- Review the Allowed services to understand the SAS token will have access to all of your storage account services:
- Blob
- File
- Queue
- Table
- Select the Allowed resources types to include:
- Service
- Container
- Object
- Review the Start and expiry date/time to understand the SAS token has a limited lifetime by default.
- Scroll down and select the Generate SAS and connection string button.
- Scroll down further and locate the Blob service SAS URL field
- Select the Copy to clipboard button at the far-right end of the Blob service SAS URL field.
- Save the copied URL somewhere for use in an upcoming step.
Note
The SAS token returned by the portal does not include the delimiter character ('?') for the URL query string. If you are appending the SAS token to a resource URL, remember to append the delimiter character to the resource URL before appending the SAS token.
Create the JavaScript project
Create a JavaScript application named blob-quickstart-v12.
In a console window (such as cmd, PowerShell, or Bash), create a new directory for the project.
mkdir blob-quickstart-v12Switch to the newly created blob-quickstart-v12 directory.
cd blob-quickstart-v12Create a package.json.
npm init -yOpen the project in Visual Studio Code:
code .
Install the npm package for blob storage
In a Visual Studio Code terminal, install the Azure Storage npm package:
npm install @azure/storage-blobInstall a bundler package to bundle the files and package for the browser:
npm install parcelIf you plan to use a different bundler, learn more about bundling the Azure SDK.
Configure browser bundling
In Visual Studio Code, open the package.json file and add a
browserlist. Thisbrowserlisttargets the latest version of popular browsers. The full package.json file should now look like this:"browserslist": [ "last 1 Edge version", "last 1 Chrome version", "last 1 Firefox version", "last 1 safari version", "last 1 webkit version" ],Add a start script to bundle the website:
"scripts": {
  "start": "parcel ./index.html"
},
Create the HTML file
Create
index.htmland add the following HTML code:<!-- index.html --> <!DOCTYPE html> <html> <body> <button id="create-container-button">Create container</button> <button id="select-button">Select and upload files</button> <input type="file" id="file-input" multiple style="display: none;" /> <button id="list-button">List files</button> <button id="delete-button">Delete selected files</button> <button id="delete-container-button">Delete container</button> <p><b>Status:</b></p> <p id="status" style="height:160px; width: 593px; overflow: scroll;" /> <p><b>Files:</b></p> <select id="file-list" multiple style="height:222px; width: 593px; overflow: scroll;" /> </body> <script type="module" src="./index.js"></script> </html>
Create the JavaScript file
From the project directory:
Create a new file named
index.js.Add the Azure Storage npm package.
const { BlobServiceClient } = require("@azure/storage-blob");
Declare fields for UI elements
Add DOM elements for user interaction:
const createContainerButton = document.getElementById("create-container-button");
const deleteContainerButton = document.getElementById("delete-container-button");
const selectButton = document.getElementById("select-button");
const fileInput = document.getElementById("file-input");
const listButton = document.getElementById("list-button");
const deleteButton = document.getElementById("delete-button");
const status = document.getElementById("status");
const fileList = document.getElementById("file-list");

const reportStatus = message => {
    status.innerHTML += `${message}<br/>`;
    status.scrollTop = status.scrollHeight;
}
This code declares fields for each HTML element and implements a reportStatus function to display output.
Add your storage account info
Add the following code at the end of the index.js file to access your storage account. Replace the <placeholder> with your Blob service SAS URL that you generated earlier. Add the following code to the end of the index.js file.
// Update <placeholder> with your Blob service SAS URL string
const blobSasUrl = "<placeholder>";
Create client objects
Create BlobServiceClient and ContainerClient objects to connect to your storage account. Add the following code to the end of the index.js file.
// Create a new BlobServiceClient
const blobServiceClient = new BlobServiceClient(blobSasUrl);

// Create a unique name for the container by
// appending the current time to the file name
const containerName = "container" + new Date().getTime();

// Get a container client from the BlobServiceClient
const containerClient = blobServiceClient.getContainerClient(containerName);
Create and delete a storage container
Create and delete the storage container when you select the corresponding button on the web page. Add the following code to the end of the index.js file.
const createContainer = async () => {
    try {
        reportStatus(`Creating container "${containerName}"...`);
        await containerClient.create();
        reportStatus(`Done. URL:${containerClient.url}`);
    } catch (error) {
        reportStatus(error.message);
    }
};

const deleteContainer = async () => {
    try {
        reportStatus(`Deleting container "${containerName}"...`);
        await containerClient.delete();
        reportStatus(`Done.`);
    } catch (error) {
        reportStatus(error.message);
    }
};

createContainerButton.addEventListener("click", createContainer);
deleteContainerButton.addEventListener("click", deleteContainer);
List blobs
List the contents of the storage container when you select the List files button. Add the following code to the end of the index.js file.
const listFiles = async () => {
    fileList.size = 0;
    fileList.innerHTML = "";
    try {
        reportStatus("Retrieving file list...");
        let iter = containerClient.listBlobsFlat();
        let blobItem = await iter.next();
        while (!blobItem.done) {
            fileList.size += 1;
            fileList.innerHTML += `<option>${blobItem.value.name}</option>`;


            blobItem = await iter.next();
        }
        if (fileList.size > 0) {
            reportStatus("Done.");
        } else {
            reportStatus("The container does not contain any files.");
        }
    } catch (error) {
        reportStatus(error.message);
    }
};

listButton.addEventListener("click", listFiles);
This code calls the ContainerClient.listBlobsFlat function, then uses an iterator to retrieve the name of each BlobItem returned. For each BlobItem, it updates the Files list with the name property value.
Upload blobs to a container
Upload files to the storage container when you select the Select and upload files button. Add the following code to the end of the index.js file.
const uploadFiles = async () => {
    try {
        reportStatus("Uploading files...");
        const promises = [];
        for (const file of fileInput.files) {
            const blockBlobClient = containerClient.getBlockBlobClient(file.name);
            promises.push(blockBlobClient.uploadBrowserData(file));
        }
        await Promise.all(promises);
        reportStatus("Done.");
        listFiles();
    }
    catch (error) {
            reportStatus(error.message);
    }
}

selectButton.addEventListener("click", () => fileInput.click());
fileInput.addEventListener("change", uploadFiles);
This code connects the Select and upload files button to the hidden file-input element. The button click event triggers the file input click event and displays the file picker. After you select files and close the dialog box, the input event occurs and the uploadFiles function is called. This function creates a BlockBlobClient object, then calls the browser-only uploadBrowserData function for each file you selected. Each call returns a Promise. Each Promise is added to a list so that they can all be awaited together, causing the files to upload in parallel.
Delete blobs
Delete files from the storage container when you select the Delete selected files button. Add the following code to the end of the index.js file.
const deleteFiles = async () => {
    try {
        if (fileList.selectedOptions.length > 0) {
            reportStatus("Deleting files...");
            for (const option of fileList.selectedOptions) {
                await containerClient.deleteBlob(option.text);
            }
            reportStatus("Done.");
            listFiles();
        } else {
            reportStatus("No files selected.");
        }
    } catch (error) {
        reportStatus(error.message);
    }
};

deleteButton.addEventListener("click", deleteFiles);
This code calls the ContainerClient.deleteBlob function to remove each file selected in the list. It then calls the listFiles function shown earlier to refresh the contents of the Files list.
Run the code
From a Visual Studio Code terminal, run the app.
npm startThis process bundles the files and starts a web server.
Access the web site with a browser using the following URL:
http://localhost:1234
Step 1: Create a container
- In the web app, select Create container. The status indicates that a container was created.
- In the Azure portal, verify your container was created. Select your storage account. Under Blob service, select Containers. Verify that the new container appears. (You may need to select Refresh.)
Step 2: Upload a blob to the container
- On your local computer, create and save a test file, such as test.txt.
- In the web app, select Select and upload files.
- Browse to your test file, and then select Open. The status indicates that the file was uploaded, and the file list was retrieved.
- In the Azure portal, select the name of the new container that you created earlier. Verify that the test file appears.
Step 3: Delete the blob
- In the web app, under Files, select the test file.
- Select Delete selected files. The status indicates that the file was deleted and that the container contains no files.
- In the Azure portal, select Refresh. Verify that you see No blobs found.
Step 4: Delete the container
- In the web app, select Delete container. The status indicates that the container was deleted.
- In the Azure portal, select the <account-name> | Containers link at the top-left of the portal pane.
- Select Refresh. The new container disappears.
- Close the web app.
Use the storage emulator
This quickstart created a container and blob on the Azure cloud. You can also use the Azure Blob storage npm package to create these resources locally on the Azure Storage emulator for development and testing.
Clean up resources
- When you're done with this quickstart, delete the
blob-quickstart-v12directory. - If you're done using your Azure Storage resource, remove your resource group using either method:
Next steps
In this quickstart, you learned how to upload, list, and delete blobs using JavaScript. You also learned how to create and delete a blob storage container.
For tutorials, samples, quickstarts, and other documentation, visit:
- To learn more, see the Azure Blob storage client library for JavaScript.
- To see Blob storage sample apps, continue to Azure Blob storage client library v12 JavaScript samples.
Feedback
Coming soon: Throughout 2024 we will be phasing out GitHub Issues as the feedback mechanism for content and replacing it with a new feedback system. For more information see: https://aka.ms/ContentUserFeedback.
Submit and view feedback for