Quickstart: Azure Blob Storage client library for Python
Note
The Build from scratch option walks you step by step through the process of creating a new project, installing packages, writing the code, and running a basic console app. This approach is recommended if you want to understand all the details involved in creating an app that connects to Azure Blob Storage. If you prefer to automate deployment tasks and start with a completed project, choose Start with a template.
Note
The Start with a template option uses the Azure Developer CLI to automate deployment tasks and starts you off with a completed project. This approach is recommended if you want to explore the code as quickly as possible without going through the setup tasks. If you prefer step by step instructions to build the app, choose Build from scratch.
Get started with the Azure Blob Storage client library for Python to manage blobs and containers.
In this article, you follow steps to install the package and try out example code for basic tasks.
In this article, you use the Azure Developer CLI to deploy Azure resources and run a completed console app with just a few commands.
API reference documentation | Library source code | Package (PyPi) | Samples
This video shows you how to start using the Azure Blob Storage client library for Python.
The steps in the video are also described in the following sections.
Prerequisites
- Azure account with an active subscription - create an account for free
- Azure Storage account - create a storage account
- Python 3.8+
- Azure subscription - create one for free
- Python 3.8+
- Azure Developer CLI
Setting up
This section walks you through preparing a project to work with the Azure Blob Storage client library for Python.
Create the project
Create a Python application named blob-quickstart.
In a console window (such as PowerShell or Bash), create a new directory for the project:
mkdir blob-quickstartSwitch to the newly created blob-quickstart directory:
cd blob-quickstart
Install the packages
From the project directory, install packages for the Azure Blob Storage and Azure Identity client libraries using the pip install command. The azure-identity package is needed for passwordless connections to Azure services.
pip install azure-storage-blob azure-identity
Set up the app framework
From the project directory, follow steps to create the basic structure of the app:
- Open a new text file in your code editor.
- Add
importstatements, create the structure for the program, and include basic exception handling, as shown below. - Save the new file as blob_quickstart.py in the blob-quickstart directory.
import os, uuid
from azure.identity import DefaultAzureCredential
from azure.storage.blob import BlobServiceClient, BlobClient, ContainerClient

try:
    print("Azure Blob Storage Python quickstart sample")

    # Quickstart code goes here

except Exception as ex:
    print('Exception:')
    print(ex)
With Azure Developer CLI installed, you can create a storage account and run the sample code with just a few commands. You can run the project in your local development environment, or in a DevContainer.
Initialize the Azure Developer CLI template and deploy resources
From an empty directory, follow these steps to initialize the azd template, provision Azure resources, and get started with the code:
Clone the quickstart repository assets from GitHub and initialize the template locally:
azd init --template blob-storage-quickstart-pythonYou'll be prompted for the following information:
- Environment name: This value is used as a prefix for all Azure resources created by Azure Developer CLI. The name must be unique across all Azure subscriptions and must be between 3 and 24 characters long. The name can contain numbers and lowercase letters only.
Log in to Azure:
azd auth loginProvision and deploy the resources to Azure:
azd upYou'll be prompted for the following information:
- Subscription: The Azure subscription that your resources are deployed to.
- Location: The Azure region where your resources are deployed.
The deployment might take a few minutes to complete. The output from the
azd upcommand includes the name of the newly created storage account, which you'll need later to run the code.
Run the sample code
At this point, the resources are deployed to Azure and the code is almost ready to run. Follow these steps to install packages, update the name of the storage account in the code, and run the sample console app:
- Install packages: In the local directory, install packages for the Azure Blob Storage and Azure Identity client libraries using the following command:
pip install azure-storage-blob azure-identity - Update the storage account name: In the local directory, edit the file named blob_quickstart.py. Find the
<storage-account-name>placeholder and replace it with the actual name of the storage account created by theazd upcommand. Save the changes. - Run the project: Execute the following command to run the app:
python blob_quickstart.py. - Observe the output: This app creates a test file in your local data folder and uploads it to a container in the storage account. The example then lists the blobs in the container and downloads the file with a new name so that you can compare the old and new files.
To learn more about how the sample code works, see Code examples.
When you're finished testing the code, see the Clean up resources section to delete the resources created by the azd up command.
Object model
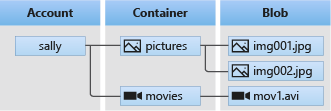
Azure Blob Storage is optimized for storing massive amounts of unstructured data. Unstructured data is data that doesn't adhere to a particular data model or definition, such as text or binary data. Blob storage offers three types of resources:
- The storage account
- A container in the storage account
- A blob in the container
The following diagram shows the relationship between these resources:
Use the following Python classes to interact with these resources:
- BlobServiceClient: The
BlobServiceClientclass allows you to manipulate Azure Storage resources and blob containers. - ContainerClient: The
ContainerClientclass allows you to manipulate Azure Storage containers and their blobs. - BlobClient: The
BlobClientclass allows you to manipulate Azure Storage blobs.
Code examples
These example code snippets show you how to do the following tasks with the Azure Blob Storage client library for Python:
- Authenticate to Azure and authorize access to blob data
- Create a container
- Upload blobs to a container
- List the blobs in a container
- Download blobs
- Delete a container
Note
The Azure Developer CLI template includes a file with sample code already in place. The following examples provide detail for each part of the sample code. The template implements the recommended passwordless authentication method, as described in the Authenticate to Azure section. The connection string method is shown as an alternative, but isn't used in the template and isn't recommended for production code.
Authenticate to Azure and authorize access to blob data
Application requests to Azure Blob Storage must be authorized. Using the DefaultAzureCredential class provided by the Azure Identity client library is the recommended approach for implementing passwordless connections to Azure services in your code, including Blob Storage.
You can also authorize requests to Azure Blob Storage by using the account access key. However, this approach should be used with caution. Developers must be diligent to never expose the access key in an unsecure location. Anyone who has the access key is able to authorize requests against the storage account, and effectively has access to all the data. DefaultAzureCredential offers improved management and security benefits over the account key to allow passwordless authentication. Both options are demonstrated in the following example.
DefaultAzureCredential supports multiple authentication methods and determines which method should be used at runtime. This approach enables your app to use different authentication methods in different environments (local vs. production) without implementing environment-specific code.
The order and locations in which DefaultAzureCredential looks for credentials can be found in the Azure Identity library overview.
For example, your app can authenticate using your Azure CLI sign-in credentials with when developing locally. Your app can then use a managed identity once it has been deployed to Azure. No code changes are required for this transition.
Assign roles to your Microsoft Entra user account
When developing locally, make sure that the user account that is accessing blob data has the correct permissions. You'll need Storage Blob Data Contributor to read and write blob data. To assign yourself this role, you'll need to be assigned the User Access Administrator role, or another role that includes the Microsoft.Authorization/roleAssignments/write action. You can assign Azure RBAC roles to a user using the Azure portal, Azure CLI, or Azure PowerShell. You can learn more about the available scopes for role assignments on the scope overview page.
In this scenario, you'll assign permissions to your user account, scoped to the storage account, to follow the Principle of Least Privilege. This practice gives users only the minimum permissions needed and creates more secure production environments.
The following example will assign the Storage Blob Data Contributor role to your user account, which provides both read and write access to blob data in your storage account.
Important
In most cases it will take a minute or two for the role assignment to propagate in Azure, but in rare cases it may take up to eight minutes. If you receive authentication errors when you first run your code, wait a few moments and try again.
In the Azure portal, locate your storage account using the main search bar or left navigation.
On the storage account overview page, select Access control (IAM) from the left-hand menu.
On the Access control (IAM) page, select the Role assignments tab.
Select + Add from the top menu and then Add role assignment from the resulting drop-down menu.
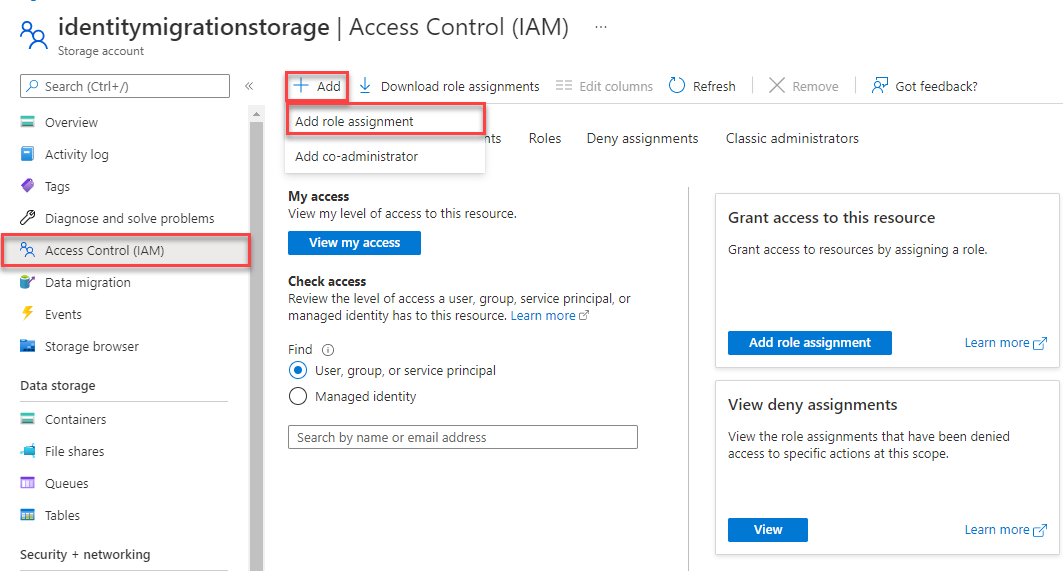
Use the search box to filter the results to the desired role. For this example, search for Storage Blob Data Contributor and select the matching result and then choose Next.
Under Assign access to, select User, group, or service principal, and then choose + Select members.
In the dialog, search for your Microsoft Entra username (usually your user@domain email address) and then choose Select at the bottom of the dialog.
Select Review + assign to go to the final page, and then Review + assign again to complete the process.

Sign in and connect your app code to Azure using DefaultAzureCredential
You can authorize access to data in your storage account using the following steps:
Make sure you're authenticated with the same Microsoft Entra account you assigned the role to on your storage account. You can authenticate via the Azure CLI, Visual Studio Code, or Azure PowerShell.
Sign-in to Azure through the Azure CLI using the following command:
az loginTo use
DefaultAzureCredential, make sure that the azure-identity package is installed, and the class is imported:from azure.identity import DefaultAzureCredential from azure.storage.blob import BlobServiceClientAdd this code inside the
tryblock. When the code runs on your local workstation,DefaultAzureCredentialuses the developer credentials of the prioritized tool you're logged into to authenticate to Azure. Examples of these tools include Azure CLI or Visual Studio Code.account_url = "https://<storageaccountname>.blob.core.windows.net" default_credential = DefaultAzureCredential() # Create the BlobServiceClient object blob_service_client = BlobServiceClient(account_url, credential=default_credential)Make sure to update the storage account name in the URI of your
BlobServiceClientobject. The storage account name can be found on the overview page of the Azure portal.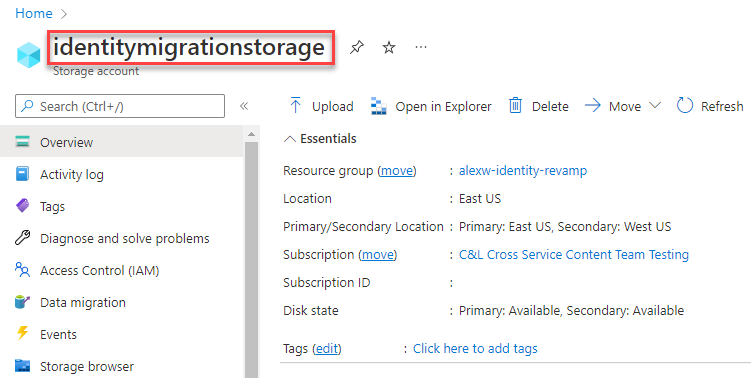
Note
When deployed to Azure, this same code can be used to authorize requests to Azure Storage from an application running in Azure. However, you'll need to enable managed identity on your app in Azure. Then configure your storage account to allow that managed identity to connect. For detailed instructions on configuring this connection between Azure services, see the Auth from Azure-hosted apps tutorial.
Create a container
Create a new container in your storage account by calling the create_container method on the blob_service_client object. In this example, the code appends a GUID value to the container name to ensure that it's unique.
Add this code to the end of the try block:
# Create a unique name for the container
container_name = str(uuid.uuid4())

# Create the container
container_client = blob_service_client.create_container(container_name)
To learn more about creating a container, and to explore more code samples, see Create a blob container with Python.
Important
Container names must be lowercase. For more information about naming containers and blobs, see Naming and Referencing Containers, Blobs, and Metadata.
Upload blobs to a container
Upload a blob to a container using upload_blob. The example code creates a text file in the local data directory to upload to the container.
Add this code to the end of the try block:
# Create a local directory to hold blob data
local_path = "./data"
os.mkdir(local_path)

# Create a file in the local data directory to upload and download
local_file_name = str(uuid.uuid4()) + ".txt"
upload_file_path = os.path.join(local_path, local_file_name)

# Write text to the file
file = open(file=upload_file_path, mode='w')
file.write("Hello, World!")
file.close()

# Create a blob client using the local file name as the name for the blob
blob_client = blob_service_client.get_blob_client(container=container_name, blob=local_file_name)

print("\nUploading to Azure Storage as blob:\n\t" + local_file_name)

# Upload the created file
with open(file=upload_file_path, mode="rb") as data:
    blob_client.upload_blob(data)
To learn more about uploading blobs, and to explore more code samples, see Upload a blob with Python.
List the blobs in a container
List the blobs in the container by calling the list_blobs method. In this case, only one blob has been added to the container, so the listing operation returns just that one blob.
Add this code to the end of the try block:
print("\nListing blobs...")

# List the blobs in the container
blob_list = container_client.list_blobs()
for blob in blob_list:
    print("\t" + blob.name)
To learn more about listing blobs, and to explore more code samples, see List blobs with Python.
Download blobs
Download the previously created blob by calling the download_blob method. The example code adds a suffix of "DOWNLOAD" to the file name so that you can see both files in local file system.
Add this code to the end of the try block:
# Download the blob to a local file
# Add 'DOWNLOAD' before the .txt extension so you can see both files in the data directory
download_file_path = os.path.join(local_path, str.replace(local_file_name ,'.txt', 'DOWNLOAD.txt'))
container_client = blob_service_client.get_container_client(container= container_name)
print("\nDownloading blob to \n\t" + download_file_path)

with open(file=download_file_path, mode="wb") as download_file:
 download_file.write(container_client.download_blob(blob.name).readall())
To learn more about downloading blobs, and to explore more code samples, see Download a blob with Python.
Delete a container
The following code cleans up the resources the app created by removing the entire container using the delete_container method. You can also delete the local files, if you like.
The app pauses for user input by calling input() before it deletes the blob, container, and local files. Verify that the resources were created correctly before they're deleted.
Add this code to the end of the try block:
# Clean up
print("\nPress the Enter key to begin clean up")
input()

print("Deleting blob container...")
container_client.delete_container()

print("Deleting the local source and downloaded files...")
os.remove(upload_file_path)
os.remove(download_file_path)
os.rmdir(local_path)

print("Done")
To learn more about deleting a container, and to explore more code samples, see Delete and restore a blob container with Python.
Run the code
This app creates a test file in your local folder and uploads it to Azure Blob Storage. The example then lists the blobs in the container, and downloads the file with a new name. You can compare the old and new files.
Navigate to the directory containing the blob_quickstart.py file, then execute the following python command to run the app:
python blob_quickstart.py
The output of the app is similar to the following example (UUID values omitted for readability):
Azure Blob Storage Python quickstart sample

Uploading to Azure Storage as blob:
        quickstartUUID.txt

Listing blobs...
        quickstartUUID.txt

Downloading blob to
        ./data/quickstartUUIDDOWNLOAD.txt

Press the Enter key to begin clean up

Deleting blob container...
Deleting the local source and downloaded files...
Done
Before you begin the cleanup process, check your data folder for the two files. You can compare them and observe that they're identical.
Clean up resources
After you've verified the files and finished testing, press the Enter key to delete the test files along with the container you created in the storage account. You can also use Azure CLI to delete resources.
When you're done with the quickstart, you can clean up the resources you created by running the following command:
azd down
You'll be prompted to confirm the deletion of the resources. Enter y to confirm.
Next steps
In this quickstart, you learned how to upload, download, and list blobs using Python.
To see Blob storage sample apps, continue to:
- To learn more, see the Azure Blob Storage client libraries for Python.
- For tutorials, samples, quickstarts, and other documentation, visit Azure for Python Developers.
Feedback
Coming soon: Throughout 2024 we will be phasing out GitHub Issues as the feedback mechanism for content and replacing it with a new feedback system. For more information see: https://aka.ms/ContentUserFeedback.
Submit and view feedback for