How to Attach a Data Disk to a Linux Virtual Machine
Important
Classic VMs will be retired on March 1, 2023.
If you use IaaS resources from ASM, please complete your migration by March 1, 2023. We encourage you to make the switch sooner to take advantage of the many feature enhancements in Azure Resource Manager.
For more information, see Migrate your IaaS resources to Azure Resource Manager by March 1, 2023.
Note
Azure has two different deployment models for creating and working with resources: Resource Manager and Classic. This article covers using the Classic deployment model. Microsoft recommends that most new deployments use the Resource Manager model. See how to attach a data disk using the Resource Manager deployment model.
You can attach both empty disks and disks that contain data to your Azure VMs. Both types of disks are .vhd files that reside in an Azure storage account. As with adding any disk to a Linux machine, after you attach the disk you need to initialize and format it so it's ready for use. This article details attaching both empty disks and disks already containing data to your VMs, as well as how to then initialize and format a new disk.
Note
It's a best practice to use one or more separate disks to store a virtual machine's data. When you create an Azure virtual machine, it has an operating system disk and a temporary disk. Do not use the temporary disk to store persistent data. As the name implies, it provides temporary storage only. It offers no redundancy or backup because it doesn't reside in Azure storage.
The temporary disk is typically managed by the Azure Linux Agent and automatically mounted to /mnt/resource (or /mnt on Ubuntu images). On the other hand, a data disk might be named by the Linux kernel something like /dev/sdc, and you need to partition, format, and mount this resource. See the Azure Linux Agent User Guide for details.
For more information about disks, see About Disks and VHDs for Virtual Machines.
Attach an empty disk
Open Azure classic CLI and connect to your Azure subscription. Make sure you are in Azure Service Management mode (
azure config mode asm).Enter
azure vm disk attach-newto create and attach a new disk as shown in the following example. Replace myVM with the name of your Linux Virtual Machine and specify the size of the disk in GB, which is 100GB in this example:azure vm disk attach-new myVM 100After the data disk is created and attached, it's listed in the output of
azure vm disk list <virtual-machine-name>as shown in the following example:azure vm disk list TestVMThe output is similar to the following example:
info:    Executing command vm disk list

* Fetching disk images
* Getting virtual machines
* Getting VM disks
 data:    Lun  Size(GB)  Blob-Name                         OS
 data:    ---  --------  --------------------------------  -----
 data:         30        myVM-2645b8030676c8f8.vhd  Linux
 data:    0    100       myVM-76f7ee1ef0f6dddc.vhd
 info:    vm disk list command OK
Attach an existing disk
Attaching an existing disk requires that you have a .vhd available in a storage account.
Open Azure classic CLI and connect to your Azure subscription. Make sure you are in Azure Service Management mode (
azure config mode asm).Check if the VHD you want to attach is already uploaded to your Azure subscription:
azure vm disk listThe output is similar to the following example:
 info:    Executing command vm disk list

* Fetching disk images
 data:    Name                                          OS
 data:    --------------------------------------------  -----
 data:    myTestVhd                                     Linux
 data:    TestVM-ubuntuVMasm-0-201508060029150744  Linux
 data:    TestVM-ubuntuVMasm-0-201508060040530369
 info:    vm disk list command OK
If you don't find the disk that you want to use, you may upload a local VHD to your subscription by using
azure vm disk createorazure vm disk upload. An example ofdisk createwould be as in the following example:azure vm disk create myVhd .\TempDisk\test.VHD -l "East US" -o LinuxThe output is similar to the following example:
info:    Executing command vm disk create
+ Retrieving storage accounts
info:    VHD size : 10 GB
info:    Uploading 10485760.5 KB
Requested:100.0% Completed:100.0% Running:   0 Time:   25s Speed:    82 KB/s
info:    Finishing computing MD5 hash, 16% is complete.
info:    https://mystorageaccount.blob.core.windows.net/disks/myVHD.vhd was
uploaded successfully
info:    vm disk create command OK
You may also use
azure vm disk uploadto upload a VHD to a specific storage account. Read more about the commands to manage your Azure virtual machine data disks over here.Now you attach the desired VHD to your virtual machine:
azure vm disk attach myVM myVhdMake sure to replace myVM with the name of your virtual machine, and myVHD with your desired VHD.
You can verify the disk is attached to the virtual machine with
azure vm disk list <virtual-machine-name>:azure vm disk list myVMThe output is similar to the following example:
 info:    Executing command vm disk list

* Fetching disk images
* Getting virtual machines
* Getting VM disks
 data:    Lun  Size(GB)  Blob-Name                         OS
 data:    ---  --------  --------------------------------  -----
 data:         30        TestVM-2645b8030676c8f8.vhd  Linux
 data:    1    10        test.VHD
 data:    0    100        TestVM-76f7ee1ef0f6dddc.vhd
 info:    vm disk list command OK
Note
After you add a data disk, you'll need to log on to the virtual machine and initialize the disk so the virtual machine can use the disk for storage (see the following steps for more information on how to do initialize the disk).
Initialize a new data disk in Linux
SSH to your VM. For more information, see How to log on to a virtual machine running Linux.
Next you need to find the device identifier for the data disk to initialize. There are two ways to do that:
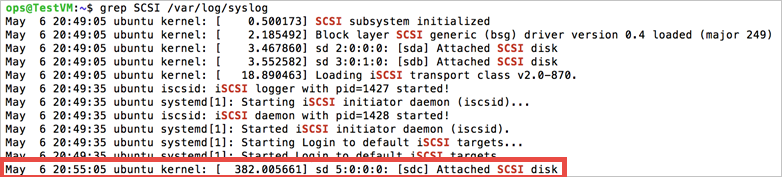
a) Grep for SCSI devices in the logs, such as in the following command:
sudo grep SCSI /var/log/messagesFor recent Ubuntu distributions, you may need to use
sudo grep SCSI /var/log/syslogbecause logging to/var/log/messagesmight be disabled by default.You can find the identifier of the last data disk that was added in the messages that are displayed.
OR
b) Use the
lsscsicommand to find out the device id.lsscsican be installed by eitheryum install lsscsi(on Red Hat based distributions) orapt-get install lsscsi(on Debian based distributions). You can find the disk you are looking for by its lun or logical unit number. For example, the lun for the disks you attached can be easily seen fromazure vm disk list <virtual-machine>as:azure vm disk list myVMThe output is similar to the following:
info:    Executing command vm disk list
+ Fetching disk images
+ Getting virtual machines
+ Getting VM disks
data:    Lun  Size(GB)  Blob-Name                         OS
data:    ---  --------  --------------------------------  -----
data:         30        myVM-2645b8030676c8f8.vhd  Linux
data:    0    100       myVM-76f7ee1ef0f6dddc.vhd
info:    vm disk list command OK
Compare this data with the output of
lsscsifor the same sample virtual machine:[1:0:0:0] cd/dvd Msft Virtual CD/ROM 1.0 /dev/sr0 [2:0:0:0] disk Msft Virtual Disk 1.0 /dev/sda [3:0:1:0] disk Msft Virtual Disk 1.0 /dev/sdb [5:0:0:0] disk Msft Virtual Disk 1.0 /dev/sdcThe last number in the tuple in each row is the lun. See
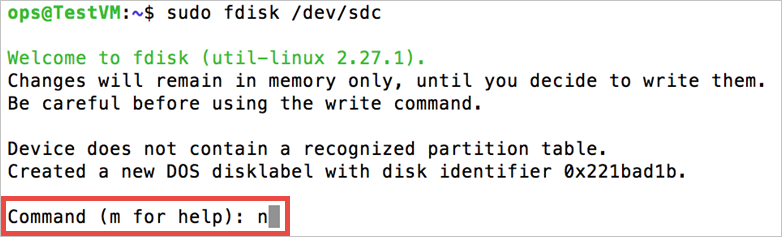
man lsscsifor more information.At the prompt, type the following command to create your device:
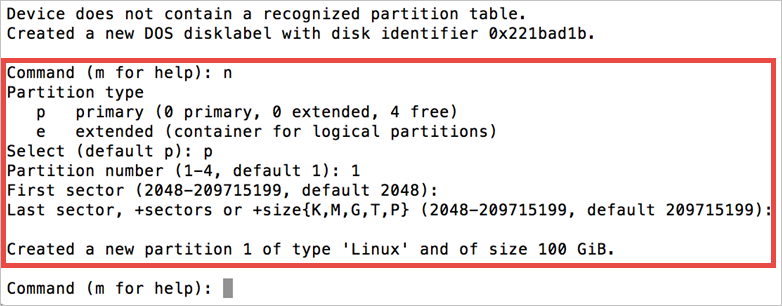
sudo fdisk /dev/sdcWhen prompted, type n to create a partition.
When prompted, type p to make the partition the primary partition. Type 1 to make it the first partition, and then type enter to accept the default value for the cylinder. On some systems, it can show the default values of the first and the last sectors, instead of the cylinder. You can choose to accept these defaults.
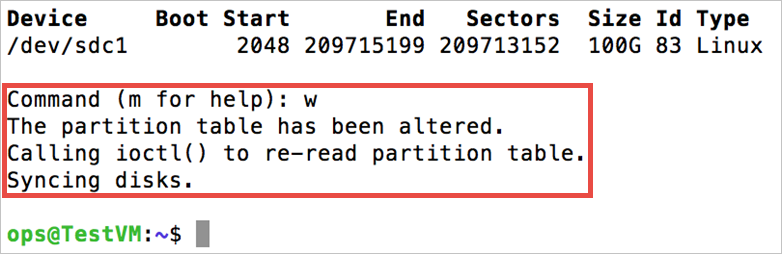
Type p to see the details about the disk that is being partitioned.
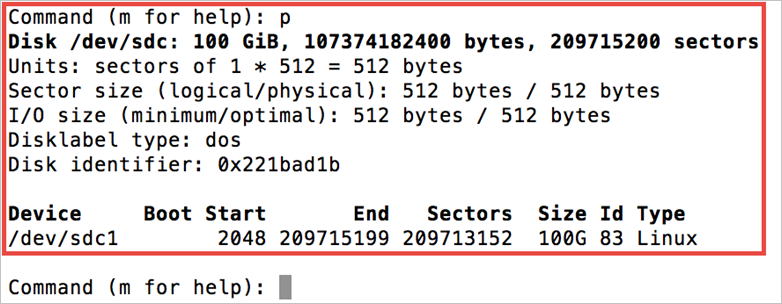
Type w to write the settings for the disk.
Now you can create the file system on the new partition. Append the partition number to the device ID (in the following example
/dev/sdc1). The following example creates an ext4 partition on /dev/sdc1:sudo mkfs -t ext4 /dev/sdc1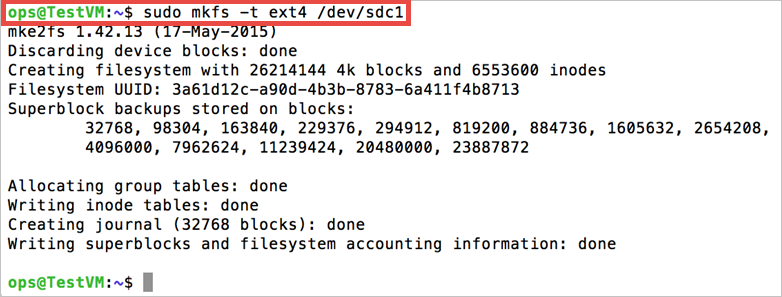
Note
SuSE Linux Enterprise 11 systems only support read-only access for ext4 file systems. For these systems, it is recommended to format the new file system as ext3 rather than ext4.
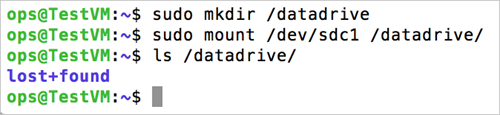
Make a directory to mount the new file system, as follows:
sudo mkdir /datadriveFinally you can mount the drive, as follows:
sudo mount /dev/sdc1 /datadriveThe data disk is now ready to use as /datadrive.
Add the new drive to /etc/fstab:
To ensure the drive is remounted automatically after a reboot it must be added to the /etc/fstab file. In addition, it is highly recommended that the UUID (Universally Unique IDentifier) is used in /etc/fstab to refer to the drive rather than just the device name (i.e. /dev/sdc1). Using the UUID avoids the incorrect disk being mounted to a given location if the OS detects a disk error during boot and any remaining data disks then being assigned those device IDs. To find the UUID of the new drive, you can use the blkid utility:
sudo -i blkidThe output looks similar to the following example:
/dev/sda1: UUID="11111111-1b1b-1c1c-1d1d-1e1e1e1e1e1e" TYPE="ext4"
/dev/sdb1: UUID="22222222-2b2b-2c2c-2d2d-2e2e2e2e2e2e" TYPE="ext4"
/dev/sdc1: UUID="33333333-3b3b-3c3c-3d3d-3e3e3e3e3e3e" TYPE="ext4"
Note
Improperly editing the /etc/fstab file could result in an unbootable system. If unsure, refer to the distribution's documentation for information on how to properly edit this file. It is also recommended that a backup of the /etc/fstab file is created before editing.
Next, open the /etc/fstab file in a text editor:
sudo vi /etc/fstabIn this example, we use the UUID value for the new /dev/sdc1 device that was created in the previous steps, and the mountpoint /datadrive. Add the following line to the end of the /etc/fstab file:
UUID=33333333-3b3b-3c3c-3d3d-3e3e3e3e3e3e /datadrive ext4 defaults,nofail 1 2Or, on systems based on SuSE Linux you may need to use a slightly different format:
/dev/disk/by-uuid/33333333-3b3b-3c3c-3d3d-3e3e3e3e3e3e /datadrive ext3 defaults,nofail 1 2Note
The
nofailoption ensures that the VM starts even if the filesystem is corrupt or the disk does not exist at boot time. Without this option, you may encounter behavior as described in Cannot SSH to Linux VM due to FSTAB errors.You can now test that the file system is mounted properly by unmounting and then remounting the file system, i.e. using the example mount point
/datadrivecreated in the earlier steps:sudo umount /datadrive sudo mount /datadriveIf the
mountcommand produces an error, check the /etc/fstab file for correct syntax. If additional data drives or partitions are created, enter them into /etc/fstab separately as well.Make the drive writable by using this command:
sudo chmod go+w /datadriveNote
Subsequently removing a data disk without editing fstab could cause the VM to fail to boot. If this is a common occurrence, most distributions provide either the
nofailand/ornobootwaitfstab options that allow a system to boot even if the disk fails to mount at boot time. Consult your distribution's documentation for more information on these parameters.
TRIM/UNMAP support for Linux in Azure
Some Linux kernels support TRIM/UNMAP operations to discard unused blocks on the disk. These operations are primarily useful in standard storage to inform Azure that deleted pages are no longer valid and can be discarded. Discarding pages can save cost if you create large files and then delete them.
There are two ways to enable TRIM support in your Linux VM. As usual, consult your distribution for the recommended approach:
Use the
discardmount option in/etc/fstab, for example:UUID=33333333-3b3b-3c3c-3d3d-3e3e3e3e3e3e /datadrive ext4 defaults,discard 1 2In some cases the
discardoption may have performance implications. Alternatively, you can run thefstrimcommand manually from the command line, or add it to your crontab to run regularly:Ubuntu
sudo apt-get install util-linux
sudo fstrim /datadrive
RHEL/CentOS
sudo yum install util-linux
sudo fstrim /datadrive
Troubleshooting
When adding data disks to a Linux VM, you may encounter errors if a disk does not exist at LUN 0. If you are adding a disk manually using the azure vm disk attach-new command and you specify a LUN (--lun) rather than allowing the Azure platform to determine the appropriate LUN, take care that a disk already exists / will exist at LUN 0.
Consider the following example showing a snippet of the output from lsscsi:
[5:0:0:0]    disk    Msft     Virtual Disk     1.0   /dev/sdc
[5:0:0:1]    disk    Msft     Virtual Disk     1.0   /dev/sdd
The two data disks exist at LUN 0 and LUN 1 (the first column in the lsscsi output details [host:channel:target:lun]). Both disks should be accessible from within the VM. If you had manually specified the first disk to be added at LUN 1 and the second disk at LUN 2, you may not see the disks correctly from within your VM.
Note
The Azure host value is 5 in these examples, but this may vary depending on the type of storage you select.
This disk behavior is not an Azure problem, but the way in which the Linux kernel follows the SCSI specifications. When the Linux kernel scans the SCSI bus for attached devices, a device must be found at LUN 0 in order for the system to continue scanning for additional devices. As such:
- Review the output of
lsscsiafter adding a data disk to verify that you have a disk at LUN 0. - If your disk does not show up correctly within your VM, verify a disk exists at LUN 0.
Next Steps
You can read more about using your Linux VM in the following articles: