Tutorial: Create and manage Azure virtual networks for Linux virtual machines with the Azure CLI
Applies to: ✔️ Linux VMs ✔️ Flexible scale sets
Azure virtual machines use Azure networking for internal and external network communication. This tutorial walks through deploying two virtual machines and configuring Azure networking for these VMs. The examples in this tutorial assume that the VMs are hosting a web application with a database back-end, however an application is not deployed in the tutorial. In this tutorial, you learn how to:
- Create a virtual network and subnet
- Create a public IP address
- Create a front-end VM
- Secure network traffic
- Create a back-end VM
This tutorial uses the CLI within the Azure Cloud Shell, which is constantly updated to the latest version. To open the Cloud Shell, select Try it from the top of any code block.
If you choose to install and use the CLI locally, this tutorial requires that you are running the Azure CLI version 2.0.30 or later. Run az --version to find the version. If you need to install or upgrade, see Install Azure CLI.
VM networking overview
Azure virtual networks enable secure network connections between virtual machines, the internet, and other Azure services such as Azure SQL Database. Virtual networks are broken down into logical segments called subnets. Subnets are used to control network flow, and as a security boundary. When deploying a VM, it generally includes a virtual network interface, which is attached to a subnet.
As you complete the tutorial, the following virtual network resources are created:
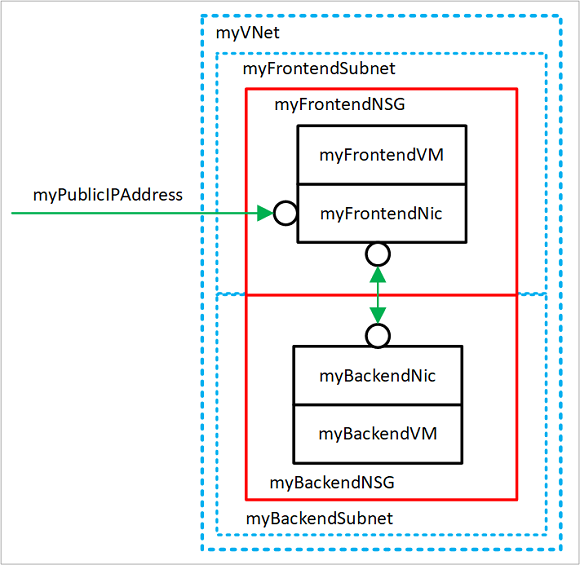
- myVNet - The virtual network that the VMs use to communicate with each other and the internet.
- myFrontendSubnet - The subnet in myVNet used by the front-end resources.
- myPublicIPAddress - The public IP address used to access myFrontendVM from the internet.
- myFrontentNic - The network interface used by myFrontendVM to communicate with myBackendVM.
- myFrontendVM - The VM used to communicate between the internet and myBackendVM.
- myBackendNSG - The network security group that controls communication between the myFrontendVM and myBackendVM.
- myBackendSubnet - The subnet associated with myBackendNSG and used by the back-end resources.
- myBackendNic - The network interface used by myBackendVM to communicate with myFrontendVM.
- myBackendVM - The VM that uses port 22 and 3306 to communicate with myFrontendVM.
Create a virtual network and subnet
For this tutorial, a single virtual network is created with two subnets. A front-end subnet for hosting a web application, and a back-end subnet for hosting a database server.
Before you can create a virtual network, create a resource group with az group create. The following example creates a resource group named myRGNetwork in the eastus location.
az group create --name myRGNetwork --location eastus
Create virtual network
Use the az network vnet create command to create a virtual network. In this example, the network is named mvVNet and is given an address prefix of 10.0.0.0/16. A subnet is also created with a name of myFrontendSubnet and a prefix of 10.0.1.0/24. Later in this tutorial a front-end VM is connected to this subnet.
az network vnet create \
  --resource-group myRGNetwork \
  --name myVNet \
  --address-prefix 10.0.0.0/16 \
  --subnet-name myFrontendSubnet \
  --subnet-prefix 10.0.1.0/24
Create subnet
A new subnet is added to the virtual network using the az network vnet subnet create command. In this example, the subnet is named myBackendSubnet and is given an address prefix of 10.0.2.0/24. This subnet is used with all back-end services.
az network vnet subnet create \
  --resource-group myRGNetwork \
  --vnet-name myVNet \
  --name myBackendSubnet \
  --address-prefix 10.0.2.0/24
At this point, a network has been created and segmented into two subnets, one for front-end services, and another for back-end services. In the next section, virtual machines are created and connected to these subnets.
Create a public IP address
A public IP address allows Azure resources to be accessible on the internet. The allocation method of the public IP address can be configured as dynamic or static. By default, a public IP address is dynamically allocated. Dynamic IP addresses are released when a VM is deallocated. This behavior causes the IP address to change during any operation that includes a VM deallocation.
The allocation method can be set to static, which ensures that the IP address remains assigned to a VM, even during a deallocated state. When using a statically allocated IP address, the IP address itself cannot be specified. Instead, it is allocated from a pool of available addresses.
az network public-ip create --resource-group myRGNetwork --name myPublicIPAddress
When creating a VM with the az vm create command, the default public IP address allocation method is dynamic. When creating a virtual machine using the az vm create command, include the --public-ip-address-allocation static argument to assign a static public IP address. This operation is not demonstrated in this tutorial, however in the next section a dynamically allocated IP address is changed to a statically allocated address.
Change allocation method
The IP address allocation method can be changed using the az network public-ip update command. In this example, the IP address allocation method of the front-end VM is changed to static.
First, deallocate the VM.
az vm deallocate --resource-group myRGNetwork --name myFrontendVM
Use the az network public-ip update command to update the allocation method. In this case, the --allocation-method is being set to static.
az network public-ip update --resource-group myRGNetwork --name myPublicIPAddress --allocation-method static
Start the VM.
az vm start --resource-group myRGNetwork --name myFrontendVM --no-wait
No public IP address
Often, a VM does not need to be accessible over the internet. To create a VM without a public IP address, use the --public-ip-address "" argument with an empty set of double quotes. This configuration is demonstrated later in this tutorial.
Create a front-end VM
Use the az vm create command to create the VM named myFrontendVM using myPublicIPAddress.
az vm create \
  --resource-group myRGNetwork \
  --name myFrontendVM \
  --vnet-name myVNet \
  --subnet myFrontendSubnet \
  --nsg myFrontendNSG \
  --public-ip-address myPublicIPAddress \
  --image Ubuntu2204 \
  --generate-ssh-keys
Secure network traffic
A network security group (NSG) contains a list of security rules that allow or deny network traffic to resources connected to Azure Virtual Networks (VNet). NSGs can be associated to subnets or individual network interfaces. When an NSG is associated with a network interface, it applies only the associated VM. When an NSG is associated to a subnet, the rules apply to all resources connected to the subnet.
Network security group rules
NSG rules define networking ports over which traffic is allowed or denied. The rules can include source and destination IP address ranges so that traffic is controlled between specific systems or subnets. NSG rules also include a priority (between 1—and 4096). Rules are evaluated in the order of priority. A rule with a priority of 100 is evaluated before a rule with priority 200.
All NSGs contain a set of default rules. The default rules cannot be deleted, but because they are assigned the lowest priority, they can be overridden by the rules that you create.
The default rules for NSGs are:
- Virtual network - Traffic originating and ending in a virtual network is allowed both in inbound and outbound directions.
- Internet - Outbound traffic is allowed, but inbound traffic is blocked.
- Load balancer - Allow Azure’s load balancer to probe the health of your VMs and role instances. If you are not using a load balanced set, you can override this rule.
Create network security groups
A network security group can be created at the same time as a VM using the az vm create command. When doing so, the NSG is associated with the VMs network interface and an NSG rule is auto created to allow traffic on port 22 from any source. Earlier in this tutorial, the front-end NSG was auto-created with the front-end VM. An NSG rule was also auto created for port 22.
In some cases, it may be helpful to pre-create an NSG, such as when default SSH rules should not be created, or when the NSG should be attached to a subnet.
Use the az network nsg create command to create a network security group.
az network nsg create --resource-group myRGNetwork --name myBackendNSG
Instead of associating the NSG to a network interface, it is associated with a subnet. In this configuration, any VM that is attached to the subnet inherits the NSG rules.
Update the existing subnet named myBackendSubnet with the new NSG.
az network vnet subnet update \
  --resource-group myRGNetwork \
  --vnet-name myVNet \
  --name myBackendSubnet \
  --network-security-group myBackendNSG
Secure incoming traffic
When the front-end VM was created, an NSG rule was created to allow incoming traffic on port 22. This rule allows SSH connections to the VM. For this example, traffic should also be allowed on port 80. This configuration allows a web application to be accessed on the VM.
Use the az network nsg rule create command to create a rule for port 80.
az network nsg rule create \
  --resource-group myRGNetwork \
  --nsg-name myFrontendNSG \
  --name http \
  --access allow \
  --protocol Tcp \
  --direction Inbound \
  --priority 200 \
  --source-address-prefix "*" \
  --source-port-range "*" \
  --destination-address-prefix "*" \
  --destination-port-range 80
The front-end VM is only accessible on port 22 and port 80. All other incoming traffic is blocked at the network security group. It may be helpful to visualize the NSG rule configurations. Return the NSG rule configuration with the az network rule list command.
az network nsg rule list --resource-group myRGNetwork --nsg-name myFrontendNSG --output table
Secure VM to VM traffic
Network security group rules can also apply between VMs. For this example, the front-end VM needs to communicate with the back-end VM on port 22 and 3306. This configuration allows SSH connections from the front-end VM, and also allow an application on the front-end VM to communicate with a back-end MySQL database. All other traffic should be blocked between the front-end and back-end virtual machines.
Use the az network nsg rule create command to create a rule for port 22. Notice that the --source-address-prefix argument specifies a value of 10.0.1.0/24. This configuration ensures that only traffic from the front-end subnet is allowed through the NSG.
az network nsg rule create \
  --resource-group myRGNetwork \
  --nsg-name myBackendNSG \
  --name SSH \
  --access Allow \
  --protocol Tcp \
  --direction Inbound \
  --priority 100 \
  --source-address-prefix 10.0.1.0/24 \
  --source-port-range "*" \
  --destination-address-prefix "*" \
  --destination-port-range "22"
Now add a rule for MySQL traffic on port 3306.
az network nsg rule create \
  --resource-group myRGNetwork \
  --nsg-name myBackendNSG \
  --name MySQL \
  --access Allow \
  --protocol Tcp \
  --direction Inbound \
  --priority 200 \
  --source-address-prefix 10.0.1.0/24 \
  --source-port-range "*" \
  --destination-address-prefix "*" \
  --destination-port-range "3306"
Finally, because NSGs have a default rule allowing all traffic between VMs in the same VNet, a rule can be created for the back-end NSGs to block all traffic. Notice here that the --priority is given a value of 300, which is lower that both the NSG and MySQL rules. This configuration ensures that SSH and MySQL traffic is still allowed through the NSG.
az network nsg rule create \
  --resource-group myRGNetwork \
  --nsg-name myBackendNSG \
  --name denyAll \
  --access Deny \
  --protocol Tcp \
  --direction Inbound \
  --priority 300 \
  --source-address-prefix "*" \
  --source-port-range "*" \
  --destination-address-prefix "*" \
  --destination-port-range "*"
Create back-end VM
Now create a virtual machine, which is attached to the myBackendSubnet. Notice that the --nsg argument has a value of empty double quotes. An NSG does not need to be created with the VM. The VM is attached to the back-end subnet, which is protected with the pre-created back-end NSG. This NSG applies to the VM. Also, notice here that the --public-ip-address argument has a value of empty double quotes. This configuration creates a VM without a public IP address.
az vm create \
  --resource-group myRGNetwork \
  --name myBackendVM \
  --vnet-name myVNet \
  --subnet myBackendSubnet \
  --public-ip-address "" \
  --nsg "" \
  --image Ubuntu2204 \
  --generate-ssh-keys
The back-end VM is only accessible on port 22 and port 3306 from the front-end subnet. All other incoming traffic is blocked at the network security group. It may be helpful to visualize the NSG rule configurations. Return the NSG rule configuration with the az network rule list command.
az network nsg rule list --resource-group myRGNetwork --nsg-name myBackendNSG --output table
Next steps
In this tutorial, you created and secured Azure networks as related to virtual machines. You learned how to:
- Create a virtual network and subnet
- Create a public IP address
- Create a front-end VM
- Secure network traffic
- Create back-end VM
To learn about protecting your VM disks, see Backup and disaster recovery for disks.
Feedback
Coming soon: Throughout 2024 we will be phasing out GitHub Issues as the feedback mechanism for content and replacing it with a new feedback system. For more information see: https://aka.ms/ContentUserFeedback.
Submit and view feedback for