Instance level public IP (Classic) overview
An instance level public IP (ILPIP) is a public IP address that you can assign directly to a VM or Cloud Services role instance, rather than to the cloud service that your VM or role instance reside in. An ILPIP doesn’t take the place of the virtual IP (VIP) that is assigned to your cloud service. Rather, it’s an additional IP address that you can use to connect directly to your VM or role instance.
Important
Azure has two different deployment models for creating and working with resources: Resource Manager and classic. This article covers using the classic deployment model. Microsoft recommends creating VMs through Resource Manager. Make sure you understand how IP addresses work in Azure.
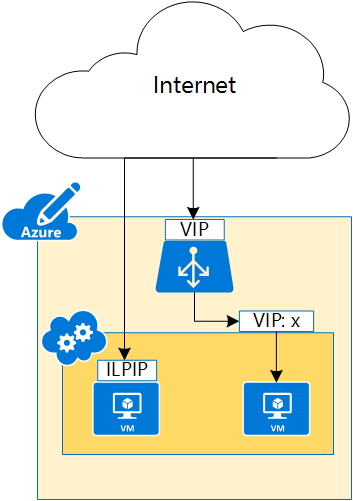
As shown in Figure 1, the cloud service is accessed using a VIP, while the individual VMs are normally accessed using VIP:<port number>. By assigning an ILPIP to a specific VM, that VM can be accessed directly using that IP address.
When you create a cloud service in Azure, corresponding DNS A records are created automatically to allow access to the service through a fully qualified domain name (FQDN), instead of using the actual VIP. The same process happens for an ILPIP, allowing access to the VM or role instance by FQDN instead of the ILPIP. For instance, if you create a cloud service named contosoadservice, and you configure a web role named contosoweb with two instances, and in .cscfg domainNameLabel is set to WebPublicIP, Azure registers the following A records for the instances:
- WebPublicIP.0.contosoadservice.cloudapp.net
- WebPublicIP.1.contosoadservice.cloudapp.net
- ...
Note
You can assign only one ILPIP for each VM or role instance. You can use up to 5 ILPIPs per subscription. ILPIPs are not supported for multi-NIC VMs.
Why would I request an ILPIP?
If you want to be able to connect to your VM or role instance by an IP address assigned directly to it, rather than using the cloud service VIP:<port number>, request an ILPIP for your VM or your role instance.
- Active FTP - By assigning an ILPIP to a VM, it can receive traffic on any port. Endpoints are not required for the VM to receive traffic. See FTP Protocol Overview for details on the FTP protocol.
- Outbound IP - Outbound traffic originating from the VM is mapped to the ILPIP as the source and the ILPIP uniquely identifies the VM to external entities.
Note
In the past, an ILPIP address was referred to as a public IP (PIP) address.
Manage an ILPIP for a VM
The following tasks enable you to create, assign, and remove ILPIPs from VMs:
How to request an ILPIP during VM creation using PowerShell
The following PowerShell script creates a cloud service named FTPService, retrieves an image from Azure, creates a VM named FTPInstance using the retrieved image, sets the VM to use an ILPIP, and adds the VM to the new service:
New-AzureService -ServiceName FTPService -Location "Central US"

$image = Get-AzureVMImage|?{$_.ImageName -like "*RightImage-Windows-2012R2-x64*"}

#Set "current" storage account for the subscription. It will be used as the location of new VM disk

Set-AzureSubscription -SubscriptionName <SubName> -CurrentStorageAccountName <StorageAccountName>

#Create a new VM configuration object

New-AzureVMConfig -Name FTPInstance -InstanceSize Small -ImageName $image.ImageName `
| Add-AzureProvisioningConfig -Windows -AdminUsername adminuser -Password MyP@ssw0rd!! `
| Set-AzurePublicIP -PublicIPName ftpip | New-AzureVM -ServiceName FTPService -Location "Central US"
If you want to specify another storage account as the location of new VM disk, you can use MediaLocation parameter:
	New-AzureVMConfig -Name FTPInstance -InstanceSize Small -ImageName $image.ImageName `
	 -MediaLocation https://management.core.windows.net/<SubscriptionID>/services/storageservices/<StorageAccountName> `
	| Add-AzureProvisioningConfig -Windows -AdminUsername adminuser -Password MyP@ssw0rd!! `
	| Set-AzurePublicIP -PublicIPName ftpip | New-AzureVM -ServiceName FTPService -Location "Central US"
How to retrieve ILPIP information for a VM
To view the ILPIP information for the VM created with the previous script, run the following PowerShell command and observe the values for PublicIPAddress and PublicIPName:
Get-AzureVM -Name FTPInstance -ServiceName FTPService
Expected output:
DeploymentName              : FTPService
Name                        : FTPInstance
Label                       :
VM                          : Microsoft.WindowsAzure.Commands.ServiceManagement.Model.PersistentVM
InstanceStatus              : ReadyRole
IpAddress                   : 100.74.118.91
InstanceStateDetails        :
PowerState                  : Started
InstanceErrorCode           :
InstanceFaultDomain         : 0
InstanceName                : FTPInstance
InstanceUpgradeDomain       : 0
InstanceSize                : Small
HostName                    : FTPInstance
AvailabilitySetName         :
DNSName                     : http://ftpservice888.cloudapp.net/
Status                      : ReadyRole
GuestAgentStatus            : 	Microsoft.WindowsAzure.Commands.ServiceManagement.Model.GuestAgentStatus
ResourceExtensionStatusList : {Microsoft.Compute.BGInfo}
PublicIPAddress             : 104.43.142.188
PublicIPName                : ftpip
NetworkInterfaces           : {}
ServiceName                 : FTPService
OperationDescription        : Get-AzureVM
OperationId                 : 568d88d2be7c98f4bbb875e4d823718e
OperationStatus             : OK
How to remove an ILPIP from a VM
To remove the ILPIP added to the VM in the previous script, run the following PowerShell command:
Get-AzureVM -ServiceName FTPService -Name FTPInstance | Remove-AzurePublicIP | Update-AzureVM
How to add an ILPIP to an existing VM
To add an ILPIP to the VM created using the script previous, run the following command:
Get-AzureVM -ServiceName FTPService -Name FTPInstance | Set-AzurePublicIP -PublicIPName ftpip2 | Update-AzureVM
Manage an ILPIP for a Cloud Services role instance
To add an ILPIP to a Cloud Services role instance, complete the following steps:
Download the .cscfg file for the cloud service by completing the steps in the How to Configure Cloud Services article.
Update the .cscfg file by adding the
InstanceAddresselement. The following sample adds an ILPIP named MyPublicIP to a role instance named WebRole1:<?xml version="1.0" encoding="utf-8"?> <ServiceConfiguration serviceName="ILPIPSample" xmlns="https://schemas.microsoft.com/ServiceHosting/2008/10/ServiceConfiguration" osFamily="4" osVersion="*" schemaVersion="2014-01.2.3"> <Role name="WebRole1"> <Instances count="1" /> <ConfigurationSettings> <Setting name="Microsoft.WindowsAzure.Plugins.Diagnostics.ConnectionString" value="UseDevelopmentStorage=true" /> </ConfigurationSettings> </Role> <NetworkConfiguration> <AddressAssignments> <InstanceAddress roleName="WebRole1"> <PublicIPs> <PublicIP name="MyPublicIP" domainNameLabel="WebPublicIP" /> </PublicIPs> </InstanceAddress> </AddressAssignments> </NetworkConfiguration> </ServiceConfiguration>Upload the .cscfg file for the cloud service by completing the steps in the How to Configure Cloud Services article.
How to retrieve ILPIP information for a Cloud Service
To view the ILPIP information per role instance, run the following PowerShell command and observe the values for PublicIPAddress, PublicIPName, PublicIPDomainNameLabel and PublicIPFqdns:
Add-AzureAccount

$roles = Get-AzureRole -ServiceName <Cloud Service Name> -Slot Production -RoleName WebRole1 -InstanceDetails

$roles[0].PublicIPAddress
$roles[1].PublicIPAddress
You may also use nslookup to query the sub-domain's A record:
nslookup WebPublicIP.0.<Cloud Service Name>.cloudapp.net
Next steps
- Understand how IP addressing works in the classic deployment model.
- Learn about Reserved IPs.