How to connect AWS and Azure using a BGP-enabled VPN gateway
This article walks you through the setup of a BGP-enabled connection between Azure and Amazon Web Services (AWS). You'll use an Azure VPN gateway with BGP and active-active enabled and an AWS virtual private gateway with two site-to-site connections.
Architecture
In this setup, you create the following resources:
Azure
- One virtual network
- One virtual network gateway with active-active and BGP enabled
- Four local network gateways
- Four site-to-site connections
AWS
- One virtual private cloud (VPC)
- One virtual private gateway
- Two customer gateways
- Two site-to-site connections, each with two tunnels (total of four tunnels)
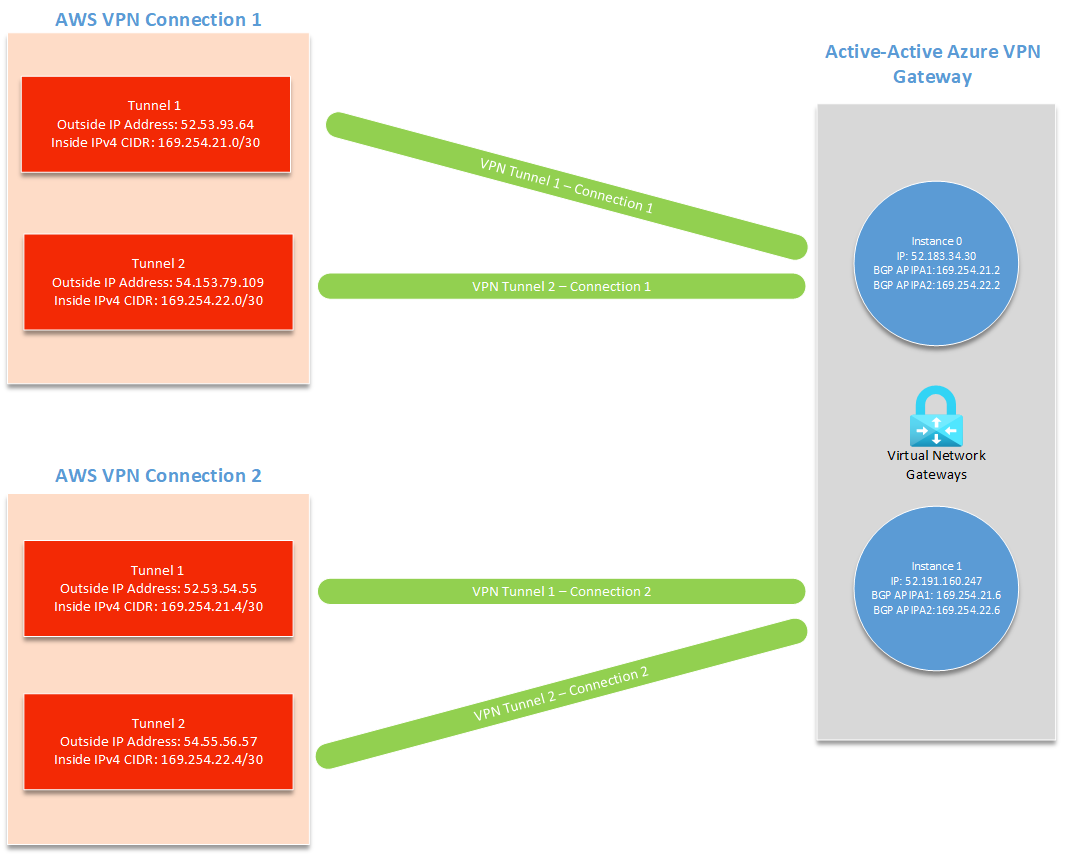
A site-to-site connection on AWS has two tunnels, each with their own outside IP address and inside IPv4 CIDR (used for BGP APIPA). An active-passive VPN gateway only supports one custom BGP APIPA. You'll need to enable active-active on your Azure VPN gateway to connect to multiple AWS tunnels.
On the AWS side, you create a customer gateway and site-to-site connection for each of the two Azure VPN gateway instances (total of four outgoing tunnels). In Azure, you need to create four local network gateways and four connections to receive these four AWS tunnels.
Choosing BGP APIPA addresses
You can use the following values for your BGP APIPA configuration throughout the tutorial.
| Tunnel | Azure Custom Azure APIPA BGP IP Address | AWS BGP Peer IP Address | AWS Inside IPv4 CIDR |
|---|---|---|---|
| AWS Tunnel 1 to Azure Instance 0 | 169.254.21.2 | 169.254.21.1 | 169.254.21.0/30 |
| AWS Tunnel 2 to Azure Instance 0 | 169.254.22.2 | 169.254.22.1 | 169.254.22.0/30 |
| AWS Tunnel 1 to Azure Instance 1 | 169.254.21.6 | 169.254.21.5 | 169.254.21.4/30 |
| AWS Tunnel 2 to Azure Instance 1 | 169.254.22.6 | 169.254.22.5 | 169.254.22.4/30 |
You can also set up your own custom APIPA addresses. AWS requires a /30 Inside IPv4 CIDR in the APIPA range of 169.254.0.0/16 for each tunnel. This CIDR must also be in the Azure-reserved APIPA range for VPN, which is from 169.254.21.0 to 169.254.22.255. AWS will use the first IP address of your /30 inside CIDR and Azure will use the second. This means you need to reserve space for two IP addresses in your AWS /30 CIDR.
For example, if you set your AWS Inside IPv4 CIDR to be 169.254.21.0/30, AWS will use the BGP IP address 169.254.21.1 and Azure will use the IP address 169.254.21.2.
Important
- Your APIPA addresses must not overlap between the on-premises VPN devices and all connected Azure VPN gateways.
- If you choose to configure multiple APIPA BGP peer addresses on the VPN gateway, you must also configure all Connection objects with their corresponding IP address of your choice. If you fail to do so, all connections use the first APIPA IP address in the list no matter how many IPs are present.
Prerequisites
You must have both an Azure account and AWS account with an active subscription. If you don't already have an Azure subscription, you can activate your MSDN subscriber benefits or sign up for a free account.
Part 1: Create an active-active VPN gateway in Azure
Create a VNet
Create a virtual network with the following values. You can refer to the steps in the Site-to-site Tutorial.
- Subscription: If you have more than one subscription, verify that you're using the correct one.
- Resource group: TestRG1
- Name: VNet1
- Location: East US
- IPv4 address space: 10.1.0.0/16
- Subnet name: FrontEnd
- Subnet address range: 10.1.0.0/24
Create an active-active VPN gateway with BGP
Create a VPN gateway using the following values:
- Name: VNet1GW
- Region: East US
- Gateway type: VPN
- VPN type: Route-based
- SKU: VpnGw2AZ
- Generation: Generation2
- Virtual network: VNet1
- Gateway subnet address range: 10.1.1.0/24
- Public IP address: Create new
- Public IP address name: VNet1GWpip
- Availability zone: Zone-redundant
- Enable active-active mode: Enabled
- SECOND PUBLIC IP ADDRESS: Create new
- Public IP address 2 name: VNet1GWpip2
- Availability zone: Zone-redundant
- Configure BGP: Enabled
- Autonomous system number (ASN): 65000
- Custom Azure APIPA BGP IP address: 169.254.21.2, 169.254.22.2
- Second Custom Azure APIPA BGP IP address: 169.254.21.6, 169.254.22.6
In the Azure portal, navigate to the Virtual network gateway resource from the Marketplace, and select Create.
Fill in the parameters as shown in the following examples.

Configure both Public IP addresses and enable active-active mode. The public IP address objects created here are associated to the VPN gateway. The public IP address is dynamically assigned to the object when the VPN gateway is created.

Configure BGP.

- Select Enabled for Configure BGP to show the BGP configuration section.
- Fill in a ASN (Autonomous System Number). This ASN must be different than the ASN used by AWS.
- Add two addresses to Custom Azure APIPA BGP IP address. Include the IP addresses for AWS Tunnel 1 to Azure Instance 0 and AWS Tunnel 2 to Azure Instance 0 from the APIPA configuration you chose. The second input will only appear after you add your first APIPA BGP IP address.
- Add two addresses to Second Custom Azure APIPA BGP IP address. Include the IP addresses for AWS Tunnel 1 to Azure Instance 1 and AWS Tunnel 2 to Azure Instance 1 from the APIPA configuration you chose. The second input will only appear after you add your first APIPA BGP IP address.
Select Review + create to run validation. Once validation passes, select Create to deploy the VPN gateway. Creating a gateway can often take 45 minutes or more, depending on the selected gateway SKU. You can see the deployment status on the Overview page for your gateway.


Part 2: Connect to your VPN gateway from AWS
In this section, you connect to your Azure VPN gateway from AWS. For updated instructions, always refer to the official AWS documentation.
Create a VPC
Create a VPC using the following values and the most recent AWS documentation.
- Name: VPC1
- CIDR block: 10.2.0.0/16
Make sure that your CIDR block doesn't overlap with the virtual network you created in Azure.
Create a virtual private gateway
Create a virtual private gateway using the following values and the most recent AWS documentation.
- Name: AzureGW
- ASN: Amazon default ASN (64512)
- VPC: Attached to VPC1
If you choose to use a custom ASN, make sure it's different than the ASN you used in Azure.
Enable route propagation
Enable route propagation on your virtual private gateway using the most recent AWS documentation.
Create customer gateways
Create two customer gateways using the following values and the most recent AWS documentation.
Customer gateway 1 settings:
- Name: ToAzureInstance0
- Routing: Dynamic
- BGP ASN: 65000 (the ASN for your Azure VPN gateway)
- IP Address: the first public IP address of your Azure VPN gateway
Customer gateway 2 settings:
- Name: ToAzureInstance1
- Routing: Dynamic
- BGP ASN: 65000 (the ASN for your Azure VPN gateway)
- IP Address: the second public IP address of your Azure VPN gateway
You can locate your Public IP address and your Second Public IP address on Azure in the Configuration section of your virtual network gateway.
Create site-to-site VPN connections
Create two site-to-site VPN connections using the following values and the most recent AWS documentation.
Site-to-site connection 1 settings:
- Name: ToAzureInstance0
- Target Gateway Type: Virtual Private Gateway
- Virtual Private Gateway: AzureGW
- Customer Gateway: Existing
- Customer Gateway: ToAzureInstance0
- Routing Options: Dynamic (requires BGP)
- Local IPv4 Network CIDR: 0.0.0.0/0
- Tunnel Inside Ip Version: IPv4
- Inside IPv4 CIDR for Tunnel 1: 169.254.21.0/30
- Pre-Shared Key for Tunnel 1: choose a secure key
- Inside IPv4 CIDR for Tunnel 2: 169.254.22.0/30
- Pre-Shared Key for Tunnel 2: choose a secure key
- Startup Action: Start
Site-to-site connection 2 settings:
- Name: ToAzureInstance1
- Target Gateway Type: Virtual Private Gateway
- Virtual Private Gateway: AzureGW
- Customer Gateway: Existing
- Customer Gateway: ToAzureInstance1
- Routing Options: Dynamic (requires BGP)
- Local IPv4 Network CIDR: 0.0.0.0/0
- Tunnel Inside Ip Version: IPv4
- Inside IPv4 CIDR for Tunnel 1: 169.254.21.4/30
- Pre-Shared Key for Tunnel 1: choose a secure key
- Inside IPv4 CIDR for Tunnel 2: 169.254.22.4/30
- Pre-Shared Key for Tunnel 2: choose a secure key
- Startup Action: Start
For Inside IPv4 CIDR for Tunnel 1 and Inside IPv4 CIDR for Tunnel 2 for both connections, refer to the APIPA configuration you chose.
Part 3: Connect to your AWS customer gateways from Azure
Next, you connect your AWS tunnels to Azure. For each of the four tunnels, you'll have both a local network gateway and a site-to-site connection.
Important
Repeat the following sections for each of your four AWS tunnels, using their respective outside IP address.
Create local network gateways
Repeat these instructions to create each local network gateway.
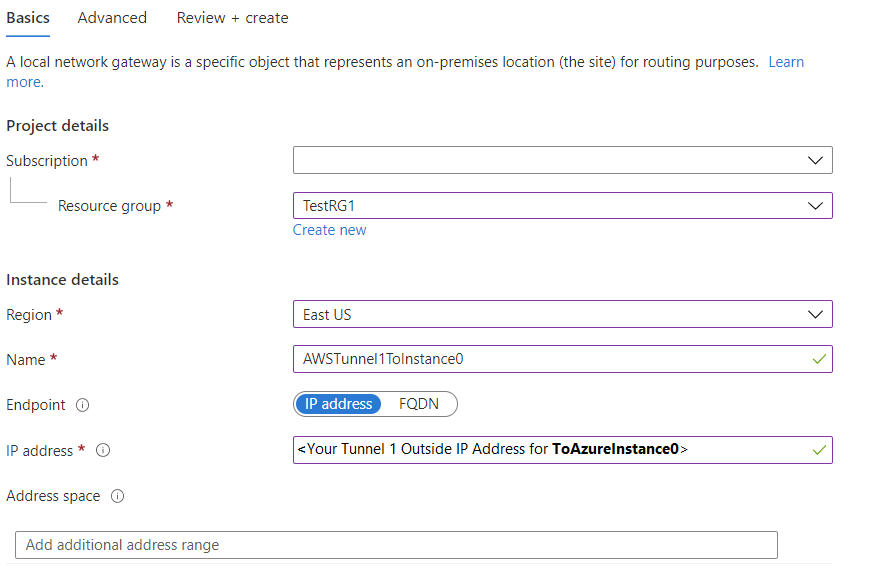
In the Azure portal, navigate to the Local network gateway resource from the Marketplace, and select Create.
Select the same Subscription, Resource Group, and Region you used to create your virtual network gateway.
Enter a name for your local network gateway.
Leave IP Address as the value for Endpoint.
For IP Address, enter the Outside IP Address (from AWS) for the tunnel you're creating.
Leave Address Space as blank and select Advanced.
On the Advanced tab, configure the following settings:
- Select Yes for Configure BGP settings.
- For Autonomous system number (ASN), enter the ASN for your AWS Virtual Private Network. Use the ASN 64512 if you left your ASN as the AWS default value.
- For BGP peer IP address, enter the AWS BGP Peer IP Address based on the APIPA configuration you chose.

Create connections
Repeat these steps to create each of the required connections.
Open the page for your virtual network gateway, navigate to the Connections page.
On the Connections page, select + Add.
On the Basics page, complete the following values:
- Connection type: Site-to-site (IPsec)
- Name: Enter a name for your connection. Example: AWSTunnel1toAzureInstance0.
On the Settings page, complete the following values:
- Virtual network gateway: Select the VPN gateway.
- Local network gateway: Select the local network gateway you created.
- Enter the Shared key (PSK) that matches the preshared key you entered when making the AWS connections.
- Enable BGP: Select to enable.
- Enable Custom BGP Addresses: Select to enable.
Under Custom BGP Addresses:
- Enter the Custom BGP Address based on the APIPA configuration you chose.
- The Custom BGP Address (Inside IPv4 CIDR in AWS) must match with the IP Address (Outside IP Address in AWS) that you specified in the local network gateway you're using for this connection.
- Only one of the two custom BGP addresses will be used, depending on the tunnel you're specifying it for.
- For making a connection from AWS to the first public IP address of your VPN gateway (instance 0), only the Primary Custom BGP Address is used.
- For making a connection from AWS to the second public IP address of your VPN gateway (instance 1), only the Secondary Custom BGP Address is used.
- Leave the other Custom BGP Address as default.
If you used the default APIPA configuration, you can use the following addresses.
Tunnel Primary Custom BGP Address Secondary Custom BGP Address AWS Tunnel 1 to Azure Instance 0 169.254.21.2 Not used (select 169.254.21.6) AWS Tunnel 2 to Azure Instance 0 169.254.22.2 Not used (select 169.254.21.6) AWS Tunnel 1 to Azure Instance 1 Not used (select 169.254.21.2) 169.254.21.6 AWS Tunnel 2 to Azure Instance 1 Not used (select 169.254.21.2) 169.254.22.6 Configure the following settings:
- FastPath: leave the default (deselected)
- IPsec / IKE policy: Default
- Use policy based traffic selector: Disable
- DPD timeout in seconds: leave the default
- Connection Mode: You can select any of the available options (Default, Initiator Only, Responder Only). For more information, see VPN Gateway settings - connection modes.
Select Save.
Review + create to create the connection.
Repeat these steps to create additional connections.
Before continuing to the next section, verify that you have a local network gateway and connection for each of your four AWS tunnels.
Part 4: (Optional) Check the status of your connections
Check your connections status on Azure
Open the page for your virtual network gateway, navigate to the Connections page.
Verify that all 4 connections show as Connected.

Check your BGP peers status on Azure
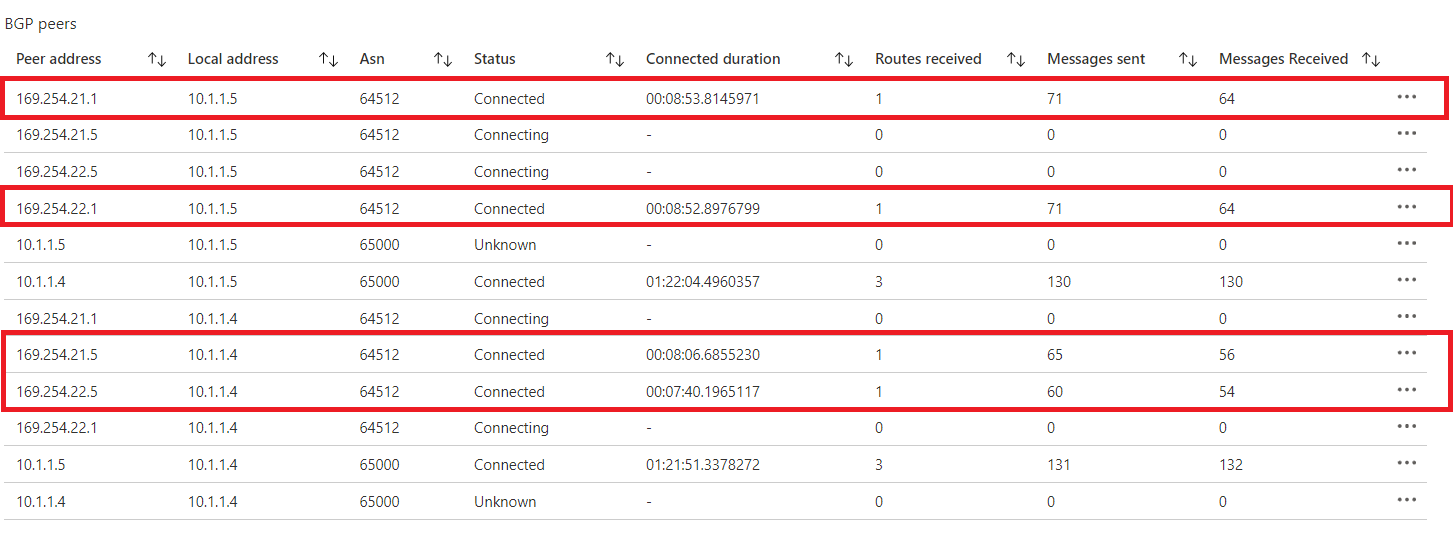
Open the page for your virtual network gateway, navigate to the BGP Peers page.
In the BGP Peers table, verify that all of the connections with the Peer address you specified show as Connected and are exchanging routes.
Check your connections status on AWS
- Open the Amazon VPC console
- In the navigation pane, select Site-to-Site VPN Connections.
- Select the first connection you made and then select the Tunnel Details tab.
- Verify that the Status of both tunnels shows as UP.
- Verify that the Details of both tunnels shows one or more BGP routes.
Next steps
For more information about VPN Gateway, see the FAQ.
Feedback
Coming soon: Throughout 2024 we will be phasing out GitHub Issues as the feedback mechanism for content and replacing it with a new feedback system. For more information see: https://aka.ms/ContentUserFeedback.
Submit and view feedback for