Integrate Azure VPN gateway RADIUS authentication with NPS server for multifactor authentication
The article describes how to integrate Network Policy Server (NPS) with Azure VPN gateway RADIUS authentication to deliver multifactor authentication (MFA) for point-to-site VPN connections.
Prerequisite
To enable MFA, the users must be in Microsoft Entra ID, which must be synced from either the on-premises or cloud environment. Also, the user must have already completed the auto-enrollment process for MFA. For more information, see Set up my account for two-step verification
Detailed steps
Step 1: Create a virtual network gateway
Log on to the Azure portal.
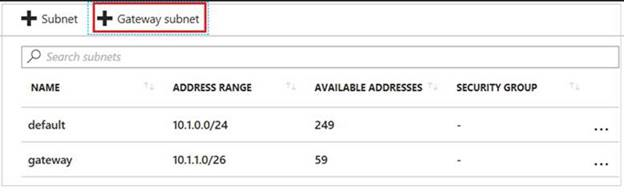
In the virtual network that will host the virtual network gateway, select Subnets, and then select Gateway subnet to create a subnet.
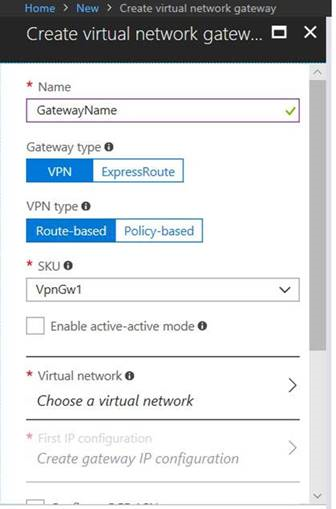
Create a virtual network gateway by specifying the following settings:
Gateway type: Select VPN.
VPN type: Select Route-based.
SKU: Select a SKU type based on your requirements.
Virtual network: Select the virtual network in which you created the gateway subnet.
Step 2: Configure the NPS for Microsoft Entra multifactor authentication
On the NPS server, install the NPS extension for Microsoft Entra multifactor authentication.
Open the NPS console, right-click RADIUS Clients, and then select New. Create the RADIUS client by specifying the following settings:
Friendly Name: Type any name.
Address (IP or DNS): Type the gateway subnet that you created in the Step 1.
Shared secret: type any secret key, and remember it for later use.

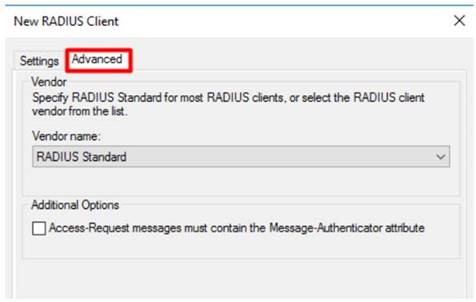
On the Advanced tab, set the vendor name to RADIUS Standard and make sure that the Additional Options check box is not selected.
Go to Policies > Network Policies, double-click Connections to Microsoft Routing and Remote Access server policy, select Grant access, and then click OK.
Step 3: Configure the virtual network gateway
Log on to Azure portal.
Open the virtual network gateway that you created. Make sure that the gateway type is set to VPN and that the VPN type is route-based.
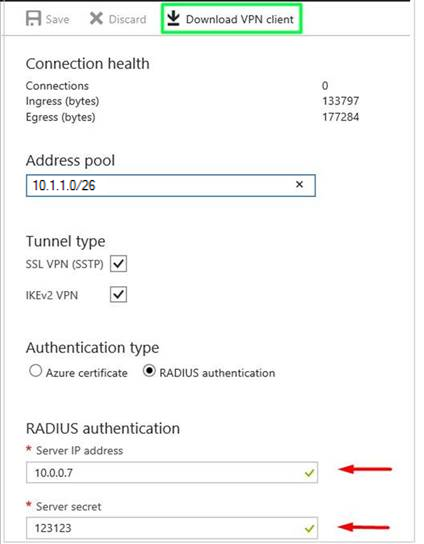
Click Point to site configuration > Configure now, and then specify the following settings:
Address pool: Type the gateway subnet you created in the step 1.
Authentication type: Select RADIUS authentication.
Server IP address: Type the IP address of the NPS server.
Next steps
Feedback
Coming soon: Throughout 2024 we will be phasing out GitHub Issues as the feedback mechanism for content and replacing it with a new feedback system. For more information see: https://aka.ms/ContentUserFeedback.
Submit and view feedback for