Step 2: Create the Inventory Request Schema

Time to complete: 7 minutes
Objective: In this step, you define the schema of the inventory replenishment message. The warehouse system sends this message for requesting inventory replenishment. This is one of the two schemas you must create for this project.
Purpose: XML not only structures and identifies information with standardized markup codes, but also has the ability to use schemas. A schema is an XML document that works like a dictionary and is used as a reference by other XML documents. The schema code defines the spelling of XML elements and the type of data enclosed by those elements. Using schemas provides an easy way for a program to process XML documents and ensures that the structure and type of information is correct.
Prerequisites
Note the following requirements before you begin this step:
- Before you begin this step you must complete Step 1: Create EAISchemas Project.
Procedures
In Step 1: Create EAISchemas Project, you created a new Visual Studio project. If you close the Visual Studio window, you can use the following procedure to open the project. Otherwise, you can skip this procedure, “To open the Visual Studio project”.
To open the Visual Studio project
Start Microsoft Visual Studio.
In Visual Studio, on the File menu, point to Open, and then click Project/Solution.
In the Open Project dialog box, browse to the C:\BTSTutorials\EAISolution\EAISolution.sln solution file, and then click Open.
In the following procedure, you add a new schema file to the project for the inventory replenishment message.
To add a new schema to the project
In Solution Explorer, right-click the EAISchemas project, point to Add, and then click New Item.
In the Add New Item - EAISchemas dialog box, do the following:
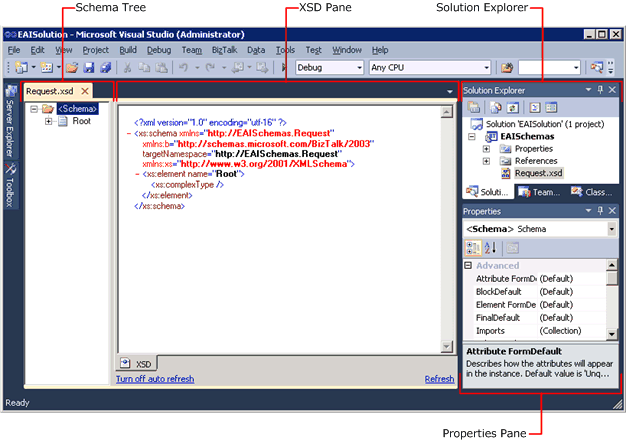
Use this To do this Installed Templates Click Schema Files, then click Schema. Name Type Request.xsd. Click Add. The schema tree and XSD pane appear. This area of Visual Studio is referred to as BizTalk Editor. In addition, your new schema appears in Solution Explorer below the EAISchemas project.

To add elements to the schema
In schema tree, click the Root node.
In the Properties pane, change the value of the Node Name property to
Request, and then press ENTER.In schema tree, right-click the Request node, point to Insert Schema Node, and then click Child Record.
Type
Headeras the new name for the child record, and then press ENTER.Repeat step 3 and 4 to create a second child record for the Request node, and name it
Items.In schema tree, right-click the Header node, point to Insert Schema Node, and then click Child Field Element.
Type
ReqIDas the new name for the element, and then press ENTER.Repeat step 6 and 7 to create a second child field element for the Header node, and name it
OrderDate.Repeat step 6 and 7 to create a third child field element for the Header node, and name it
GrandTotal.In schema tree, right-click the Items node, point to Insert Schemas Node, and then click Child Record.
Type
Itemas the new name for the child record, and then press ENTER.In schema tree, right-click the Item node, and add the following child field elements:
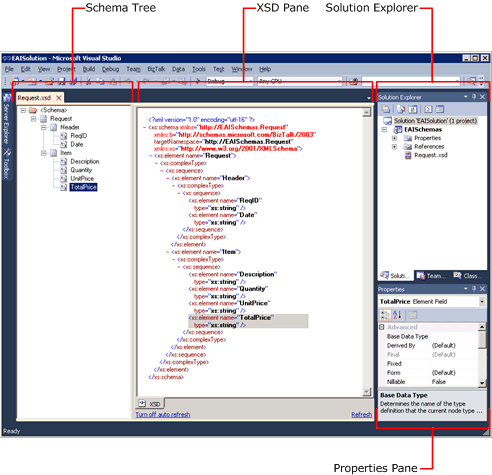
DescriptionQuantityUnitPriceThe completed Request.xsd should look similar to the following figure.

When you add nodes to a schema, BizTalk Editor gives a set of default values for their properties. You must configure them based on the requirements.
To configure the elements
In schema tree, click OrderDate to select it.
In the Properties pane, change Data Type to xs:dateTime.
Repeat step 1 and 2 to configure the following properties:
Element Property Value GrandTotal Data Type Xs:decimal Item Max Occurs Unbounded Item Min Occurs 1 Quantity Data Type xs:unsignedInt A schema can have many elements, but your application may only require that you use a few of them for your data processing. To save computer resources, BizTalk Server doesn't automatically read each schema element. If you want BizTalk Server to read data from a specific element, you must identify that element by using BizTalk Editor to promote its properties.
The orchestration that we will create in Lesson 2: Define the Business Process will base on the GrandTotal field to route messages. So we must promote the GrandTotal field.
To promote an element
In Schema tree, right-click GrandTotal, point to Promote, and then click Quick Promotions.
Click OK to acknowledge adding a property schema.
On the File menu, click Save All.
What did I just do?
In this step, you defined the warehouse inventory replenishment message schema.
Next Steps
You define the request decline message schema.
See Also
Step 1: Create EAISchemas Project
Step 3: Create the Request Decline Schema
Step 4: Create the Map
Step 5: Build the EAISchemas Project
Creating Schemas Using BizTalk Editor
About BizTalk Message Context Properties
Feedback
Coming soon: Throughout 2024 we will be phasing out GitHub Issues as the feedback mechanism for content and replacing it with a new feedback system. For more information see: https://aka.ms/ContentUserFeedback.
Submit and view feedback for