Adding rich card attachments to messages with the Bot Connector API
Some channels allow your bot to send rich cards to users. A rich card is an attachment that contains interactive elements, such as buttons, text, images, audio, video, and so on.
This article describes how to create rich cards that you can attach to a message. See how to add media attachments to messages for specific instructions on adding an attachment to a message.
Types of rich cards
A rich card comprises a title, description, link, and images. A message can contain multiple rich cards, displayed in either list format or carousel format. The Bot Framework currently supports eight types of rich cards:
| Card type | Description |
|---|---|
| AdaptiveCard | A customizable card that can contain any combination of text, speech, images, buttons, and input fields. See per-channel support. |
| AnimationCard | A card that can play animated GIFs or short videos. |
| AudioCard | A card that can play an audio file. |
| HeroCard | A card that typically contains a single large image, one or more buttons, and text. |
| ThumbnailCard | A card that typically contains a single thumbnail image, one or more buttons, and text. |
| ReceiptCard | A card that enables a bot to provide a receipt to the user. It typically contains the list of items to include on the receipt, tax and total information, and other text. |
| SignInCard | A card that enables a bot to request that a user sign-in. It typically contains text and one or more buttons that the user can click to initiate the sign-in process. |
| VideoCard | A card that can play videos. |
Tip
For information about which features are supported on each channel, see the channels reference article.
Process events within rich cards
To process events within rich cards, use CardAction objects to specify what should happen when the user clicks a button or taps a section of the card. Each CardAction object contains these properties:
| Property | Type | Description |
|---|---|---|
| channelData | string | channel-specific data associated with this action |
| displayText | string | test to display in the chat feed if the button is clicked |
| text | string | text for the action |
| type | string | type of action (one of the values specified in the table below) |
| title | string | title of the button |
| image | string | image URL for the button |
| value | string | value needed to perform the specified type of action |
Note
Buttons within Adaptive Cards are not created using CardAction objects,
but instead using the schema that is defined by Adaptive Cards.
See Add an Adaptive Card to a message for an example that shows how to
add buttons to an Adaptive Card.
To function correctly, assign an action type to each clickable item on a hero card. This table lists and describes the available action types and what should be in the associated value property.
The messageBack card action has a more generalized meaning than the other card actions. See the Card action section of the Activity schema for more information about the messageBack and other card action types.
| Type | Description | Value |
|---|---|---|
| call | Initiates a phone call. | Destination for the phone call in this format: tel:123123123123. |
| downloadFile | Downloads a file. | The URL of the file to download. |
| imBack | Sends a message to the bot, and posts a visible response in the chat. | Text of the message to send. |
| messageBack | Represents a text response to be sent via the chat system. | An optional programmatic value to include in generated messages. |
| openUrl | Opens a URL in the built-in browser. | The URL to open. |
| playAudio | Plays audio. | The URL of the audio to play. |
| playVideo | Plays a video. | The URL of video to play. |
| postBack | Sends a message to the bot, and may not post a visible response in the chat. | Text of the message to send. |
| showImage | Displays an image. | The URL of the image to display. |
| signin | Initiates an OAuth sign-in process. | The URL of the OAuth flow to initiate. |
Add a Hero card to a message
To add a rich card attachment to a message:
- Create an object that represents the type of card that you want to add to the message.
- Create an Attachment object:
- Set its
contentTypeproperty to the card's media type. - Set its
contentproperty to the object you created to represent the card.
- Set its
- Add the
Attachmentobject to theattachmentsarray of the message.
Tip
Messages that contain rich card attachments typically don't specify text.
Some channels allow you to add multiple rich cards to the attachments array within a message. This capability can be useful in scenarios where you want to provide the user with multiple options. For example, if your bot lets users book hotel rooms, it could present the user with a list of rich cards that shows the types of available rooms. Each card could contain a picture and list of amenities corresponding to the room type and the user could select a room type by tapping a card or clicking a button.
Tip
To display multiple rich cards in list format, set the Activity object's attachmentLayout property to "list".
To display multiple rich cards in carousel format, set the Activity object's attachmentLayout property to "carousel".
If the channel doesn't support carousel format, it will display the rich cards in list format, even if the attachmentLayout property specifies "carousel".
The following example shows a complete message that contains a single Hero card attachment. In this example request, https://smba.trafficmanager.net/teams represents the base URI; the base URI for requests that your bot issues may be different. For details about setting the base URI, see API Reference.
POST https://smba.trafficmanager.net/teams/v3/conversations/abcd1234/activities/5d5cdc723
Authorization: Bearer ACCESS_TOKEN
Content-Type: application/json
{
    "type": "message",
    "from": {
        "id": "12345678",
        "name": "sender's name"
    },
    "conversation": {
        "id": "abcd1234",
        "name": "conversation's name"
    },
    "recipient": {
        "id": "1234abcd",
        "name": "recipient's name"
    },
    "attachments": [
        {
            "contentType": "application/vnd.microsoft.card.hero",
            "content": {
                "title": "title goes here",
                "subtitle": "subtitle goes here",
                "text": "descriptive text goes here",
                "images": [
                    {
                        "url": "https://www.publicdomainpictures.net/pictures/30000/t2/duck-on-a-rock.jpg",
                        "alt": "picture of a duck",
                        "tap": {
                            "type": "playAudio",
                            "value": "url to an audio track of a duck call goes here"
                        }
                    }
                ],
                "buttons": [
                    {
                        "type": "playAudio",
                        "title": "Duck Call",
                        "value": "url to an audio track of a duck call goes here"
                    },
                    {
                        "type": "openUrl",
                        "title": "Watch Video",
                        "image": "https://www.publicdomainpictures.net/pictures/30000/t2/duck-on-a-rock.jpg",
                        "value": "url goes here of the duck in flight"
                    }
                ]
            }
        }
    ],
    "replyToId": "5d5cdc723"
}
Add an Adaptive card to a message
The Adaptive Card can contain any combination of text, speech, images, buttons, and input fields. Adaptive Cards are created using the JSON format specified in Adaptive Cards, which gives you full control over card content and format.
Leverage the information within the Adaptive Cards site to understand Adaptive Card schema, explore Adaptive Card elements, and see JSON samples that can be used to create cards of varying composition and complexity. Additionally, you can use the Interactive Visualizer to design Adaptive Card payloads and preview card output.
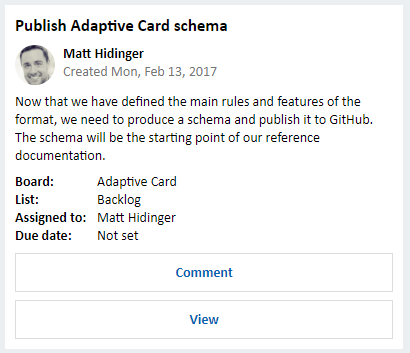
The following example shows a single Adaptive Card attachment object, representing a work assignment. To send this to a user, you would need to add it as an attachment in a message.
{
  "$schema": "http://adaptivecards.io/schemas/adaptive-card.json",
  "type": "AdaptiveCard",
  "version": "1.0",
  "body": [
    {
      "type": "Container",
      "items": [
        {
          "type": "TextBlock",
          "text": "Publish Adaptive Card schema",
          "weight": "bolder",
          "size": "medium"
        },
        {
          "type": "ColumnSet",
          "columns": [
            {
              "type": "Column",
              "width": "auto",
              "items": [
                {
                  "type": "Image",
                  "url": "https://pbs.twimg.com/profile_images/3647943215/d7f12830b3c17a5a9e4afcc370e3a37e_400x400.jpeg",
                  "size": "small",
                  "style": "person"
                }
              ]
            },
            {
              "type": "Column",
              "width": "stretch",
              "items": [
                {
                  "type": "TextBlock",
                  "text": "Matt Hidinger",
                  "weight": "bolder",
                  "wrap": true
                },
                {
                  "type": "TextBlock",
                  "spacing": "none",
                  "text": "Created {{DATE(2017-02-14T06:08:39Z, SHORT)}}",
                  "isSubtle": true,
                  "wrap": true
                }
              ]
            }
          ]
        }
      ]
    },
    {
      "type": "Container",
      "items": [
        {
          "type": "TextBlock",
          "text": "Now that we have defined the main rules and features of the format, we need to produce a schema and publish it to GitHub. The schema will be the starting point of our reference documentation.",
          "wrap": true
        },
        {
          "type": "FactSet",
          "facts": [
            {
              "title": "Board:",
              "value": "Adaptive Card"
            },
            {
              "title": "List:",
              "value": "Backlog"
            },
            {
              "title": "Assigned to:",
              "value": "Matt Hidinger"
            },
            {
              "title": "Due date:",
              "value": "Not set"
            }
          ]
        }
      ]
    }
  ],
  "actions": [
    {
      "type": "Action.ShowCard",
      "title": "Comment",
      "card": {
        "type": "AdaptiveCard",
        "body": [
          {
            "type": "Input.Text",
            "id": "comment",
            "isMultiline": true,
            "placeholder": "Enter your comment"
          }
        ],
        "actions": [
          {
            "type": "Action.Submit",
            "title": "OK"
          }
        ]
      }
    },
    {
      "type": "Action.OpenUrl",
      "title": "View",
      "url": "https://adaptivecards.io"
    }
  ]
}
The resulting card contains a title, information about who created the card (their name and avatar), when the card was created, a description of the work assignments, and information related to the assignment. There are also buttons that can be clicked to either comment on the work assignment or view it:
Additional resources
Feedback
Coming soon: Throughout 2024 we will be phasing out GitHub Issues as the feedback mechanism for content and replacing it with a new feedback system. For more information see: https://aka.ms/ContentUserFeedback.
Submit and view feedback for