Admin Handoff for Speech
APPLIES TO: Composer v2.x
In the case that a developer or user would like to interact with their bot using Direct Line Speech, you need to create a Speech resource.
Many users won't have the right to create a Speech resource for their bot project as they don't have rights to an Azure Tenant to create resources. The following with walk a user through the process of generating an Admin Handoff request.
Requesting a Speech resource creation via Admin Handoff
In Composer, if you would like to enable a bot for speech, you'll be required to have created a publishing profile to define the bot environment to which you're publishing. Once you've created a publishing profile and want to enable that environment for Speech, you'll need to go to the Connections tab in the Configure page.
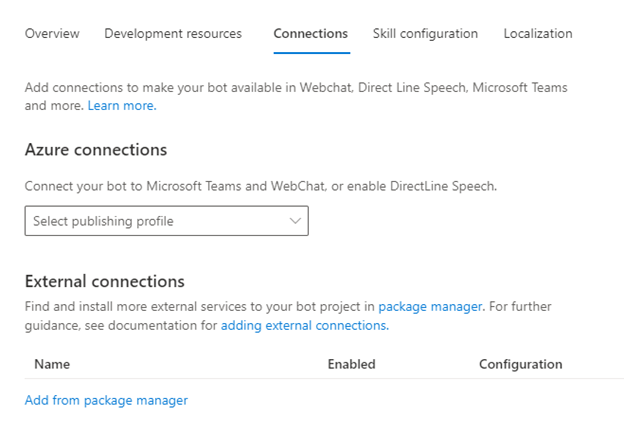
Once in the Connections tab, choose the desired publishing profile in the drop-down.
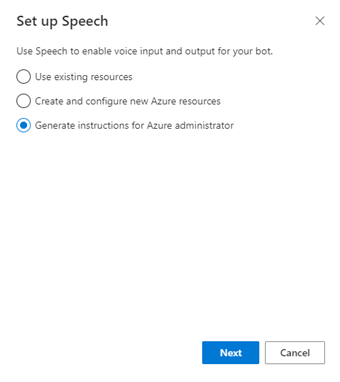
You'll then be presented with the option to enable Speech for this publishing profile-defined environment by selecting the toggle and following the prompts to create or generate instructions for the Azure administrator. Select Generate instructions for Azure admin and then Next.
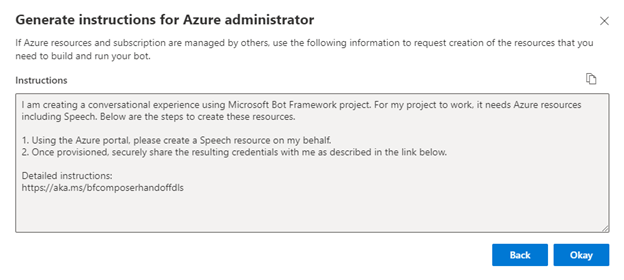
You'll then be given a screen that will allow you to copy and paste the instructions for your Azure Administrator to complete the process needed to provision your needed resources.
Execute the Azure Admin request for a Speech resource request from Composer
As an Azure Admin, you may be requested to create a Speech resource for use with Composer. To complete these actions, you'll need to log on to the Azure portal and create a Speech resource.
Create Speech resource
In Azure, search for Speech.
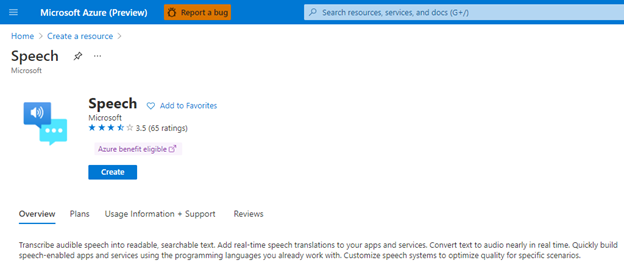
Select Create.
Ensure that you complete the required items. It's suggested that you keep all the resources in the same data center location. Then select the Create button.
Once the resource has been created, you'll be presented with a confirmation screen and you'll need to select Go to resource. This will take you to the Speech resource that was created.
Provide requestor with resource details
Navigate in the Azure portal to the Speech resource that was created above and collect the Resource and Subscription names.
You'll then need to give the user that requested the resource Contributor rights on the resource using the Access control (IAM) item from the left menu on the Azure portal. You should also record the name of the resource that was created and the subscription name to share with the requestor.
Now send this information back to the Requestor of the Resource.
Update Composer's publishing profile environment manually with your Speech information
Once you securely receive the response from your Azure administrator, you'll need to complete the following steps to ensure that your environment and publishing profile are setup for use in Composer.
- Navigate to the Configure tab on the left column and then select the tab called Connections.
- Select the publishing profile that you would like to configure for speech in the drop-down.
- Enable the Speech toggle and select the Use existing resources option.
- Select your Directory, Subscription, and Speech resource name from the information that was provided by your Azure administrator. Select Next.
- You'll get a confirmation screen with the key and region for the Speech service to confirm. Select Done.
- Verify that your toggle switch in Composer is now turned on and use the documentation's Learn more link to verify that your Speech service is properly set up and working.
Feedback
Coming soon: Throughout 2024 we will be phasing out GitHub Issues as the feedback mechanism for content and replacing it with a new feedback system. For more information see: https://aka.ms/ContentUserFeedback.
Submit and view feedback for