Microsoft Dynamics GP Payroll Extensions
Chapter 1: Payroll Extension Essentials
Payroll Integration to Payables
Payroll Integration to Payables provides a time-saving tool for creating purchasing transactions for standard payroll generated expenses. As part of the payroll process, businesses need to generate checks (or EFT – Electronic File Transfer) to vendors to pay for the various deductions applied to mployee checks during payroll processing. The Payroll Vendor Setup window will allow the user to assign types of deductions to a vendor. During the posting process of the payroll processing, the system will create Payables Voucher Transaction(s) automatically. The user can then cut checks or do EFTs using the standard Microsoft Dynamics® GP Payables Management features.
With the automation of creating these purchasing transactions, you can quickly print checks and post a batch, without manually keying all the payables transactions required to complete payroll.
Payroll Integration to Payables allows you to set up Payroll Vendor selections for each transaction type available. The selections and Payroll Vendor Setup records created will determine the details of all purchasing transactions creating by Payroll Integration to Payables during the payroll posting process. If no Payroll Vendor Setup record exists for a particular tax or deduction code, no payables transaction will be created for that amount.
Note
Reported Tips, Charged Tips, and Manual Checks are not supported by Payroll Integration to Payables features.
Payroll Integration to Payables also provides some additional Payroll Reporting options:
Print Distribution Reports
Print Period End Payroll Reports
Overtime Rate Manager
Many methods are utilized to calculate overtime hours and overtime pay rates to apply to those hours. The methods are framed by federal law, state law, corporate policies, collective bargaining agreements and rules according to certain positions and employee classifications.
Overtime Rate Manager provides enhanced overtime calculation methods, allowing you to set up calculation methods that meet requirements of law as well as requirements based on your unique company policies. The flexibility provided in this tool allows you to apply blended rates where needed and make exceptions based on certain pay scenarios such as shift codes, positions or departments. Each calculation method can be applied at an employee level and rolled down from the company level via the Pay Code Setup window.
With the ability to assign the calculation methods you define to employee levels, you can easily manage overtime calculation variables due to multiple employee types.
Overtime Rate Manager allows you to set up one or more calculation methods that can be assigned to pay codes at both the company (Pay Code Setup window) and employee (Employee Pay Code Maintenance window) levels.
The calculation method selected will determine what calculation will be used, as well what average calculations and exclusions will be applied for transactions entered for that pay code. If no calculation method is selected for the employee pay code, no rate adjustments will take place to transactions with those pay codes. Any number and configuration of calculation methods can be created and used with Overtime Rate Manager.
Deduction In Arrears
The Deductions In Arrears module enables the tracking of deduction balances when the employee’s net pay is not sufficient to meet all deductions or collect mandatory arrears for employee deductions where the employee does not receive a pay check.
Microsoft Dynamics GP Payroll or Human Resources users often need to track deduction amounts that the system was unable to collect during a specific pay run or that originated outside of a standard deduction. The Deductions In Arrears module has been designed to allow the uncollected deductions to be tracked, edited, added to or deleted providing activity level tracking of all arrear transactions.
Deductions In Arrears integrates with the Microsoft Dynamics GP Payroll module to provide a seamless solution. When processing your payroll in Microsoft Dynamics GP, Deductions In Arrears calculates and attempts to take any deductions that are currently in arrears. Any new deductions that cannot be collected during that payroll processing are then assigned as new arrears records for that employee.
Note
Deduction In Arrears does not “uncollect” on voids; it simply updates the YTD summary for Employee + Deduction.
Chapter 2: Payroll Setup Procedures
The objectives are:
Understand the procedures to follow when setting up the Microsoft Dynamics GP Payroll Extensions module.
Set up the integration to make the association between the payroll totals and their appropriate vendors.
Set up Overtime Rate Manager calculation methods and Overtime Rate Manager options.
Set up deduction in arrears parameters on the Deduction Setup window.
Introduction
This chapter explains how to set up overtime rate calculation methods, default deduction in arrears and the payroll integration to payables.
Microsoft Dynamics GP Payroll Extensions is a computer application that helps to:
Use Security Task Setup window to edit security tasks for Payroll Extensions modules.
Use Security Roles Setup window to edit security roles for Payroll Extensions modules.
Set up multiple calculation methods to match your company policies
Calculate Overtime with blended rates
Set up exceptions within each calculation method to include hours and or dollars in the calculation
Set up exceptions within each calculation method to exclude hours/dollars for specific departments, positions or shifts
Apply calculation methods at employee level
Calculate Average overtime by transactions in batch only or in all batches included in the current Build
Arrears setup at the Deduction Setup level
Arrears setup at the Employee Deduction level
Allow Arrears
Mandatory Deductions/Arrears
Collect Arrears When Possible
Add/Edit/Delete Arrears
Track Activity on each Arrears
Integration with core deduction collections
Automation of creating Purchasing Transactions for: Federal Taxes, State Taxes, Local Taxes, Company Deductions, Employee Deductions, Company Benefits, and Employee Benefits
Security Task Setup
Use the Security Task Setup window to select a default Payroll
Extensions security task or modify the default security task. To open Security Task Setup window, click the Administration series button, click System on the Setup content pane and then click Security Tasks.
Select appropriate Task ID
Select Product – HRM Solutions Series
Select Type – Windows
Select Series – 3rd Party
Select the following from the access list
Arrear Transaction Summary
Arrear Transactions
Arrear Transactions Activity
Arrear Transactions Reports
Calculation Method Setup
Calculation Methods
Deduction In Arrears Setup
Employee Pay Code Options
Mandatory Arrears
ORM Options
Pay Code Options
Change Type – Reports
Change Series – 3rd Party
Select the following from the access list
APR Arrears TRX Activity Report
APR Arrears TRX Report
APR Arrears TRX Summary Report
APR Deduction In Arrears Register
APR DIA Mandatory Arrears Calculated Arrears
APR DIA Mandatory Arrears Payruns
ID Employee Ded in Arrears Report
ORM_Adjustment_Report
Change Series – Payroll
Select the following form the access list
- DIA Deduction Build Report
Change Product – Payroll Integration to Payables
Change Type – Windows
Change Series – 3rd Party
Select the following from the access list
Create Stored Procedures
Payroll Vendor Setup
Prompt Print Edit Reports
Change Type – Reports
Select the following from the access list
APR Payroll Vendor Setup
APR PPM Distribution Report Detail
APR PPM Distribution Report Summary By Depart
Change Type – Windows
Change Series – Payroll
Select the following from the access list
Employee Benefits
Employee Deductions
Click Save.
Alternate/Modified Forms and Reports
Use the Alternate/Modified Forms and Reports window to set access to the alternate/modified forms for Payroll Extensions. To open this window, click the Administration series button, click System on the Setup content pane and then click Alternate/Modified Forms and Reports.
Select appropriate ID
Select Product – HRM Solutions Series
Select Type – Windows
Expand the Payroll folder and select the HRM Solution Series radio button for each of the following Alternate Core Microsoft Dynamics GP windows:
Benefit Setup
Deduction Setup
Employee Deduction Maintenance
Employee Pay Code Maintenance
Pay Code Setup
Click Save.
Setting up Security Roles
Use the Security Role Setup window to select a default security role for Payroll Extensions or modify the default security role. To open this window, click the Administration series button, click System on the Setup content pane and then click Security Roles.
Setting up Payroll Integration to Payables Management
Use the Payroll Vendor Setup window to make the association between the payroll totals and their appropriate vendors. To open this window, click the HR and Payroll series button, then click Payables Integration on the Setup content pane, and then click Vendors.
Transaction Type
Selecting the desired Transaction Type, the fields and/or options reflect that selection. For example, when Transaction Type of Local Tax is selected the Code field lookup contains a list of all Local Tax codes and only allows selecting a code that is a Local Tax type.
Transaction Type drop-down contains the list of transaction types that vendor assignments can be set up for.
Employee ID
Employee and Name fields are only accessible when the Transaction Type of Employee Deduction or Employee Benefit is selected. This allows vendor assignments to be set up for deductions at the employee level, not just the company education level.
For example, if a Child Support deduction is sent to different vendors for each employee, then set up Payroll Vendor Setup records for Employee Deductions for each employee required with that child care deduction code. The Vendor assigned can then be set to the correct one for that specific Employee's Child Care deduction payments.
Code
Code varies based on the Transaction Type selected. Selecting the code here allows selecting related Payroll Vendor setup information that is used to create a purchasing transaction for each code.
The Zoom and Lookup features available on the Code field allow the appropriate transaction type data available based on which transaction type is currently selected.
For example, if transaction type of Local Tax is selected the Code field reflects a Zoom to the correct Local Tax setup window and the Lookup reflects only Local Tax codes.
Description displays the appropriate description for the selected Code. The Code field is always a required field even though the label might not reflect that property correctly.
Vendor
The Vendor field allows selecting an existing vendor to assign to a particular Payroll Vendor Setup record. Vendor Name displays the appropriate name for the selected vendor.
Voucher Description and Document Number
Voucher Description list varies based on the Transaction Type selected. When any of these options are selected, when the voucher is created, the related information is pulled and inserted into the Description field. For example: If Voucher Description option Deduction Code + Check Date is selected, the Description field in the corresponding payables transaction created displays UW 4/17/2014 where the deduction code used is UW and the check date for that Pay Run is set to 4/17/2014.
Also, any specific text value can be entered by typing in this field. If the value United Way Deductions is entered, when the voucher is created, the Document Number field on the payables transaction displays United Way Deductions.
Voucher Document Number the system auto-increments by the selected Vendor ID (the first Voucher Created by Payroll Integration to Payables for a specific vendor has the Voucher Document Number set to PIP00000000000000001).
A Payroll Vendor Setup report can be printed from this window. This report contains the Payroll Vendor Setup records.
Payroll Edit Preferences
Use the Posting Setup window to specify which pre-posting reports print after calculation separately from the reports which print during the posting process. The user can differentiate between how the system prints the pre-posting report from the posting report. To open this window, click the Administration series button, click Posting on the Setup content pane and then click Posting.

Setup for Multiple Account Distributions
Use this window to set up distributions across multiple accounts. To open this window, click the Administration series button, and then click Payroll Accounts on the Setup content pane.
An example of this requirement is to departmentalize the accruals into multiple accounts. The configuration requirements to utilize this Payroll Integration to Payables are listed in this course.
Payroll Account Type - Select Deduction Withholding (CR). The Payroll Posting Account Setup window is set up to allocate Deduction Withholding (CR) by department to separate General Ledger accounts.
Use the Vendor Account Maintenance window to set both the Accounts Payable and Purchases GL account post to the same account number. To open this window, click the Purchasing series button, click Vendor on the Cards content pane and then click Accounts on the Vendor Maintenance window.
The distributions created are based on the Account setup for the particular corresponding Vendor ID. To have the payment affect the correct General Ledger account, it is necessary to change the payment Distribution to reflect the amount of each departmental accrual being paid to the associated General Ledger account. These accounts mirror the setup in Payroll Posting Accounts Setup.
Setting up Overtime Rate Manager
Many methods are used to calculate overtime hours and overtime pay rates to apply to those hours. The methods are framed by federal law, state law, corporate policies, collective bargaining agreements and rules according to certain positions and employee classifications. To open the Calculation Method Setup window, click the HR and Payroll series button and then click Overtime Methods on the Setup content pane.

Overtime Rate Manager is used to:
Set up multiple calculation methods to match company policies.
Calculate overtime with blended rates.
Set up exceptions within each calculation method to include hours and or dollars in the calculation.
Set up exceptions within each calculation method to exclude hours and, or dollars for specific departments, positions or shifts.
Apply calculation methods at the employee level.
Calculate average overtime by transactions in batch only or in all batches included in the current build.
Use Overtime Rate Manager to set up one or more calculation methods that can be assigned to pay codes at both the company (Pay Code Setup window) and employee (Employee Pay Code Maintenance window) levels.
Tip
It is not recommended to run the same build ID for multiple users a the same time. It is also not recommended to build or calculate more than one record at the same time, but rather process them sequentially.
Calculating Overtime Hours
Overtime Hours are earned when an employee works in excess of a set amount of hours in a specific time frame. This can be hours in a day, week, and, or pay-period, and so on.
Calculating Overtime Pay Rates
Overtime Hours are the hours worked by the employee that are eligible to receive a pay rate at least 1.5 times the standard rate. This increased rate is referred to as the Overtime Rate.
The Overtime Rate can be calculated in a number of ways. However, by law (FSLA), the overtime rate must be at least 1.5 times the standard rate. Sometimes, the difficult part is determining what the standard rate is for a particular time period where an employee works for different rates of pay. The standard rate can also take into account bonus amounts that are paid to the employee.
Weekly Overtime
Weekly overtime is the method an employee is given overtime for any hours over 40 worked in a week.
Overtime Hours
The overtime hours are calculated by subtracting 40 from the total hours worked in that week. The result is the number of hours the employees are paid the overtime rate for.
For example, if an employee works 45 hours in that week, the overtime hours are 5 (45-40 = 5).
Overtime Rate
The calculation of the overtime rate paid for the overtime hours is dependent on other variables.
Simple Method
The simplest method of calculating the overtime rate occurs if the employee works at the same rate for all hours. In this situation, that pay rate is multiplied by 1.5 to arrive at the overtime rate.
Example: The employee works 45 hours in a week at a rate of $10 per hour for all 45 hours. The threshold for overtime is 40 hours. The employee receives $10 per hour for 40 hours and $15 ($10 * 1.5) for the 5 hours of overtime (45-40 = 5). The employee's gross pay is $475.
Blended Rate
The employee's overtime rate is calculated differently if the employee works hours at multiple rates of pay. In this situation, the employee's overtime rate is calculated by multiplying a weighted average rate times the overtime factor of 1.5.
Example: The employee works 45 hours in a week. The employee works 20 hours at a rate of $10 per hour, 20 hours at a rate of $12 per hour, and 5 hours at a rate of $15 per hour. The employee receives the overtime rate for 5 hours. In this situation, the overtime rate is the weighted average rate for all the hours worked * 1.5. The weighted average rate is determined by dividing the total wages / total hours: ($200 + $240 + $75) / 45 = $11.44
Typically, the overtime rate is calculated as $11.44 * 1.5 = $17.16. However, in this case, the standard pay rate is not known for those 5 hours that are now considered overtime. It is not necessary to breakout the 40 hours of standard time and 5 hours of overtime. Consider the 45 hours as paid and the standard rate (factor of 1.0), so now only the overtime factor (.5) is paid for the overtime hours. So, the overtime premium for this employee is $11.44 * .5 = $5.72 * 5 (hrs) = $28.60. The employees gross pay is $514.80 + $28.60 = $543.40.
Overtime Rate with Bonus Pay
Much like the blended rate calculation, when an employee is given a performance based bonus, this amount must be figured into the overtime calculation. Again, in this case, the weighted average rate (which the overtime rate is applied to) is determined by taking the gross wages (including bonus) / hours worked.
Example: The employee works 45 hours, and also receives a $100 performance bonus in this pay period. The weighted average rate is determined by dividing the total wages / total hours: ($200 + $240 + $75 + 100) / 45 = $13.67 / hour.
Consider the 45 hours as paid and the standard rate (factor of 1.0), so now only the overtime factor (.5) is paid for the overtime hours. So, the overtime premium for this employee is $13.67 * .5 = $6.84 * 5 (hours) = $34.20. The employee's gross pay is $514.80 (hourly wages) + $100 (bonus) + $34.20 (Overtime Premium) = $649.00.
The result is that even though the employee only earned a $100 bonus, the employee's gross pay increased $105.60 compared to the blended rate example.
Weekly Overtime with Bi-Weekly Pay Periods
Overtime Hours The overtime hours are calculated by subtracting 40 from the total hours worked in each week. The result is the number of hours in each week the employee is paid the overtime rate for. For example, if an employee works 45 hours in that week, the overtime hours are 5 (45-40 = 5).
Overtime Rate The overtime rate is calculated according to the methods above. However, these calculations happen twice (one for each week) producing two distinct results for overtime hours and overtime pay rates.
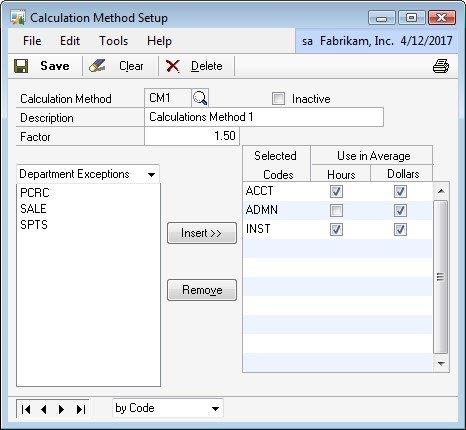
Setting up a Calculation Method
The Calculation Methods created are implemented into the calculations when they are assigned to a Pay Code or Employee Pay Code.
Calculation Method - Enter a code to identify this calculation method.
Description - Enter a description to identify this calculation method.
Inactive - Makes a calculation method inactive. An inactive calculation method cannot be assigned to any pay codes or employee pay codes.
Factor - Enter the factor to calculate by.
If the Pay Factor on the Pay Code Setup window is greater than or equal to 1, then the factor is added to the factor on the Calculation Method Setup window.
If the Pay Factor on the Pay Code Setup window is less than 1, then the factor replaces the factor on the Calculation Method Setup window.
Pay Codes to Include - Select all Pay Codes to use to figure this calculation method. Click the Insert button. For each Pay Code selected, select to use only the hours, only the dollars or both hours and dollars from that pay code to impact the calculations.
Use in Average - Hours - Select to include all payroll transaction hours for this pay code in the calculation. If this box is selected for a pay code that does not track hour units, a message stating, “This pay code does not track hours” appears, and this box cannot be selected.
Use in Average - Dollars - Select to include all payroll transaction dollars for this pay code in the calculation.
When calculating MS Extensions Overtime Rate Manager Rates, the system adds the Overtime Rate Manager rate to the rate from the Employee Pay Code Maintenance window for the Pay Code associated with the MS Extensions Overtime Rate Manager rate only if, the factor for the selected Pay Code is <= 1.00. Otherwise, the system uses the Overtime Rate Manager rate and ignores the rate from the Employee Pay Code Maintenance window for the Pay Code associated with the MS Extensions Overtime Rate Manager rate.
Setting up Exceptions
The Calculation Method window allows further restrictions to the calculation method by assigning exclusions. Exclusions can be selected for Departments, Positions or Shifts. Each exception can be set to use only the hours, only the dollars or both hours and dollars from that pay code to impact the calculations.
Select the drop-down arrow next to Pay Codes to Include.
Select one of the following items to base exception upon:
- Department Exceptions
- Position Exceptions
- Shift Exceptions
In the following example, the calculation method is set up to include all selected Pay Code Hours and Dollars excluding payroll transactions where the Department is ADMN. When the transaction Department is ADMN the calculation method includes only the Dollars from that transaction when calculating the overtime rate.
Overtime Rate Manager Options
The Overtime Rate Manager Options window extends the functionality provided in the Overtime Rate Manager by allowing the overtime average to be calculated by only transactions within a batch or across all batches in the current build. To open this window, click the HR and Payroll series button and then click Overtime Options on the Setup content pane.
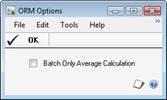
The standard Overtime Rate Manager Calculation uses all transactions across all batches in the current build. If the Batch Only Average Calculation option is selected on the ORM Options window, the overtime average is calculated based only on transactions within the same batch as the overtime transaction being calculated.
Example for Overtime Rate Manager
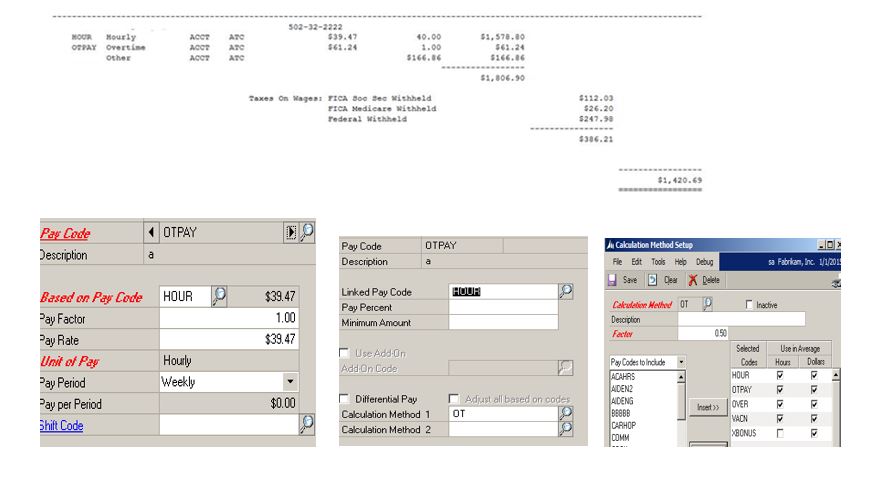
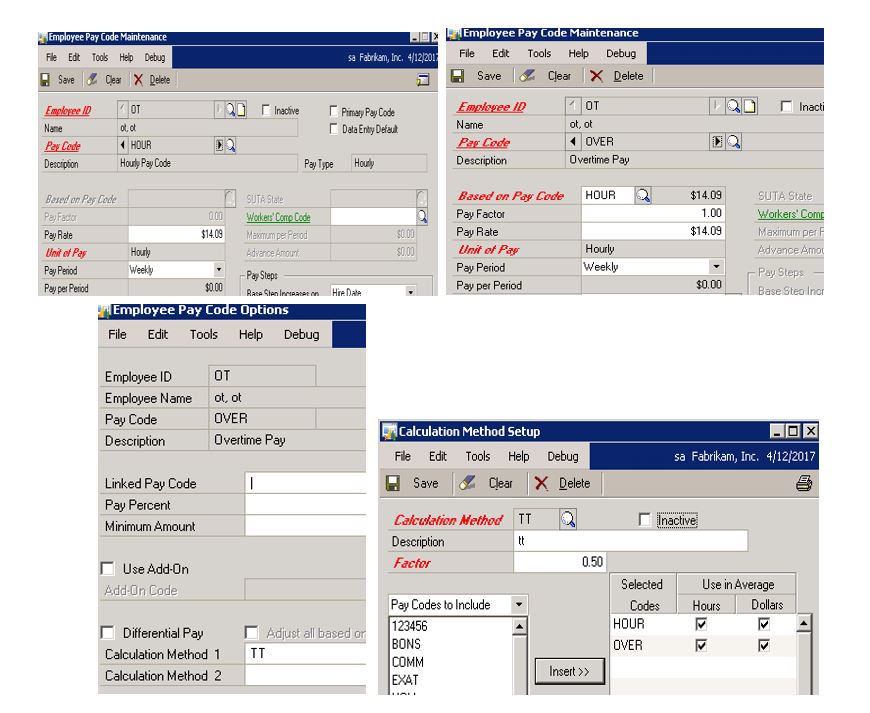
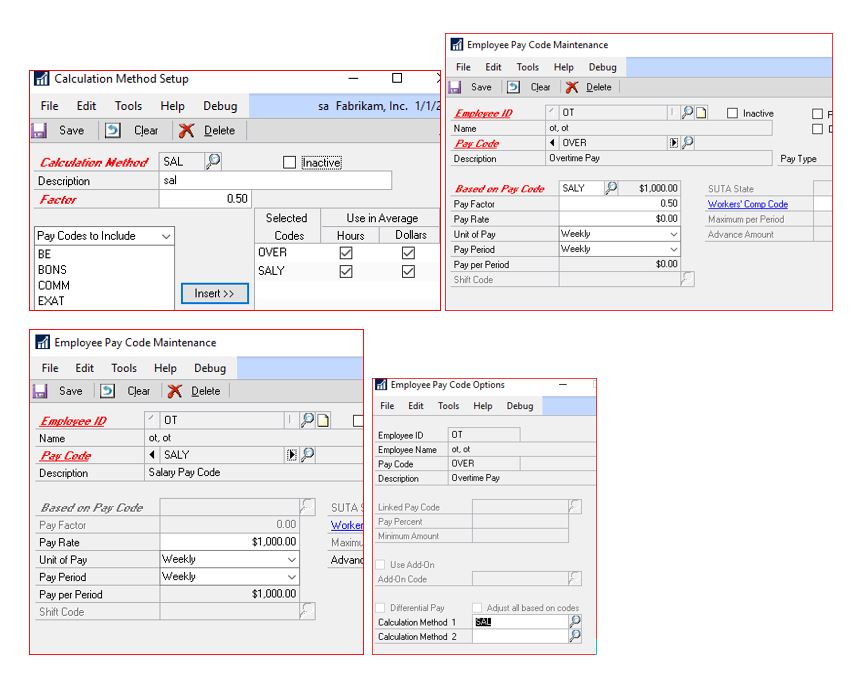
Fabrikam, Inc. uses a blended overtime methodology to determine overtime rates. Payroll Extensions offers the user flexibility to choose how to determine their overtime rate through the use of the Pay Code Setup, Pay Code Options and Calculation Method windows.
The Pay Code Setup window allows the user to determine the pay factor associated with overtime and how the calculation for overtime will be performed. In this example showing one of Fabrikam’s choices, the pay factor for the pay code OVER is set to 0.00. When the pay factor on the Pay Code Setup window is less than or equal to 1, this pay factor is added to the factor found on the Calculation Method window. Next, the user must attach one or more calculation methods using the Pay Code Options window. This is specified in the Pay Code Setup window (Microsoft Dynamics GP > Tools > Setup > Payroll > Pay Code), as shown in the following illustration.

The Pay Code Options window includes functionality for Payroll Extensions and for Advanced Payroll. For this example, the fields applicable to blended overtime are the two Calculation Method fields. These two fields are active only if the selected pay code has an associated pay type of overtime or double time. Use the lookup button to select the appropriate Calculation Method, in this example OT. This is specified in the Pay Code Options window (Microsoft Dynamics GP > Tools > Setup > Payroll > Pay Code > GoTo > Pay Code Options), as shown in the following illustration.

Fabrikam has chosen to apply a factor of 1.50 to this particular calculation method. In addition, they determined that of the pay codes available, BONS, COMM, HOUR, OVER, SICK and VACN would be used to determine the average. As indicated in the illustration below, the dollars associated with each pay code will be used to calculate the average,but only the hours for the pay codes HOUR, OVER and VACN will be used.This is specified in the Calculation Method Setup window (Microsoft Dynamics GP > Tools > Setup > Payroll > Overtime Methods), as shown in the following illustration.
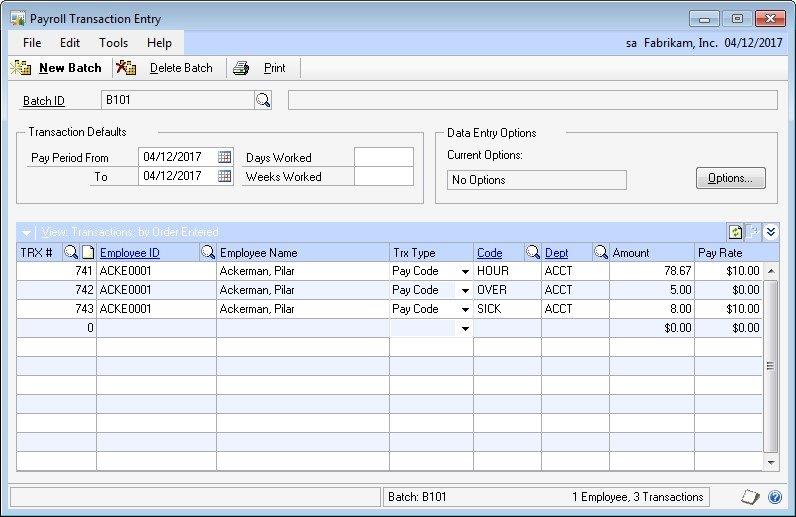
To enter the time for this example, in the Payroll Transaction Entry window, Fabrikam will enter at least two transactions. One or more entries will be for straight time worked (HOUR, SICK, VACN), and there will be another entry for overtime hours.
Fabrikam can choose other combinations of pay factors in the Pay Code Setup window and the factor in the Calculation Method window depending on their particular business practices. If necessary more than one Calculation Method can be assigned to the overtime pay code, which causes the results of each Calculation Method assigned to be added together for a total overtime rate.
Setting up Pay Code Options
Use the Pay Code Options Setup window to enter Linked Pay Codes and their associated Pay Percentages or Minimum Amounts, enter AddOn Codes and Calculation Methods to Pay Codes, to exclude hours from payroll accruals, to select pay codes that will not post hours to the General Ledger, to calculate FTE by pay code and to enter whether a pay code is considered productive or non-productive time. The Pay Code Options window includes functionality for Payroll Extensions and for Advanced Payroll. The functionality specific to Payroll Extensions is discussed here.
Pay Code Displays the pay code that you entered or selected in the Pay Code Setup window.
Description Displays the description for the pay code that you entered or selected on the Pay Code Setup window.
Differential Pay Select a pay code as Differential when you want to add a blended premium amount to the transactions included in a build for the Based On Pay Code which have the same Employee ID, Department Code, Position Code and Shift Code assigned to the transaction. The system will update the pay rate when the Based On Pay Code transaction Start and/or End Date falls within the Start and End Date of the Differential Pay transaction.
Adjust All Based On Codes Mark the Adjust all based on codes check box to add a blended premium amount to other pay codes which are based on the same pay code as the differential pay code (for example: Vacation, Sick, and Holiday pay codes).
Note
Transactions created for differential pay codes will not be paid to the employee; they will be used only for updating rates of other pay codes included in the build for the employee.
Calculation Method 1 Select an active calculation method to assign it to the selected pay code. The system will perform the calculation during the payroll process. This field is enabled only if the Pay Code is pay type overtime or double-time.
Calculation Method 2 Select an active calculation method to assign it to the selected pay code. The system will perform the calculation during the payroll process. This field is enabled only if the pay code is pay type overtime or double-time.
Note
The system will sum the calculated rate from the Calculation Method 1 and Calculation Method 2.
Setting up Deduction In Arrears
Use the Deduction Setup window to enter and maintain company deduction in arrears records to use as default entries for setting up employee deductions. To open this window, click the HR and Payroll series button and then click Deduction Setup on the Setup content pane.
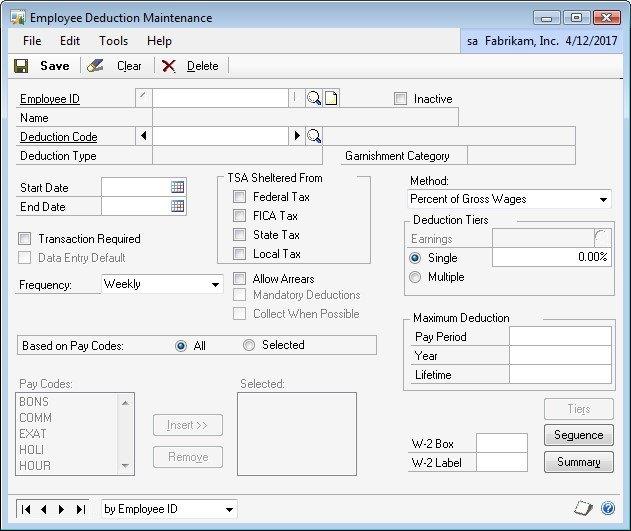
Use the Employee Deduction Maintenance window to enter Payroll deduction information for a specific employee. For example, the amount an employee wants deducted for charitable contributions or union dues can be entered. A deduction can be set up as a percentage of gross, net, or earnings wages, as a fixed amount, or as an amount per unit of wages.
The three Deductions in Arrears check boxes default from the Deduction Setup window and these defaults can be overridden.
Refer to the Payroll / Human Resources printable manuals for the other deduction setups.
Allow Arrears
Select Allow Arrears to enable the tracking of deduction balances when the employee's net pay is not sufficient to meet all deductions. This check box enables the tracking of deduction balances when the employee’s net pay is not sufficient to meet all deductions.
Mandatory Deductions
Select Mandatory Deductions to collect mandatory arrears for employee deductions where the employee does not receive a pay check. This check box collects mandatory arrears for employee deductions where the employee does not receive a pay check.
Collect When Possible
Select Collect When Possible to collect deduction in arrears amounts from ANY paycheck.
If Collect When Possible is not selected, an attempt is made to collect deductions in arrears amounts ONLY from paychecks where the deduction code already exists on the paycheck. This option is not available unless the Allow Arrears option is selected.
Note
The Maximum Deductions (per Pay Period, Per Year and Per Lifetime) still apply when Arrears options are selected. If the employee hits a Max Per Pay Period during a pay cycle the balance of the deduction amount is created as a new arrears record. If the employee hits a Max Per Year or a Max Per Lifetime during a pay cycle no arrears record is created for the balance.
Arrears Transactions
Use the Arrear Transactions window to edit or add new uncollected deductions in arrears. To open this window, click the HR and Payroll series button and then click Arrears Transactions on the Cards content pane.
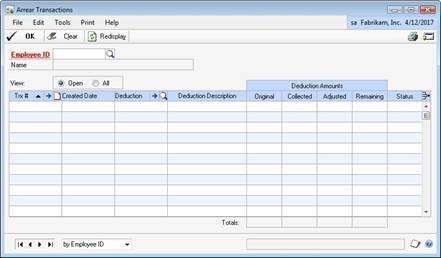
A new arrear adjustment for an uncollected deduction can be created when it is paid by the employee outside of a pay check, or if it is forgiven by the employer, or if it needs to be edited or removed. The Arrears Amount can be edited or the record can be deleted to handle these situations. The uncollected deductions in arrears amounts can be increased or reduced or the entire arrears record can be deleted.
Employee ID, Name and View
Enter or select an Employee ID. The selected employee's name displays.
The View option defaults to Open. However, the option exists to view either Open, or All of an Employee's transactions.
View Open transactions are defined as those arrear transactions with a Remaining Balance greater or less than 0.00.
View All transactions are defined as all an Employee's Arrear Transactions regardless of the Remaining Balance.
TRX No. and Created Date
TRX # is a unique number assigned to each new arrears transaction created. Created Date reflects the original date the arrears transaction is created.
Deduction and Deduction Description
Deduction code displays the deduction code of the arrears transaction.
Deduction Description displays the deduction description of the arrears transaction.
Deduction Amounts
Deduction Amounts Original reflects the original arrears transaction amount.
Deduction Amounts Collected reflects the total amount collected against this arrears transaction.
Deduction Amounts Adjusted reflects the total amount adjusted against this arrears transaction.
Deduction Amounts Remaining reflects the total amount remaining on this arrears transaction.
Status
Status is an informational field that displays a User ID if this deduction is currently in a payroll build, calculate or posting process. Anytime the status is filled with a User ID this employee deduction cannot be edited.
Arrear Transaction Summary
The Arrear Transaction Summary window allows the current or all arrears for an employee to be viewed, as in the Arrear Transactions window, but they are summarized by the deductions. To open this window, click the HR and Payroll series button and then click Arrears Transactions on the Cards content pane, then click Go To on the Arrear Transactions window, and then click Arrear Transaction Summary.
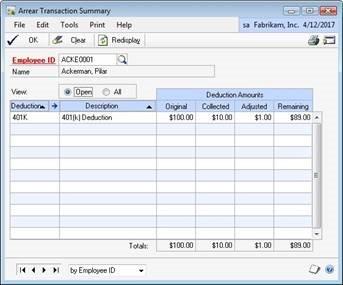
The scrolling window allows multiple sorting options by clicking on the column headings. Both ascending and descending sorts are available for these columns, the current sort indicated by the arrow on the column heading pointing up or down.
Arrears Transaction Activity
The Arrears Transaction Activity GoTo option is available when a record/row is selected in the scrolling window and is used to view all the activity of a specific arrear transaction. To open this window, click the HR and Payroll series button and then click Arrears Transactions on the Cards content pane, then click Go To on the Arrear Transactions window, and then click Arrear Transaction Activity.

A record/row can be selected by clicking on the created date or the row. New activity arrears records can be created. The scrolling window allows multiple sorting options by clicking on the column headings. Both ascending and descending sorts are available for these columns, the current sort indicated by the arrow on the column heading pointing up or down.
Employee ID and Name
- Employee ID/Name reflects the employee associated with this arrear transaction. The selected employee's name displays.
TRX No. and Orig. Created Date
TRX # is a unique number assigned to each new arrears transaction created.
Original Created Date reflects the original date the arrears transaction is created.
Deduction and Deduction Description
Deduction code displays the deduction code of the arrears transaction.
Deduction Description displays the deduction description of the arrears transaction.
Original Deduction Amount and Total Amount Collected
- Original Deduction Amount reflects the original arrears transaction amount. Total Amount Collected reflects the total amount collected against this arrears transaction.
Total Amount Adjusted and Deduction Remaining
- Total Amount Adjusted reflects the total amount adjusted against this arrears transaction. Deduction Remaining reflects the total amount remaining on this arrears transaction.
Add Activity
Date This becomes the Created Date for the new activity record.
Type This is the type of activity record to add; Adjusted or Collected.
Amount This is the amount of the adjustment or collection to add with this activity record.
Click the Note icon to add a note related to this activity record to the Trx # note.
Sequence Number
The sequence number is a unique number assigned to each new arrears transaction activity created.
Source
Source The source is assigned to each new arrears transaction activity when it is created to reflect the process that generated the activity record. The following are the sources and the related processes that generate those particular activity records.
Created By User Source used when a new Arrear TRX # is added by the user in the Arrears Transaction window.
Collected By User Source used when a Collected Add Activity is added in the Arrears Activity Transaction window.
Edited By User Source used when an Adjusted Add Activity is added in the Arrears Activity Transaction window.
Note
This source is also used when the DIA Data Conversion is run.
Deleted By User Source used when a record (it zero's out) is deleted in the Arrears Transaction window.
Created By Payrun Source used when a new Arrear TRX # is created by the payroll process.
Updated By Payrun Source used when the payroll process updates all or a portion of an existing Arrears TRX #.
Attempted By Payrun Source used when no amount of an existing Arrears TRX # can be collected during the payroll process but the payroll process attempted to collect on it.
Created By Voided TRX Source used when a check that had an associated arrear transaction activity record is voided.
Created By Mandatory Source used when arrears records are posted from the Mandatory window/process.
Employee Changes Source used when Yes is the answer to the Inactivate Employee Deduction message “Do you wish to zero out the remaining balance for all arrears associated with this Employee and Deduction?” or when Yes is the answer to the Terminate Employee message “Do you wish to zero out the remaining balance for all arrears associated with this Employee and eduction?”
Edited By User for Settings Source used when Un-Select Allow Arrears is used on an Employee/Deduction and the answer is Yes to the message “Do you wish to zero out the remaining balance for all arrears associated with this Employee and Deduction?”
Audit Trail Code
The Audit Trail Code assigned to the arrear transaction activity records created during the payroll process and it reflects the audit trail code associated with that payroll process. If a specific row is selected zoom to the transaction history of that audit trail code/payroll process for related information.
Check Number
The Check Number assigned to the arrear transaction activity records created during the payroll process and it reflects the audit trail code associated with that payroll process.
Attempted and Collected
- Attempted The Attempted column reflects the beginning amount of this arrear transaction activity.
- Collected The Collected column reflects the amount collected against this arrears transaction with this arrears transaction activity.
Adjusted and Remaining
Adjusted The Adjusted column reflects the amount adjusted against this arrears transaction with this arrears transaction activity.
Remaining The Remaining column reflects the total amount remaining on this arrears transaction as the end result of this arrear transaction activity.
Created Date and Created By
Created Date The created date reflects the date the arrears transaction activity record is created.
Created By The created by reflects the user that created the arrears transaction activity record.
Summary
This chapter explains how to enter information about the employee deduction in arrears and overtime parameters.
Some key points to remember from this course include:
The uncollected deductions in arrears amounts can be increased or reduced or the entire arrears record can be deleted.
How to assign calculation methods.
Chapter 4: Daily Procedures
The objectives are:
• Use the Mandatory Arrears window to process mandatory arrears.
This chapter describes how to use the Mandatory Arrears window to process the mandatory arrears.
Mandatory Arrears
Deduction In Arrears allows mandatory arrears to be captured for collection during the pay run for an employee. Use the Mandatory Arrears window to process the mandatory arrears. To open this window, click the HR and Payroll series button, and click Mandatory Arrears on the Transactions content pane.
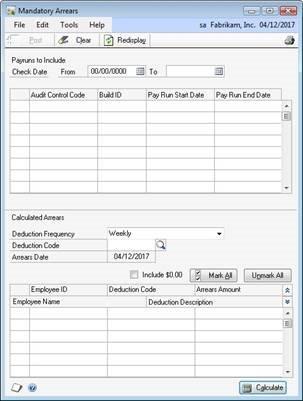
The Mandatory Arrears feature is used for a standard deduction like health insurance that is a required per pay period deduction even though the employee does not receive a pay check for that pay period.
It becomes a new step in the payroll processing to collect and post all mandatory deductions for any employees not included in that pay period processing. Once Mandatory Arrears are calculated they are then posted and an Arrears record for that employee, deduction and arrears amount is created.
Collection is not attempted for mandatory deductions without marking the Allow Arrears and Mandatory Arrears check boxes in the Employee Deduction Maintenance window.
Check Date and Pay Runs to Include
Enter the beginning (From) and ending (To) check dates range. Once the check date range is entered,
Pay runs to Include
The scrolling window populates with all builds that are posted with a check date that falls within that date range. Select the appropriate builds. Mandatory Arrears are calculated based on Deduction frequency.
Deduction Frequency, Deduction Code and Arrears Date
Once all the appropriate Builds are selected, select or enter the desired Deductions Frequency, Deduction Code and Arrears Date.
- Deductions Frequency
The deduction frequency restricts the calculated arrears to mandatory employee deductions that are set up with that deduction frequency.
Deduction Code
When the deduction code is left blank the system calculates mandatory arrears for all employee deductions that match the deductions frequency selected. When mandatory arrears are calculated for a specific deduction that deduction can be selected from the lookup or the deduction code can be entered into this field.
Arrears Date
Enter the date to assign the arrears record created during the Post Mandatory Arrears process.
Calculate
Once all the criteria are selected, press Calculate at the bottom of the window. The system calculates which employees have mandatory deductions and are not included in any of the selected Builds that match any other criteria selected.
Note
Note: The employee must not exist in any of the selected builds to show in the scrolling window in the Calculated Arrears section of the Mandatory Arrears window.
The scrolling window in the Calculate Arrears section of the Mandatory Arrears window populates with all employees and mandatory deductions that match all the criteria. The Arrears Amount defaults to that employee deduction amount from the employee deduction record but can be edited. Select the Employee/Deduction(s) to create Mandatory Arrears records for.
By selecting or deselecting the Include $0.00 option, it further expands or restricts the Mark All selection. Mandatory Arrears functionality only supports Fixed Amount deductions.
This chapter explains how to use the Mandatory Arrears window to process the mandatory arrears.
Some key points to remember from this course include:
• Mandatory Arrears functionality only supports fixed amount deductions.
Overtime Rate Manager Setup Examples and Calculations
With Overtime Rate Manager (ORM), you can calculate a blended overtime rate to pay employees with. This meets requirements for FLSA, Fair Labor Standards. Many times in support we get questions on how to set this up. In the following sections, we provide some basic examples of a setup and also the calculation we use to back into these figures. One with overtime, and one with double overtime, bonus and shift pay.
These are just examples, and guidelines for you to follow as you start to use this product, the system is more rules based in this area and your setup may fluctuate based off your need of calculation.
It is very important when working with overtime rate manager that you know the rate that was keyed into the payroll transaction, as you can see examples below, once you get to the calculate checks report it shows the BLENDED rate, not the actual rate that is keyed into the system and that seems to confuse a lot of users.
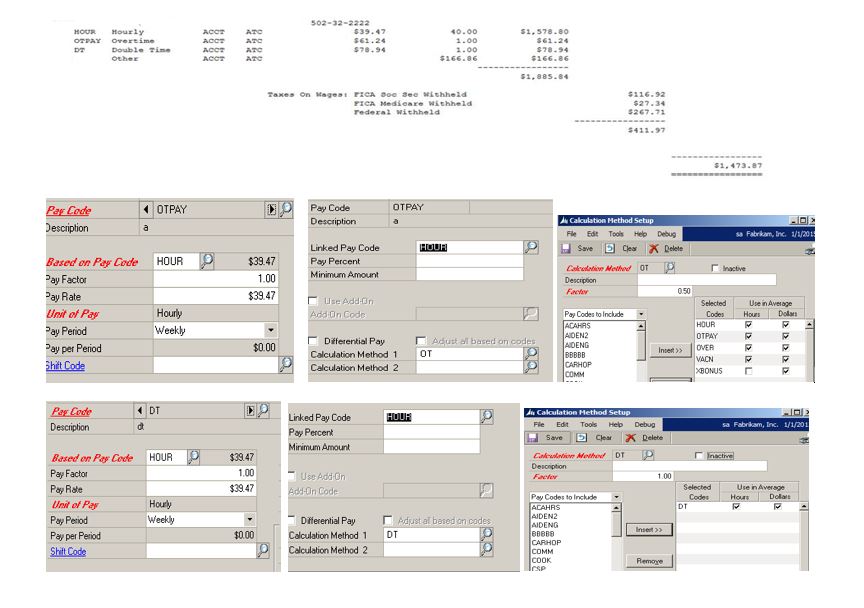
Overtime example 1
1 hour of OT---40 reg hours at 39.47 and bonus pay of 166.86
40.00 * 39.47=1578.80
1.00 * 39.47 = 39.47
Blended rate is total wages / hours to get average
1578.80 + 39.47+ bonus pay 166.86=1785.13 / 41.00 =43.54 this is my blended rate
The overtime premium for this employee is 43.54 *.5 = 21.77
Then you take this times your OT hours in this example 1 * 21.77 = 21.77 this is your premium
The employee’s gross pay is 1578.80 + 39.47+ bonus pay 166.86 + 21.77= 1806.90, matches calc checks
If you need to back into 1806.90
It would be 1806.90-1578.80 -166.86=61.24/ 1.00=61.24 per the OT rate on calc checks
Overtime example 2: Double Time
1 hour of OT, 1 hour DT , 40 reg and bonus pay of 166.86
40.00 * 39.47=1578.80
1.00 * 39.47 = 39.47
1.00 * 39.47 = 39.47
Notice how the blended rate did not change as in our DT calc method we are NOT including the prior hours, just DT straight at double time …it is not blended or included in the OT blend.
Blended rate is total wages / hours to get average this would be the same as DT is not in the reg. OT code nor blended 1578.80 + 39.47 bonus pay 166.86=1785.13 / 41.00 =43.54 this is my blended rate The overtime premium for this employee is 43.54 *.5 = 21.77 Then you take this times your OT hours 1. * 21.77 = 21.77 this is your premium The employees gross pay is 1578.80 + 39.47+ bonus pay 166.86 + 21.77 + 78.94 (DT)= 1885.84 matches calc checks
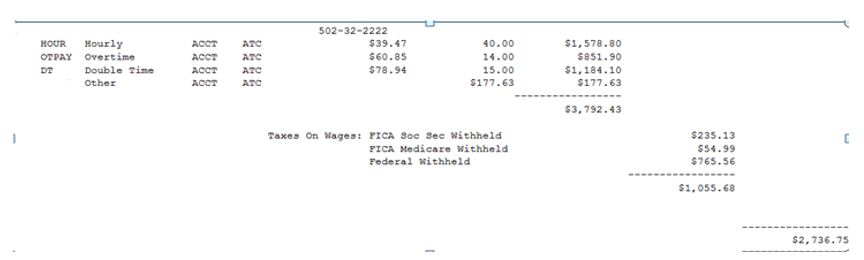
Overtime example 3: Overtime and Double Time
14 hour of OT, 15 hour DT , 40 reg and bonus pay of 177.63
40.00 * 39.47=1578.80
14.00 * 39.47 = 552.58 OT
15.00 * 39.47 = 592.05 DT
Notice how the blended rate did not change as in our DT calc method we are NOT including the prior hours, just DT straight at double time …it is not blended Blended rate is total wages / hours to get average this would be the same as DT is not in the reg. OT code nor blended 1578.80 + 552.58 bonus pay 177.63=2309.01 / 54.00 =42.76 this is my blended rate The overtime premium for this employee is 42.76 *.5 = 21.38 Then you take this times your OT hours 14 * 21.38 = 299.32 this is your premium The employees gross pay is 1578.80 + 552.58+ bonus pay 177.63 + 299.32 +1184.10(DT not blended)= 3792.43 matches calc checks
Use same screen shot setup as ones noted above for setup.
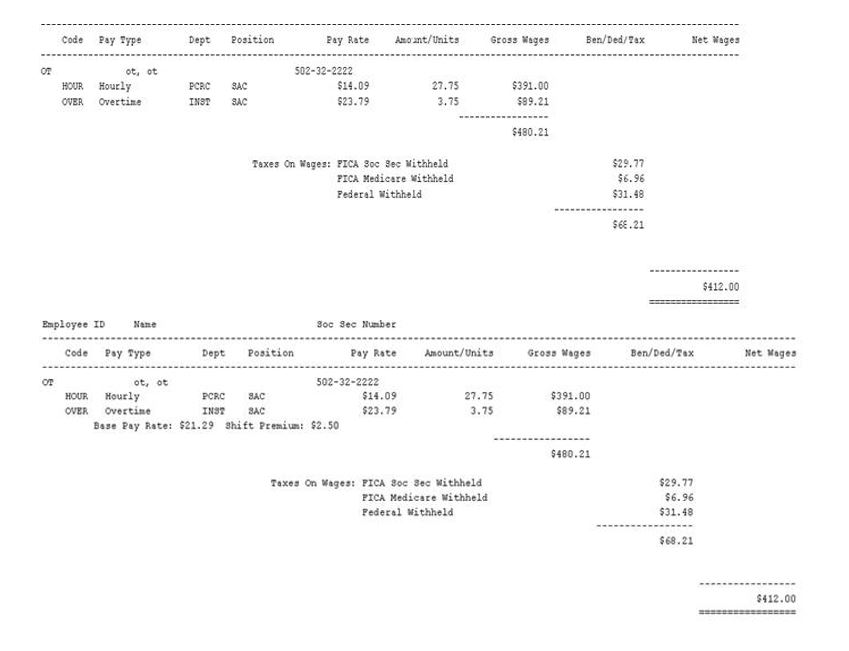
Overtime example 4: Overtime and Shift Differential
The premium or shift is just added to the rate, you would get the same results if you took off the shift and just updated the OT rate to 16.59 1st calculate checks screen shot ….2nd Screen on bottom is with shift, same thing 27.75 * 14.09=391.00 3.75 * 16.59 = 62.21 or 14.09 + 2.50 * 3.75 = 62.21
Blended rate is total wages / hours to get average 391.00 + 62.21=453.21 / 31.50 =14.39 this is my blended rate The overtime premium for this employee is 14.39 *.5 = 7.195 Then you take this times your OT hours 3.75 * 7.195 = 26.98 this is your premium The employees gross pay is 391.00 + 62.21 + 26.98 = 480.19 If you need to back into 480.19 It would be 480.19-391.00=89.19/ 3.75 =23.78 – 2.50 = 21.28 A penny off, rounding
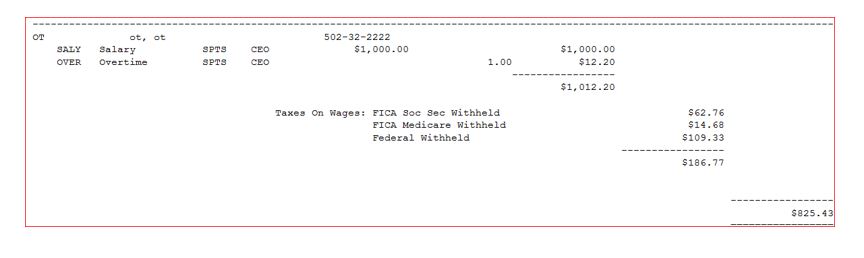
Overtime example 5: Overtime and Salary Pay
Employee worked 41 hours, Salary pay code, weekly at 53,000 annually, 1,000 weekly pay. Gross Salary must be 1012.20 for the week.
- 1000.00/41 hours = 24.39
- 24.39*.50 for the premium is 12.20
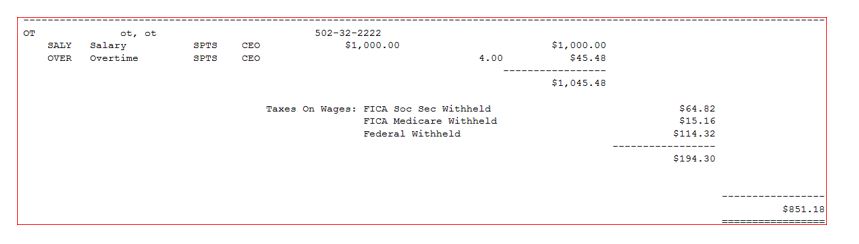
Employee worked 44 hours, Salary pay code, weekly at 53,000 annually, 1,000 weekly pay. Gross Salary must be 1045.44 for the week.
- 1000.00/44 hours = 22.73
- 22.73 *.50 for the premium is 11.37
- 11.37 * 4hours = 45.48 overtime
The setup is the same for both examples You would just key a transaction for the hours of overtime.
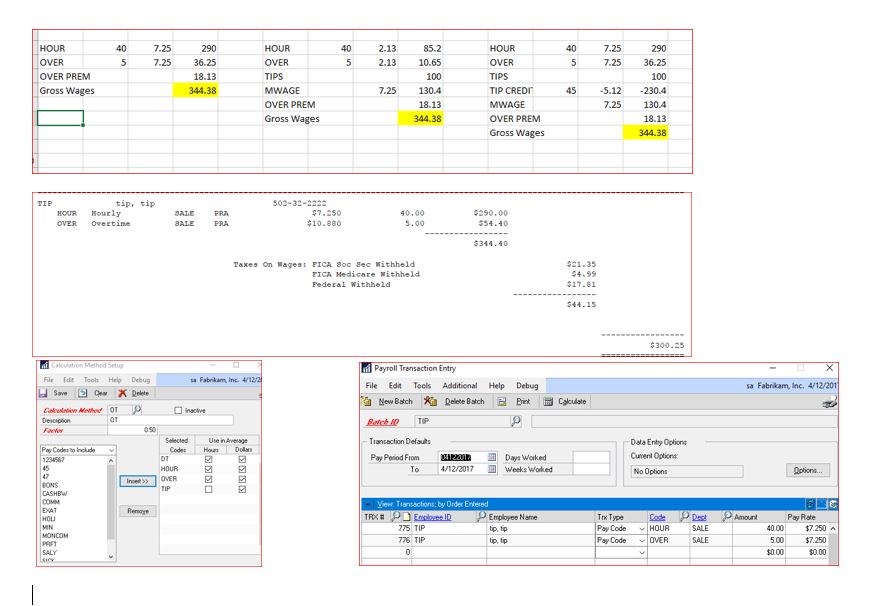
Overtime example 6: Overtime and Minimum Net pay, Tips/Tip Credit
The employer pays a cash wage of $2.13 per hour claims an FLSA 3(m) tip credit of $5.12, and the employee works 45 hours in a tipped occupation.
- Tips reported : $100.00
- 45 hours (total hours worked) × $7.25 (regular rate) = $326.25 (straight time wages due)
- 5 hours (overtime hours) × .5 × $7.25 (regular rate) = $18.13 (overtime wages due)
- $326.25 (straight time wages due) + $18.13 (overtime wages due) = $344.38 (total wages due)
Generally, employers display the “Tip Credit” as a reduced hourly rate to the employee.
Thus, in this example, they pay the employee $2.13/hour (minimum wage rate of $7.25 – tip credit of $5.12). When a state has a higher minimum wage, generally the tip credit amount stays the same.
Regardless, this just results in a higher hourly rate for hours worked. The GP minimum wage functionality ensures the employee is paid the minimum amount. The Tip Credit is inherently “included in determining the regular rate” by the nature of the fact that the hourly rate is reduced by the Tip Credit amount. In addition, the tips wages are also included via the ORM Method as is the Minimum Wage amount. Below is a spreadsheet that details the calculation for the following scenarios:
- No tips
- Tips with rate set to $2.13/hour
- Tips with rate set to $7.25/hour (breaking out the tip credit separately)
The target gross wages is correct if $2.13/hour is used.
Chapter 5: Reports
The objectives are:
• Understand the options available for printing reports in Payroll Extensions.
Payroll Extensions provides the ability to print window level reports, Deduction in Arrears Build report and Differential Build Edit Report.
The Payroll Extensions module provides printing capabilities by using the printer icons on the individual windows. For example, pulling up the Calculation Method Setup window and selecting the printer icon (without making any Calculation Methods selections) will print a report giving all of the Calculation Methods currently set up.
Deduction In Arrears Build Report
After the Build processing has completed, the user will be prompted with the option to print the DIA Deduction Build Report.
The report is comprised of the following data elements for each Employee/Deduction included in the Build:
Standard deductions –The pay period deductions Microsoft Dynamics GP is set up to take from the employee either as Transactions entered or as automatic transactions created during the build process.
Arrear Transaction deductions –The deductions that have been put into Arrears. There may be multiple arrear transactions for the same deduction. The system will track each missed or uncollected arrear separately and attempt to take that arrear until the total remaining has been completely collected. These rows are identified by the text “(DIA)” prior to the Code on the report.
Note
You can adjust the arrear transactions through the Arrear Transaction windows as needed. What will be collected is only the Amount Remaining at the time the Build is generated.
Differential Build Edit Report
The Differential Build Edit Report prints after the calculate checks process and details the differential transaction which was responsible for adjusting any pay codes in the build.
Summary
Payroll Extensions provides reporting capabilities by using history windows,the Percent Current Inquiry window, and the use of printer icons on individual windows.
Key points to remember from this chapter:
• Reports are provided by using printer icons.
Feedback
Coming soon: Throughout 2024 we will be phasing out GitHub Issues as the feedback mechanism for content and replacing it with a new feedback system. For more information see: https://aka.ms/ContentUserFeedback.
Submit and view feedback for