Create and manage segments
Segments let you group your customers based on demographic, transactional, or behavioral attributes. Use segments to target promotional campaigns, sales activities, and customer support actions to achieve your business goals.
Customer or contact profiles that match the filters of a segment definition are referred to as members of a segment. Some service limits apply.
Create segments
Choose how to create a segment based on your target audience.
- Complex segments with segment builder: Build your own
- Simple segments with one operator: Quick segment
- AI-powered way to find similar customers: Similar customers
- AI-powered suggestions based on measures or attributes: Suggested segments based on measures
- Suggestions based on activities: Suggested segments based on customer activity
Manage existing segments
Go to the Insights > Segments page to view the segments you created, their status and state, the last time the data was refreshed, and their refresh schedule. You can sort the list of segments by any column or use the search box to find the segment you want to manage.
Select next to a segment to view available actions.

Tip
Supported bulk operations include: refresh, download, delete, change state (activate/deactivate), change type (static/dynamic), and tags.
- View the segment details, including member count trend and a preview of segment members.
- Download the list of members as a CSV file for one or more segments.
- Edit the segment to change its properties or view segment member counts for each rule.
- Create duplicate of a segment. You can choose to edit its properties right away or save the duplicate.
- Refresh one or more segments manually to include the latest data. The Last refreshed column shows a timestamp of the last successful refresh. If an error occurs, select the error to see details about what happened.
- Activate or Deactivate one or more segments. For multiple segments, select Change state. Inactive segments won't get refreshed during a scheduled refresh and have the Status listed as Skipped, indicating that a refresh wasn't even attempted. Active segments are refreshed based on their type: static or dynamic and their schedule.
- Make static or Make dynamic the segment type. Static segments must be refreshed manually. Dynamic segments are automatically refreshed according to their schedule.
- Find similar customers from the segment.
- Rename the segment.
- Tag to manage tags for one or more segments.
- Manage exports to see export-related segments and manage them. Learn more about exports.
- Delete one or more segments.
- Schedule to customize schedules for segments.
- Columns to customize the columns that display.
- Filter to filter on tags.
- Search name to search by segment name.
Segment management tips
The smaller the number of segments and measures that need to be refreshed daily, the quicker the overall system refresh takes. To lower the number of segments refreshed daily, consider the following tips:
When a campaign is over and you no longer need a segment, Delete it. If a campaign runs more than once, you can deactivate the segment. Deactivating it saves the segment configuration, but stops the automatic refresh.
Schedule segments on a slower cadence so they are not refreshed daily.
We recommend setting up a recurring audit process to review segments and measures and delete the ones that are not needed anymore. To help you with this process, use tags with campaign and end date information. During the audit process you can search for tags and delete segments and measures in bulk.
View segment details
On the Segments page, select a segment to view the processing history and segment members.
The upper part of the page includes a trend graph that visualizes changes in member count. Hover over data points to see the member count on a specific date. Change the time frame of the visualization.
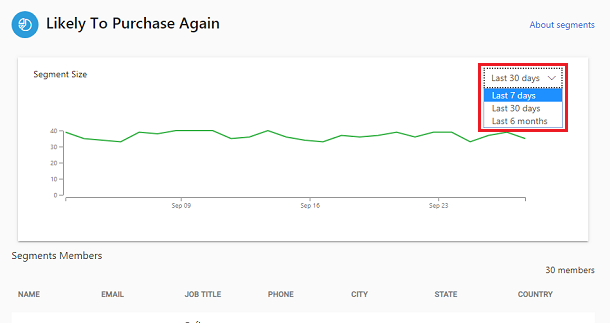
The lower part contains a list of the segment members.
Note
Fields that appear in this list are based on the attributes of your segment's tables.
The list is a preview of the matching segment members and shows the first 100 records of your segment so that you can quickly evaluate it and review its definitions if needed. To see all matching records, select See more which opens the Tables page or export the segment.
View segment member counts (preview)
[This article is prerelease documentation and is subject to change.]
View the number of members based on each rule or combination of rules in a segment. The number of members can help you determine if the rules are meeting your expectations.
Important
- This is a preview feature.
- Preview features aren't meant for production use and may have restricted functionality. These features are available before an official release so that customers can get early access and provide feedback.
On the Segments page, find the segment you want to view and select Edit.
Turn on Inspection mode.
Save the segment.
Run or refresh the segment. After the refresh completes, segment member counts display.
Tip
While editing a segment, the rules show the old value for the member count until you save the updated segment. Once save, the values are reset to zero. After refreshing it, the updates values show on the rules.
The following image shows the different member counts.

The number of members at the top of the page shows the number of customers for the segment after all rules are calculated.
Each rule shows the number of customers based on that rule, its subrules, and its conditions.
If you hover over the member count for each rule, a tooltip displays. The tooltip shows the number of customers based on that rule and all previous rules. For example, the Rule 2 tooltip shows the union or combined count of Rule 1 and Rule 2. The Rule 3 tooltip shows the combined count of Rule 1 and Rule 2 and the intersection of Rule 3.
Export segments
Export segments to other apps to further use the data. Export a segment from the segments page or the exports page.
Go to the Insights > Segments page and select the segment you want to export.
Select Manage exports. The page Exports (preview) for segment opens. View all configured exports grouped by whether they contain the current segment or not.
To add the selected segment to an export, Edit the respective export to select the corresponding segment, then save. In environments for individual customers, select the export in the list and select Add segment to achieve the same outcome.
To create a new export with the selected segment, select Add export. For more information about creating exports, see Set up a new export.
Select Back to return to the main page for segments.
Manage the number of active segments
When you approach or exceed the number of active segments based on the service limits, you might experience the following:
- Typical system refresh time is slower.
- Running or refreshing individual segments is slower.
- Refresh failures indicating out of memory.
The complexity of your segments can also impact performance. To help you prevent performance issues, Dynamics 365 Customer Insights - Data provides messages or warnings when you approach, reach, or exceed the total number of active segments. These messages display on the Segments list page. If you encounter these messages or symptoms, see the following recommendations.
- Delete old or no longer relevant segments even if they are static or inactive. When a campaign ends, deactivate associated segments for recurring campaigns.
- Schedule individual segments to run weekly or monthly during slow business days (such as the weekend) instead of daily.