Personalize sales accelerator
Use personal settings to determine how activities are scheduled based on work availability and decide what happens when an activity is complete.
License and role requirements
| Requirement type | You must have |
|---|---|
| License | Dynamics 365 Sales Premium or Dynamics 365 Sales Enterprise More information: Dynamics 365 Sales pricing |
| Security roles | Any primary sales role, such as salesperson or sales manager More information: Primary sales roles |
What can you personalize?
As a seller, you can personalize the sales accelerator by determining how activities are scheduled based on your work availability and deciding what happens when you complete an activity. The following personal settings are available for you to configure:
- Configure your work availability
- Configure the auto advance steps
- Configure steps and activities
- Show or hide filters
Configure your work availability
Configure your working days, hours, and days off to adjust scheduled tasks and lead assignment according to your availability. For example, you're taking a day off on April 1, 2021, and you have a few activities to complete that day. When you configure the calendar with your day off, any activities that were scheduled for that day will be moved to your next available date or time.
Note
As a sales manager, you can configure the availability of sellers who report to you. More information: Manage seller availability
Depending on the license you have in the organization, you use one of the following ways to configure your work availability:
- Sales Premium: Through work list settings
- Sales Enterprise: Through personal settings
Note
- Ensure that you have read and write privileges to the Calendar entity. More information: Security roles and privileges
- Verify that the administrator has enabled the option to configure your availability:
- Through sequence settings. More information: Seller availability
- Through sales accelerator configuration. More information: step 4 in Configure sales accelerator for assignment rules
- Starting from April 1, 2024, you can't set the seller's availability through Outlook. More information: Deprecation of setting seller availability using Outlook calendar
Through work list settings (Sales Premium)
Sign in to the Dynamics 365 Sales Hub app, and go to My work > Sales accelerator.
In the work list section, select More options > Settings.
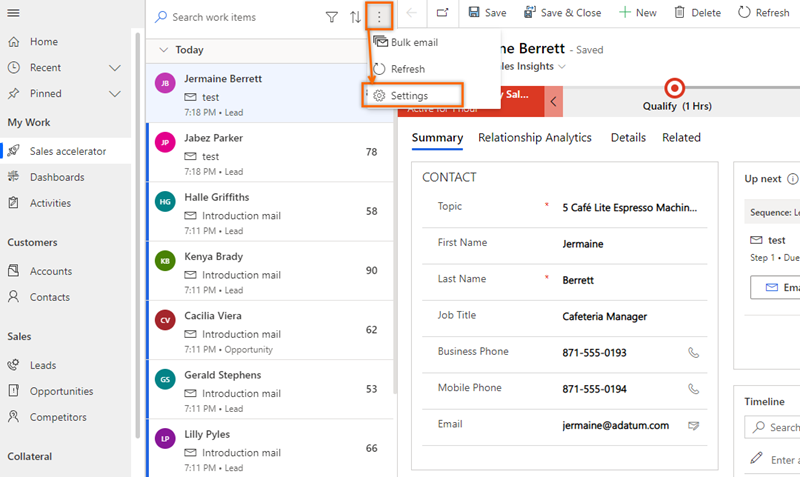
On the Personal settings page, select Availability.
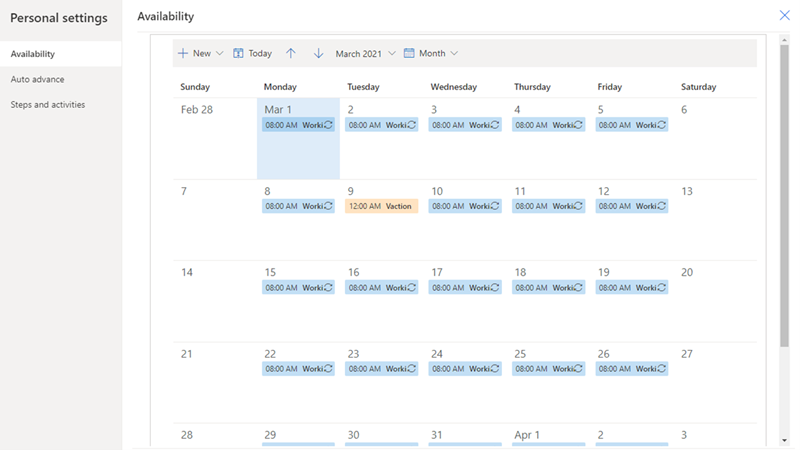
Select New, and choose an option to configure your calendar according to your requirements:
Working hours: Configure your regular working hours between dates you define. This helps the sales accelerator to consider the assignment of activities to your work list.
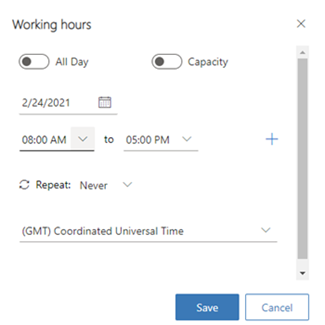
Configure the following options:
Select a date for which you want to configure your working hours.
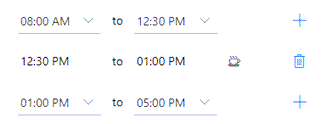
Select the working hours in your day. By default, nine working hours are configured from 8∶00 AM to 5∶00 PM, without any breaks. To add a general break or lunch hours between working hours, select Add (+). In the following example, you can see that a break of 30 minutes has been added to the working hours. You can continue adding breaks as needed.
Choose whether you want to repeat this working hour configuration each day or only on this day of the week:
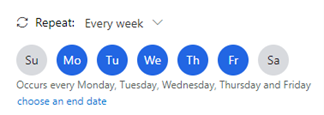
If you select Every day, the configured working hours are applied to each day of the week, including Saturday and Sunday. You can select any days for which you don't want to apply these working hours. In the following example, Saturday and Sunday have been removed from this working hour configuration. Also, you can choose an end date on which you want to end this working hour configuration.
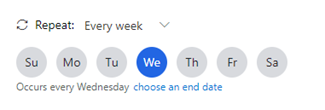
If you select Every week, the configured working hours are applied to the same day every week. In the following example, the configuration is applied on Wednesday, and all subsequent Wednesdays will have the same working hour configuration. Also, you can choose an end date on which you want to end this working hour configuration.
Select your time zone. The time zone allows you to match the time properly when your team is spread across countries or regions. By default, Coordinated Universal Time (Greenwich Mean Time) is selected.
Save the configurations.
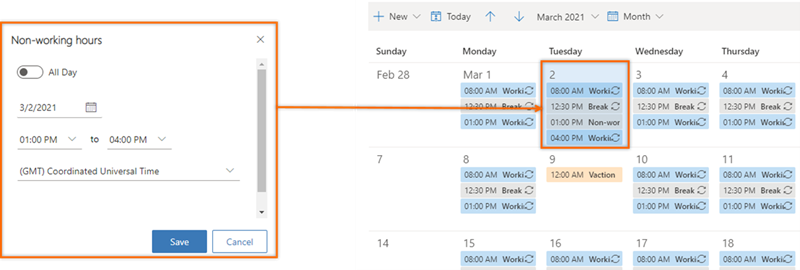
Non-working hours: Configure a break or time you're taking off from work on a particular day. Choose the period of time you want to take off, and then select Save.
In the following example, you have an appointment with a doctor for a checkup between 1:00 and 4:00 PM on March 2, 2021. When you use the Non-working hours option to update your calendar, the sales accelerator will consider the break and adjust your activity timeline to match your working hours.
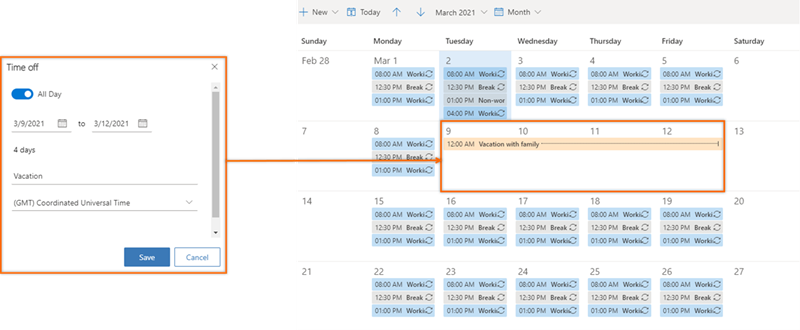
Time off: Configure vacations or personal days off from work. This option blocks a full day or multiple days. When you're applying for multiple days, select the All-day option, and then choose start and end dates.
Provide a description so other sellers can know your status and your reason for being away. Select your time zone, and then save the configurations.
In the following example, you plan to go on vacation with family from March 9 to March 12, and you use the Time off option to update your calendar. The sales accelerator will consider the vacation and adjust the activity timeline to match your vacation.
Through personal settings (Sales Enterprise)
Sign in to your Sales Hub app, and in the lower-left corner, go to Change area > Personal settings.
Select Calendar.
The calendar opens for the current month with your work availability. Also, at the bottom of the calendar, you can see the default local time of your organization.

Configure your calendar according to your requirements as described in step 4 of the Through work list settings section, earlier in this topic.
Configure the auto advance steps
The Auto advance settings specify the next course of action to take when you complete or skip a step.
Sign in to the Dynamics 365 Sales Hub app, and go to My Work > Sales accelerator.
In the work list, select the settings icon.

On the Personal settings page, select Auto advance.
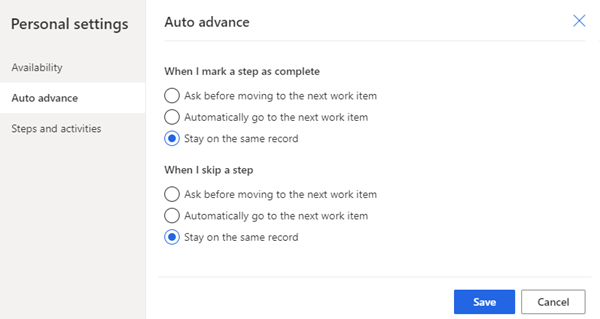
The following settings are available for completing or skipping an activity:
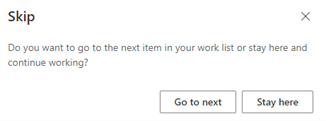
- Ask before moving to the next work item: When an activity is completed or skipped, a message is displayed before you move to the next record in the work list. On the message, you select an appropriate option to proceed. The following image shows the message that's displayed when you skip an activity.
- Automatically go to the next work item: When an activity is completed or skipped, the next record in the work list queue is automatically displayed.
- Stay on the same record: When an activity is completed or skipped, the same record still is displayed, and the Up next widget displays the next activity that has been defined in the sequence.
- Ask before moving to the next work item: When an activity is completed or skipped, a message is displayed before you move to the next record in the work list. On the message, you select an appropriate option to proceed. The following image shows the message that's displayed when you skip an activity.
Save and close the settings page.
Configure steps and activities
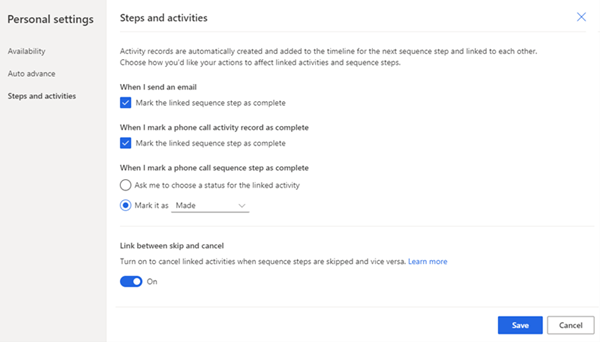
When a step is displayed in the Up next widget, a corresponding activity is automatically created on the timeline and linked to the step. When you complete the action, such as sending an email or making a call through the timeline, the step is updated. By configuring the activities and steps, you can choose how the actions you perform on steps will affect the linked activities and sequence steps.
Note
Verify that the administrator has enabled the option to configure steps and activities. More information: Enable the availability option in sequence settings
Sign in to the Dynamics 365 Sales Hub app, and go to My work > Sales accelerator.
In the work list, select the settings icon.

On the Personal settings page, select Steps and activities.
On the Steps and activities page, configure the following options as required:
- When I send an email: When you select this checkbox and send an email through the timeline, the sequence step that's related to this activity is automatically marked as complete.
- When I mark a phone call activity record as complete: When you select this checkbox and make a phone call through the timeline, the sequence step that's related to this activity is automatically marked as complete.
- When I mark a phone call sequence step as complete: When you complete a phone call activity in the sequence step, you can choose to enter the status of the activity or enter a default value that has been defined for your organization.
Save and close the settings page.
Show or hide filters
As a seller, you can hide any filter that's available in the filter list. After hiding a filter, you can't view the filter option in your list.
In the work list section, select More options > Settings.

On the Personal settings page, select Filters.

Go to the filter that you want to hide, and turn off the toggle.
Note
- To hide a group, turn off the toggle for the group.
- If the administrator hides filters or groups, you can't see them in your list. Contact your administrator to show the filters for you to use. More information: Hide filters

Select Save.
The filter is hidden from your list.
Can't find the options in your app?
There are three possibilities:
- You don't have the necessary license or role.
- Your administrator hasn't turned on the feature.
- Your organization is using a custom app. Check with your administrator for exact steps. The steps described in this article are specific to the out-of-the-box Sales Hub and Sales Professional apps.
See also
Configure sales accelerator settings for sellers to personalize
Prioritize your sales pipeline by using the work list
Feedback
Coming soon: Throughout 2024 we will be phasing out GitHub Issues as the feedback mechanism for content and replacing it with a new feedback system. For more information see: https://aka.ms/ContentUserFeedback.
Submit and view feedback for