Set up Azure Key Vault for secure key management
This article describes how to set up Azure Key Vault to provide secure key management in Dynamics 365 Commerce.
Some Dynamics 365 Commerce e-commerce development scenarios require business-sensitive data such as credentials or access tokens that must be stored securely. Azure Key Vault provides the capability to import, store, and manage cryptographic keys and certificates that can be securely accessed as needed.
This article shows how to do the following:
- Create a Key Vault to securely store sensitive information.
- Configure your e-commerce site to securely communicate with Retail Server.
- Set up Retail Server to securely communicate with your Key Vault.
- Access secret values from within your e-commerce components.
Create a Key Vault to store application secrets
The first step is to create a new Key Vault to store application secrets. You will need an Azure account to access Azure Key Vault.
To create a new Key Vault, follow these steps.
- Navigate to your Azure Portal homepage.
- Select Create a resource.
- Search for Key Vault, and then select Create.
- Select the subscription and resource group you would like this Key Vault to be a part of.
- Enter a name, region, and pricing tier for your Key Vault.
- Select Next, and then create access policies and assign permissions to users. Leave all other settings as is.
- Select Review + create.
- After you have reviewed the configuration, select Create and then wait for the deployment to complete.
- After the Key Vault has successfully been deployed, you can add any secrets under Secrets.
Configure server-to-server authentication between the e-commerce Node application and Retail Server
Note
If you are running Commerce version 10.0.31 or later, this section can be skipped.
Next, the e-commerce Node application needs to be configured to securely communicate with Retail Server.
For the following steps, you will need to have the tenant ID of the Azure App Service hosting your Node application, as well as the client ID of the managed identity tied to your Azure App Service. You will not have access to these IDs, so please work with your service integrator or support team to obtain the required information. Once you have these IDs available you can continue with the steps below.
Add your Node application details into Retail Server’s authentication allow list
Note
If you are running Commerce version 10.0.31 or later, this section can be skipped.
To add your Node application details into Retail Server's authentication allow list, follow these steps.
- In Commerce headquarters, go to Commerce Shared Parameters.
- Select the Identity Providers tab.
- In the first section named IDENTITY PROVIDERS, select Add.
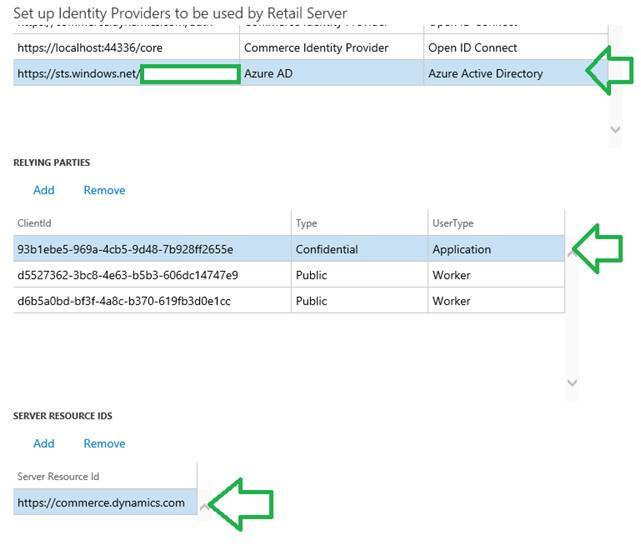
- For Issuer Value, enter
https://sts.windows.net/<TENANT_ID>/, where <TENANT_ID> is your tenant ID. Ensure that no extra trailing spaces are added. - For Name, enter "Microsoft Entra ID". The name is case sensitive, so ensure that it is copied exactly as shown.
- For Type, enter "Active Directory".
- In the second section named RELYING PARTIES, add an entry with the client ID of your managed identity.
- For Type, select Confidential.
- For UserType, select Application.
- Provide a name for your Node application.
- In the third section named SERVER RESOURCE IDS, add an entry with the server resource ID of
https://commerce.dynamics.com, and then select Save.
You should now have a configuration similar to the one in the following example.
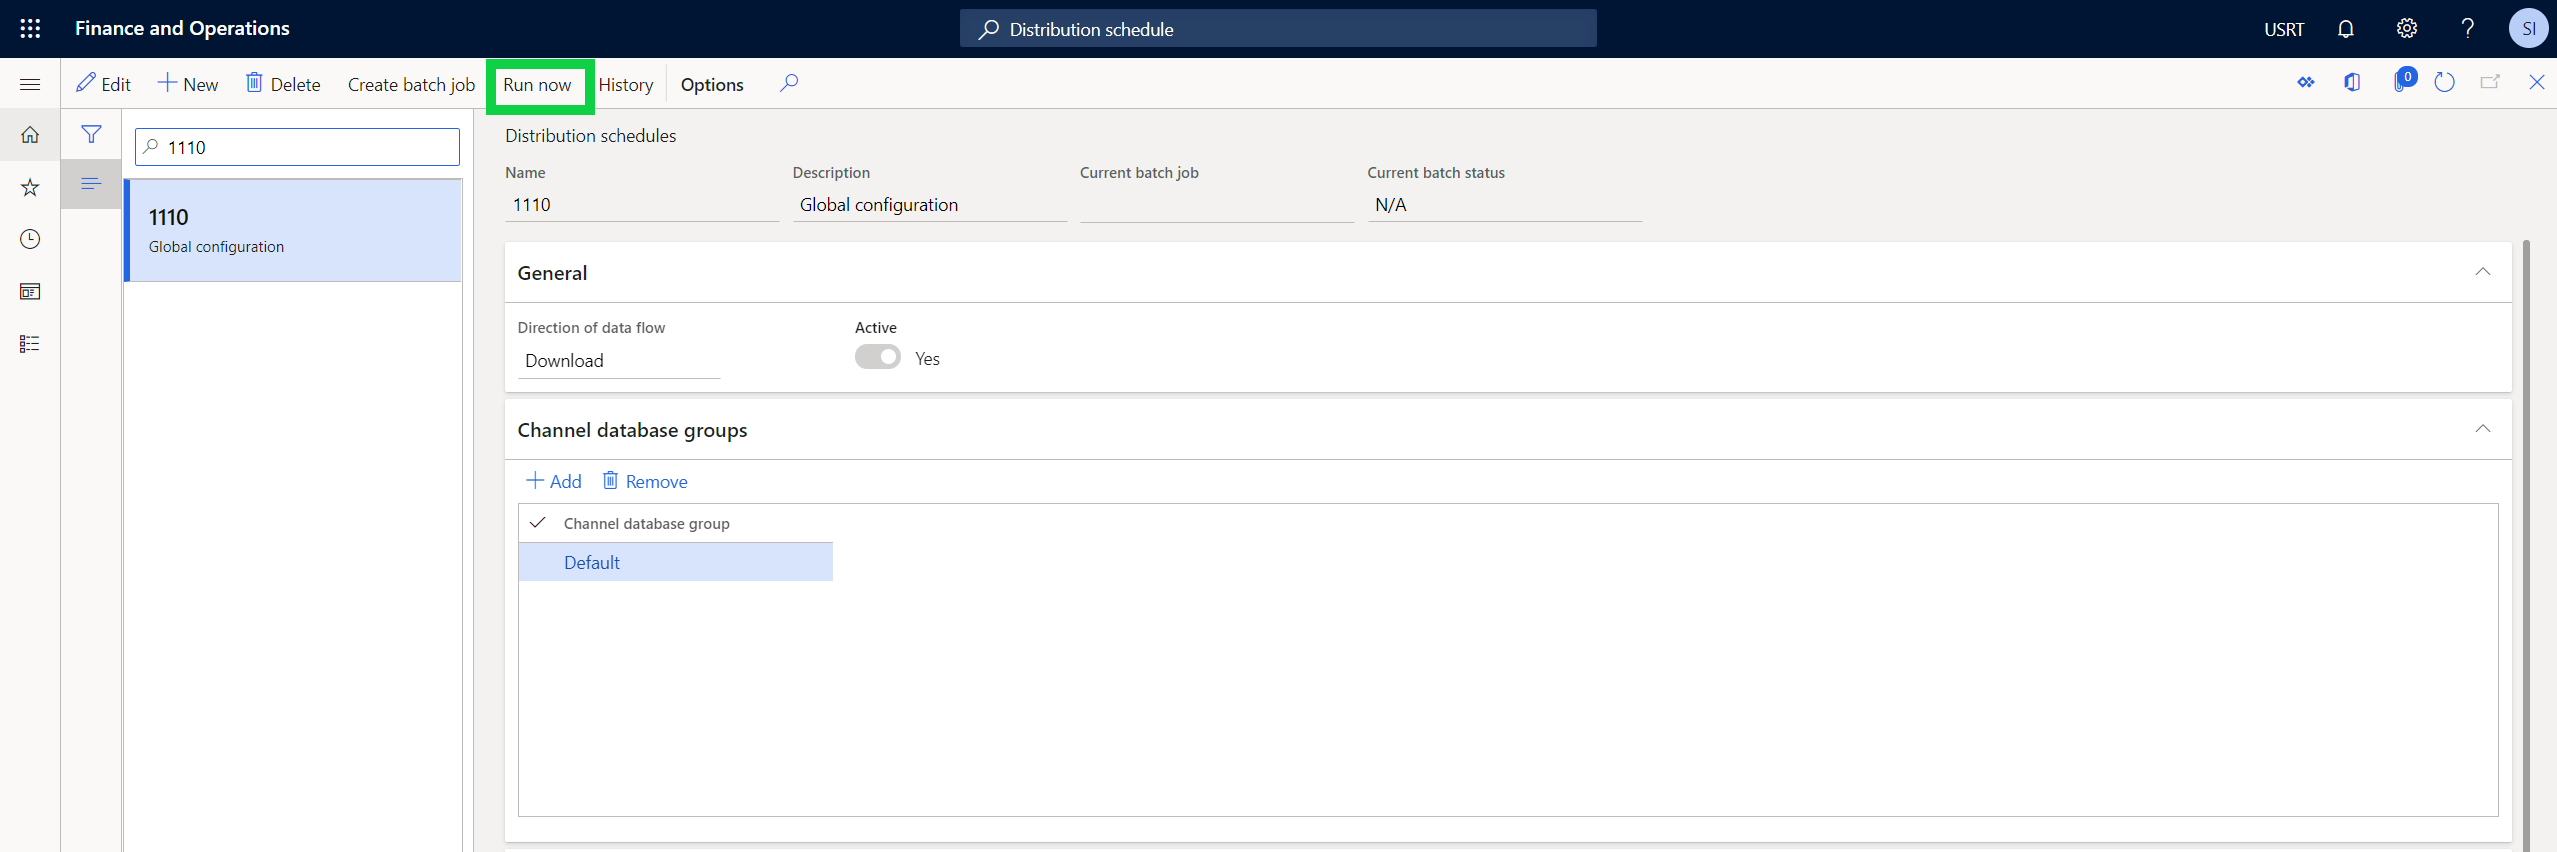
To synchronize the changes into the channel database, in Commerce headquarters go to Distribution schedule and execute job 1110 (Global configuration), as shown in the following image.
Your Node application will now be able to securely communicate and request Key Vault secrets from Retail Server.
Add Key Vault details to Retail Server
Next, you will configure Retail Server to securely communicate with your Key Vault.
Create a new app registration and add a client secret
You will first need to create a new app registration under Microsoft Entra ID to represent your Retail Server so that you can register your Key Vault with Retail Server.
To create a new app registration, follow these steps.
Navigate to your Azure Portal homepage.
Go to the directory containing the Azure App Service hosting your Node application.
Go to Microsoft Entra ID.
In the left navigation pane, select App registrations.
Select New registration, and then enter a name (for example, "RetailServer").
In the overview panel, copy and save the Application (client) ID value for later use.
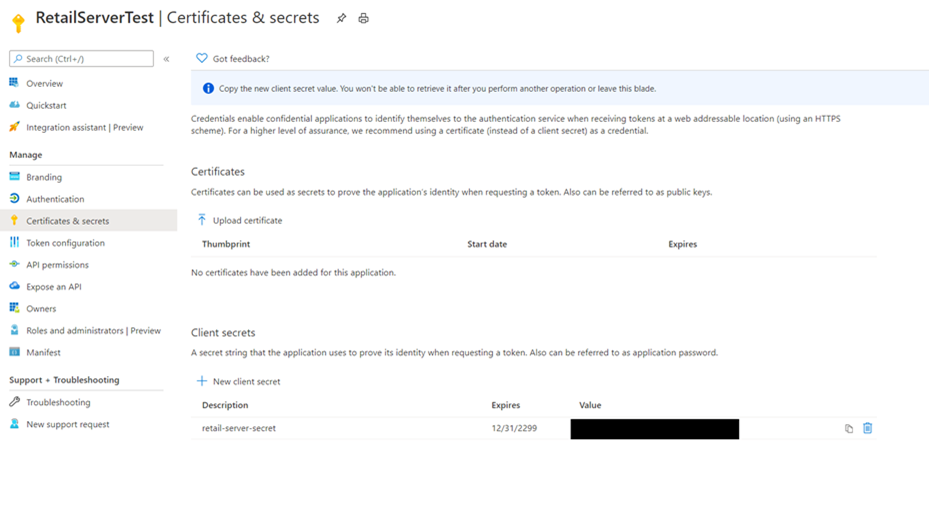
Select Certificates & secrets, and then under Client secrets select New client secret.
In the Add a client secret dialog box, enter a description under Description (for example, "retail-server-secret").
Under Expires, select Never, and then select OK.
On the Certificates & secrets page, copy the secret value In the Value box of your new client secret and store it in a safe place. This secret value is what will enable communication between Retail Server and your Key Vault.
Note
You will only have one opportunity to copy the secret value so it's important to do so now.
Add an access policy in your Key Vault
Next, to add an access policy in your Key Vault, follow these steps.
- Go to your Key Vault.
- Select Access policies, and then select Add Access Policy.
- For the first option, select Key, Secret, and Certificate Management.
- For Select principal, search for and select the app you registered earlier (for example, "RetailServer").
- Leave Authorized application blank.
- Select Save.
Add the Key Vault details in Retail Server
Next, to add the Key Vault details in Retail Server, follow these steps.
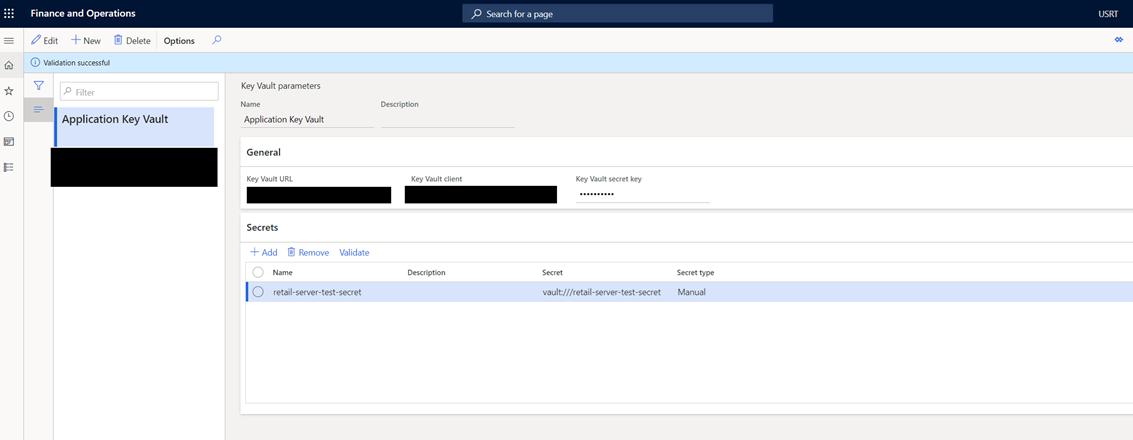
- In Commerce headquarters, go to Key Vault parameters.
- From the store selector on the top right, select the store for which you want to configure the secret key and values.
- Select New, and then enter a name to represent your Key Vault.
- Enter the Key Vault URL. This is the Vault URI value listed on your Key Vault's Overview page.
- Enter the Key Vault client. This is the application ID of the registered app.
- Enter the Key Vault secret key. This is the secret value saved from the app registration process.
- Add the secrets you want to access from Retail Server. For example, if the secret name is "retail-server-test-secret", add "retail-server-test-secret" as the Name, and "vault:///retail-server-test-secret" as the Secret. The Secret type should be set to Manual.
- Select Validate to test your configuration. If everything was configured correctly, you will see a message that says, "Validation successful."
Important
Note the operating unit number of the store that was used to configure the secret key and values. This can be found in Commerce headquarters at Retail and Commerce > Channels > Online stores. You will need to specify this value in the platform settings JSON file.
Access secret values within your e-commerce Node application
After the configuration steps above are complete, you will be able to access the secret values from within your e-commerce Node application using the SecretManager class. This class is initialized on the global msdyn365Commerce object and implements the interface shown in the following example. Along with the secretKey, the baseURL for your Retail Server needs to be passed in as a second argument. This base URL can be found in the RequestContext API under the requestContext.apiSettings.baseUrl API, which is accessed through the action context inside of data actions or the props.context context object in modules.
export interface ISecretManager {
    getSecretValue(secretKey: string, baseRetailServerUrl: string): Promise<ISecretValue>;
}

export interface ISecretValue {
    value: string; // secret value
    id?: string; // secret ID (if applicable)
    error?: Error; // Error details (set if request to fetch secret value failed)
    expiresOn: number; // Unix timestamp (in seconds) when the secret value will expire
}
To import this into your code, add msdyn365Commerce to the import statement for the ‘@msdyn365-commerce/core’ library as shown in the following example.
import msdyn365Commerce, { IRequestContext, … } from '@msdyn365-commerce/core';
The following example shows how to use the SecretManager class to access the secret value:
const secretValue: ISecretValue | undefined = await msdyn365Commerce.secretManager?.getSecretValue('secretKey', requestContext.apiSettings.baseUrl);
Note that secretManager is a nullable property on msdyn365Commerce because the SecretManager class can only fetch secrets when running server-side. This is to prevent leaking the secret value to your browser. If the secretManager property is undefined, it means that the code is running in the context of a browser (client-side).
As a developer, you should only use the SecretManager class on code that is ensured to run server-side (for example, data actions that will run only on server-side), because you will otherwise be unable to access the secret value. If you include this property in code that will run in both contexts (server-side and client-side), it is important to include a fallback option if the secretManager property is undefined.
If the request to fetch the secret value fails, the error property will be set. You can use this to debug any issues you may encounter when trying to fetch secret values.
Update the platform settings file
You must update the secretsManagerOUN property in the platform.settings.json file to specify the operating unit number of the store or channel where the key vault parameters were configured. For more information, see Platform settings file.
Local development
Your e-commerce Node application is only able to communicate with Retail Server and request tokens need to securely communicate in a deployed App Service environment. This means that when developing locally, the SecretManager class will be unable to retrieve secrets from your Key Vault. Instead you can create a secrets directory in your Node application and add a secrets.json file, where you can configure secretKeys and secretValues that will only be used when developing locally.
Note
- Everything under the
secrets/directory should be added to your .gitignore file to help prevent secrets from being leaked online. - Ensure that the
secrets/secrets.jsonfile is created and placed in the root level directory and not in thesrcdirectory of your local development environment.
The following example shows the contents of a secrets/secrets.json file.
{
    "secretKey": "secretValue!"
}
If you do not configure this file, during local development you may encounter errors as the SecretManager class attempts to communicate with your Key Vault but fails to do so.
Additional resources
Extend a module definition file
Interactive components overview
Mock the signed-in state during local development
Feedback
Coming soon: Throughout 2024 we will be phasing out GitHub Issues as the feedback mechanism for content and replacing it with a new feedback system. For more information see: https://aka.ms/ContentUserFeedback.
Submit and view feedback for