Install Dynamics 365 Server Front End Server and Back End Server roles
This article doesn't apply to the Dynamics 365 Customer Engagement (on-premises), version 9.1 update. For information about new features in update 9.1, see What's new.
For information about this topic for Dynamics 365 Customer Engagement (on-premises), version 9.0, select the version located above the left navigation pane.
The following procedure installs Dynamics 365 Customer Engagement (on-premises) Front End Server and Back End Server roles on two separate servers that do not already have Dynamics 365 Server installed. We recommend this configuration instead of a single Full Server deployment because it helps improve security and performance by isolating specific Dynamics 365 Server services on each computer. As part of this procedure, the Microsoft Dynamics 365 Reporting Extensions are installed on the server where the Back End Server roles are installed, and the Deployment Tools are installed on the server where the Front End Server roles are installed.
A back-end and front-end deployment configuration requires two separate computers running Windows Server. This example uses two computers that are named CRMbackend and CRMfrontend.
Important
After Setup is complete, you must either import or create at least one organization to be able to connect a client to the Dynamics 365 Customer Engagement (on-premises) deployment. You can do this by using Windows PowerShell or Deployment Manager. More information: New-CrmOrganization
In this example, the Back End Server role will be installed before the Front End Server role.
Install Back End Server role
On the computer named CRMbackend, complete the following procedure.
Meet all requirements specified in Dynamics 365 Customer Engagement (on-premises) system requirements and required components.
Log on to the domain as a user who has administrator-level privileges where Dynamics 365 Server will be installed and who is a member of the Administrators group on the local computer. You cannot install the application as a member from a trusted domain.
Locate the Dynamics 365 Server installation files. You can find the Dynamics 365 Server download packages on the Microsoft Download Center.
In the folder where the Dynamics 365 Server files are located, move to the Server\amd64 folder, and then double-click SetupServer.exe.
On the Welcome to Microsoft Dynamics 365 Server Setup page, we recommend that you select Get updates for Microsoft Dynamics 365 Customer Engagement (on-premises), to make sure that Setup has the most recent installation files. Select Next.
On the Product Key Information page, type your product key in the Product key boxes, and then select Next.
On the License Agreement page, review the information and if you accept the license agreement, select I accept this license agreement, and then select I Accept.
If Setup detects that components are missing, the Install Required Components page appears.
If you have already installed the required components, this page will not appear.
If you have not installed the required components listed, you can install them now. Select Install. When the components are installed, the status column will change from Not Installed to Installed, and you can select Next to continue.
Note
If you are prompted to restart the computer, do so, and then start Setup again.
On the Select Installation Location page, accept the default location or enter a different file installation location, and then select Next.
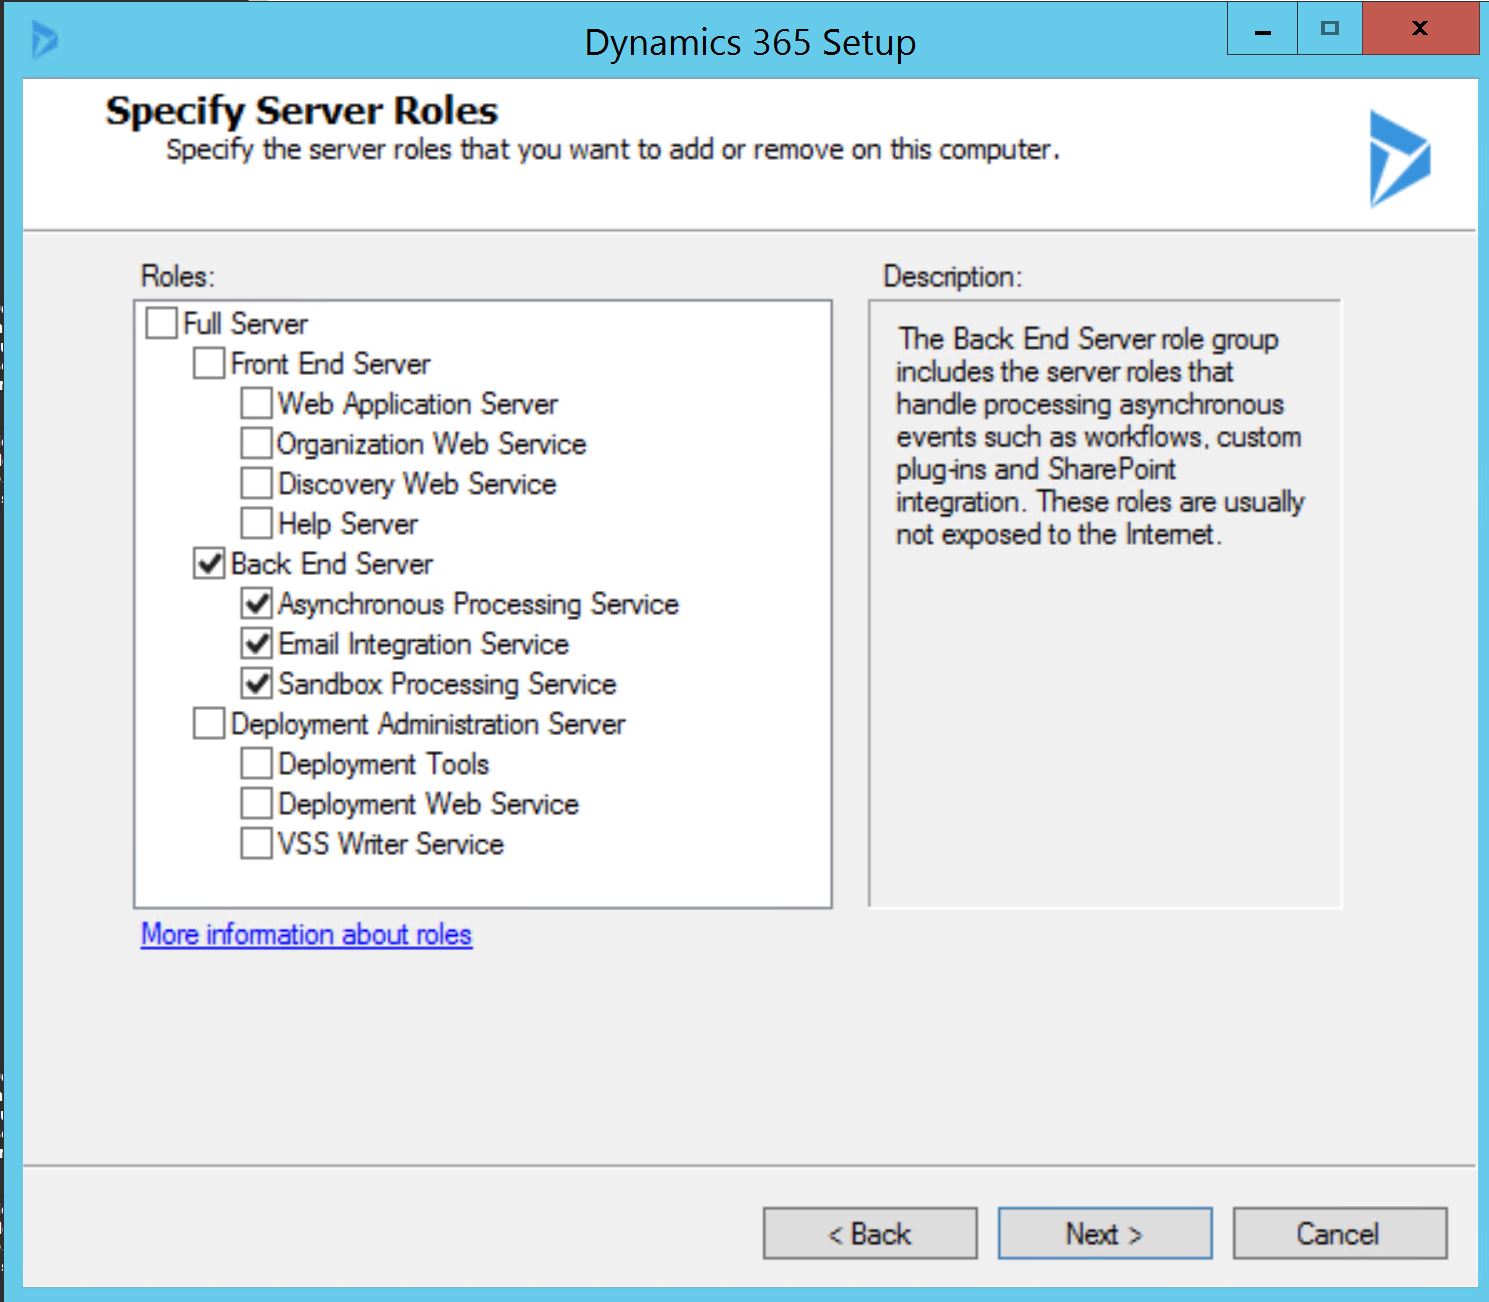
On the Specify Server roles page, select all the Back End Server roles. Leave the rest blank.
On the Specify Deployment Options page, in the Enter or select the name of the computer that is running SQL Server to use with the deployment box, type or select the instance of SQL Server that will be used to store the Dynamics 365 Customer Engagement (on-premises) database (MSCRM_CONFIG).
On the Select the Organizational Unit page, select Browse to display your Active Directory structure. Select the organizational unit where you want to add security groups, select OK, and then select Next.
On the Specify Service Accounts page, select the security accounts for the Dynamics 365 Customer Engagement (on-premises) services, and then select Next.
The services are described below.
Sandbox Processing Service. Enables an isolated environment to allow for the execution of custom code, such as plug-ins. This isolated environment reduces the possibility of custom code affecting the operation of the organizations in the Dynamics 365 Customer Engagement (on-premises) deployment.
Asynchronous Processing Service. Processes queued asynchronous events, such as bulk email or data import.
Monitoring Service. This service will be installed with any Dynamics 365 Server role installation to monitor Dynamics 365 Customer Engagement (on-premises) server roles that are running on the local computer.
For each service, we recommend that you select a low-privilege domain user account that is dedicated to running these services and is not used for any other purpose. Additionally, the user account that is used to run a Dynamics 365 Customer Engagement (on-premises) service cannot be a Dynamics 365 Customer Engagement (on-premises) user. The domain account must be a member of the Domain Users group. Additionally, if the Asynchronous Service and Sandbox Processing Service roles are installed, such as in a Full Server or a Back End Server installation, the domain account must be a member of the Performance Log Users security group.
On the Select Microsoft Update Preference page, select whether you want to use Microsoft Update for checking for updates for your Microsoft products, and select Next. We recommend that you use Microsoft Update to check for updates because this helps keep your computer up-to-date and secure. For more information about the legal terms and privacy with Microsoft Update licensing, see Windows Update FAQ.
The System Checks page appears. This page is a summary of all requirements and recommendations for a successful installation. Errors must be resolved before installation can continue. If no errors, or only warnings, appear, you can continue with the installation. To do this, select Next.
The Service Disruption Warning page appears. This page lists all services that will be stopped or restarted during Setup.
Review the Ready to Install Microsoft Dynamics 365 Customer Engagement (on-premises) page, and then select Back to correct any warnings. When you are ready to continue, select Install.
When the Setup program is finished, select Finish.
Run Microsoft Dynamics CRM Reporting Extensions Setup. More information: Install Microsoft Dynamics 365 Customer Engagement (on-premises) Reporting Extensions
Important
Microsoft Dynamics 365 Reporting Extensions for SQL Server Reporting Services are required to complete the Front End Server and Back End Server deployment of Dynamics 365 Server.
When the Microsoft Dynamics CRM Reporting Extensions Setup has finished, complete the next procedure to install the Front End Server role.
Install Front End Server role
On the computer named CRMfrontend, follow these steps.
Log on to the domain as a user who has administrator-level privileges where Dynamics 365 Server will be installed and who is a member of the Administrators group on the local computer. You cannot install the application as a member from a trusted domain.
In the folder where the Dynamics 365 Server files are located, move to the Server\amd64 folder, and then double-click SetupServer.exe.
On the Welcome to Microsoft Dynamics 365 Customer Engagement (on-premises) Setup page, we recommend that you select Get updates for Microsoft Dynamics 365 Customer Engagement (on-premises), to make sure that Setup has the most recent installation files. Select Next.
On the Product Key Information page, type your product key in the Product key boxes, and then select Next.
On the License Agreement page, review the information and, if you accept the license agreement, select I accept this license agreement, and then select I Accept.
If Setup detects that components are missing, the Install Required Components page appears.
If you have already installed the required components, this page will not appear.
If you have not installed the required components listed, you can install them now. Select Install. When the components are installed, the status column will change from Not Installed to Installed, and you can select Next to continue.
Note
If you are prompted to restart the computer, do so, and then start Setup again.
On the Select Installation Location page, accept the default location or enter a different file installation location, and then select Next.
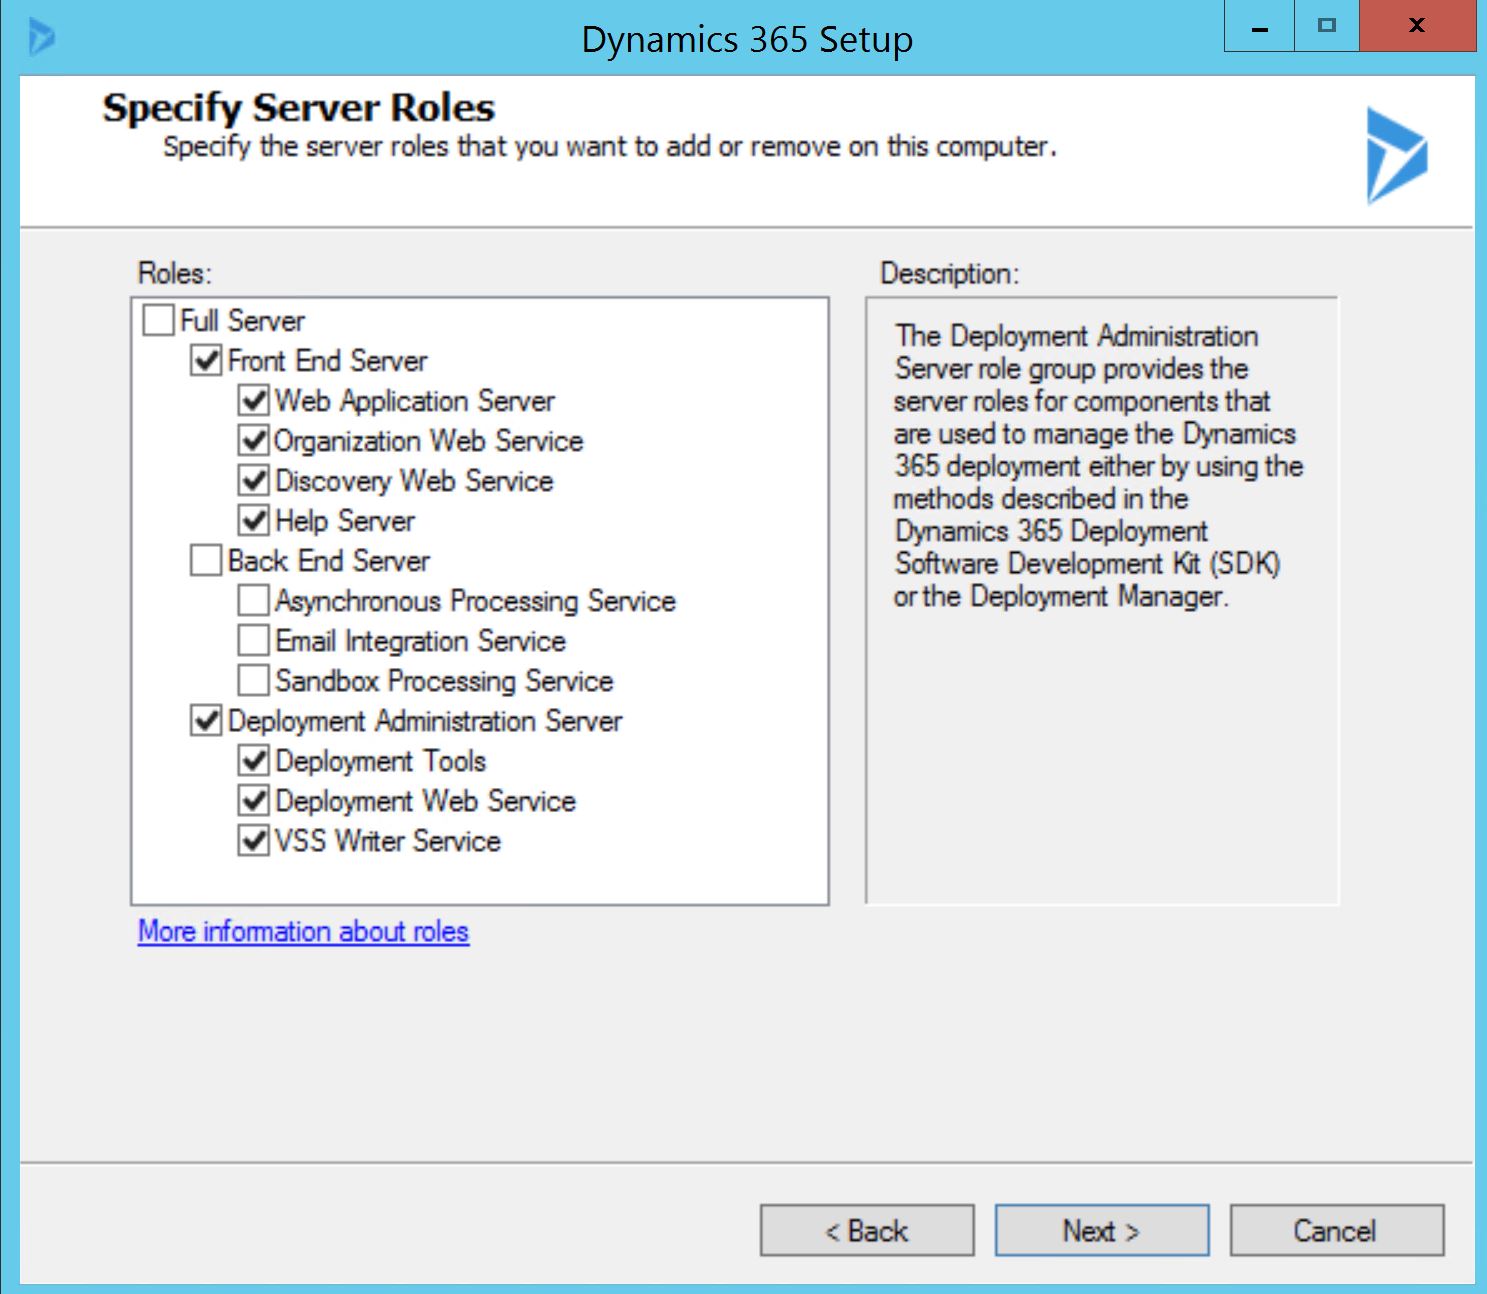
On the Specify Server roles page, select all the Front End Server and Deployment Administration Server roles. Leave the rest blank.
On the Specify Deployment Options page, select Connect to, and if necessary, upgrade an existing deployment, and then in the Enter or select the name of the computer that is running SQL Server to use with the deployment box, type or select the instance of SQL Server that you entered previously, and then select Next.
On the Select the Organizational Unit page, select Browse to display your Active Directory structure. Select the location where you want the organizational unit installed, select OK, and then select Next. We recommend that you select the same organization unit that you selected in the previous step.
On the Specify Service Accounts page, select the security accounts for the Dynamics 365 Customer Engagement (on-premises) services, and then select Next.
The services are described below.
Application Service. This service runs the Dynamics 365 Customer Engagement (on-premises) web application that is used to connect users to Dynamics 365 Customer Engagement (on-premises) data.
Deployment Web Service. Publishes the web service that provides the deployment interface described in the Developer Guide for Dynamics 365 Customer Engagement (on-premises), such as those used to create an organization or manage the list of Deployment Administrators for the Dynamics 365 Customer Engagement (on-premises) deployment.
Important
For each service, we recommend that you select a low-privilege domain user account that is dedicated to running these services and is not used for any other purpose. Additionally, the user account that is used to run a Dynamics 365 Customer Engagement (on-premises) service cannot be a Dynamics 365 Customer Engagement (on-premises) user. This domain account must be a member of the Domain Users group.
If you select to run the ASP.NET service under a domain user account that is not a domain administrator or a local administrator, you must set a local security policy after you install Dynamics 365 Server for the ASP.NET service to work correctly. Also, depending on the password policies that you have implemented for your organization, the password for the user may expire. More information: How to use the ASP.NET utility to encrypt credentials and session state connection strings
VSS Writer Service. The Dynamics 365 Customer Engagement (on-premises) VSS Writer Service provides an interface to back up and restore Dynamics 365 Customer Engagement (on-premises) data by using the Windows Server Volume Shadow Copy Service (VSS) infrastructure.
Monitoring Service. This service will be installed with any Dynamics 365 Server role installation to assist in event monitoring.
On the Select a Web Site page, select Create a new Web site or select Select a Web Site and select a website from the list. By default, Setup will use the default website.
Important
We strongly recommend that you verify the status of the existing website before you specify Setup to use an existing website. We also strongly recommend that the website you select is configured for Transport Layer Security (TLS). For more information see the IIS documentation. During the installation, Setup can bind the Dynamics 365 Customer Engagement (on-premises) application to the HTTPS website. If you select a network port other than a default port, ensure that the firewall does not block the port.
When you select the Create a new Web site option, Setup creates a new website for Dynamics 365 Customer Engagement (on-premises). You can specify the following option:
- Port Number. Type the TCP port number that Dynamics 365 Customer Engagement (on-premises) clients will use to connect to the Dynamics 365 Server. The default port number is 5555.
Select Next.
On the Specify E-mail Router Settings page, in the E-mail Router server name box, type the name of the computer where the Email Router will be installed. This computer will route Dynamics 365 Customer Engagement (on-premises) email messages. If you are not going to install the Email Router (recommended), you can leave this box blank. However, if you install the Email Router later, you must add the computer where the Email Router service is running when you use Local System, or if you use a domain user account, the account, to the PrivUserGroup security group. Select Next.
On the Select Microsoft Update Preference page, select whether you want to use Microsoft Update for checking for updates for your Microsoft products, and select Next. We recommend that you use Microsoft Update to check for updates because this helps keep your computer up-to-date and secure.
The System Checks page appears. This page is a summary of all requirements and recommendations for a successful installation. Errors must be resolved before installation can continue. If no errors, or only warnings, appear, you can continue with the installation. To do this, Select Next.
The Service Disruption Warning page appears. This page lists all services that will be stopped or restarted during Setup. Select Next.
Review the Ready to Install Microsoft Dynamics 365 Customer Engagement (on-premises) page, and then select Back to make changes. When you are ready to continue, select Install.
When the Setup program is finished, select Finish.
Create the Microsoft Dynamics 365 Customer Engagement (on-premises) organization
After Microsoft Dynamics 365 Server Setup program is finished installing the Back End Server, Front End Server, Deployment Administration Server roles, and Microsoft Dynamics 365 Reporting Extensions, you must create at least one organization to make the deployment available for users.
To create an organization, on the computer named CRMfrontend where the Deployment Administration Server role is installed, run the New-CrmOrganization Windows PowerShell command. Alternatively, you can use Deployment Manager.
If you have a Dynamics 365 Customer Engagement (on-premises) (8.2) deployment, you can import the organization databases into the new deployment. Imported databases will be upgraded during the operation. To import an organization, on the computer named CRMfrontend where the Deployment Administration Server role is installed, run the Import-CrmOrganization Windows PowerShell command. Alternatively, you can use Deployment Manager.
See also
Microsoft Dynamics 365 Server installation
Install Microsoft Dynamics 365 Customer Engagement (on-premises) Full Server role on a server without Microsoft Dynamics 365 Customer Engagement (on-premises) installed
Feedback
Coming soon: Throughout 2024 we will be phasing out GitHub Issues as the feedback mechanism for content and replacing it with a new feedback system. For more information see: https://aka.ms/ContentUserFeedback.
Submit and view feedback for