Schedule work over multiple days
Requirements can be scheduled across multiple days and weeks. Dispatchers can schedule multi-day work in between existing bookings, by double-booking existing schedules, or as a continuous block of time.
Tip
If the work you wish to schedule spans multiple weeks or has dependencies on previous steps and milestones, consider using Dynamics 365 Project Service with Gantt chart functionality.
Schedule a multi-day requirement manually on the schedule board
Manually scheduling a multi-day requirement on the schedule board allows you to choose the allocation method to determine the breakdown of the bookings created when scheduling. If you are using requirement details to define the allocation method, manually scheduling the requirement will ignore them. Use the schedule assistant instead.
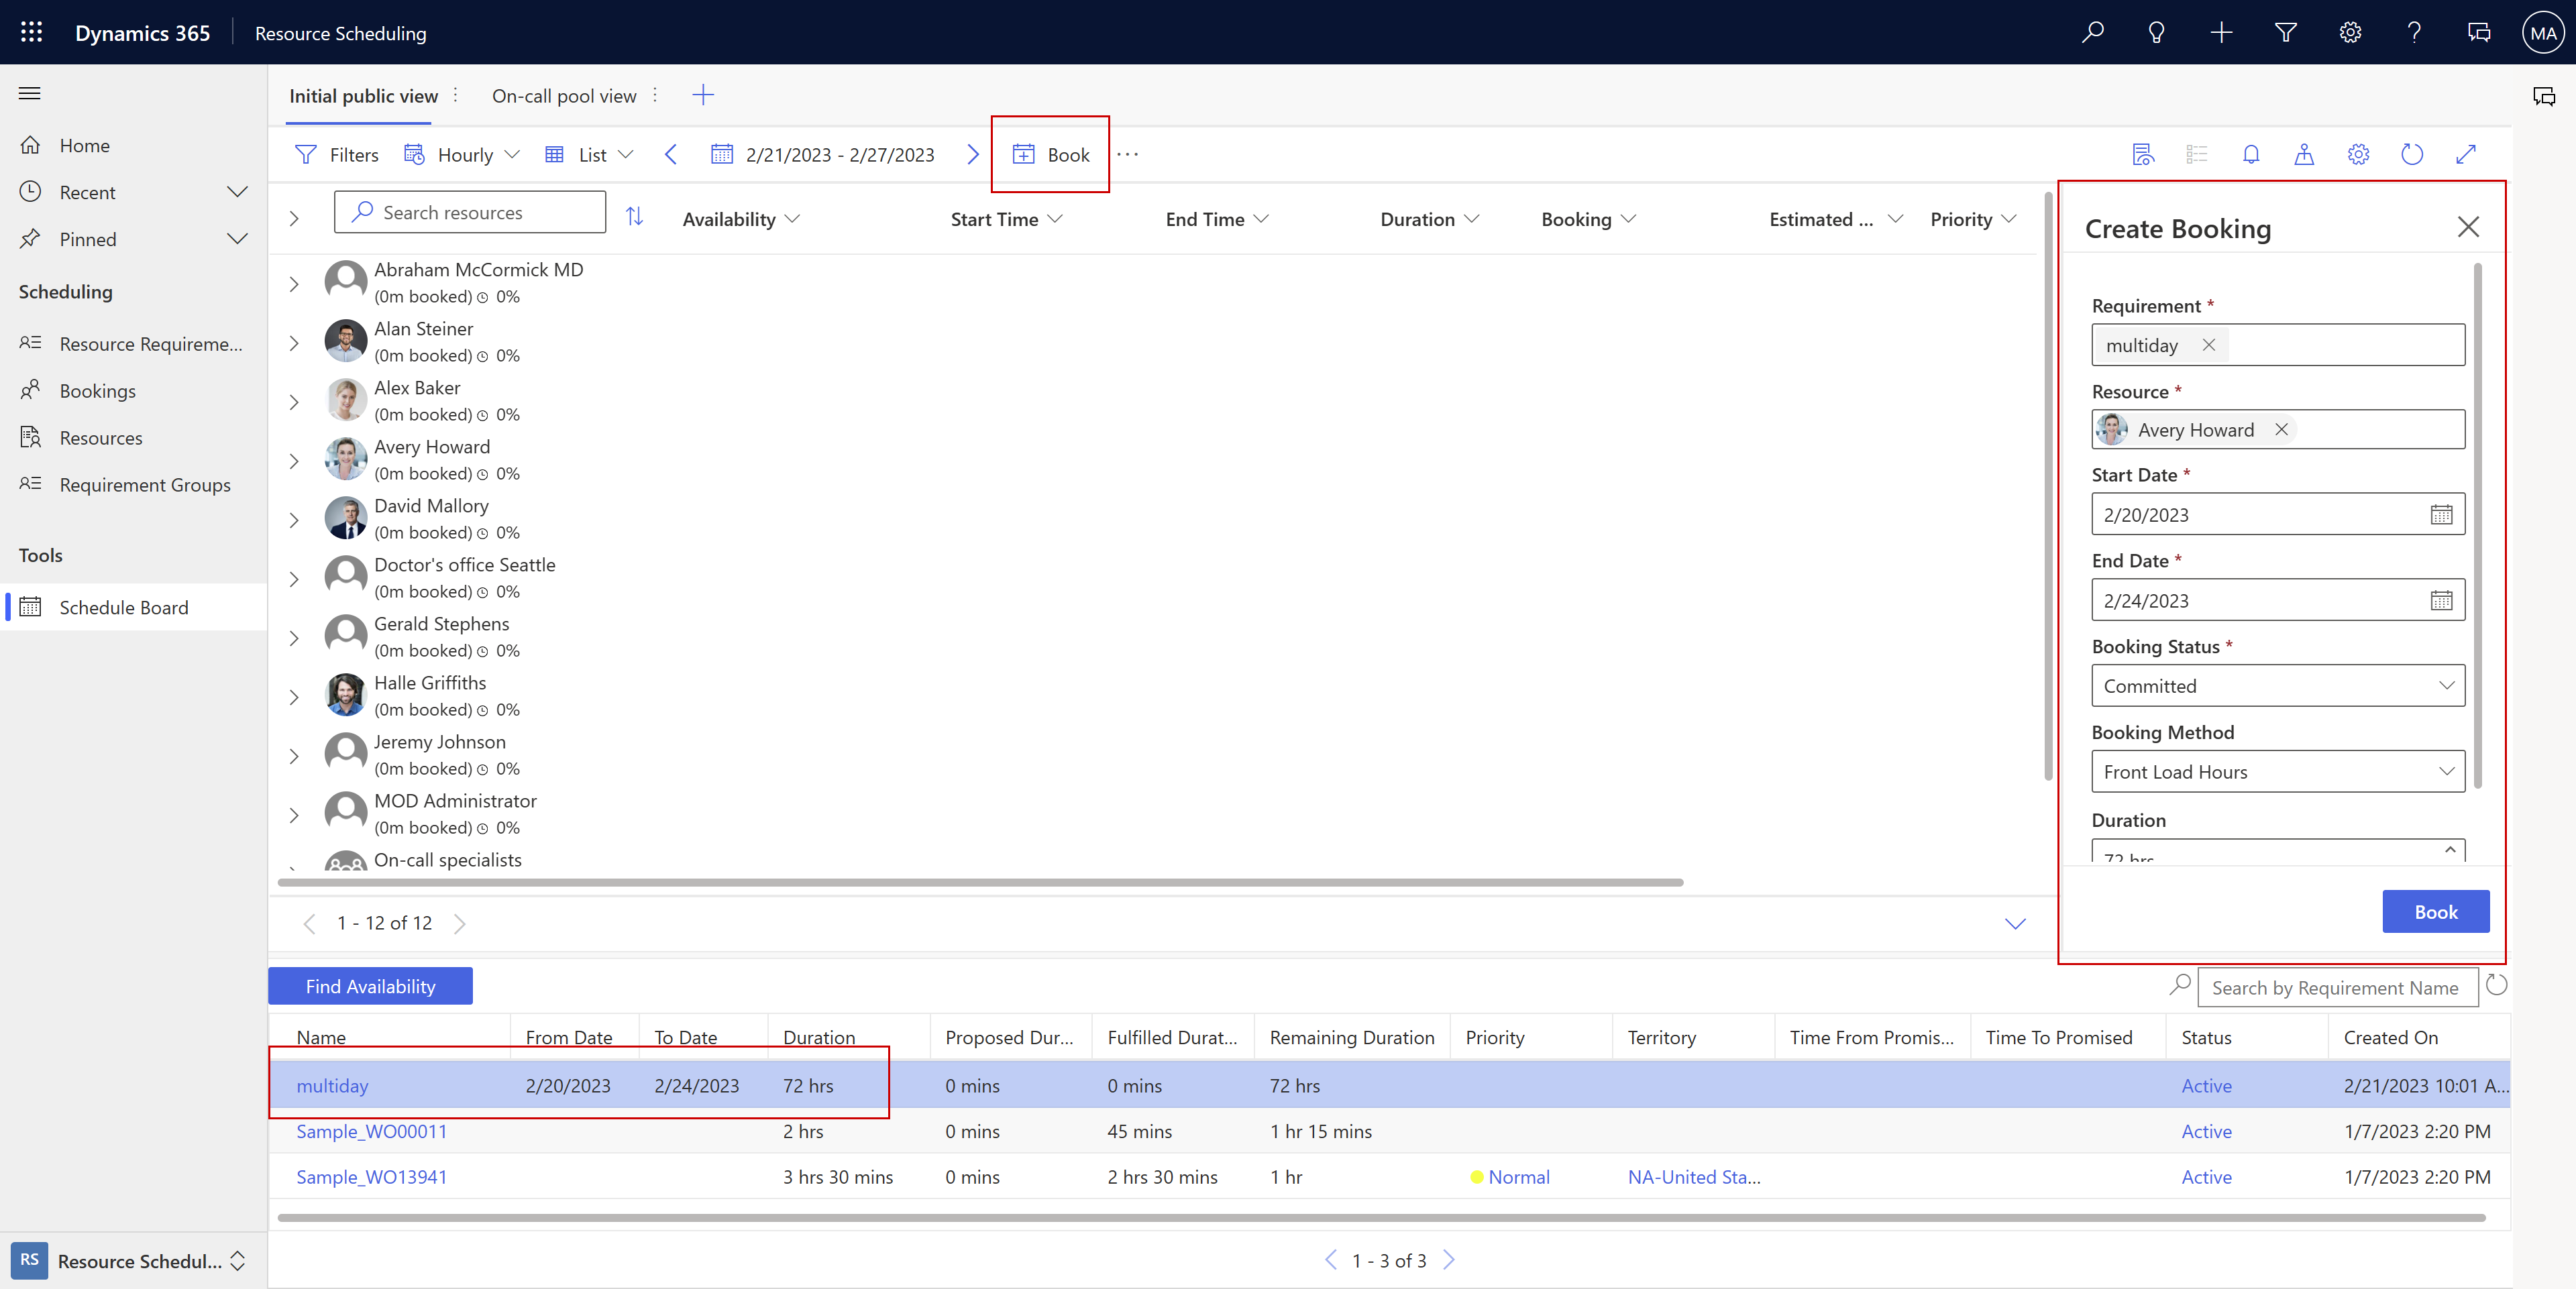
Open the schedule board on the hourly view and select a multi-day requirement in the requirements pane.
Then, select a resource on the board for which you would like to schedule the multi-day work order requirement and select Book.
Caution
Don't drag and drop multi-day requirement to a resource on the hourly board view. It will create a long continuous booking through non-working hours.
In the Create Booking pane, review and update the values as needed. Choose the Booking Method to define how to spread the requirement over multiple days.
- Full Capacity: Books the resource’s full capacity for the specified from and to dates without regard to the resource's remaining capacity or the duration of the requirement.
- Percentage Capacity: Books the resource for a percentage of capacity for the specified from and to dates.
- Evenly Distribute Hours: Books the resource for a specified number of hours, distributing the time evenly per day over the specified from and to dates.
- Front Load Hours: Books the resource for a specified number of hours, front-loading the per-day hours over the specified from and to dates. The front load method considers existing bookings and available capacity.
Note
Full Capacity, Percentage Capacity, Evenly Distribute Hours, and Fixed time can lead to overbooking. For more information, see Allocation methods.
Select Book and the system creates multiple bookings across multiple days.
Create and edit patterns for requirements
Use the Specify Pattern control to define how to split a long-running requirement into individual bookings when it's scheduled. It allows users to customize these requirement details beyond the default allocation methods.
To create a requirement detail, select Add detail to open a side pane where you choose the requirement and set the duration, start time, and end times for the time window. For example, the time window is from 9am to 5pm with a three hour duration. When you schedule that requirement detail, the system books a resource for three hours between 9am and 5pm. Note that the duration must be shorter than the time window. Alternatively, in daily view, drag requirement on the grid to create a new detail. In either method, select Apply to save the requirement detail.
To edit an existing requirement detail, select it to open the Edit detail pane. Change the duration or time window and save the changes. To edit multiple details at once, select the requirement and select Edit all within range on the details pane. Under Duration summary, each date range that has at least one detail shows. Adjust the allocated duration where needed. Use the settings under Duration allocation to control how to distribute the changed durations across multiple details. When decreasing duration, there are two options:
- Proportionally distributed: The decrease in duration is split among all contained details in proportion to their respective durations, so that all are decreased by the same percentage.
- Subtracted from total: The decrease is subtracted from the total length of all contained details. This new total is then evenly distributed among contained details.
When increasing duration, there are four options:
- Proportionally Distributed: The increase in duration is split among all contained details in proportion to their respective durations, so that all are increased by the same percentage.
- Front loaded: The increase in duration is added to the first contained detail until it hits capacity. It is then added to the next detail and so on.
- Distributed Evenly: The increase is split evenly among all contained details.
- Added to total: The increase is added to the total length of all contained details. This new total is then evenly distributed among all contained details.
To delete a detail, select the detail from the calendar and select the Delete.
Use work hours templates
Alternatively, you can set up a work hours template, which you can assign to a resource requirement. The system generates resource requirements details based on the work hours template.
Schedule a multi-day requirement with the schedule assistant
Note
This scenario schedules a requirement without a related work order. To schedule a multi-day work order with the schedule assistant, you'll need to manually add a related requirement with an allocation method to a schedulable entity and delete or disregard the automatically created ones. Alternatively, you can manually create requirement detail records with Specify Pattern for the auto-created requirement. The requirement needs an allocation method set before saving and the requirements that are automatically created by schedulable entities have an allocation method of None by default.
Create a multi-day requirement record with an allocation method set. Provide details such as skills, roles, resource preferences, and service territory to define the eligible resources.
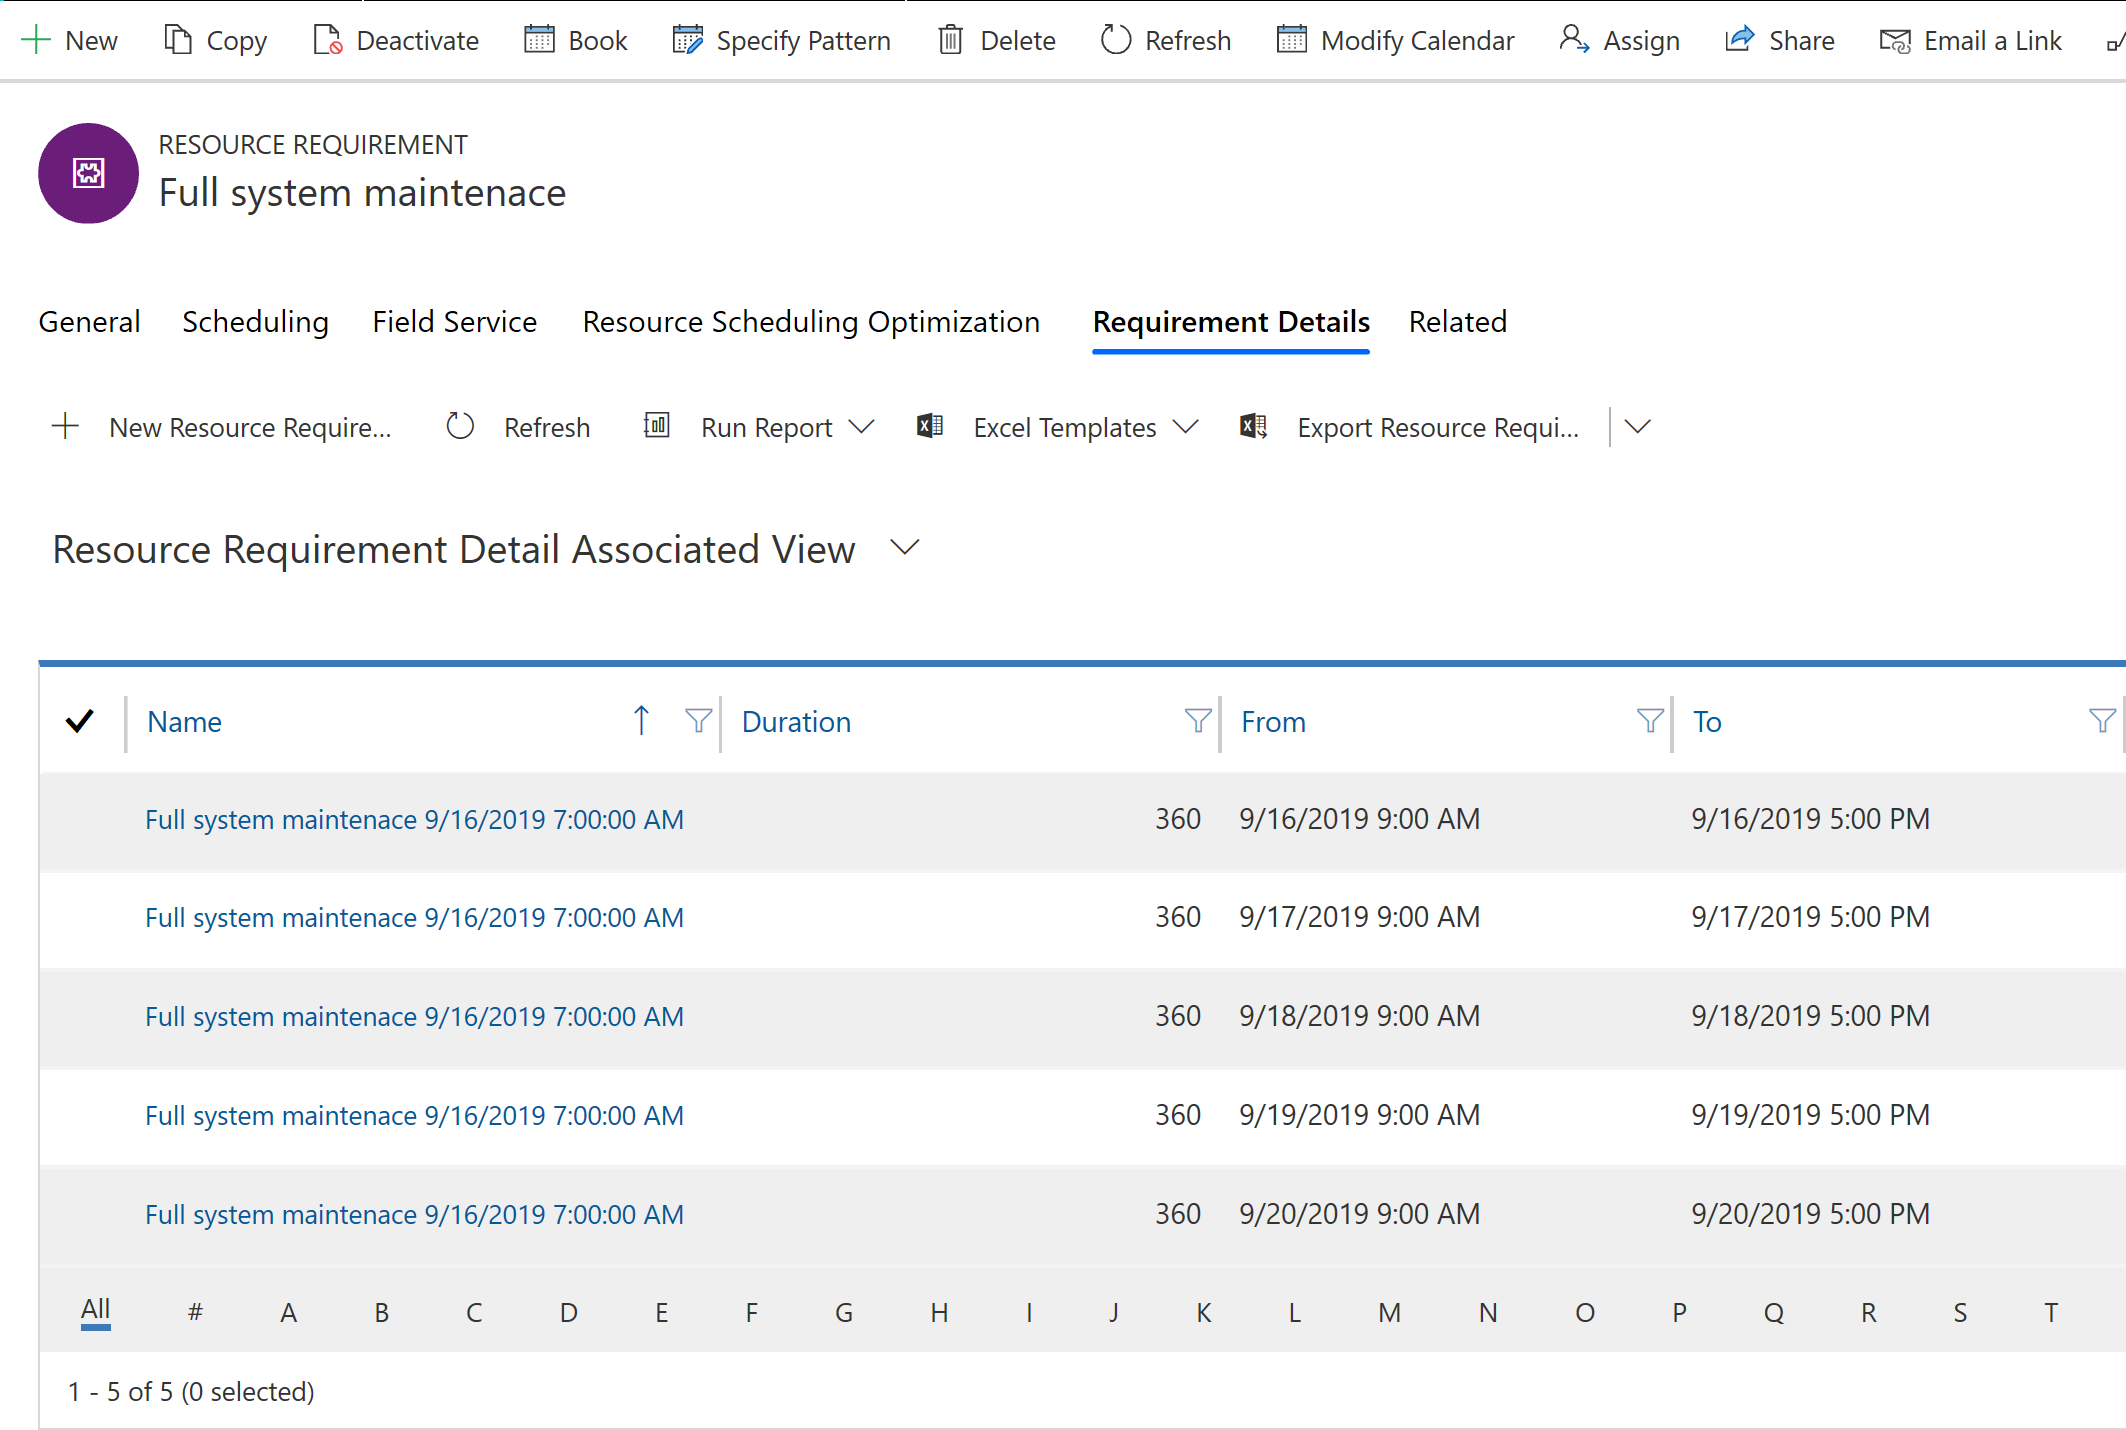
On the requirement records, go to Related > Requirement Details.
The system automatically creates requirement details and splits them into segments based on the duration and the allocation method. The requirement details are based on the requirement's calendar. Edit them by selecting Modify Calendar on the resource requirement record.
Select Book to launch the schedule assistant for the multi-day requirement.
Resources with availability and that meet the other attributes will show as results. Choose a resource, the dates, and select Book to create multiple bookings according to the pattern of the allocation method.
Schedule a multi-day requirement to multiple resources
From a multi-day resource requirement, go to Related > Requirement Details and select Specify Pattern. Edit and override the requirement details pattern created by the allocation method.
Select Book.
Choose a resource and specific days for just that resource, then select Book (not Book & Exit).
Then, choose another resource and specific days for only that resource and select Book again.
The system creates bookings for each resource on the days selected.
Note
Resources don't need continuous availability in a single block. For example, if the requirement is a resource for five hours in a day, resources with five total hours of availability show in schedule assistant results.
The system can't schedule requirement groups for multiple days.
Next steps
Feedback
Coming soon: Throughout 2024 we will be phasing out GitHub Issues as the feedback mechanism for content and replacing it with a new feedback system. For more information see: https://aka.ms/ContentUserFeedback.
Submit and view feedback for