Customer electronic invoices in Denmark
This article explains how to configure and issue customer electronic invoices in Denmark by using the OIOUBL format for electronic invoices.
Prerequisites
The primary address of the legal entity must be in Denmark.
Import Electronic reporting configurations
In the Electronic reporting workspace, import the following Electronic reporting (ER) formats from the repository:
- OIOUBL Sales invoice (DK)
- OIOUBL Project invoice (DK)
- OIOUBL Sales credit note (DK)
- OIOUBL Project credit note (DK)
Note
Any other required configurations are automatically imported.
For more information about how to import ER configurations, see Download Electronic reporting configurations from Lifecycle Services.
Reference the imported ER format configurations
Go to Accounts receivable > Setup > Accounts receivable parameters.
On the Electronic documents tab, on the Electronic reporting FastTab, select the imported formats for electronic documents:
- Sales and Free text invoice: OIOUBL Sales invoice (DK)
- Sales and Free text credit note: OIOUBL Sales credit note (DK)
- Project invoice: OIOUBL Project invoice (DK)
- Project credit note: OIOUBL Project credit note (DK)
Configure parameters
Configure legal entity parameters
- Go to Organization administration > Organizations > Legal entities.
- On the Tax registration FastTab, in the Tax registration number field, enter the company's value-added tax (VAT) number.
- On the Bank account information FastTab, in the Routing number field, enter the company's registration number.
- In the FI-Creditor ID field, enter the creditor's identification number if you plan to use FIK payments.
Configure methods of payment
According to OIOUBL standards, the payment method codes in the XML file output of electronic invoices must comply with the official list of standardized codes.
The system supports the following predefined codes for payment methods and provides automatic conversion to the official codes.
| Internal payment method code | Official payment method code |
|---|---|
| DK:BANK | 42 |
| DK:FIK | 93 |
| DK:GIRO | 50 |
| All other codes | 97 |
Follow these steps to configure methods of payment.
Go to Accounts receivable > Setup > Payments setup > Methods of payment.
Create a new method of payment, or select an existing method to configure.
On the General FastTab, in the Posting section, in the Account type field, select Bank.
In the Payment account field, enter the company bank account that is associated with the method of payment.
Note
The company bank account must already be set up at Cash and bank management > Bank accounts > Bank accounts.
Configure units of measure
- Go to Organization administration > Setup > Units > Units.
- Select a unit ID in the list, and then select External codes.
- On the External codes page, in the Overview section, in the Code field, enter a code that corresponds to the selected unit ID.
- In Value section, in Value field, enter the external code that should be used as the recommended unit of measure code according to Codes for Units of Measure Used in International Trade.
Configure sales tax codes
When you generate electronic invoices in OIOUBL format, the tax information in the output XML file must be hierarchically structured in a specific way.
The top level of the hierarchy is Tax Scheme. For the official list of tax schemes that are applicable to the OIOUBL format, see OIOUBL Tax Schemes.
The next level of tax data grouping, within the tax scheme, is Tax Category. For the official list of tax categories that are applicable to the OIOUBL format, see OIOUBL Tax Categories.
For some taxes, an additional attribute, Tax Type Code, must be also defined.
You can associate tax schemes, tax categories, and tax type codes with sales tax codes by using application-specific parameters. For information about how to configure application-specific parameters, see the next section.
Configure application-specific parameters
Application-specific parameters must be configured for the following configurations:
- OIOUBL Sales invoice (DK)
- OIOUBL Project invoice (DK)
- OIOUBL Sales credit note (DK)
- OIOUBL Project credit note (DK)
For each configuration, follow these steps.
In the Electronic reporting workspace, on the Reporting configurations tile, in the list of configurations, select a required configuration. For example, select OIOUBL Sales invoice (DK).
On the Configurations menu, in the Application specific parameters section, select Setup.
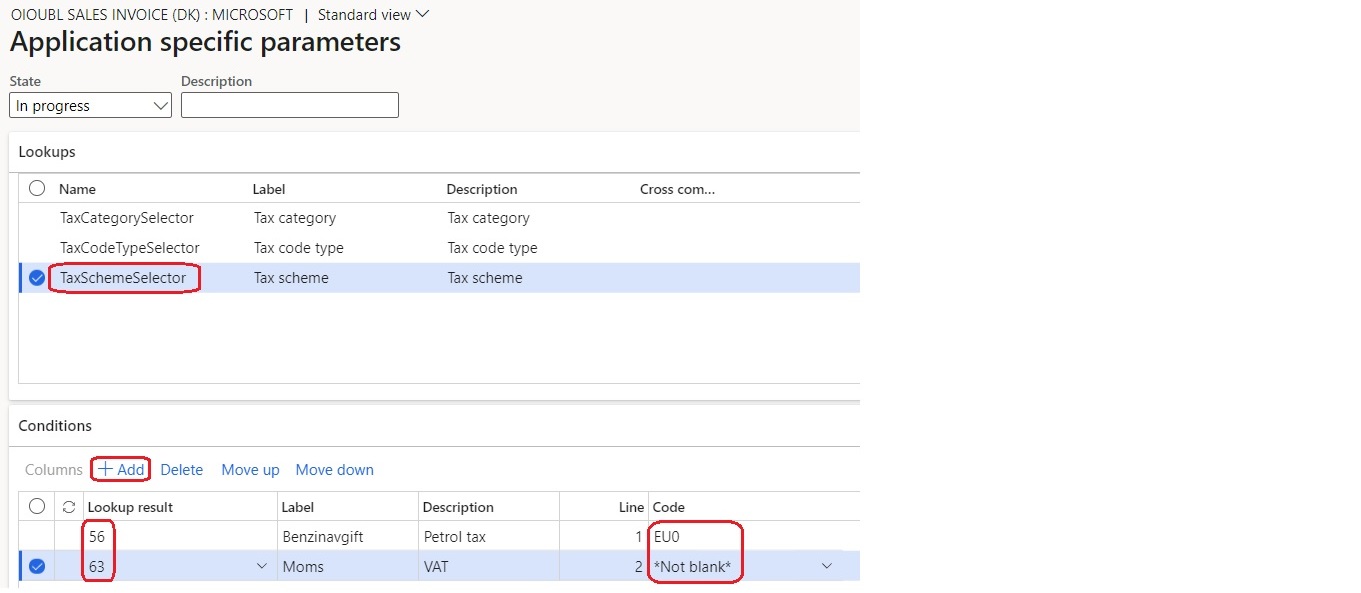
On the Application specific parameters page, on the Lookups FastTab, select TaxSchemeSelector in the grid.
Next, on the Conditions FastTab, you will configure the correspondence between internal sales tax codes and official tax schemes codes.
On the Conditions FastTab, select Add to add a condition to the grid.
In the Code field for the new condition, select the sales tax code that is defined in the system.
Note
In the Code field, you can select the *Blank* or *Not blank* placeholder value instead of a specific sales tax code.
In the Lookup result field, select a corresponding official tax schemes code.
On the Lookups FastTab, select TaxCategorySelector in the grid.
On the Conditions FastTab, repeat steps 4 through 6 to configure the correspondence between internal sales tax codes and official tax categories codes.
On the Lookups FastTab, select TaxCodeTypeSelector in the grid.
On the Conditions FastTab, repeat steps 4 through 6 to configure the correspondence between internal sales tax codes and tax type codes. If no tax type code is required, select Not applicable.
In the State field at the top of the page, select Completed, and then save your changes.
Configure customer parameters
Go to Accounts receivable > Customers > All customers, and select a customer.
On the Invoice and delivery FastTab, set the eInvoice option to Yes to enable the generation of electronic invoices.
Set the eInvoice attachment option to Yes to attach a PDF copy of the printable invoice to the electronic invoice.
In the Tax exempt number field, enter the customer's VAT exempt number.
In the EAN field, enter the customer's identification number. This number will be used as the Endpoint ID value in the output XML file of the electronic invoice.
On the Sales demographics FastTab, in the Primary contact field, select a person who will be considered the buyer's contact.
Note
All available contact persons must already be defined for this customer.
Export customer electronic invoices
Send e-invoices
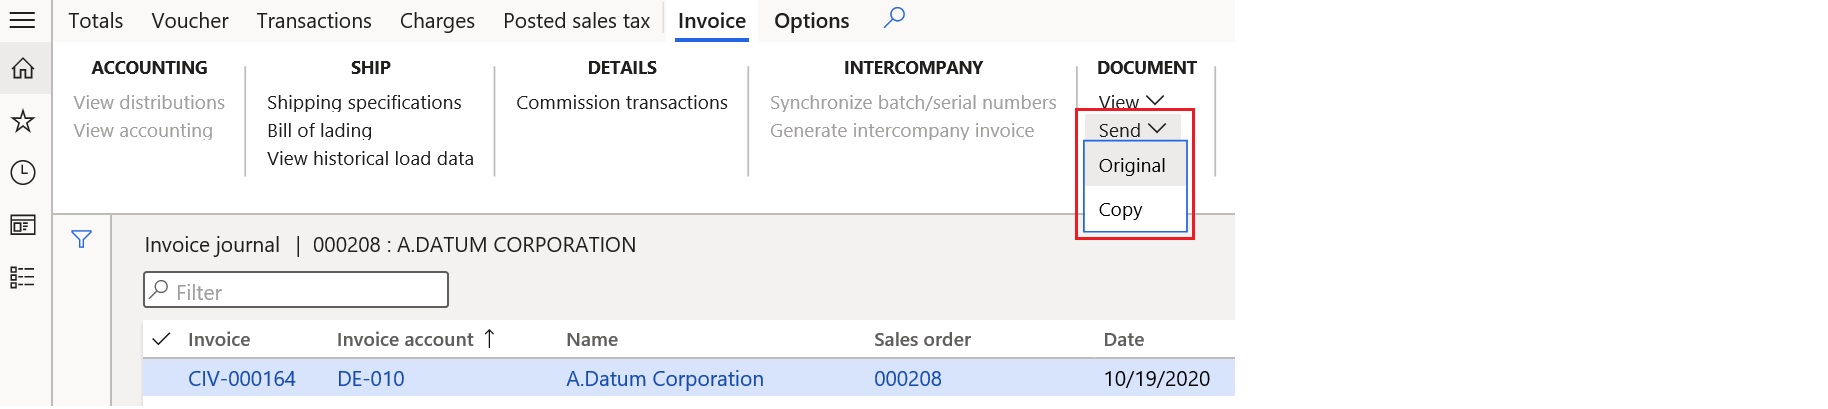
After an invoice is posted, you can generate an electronic invoice by selecting the invoice and then selecting Send > Original in the Document group on the Invoice tab of the Action Pane.
View e-invoices
Follow these steps to inquire about the XML files of electronic invoices that have been generated.
Go to Organization administration > Electronic reporting > Electronic reporting jobs.
Select a job, and then select Show files.
Select Open to download the file that contains the electronic invoice.
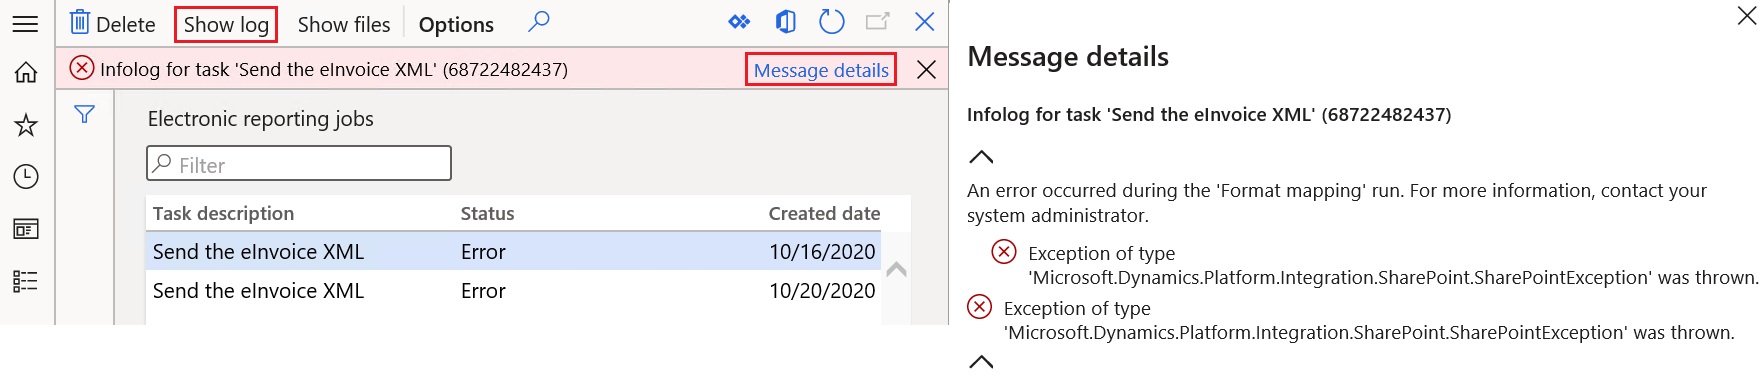
If generation of the electronic invoices failed because of errors, select Show log. Then select Message details in the message bar to view more details about the error.
Send e-invoices to ER destinations
You can set up ER destinations for electronic invoice formats. In this case, output XML files that contain electronic invoices are automatically sent to the defined destinations immediately after the invoices are posted. When you post the invoices, you must turn on the Print invoice parameter.
For more information about ER destinations, see Electronic reporting destinations.
Feedback
Coming soon: Throughout 2024 we will be phasing out GitHub Issues as the feedback mechanism for content and replacing it with a new feedback system. For more information see: https://aka.ms/ContentUserFeedback.
Submit and view feedback for