Configure a document definition
To configure a document type in the Document intelligence component, you need to create a business scenario, and then configure the required document definitions relevant to this business scenario. For example, in the sample Onboarding application, the account onboarding is the business scenario, and the Identification document is the document definition. You can define other document definitions for the Account onboarding sample scenario, such as a payslip document.
You can create a new document definition with or without an automatic flow.
Create a new document definition with an automatic flow
To create a new document definition with an automatic flow, follow these steps:
1. Configure the prerequisites
3. Create a custom pipeline step flow
4. Create a custom pipeline flow
1. Configure the prerequisites
Sign in to Power Apps.
Create a new unmanaged solution for the customization, or work within an existing one.
2. Add Dataverse definitions
The process of adding Dataverse definitions involves the following steps:
2a. Add business scenario for Document intelligence
Note
You can also use an existing business scenario.
The business scenario definition helps to filter only relevant document definitions according to business scenarios.
In the Document intelligence user interface, when requesting a new document, the dropdown list to select the document for upload displays only relevant document definitions according to specific business scenarios.
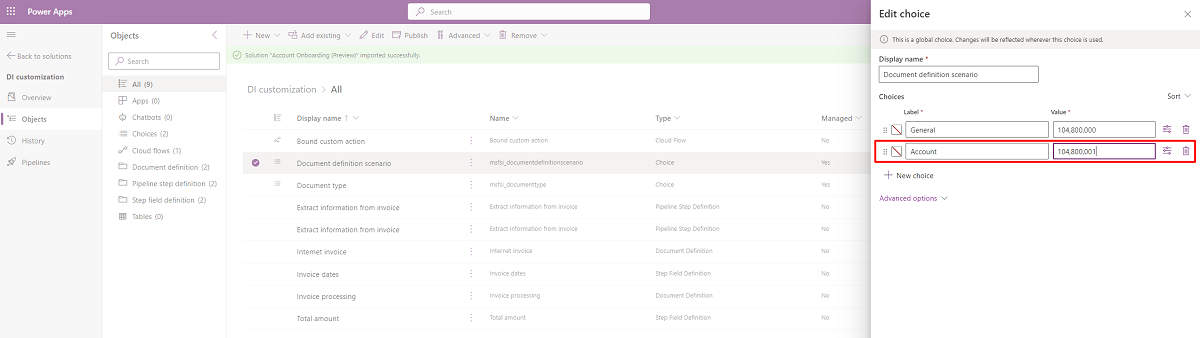
a. In Power Apps, for the selected solution, go to Add existing > More > Choice, and select msfsi_documentdefinitionscenario.
b. Add a new choice to the Document definition scenario, for example, the Account scenario.
2b. Add document type
Note
You can also use an existing document type.
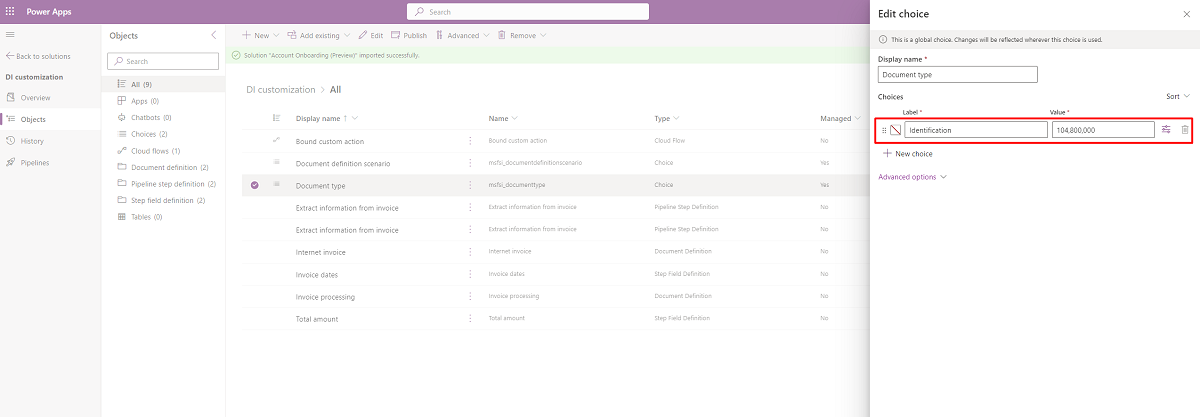
a. In Power Apps, for the selected solution, go to Add existing > More > Choice, and select msfsi_documenttype.
b. Add a new choice to the Document type, for example, the Identification document type.
2c. Add document definition
Add a new record to the Document definition table (msfsi_documentdefinition) and save it. The table is solution-aware.
a. In Power Apps, for the selected solution, go to New > More > Other > Document definition.
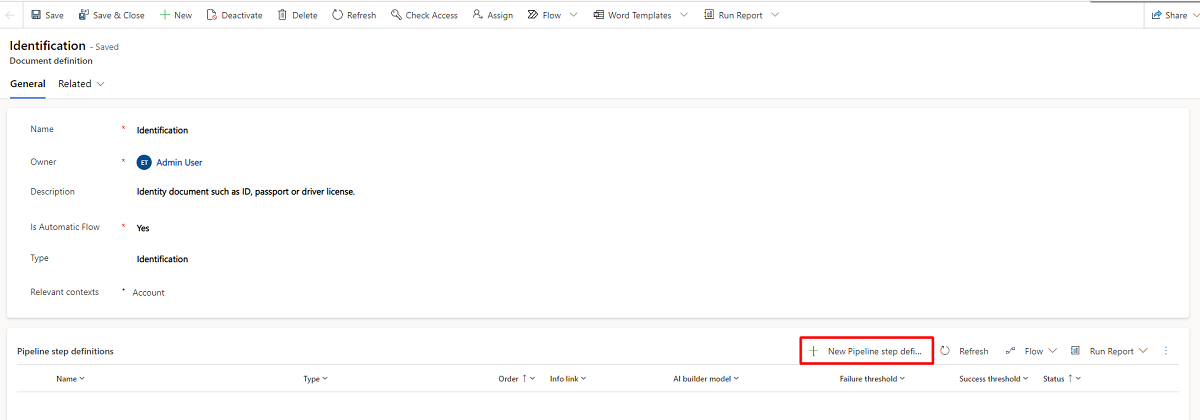
b. Set the value of the Is automatic flow field to Yes.
c. Select the type that you've already defined. Multiple document definitions with different flow definitions can use a document type.
d. Select the relevant business scenarios.
For example, you can add the Account scenario to the Account onboarding scenario.
A document definition can have several relevant document definition scenarios. So, you can use the same document type multiple business scenarios with the same automatic workflow. For example, in both the Account onboarding and Loan onboarding scenarios, you can use the same automatic identification document workflow. You can configure the document definition of the identification document to both the business scenarios.
In addition, more than one document definition can use a business scenario.
e. Select Save. After saving the document definition, you'll see the Pipeline step definitions view as shown in the following image, and you can add step definitions for the created document definitions.
2d. Add pipeline step definitions
Add new records to the Pipeline step definition table (msfsi_pipelinestepdefinition) for each action you want to perform on documents that are linked to the current document definition. For example, if an Identity document definition is defined in the Document definition table, you need to configure the Identification document process steps as part of the identification automated journey. The Document definition table is solution-aware.
Each step definition has a related Power Automate flow that performs the actual business logic.
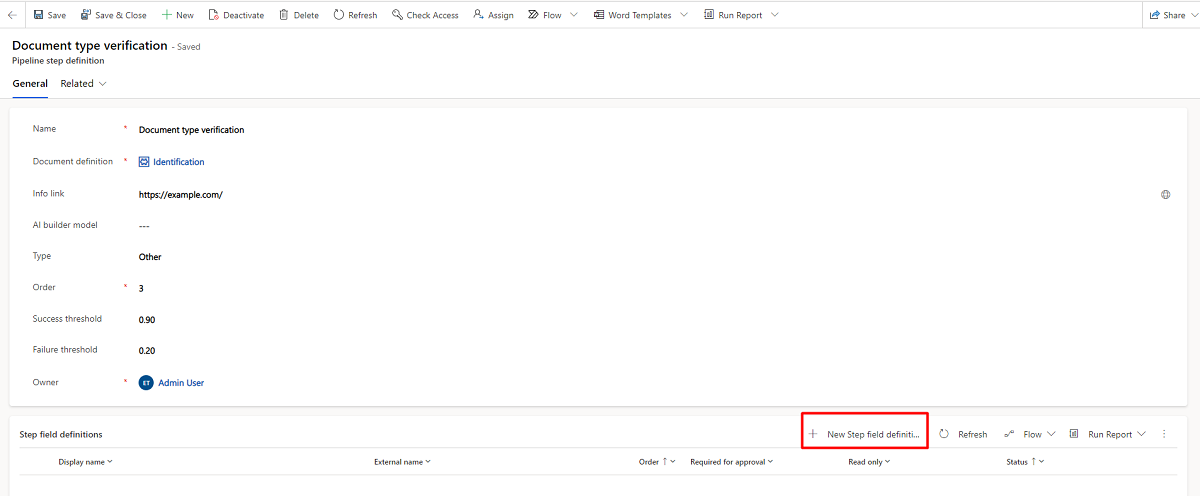
a. Select New Pipeline step definition.
b. Specify the Name of the document definition and Order, the run order of this step with reference to the other steps of the document definition.
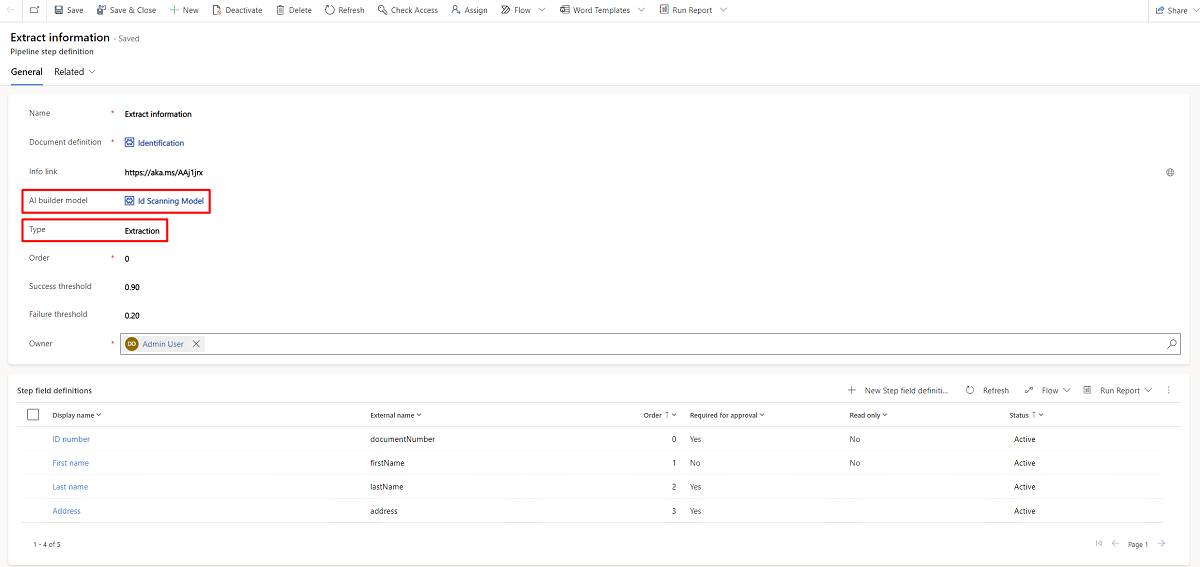
c. If required, you can specify the following values:
Info link: A link that displays in the user interface to describe the step method, and in the case of an AI model step, to provide an explanation on the model run. Only the business admin can specify this value.
AI builder model: Specify the value if the flow runs an AI builder model.
Type: Specify if this step is an extraction or enrichment step. The user interface displays the first extraction type and first enrichment type in a single document view as part of the Extraction tab.
Success threshold and Failure threshold: The flow can use these values to determine the recommended document status.
d. Save your changes. After saving the pipeline step definition, you'll see the Field step definitions view as shown in the following image. You can add field step definitions for the created pipeline step definitions.
2e. Add step field definition (optional)
Add new records to the Step field definition table (msfsi_stepfielddefinition) if the step requires configuration of fields in its business logic. The Step field definition table is solution-aware. You can use the configuration primarily in the following cases:
An out-of-the-box AI builder step
A user interface to display and manage the fields of the first extraction and first enrichment steps.
You can also use the configuration in other cases, if required.
2f. Add special step definitions
For each document definition, you can define two special steps, a single extraction step, and a single enrichment step, such that the Document user interface displays their output under the Extracted details tab.
Extraction step
The extraction step helps you extract information from a document. If you're using an AI builder model to define the step, you must train the AI builder model. You can either use a prebuilt AI model or a custom model that you've created and trained.
Note
The Out-of-the-box AI builder step currently supports only the ID reader prebuilt model and the custom document processing model.
You can define the extraction step as follows:
a. Select the AI builder model of your choice.
b. Set the Type to Extraction. For each document definition, add a single step of type extraction.
c. If you want the extraction step to run automatically, set the Order to 0 so that this step is the first in the main flow.
d. Enter the Success threshold and Failure threshold values. The default success threshold value is 0.9, while the default failure threshold value is 0.2.
The extraction step recommendation for the document depends on the confidence values of the Collection and other extracted output fields:
If the fields were extracted with a confidence value higher than the success threshold, the step recommendation is to approve the document.
If the fields were extracted with a confidence value lower than the failure threshold, the step recommendation is to reject the document.
Otherwise, the step recommendation for the document is unclear.
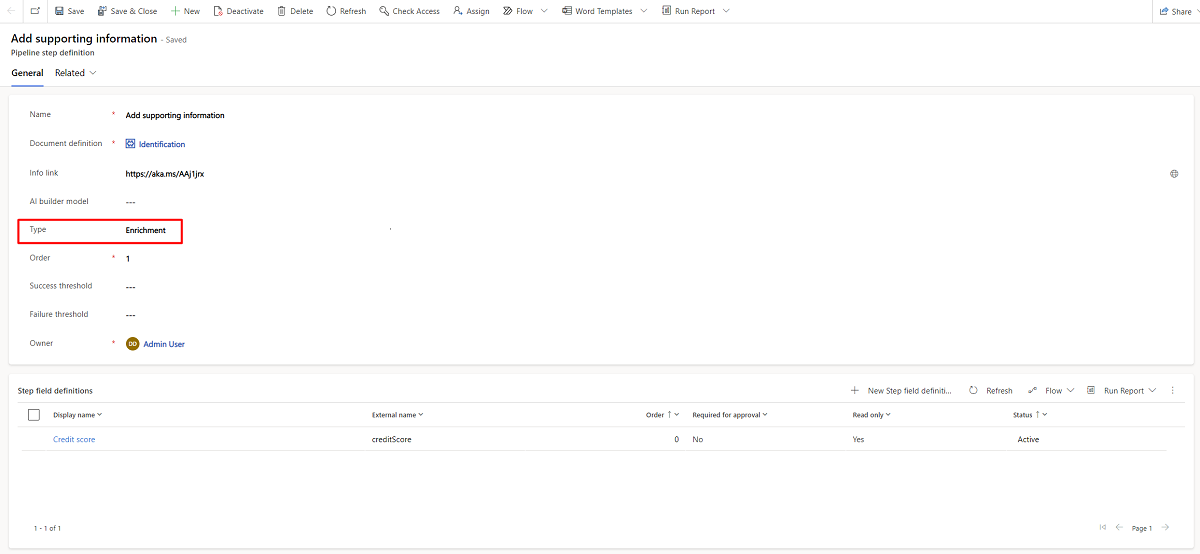
Enrichment step
The enrichment step helps you enrich the extracted data with supporting information.
You can define the enrichment step as follows:
a. Set the Type to Enrichment. For each document definition, add a single step of type enrichment.
b. Set the Order of the step in relation to the other steps.
Create step field definitions for the extraction and enrichment steps
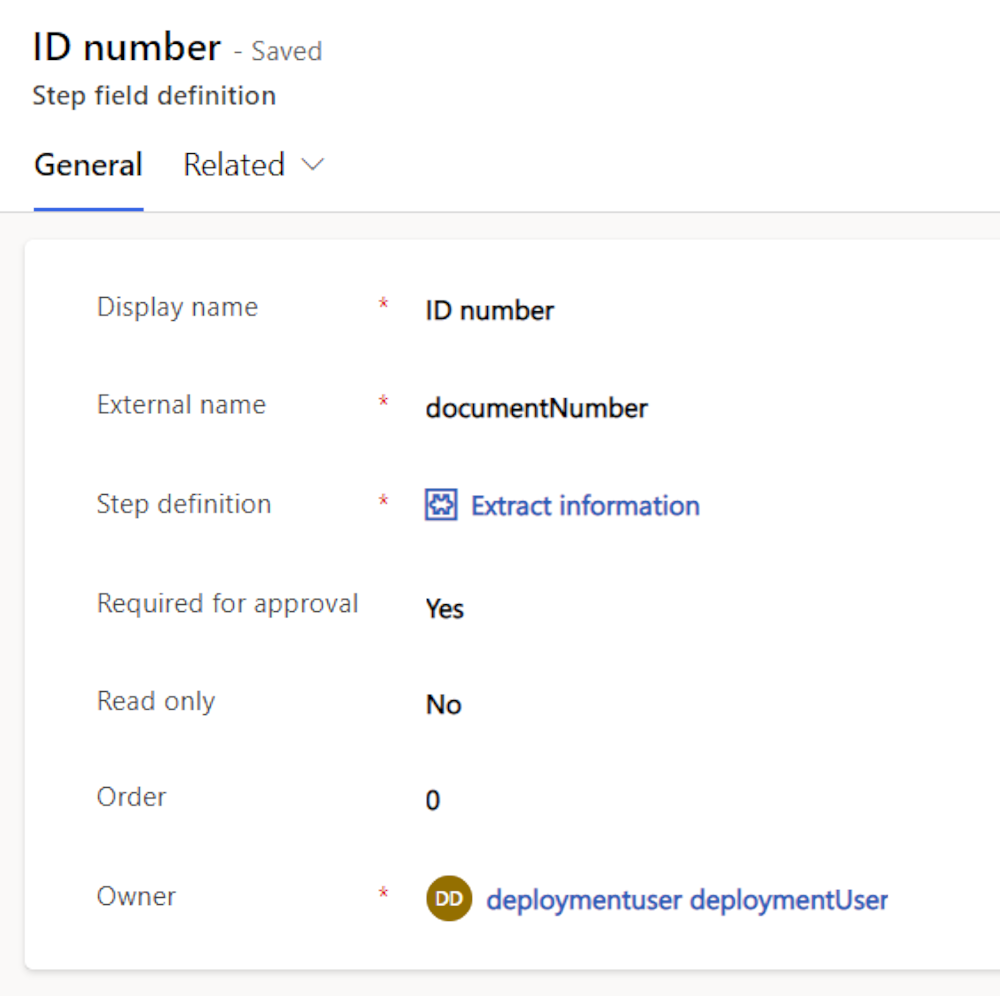
For each field of the extracted or supporting data, you need to configure the expected behavior in the user interface.
a. Set the value of Display name, which is the field label in the user interface.
b. Set External name as the field name defined in the model or external system.
c. Set the value of Required for approval to Yes, if this field must have a value before the document approval. The default value is No.
d. Set the value of Read only to Yes, if this field must not be editable in the user interface. The default value is No.
Note
We recommend not to have Required for approval fields marked Read only in an extraction step.
e. (Optional) Set the value of Order to the requested field position in the user interface. The default is alphabetical order.
3. Create a custom pipeline step flow
Create a new instant cloud flow that performs the action for each pipeline step definition.
Note
For the steps that perform the action of running the AI builder model and saving the output, you can use the out-of-the-box core flow: Document AI builder step. This step uses the AI builder model lookup from the step definition and runs this model on the document. If the step definition type is extraction and has active field definitions, the flow also formats the output to a unified structure with which the user interface works. Formatting is currently supported for prebuilt Identity document reader and Custom document processing models.
In Power Apps, go to New > Automation > Cloud Flow > Instant.
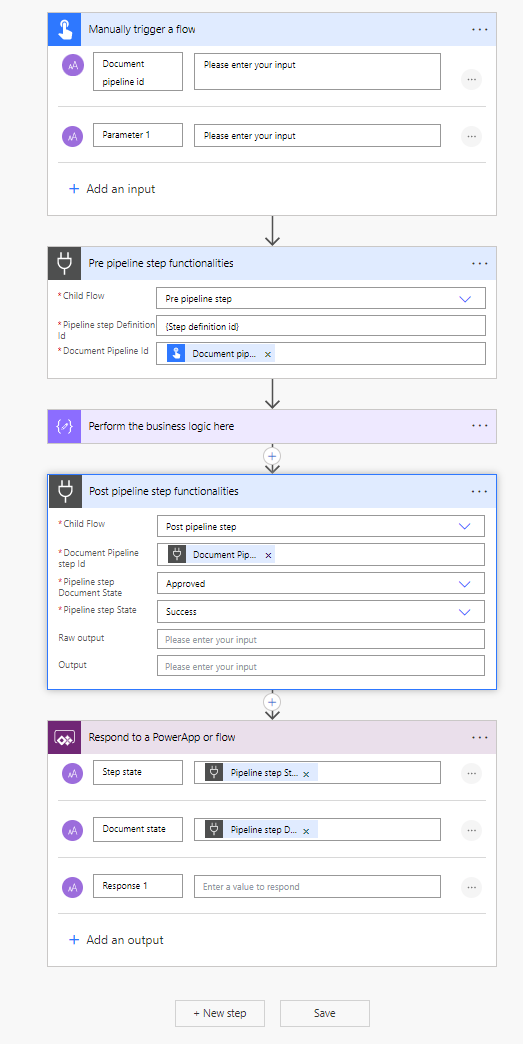
Enter the flow name, select Manually trigger a flow, and then select Create.
In the flow trigger, add Document pipeline id and more parameters, based on your requirements.
Call the Pre pipeline step child flow to add the step linked to the running pipeline.
a. Select New step, and then select Add a child flow.
b. Select the Out-of-the-box flow Pre pipeline step and add its parameters.
Add the steps to perform the required actions on the document. You can use the configuration defined in the Related pipeline step definition and Step field definition records.
Call the Post pipeline step to specify details such as step state, document recommended state, and optionally, step output.
a. Select New step, and then select Add a child flow.
b. Select the Out-of-the-box flow Post pipeline step and add its parameters.
Respond to the calling flow by returning the requested output parameters such as step, document state, and so on.
a. Select New step, and then select Respond to a Power App or flow.
b. Provide responses based on the requirements.
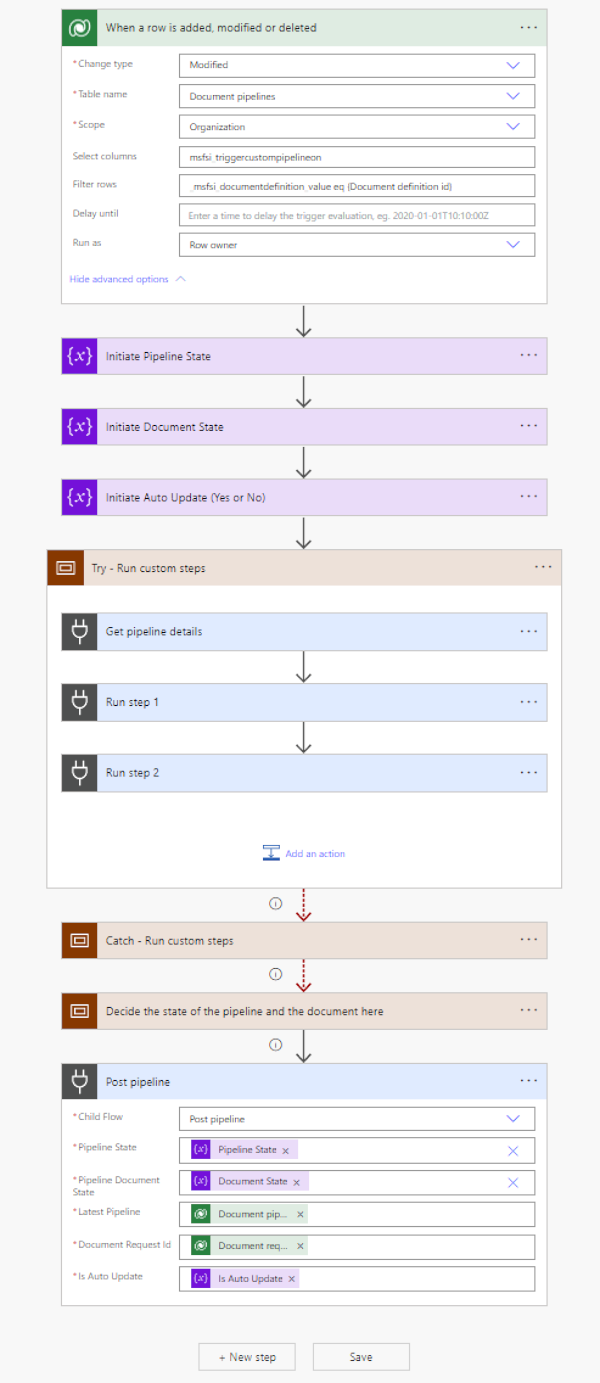
4. Create a custom pipeline flow
In Power Apps, go to New > Automation > Cloud Flow > Automated.
Enter the pipeline name, select When a row is added, modified or deleted, and then select Create.
Specify various details in the flow trigger as specified:
Set Change type to Modified.
Set Table name to Document pipelines.
Set Scope to Organization.
Enter the value of Select column as msfsi_triggercustompipelineon. The value denotes the field to modify and trigger the custom pipeline, if it exists.
Enter the value of Filter rows as _msfsi_documentdefinition_value eq {Document definition id}. Here, {Document definition id} is the Document definition for which you're building the custom pipeline.
Call the Get pipeline details child flow for information about the running pipeline and its related documents.
a. Select New step, and then select Add a child flow.
b. Select the Out-of-the-box flow Get pipeline details. In addition, select Yes/No for the Fetch file parameter if you require the base64 string content of the file.
Call the custom step's child flows in the order that they were defined.
Note
If the first step definition of this document definition, according to the Order, is of type Extraction, the Out-of-the-box Document AI builder step runs automatically in the main flow. Therefore, you need not call the step actively from the custom pipeline.
We recommend that you run the custom steps within the scope of try-catch blocks to provide final pipeline recommendations in all the cases.
Decide the final state of the pipeline and the recommendation status for the document.
You can use different step outputs such as step state and document state to calculate the final states for the pipeline and the document.
The document status of Approved, Rejected, or Unclear displays in the user interface as a recommendation of the pipeline regarding the uploaded document.
Call the Post pipeline child flow to update the running pipeline record with the final state and document recommendation.
a. Select New step, and then select Add a child flow.
b. Select the Out-of-the-box flow Post pipeline and enter its parameters:
Pipeline state: Either Failure or Success as its value.
Pipeline document state: Approved, Rejected, or Unclear
Latest pipeline: Id of the running pipeline record. This value is available in the trigger.
Document request id: Id of the document request that the pipeline relates to. This value exists in the trigger.
Is auto update: Set to Yes if you want the pipeline to automatically update the document request state, or No if you only want to show the recommendation and manually update the document request status.
Create a new document definition without an automatic flow
You can create a new document definition without any automatic flow, custom pipeline, or custom step pipeline flow. To create a new document definition without an automatic flow, follow these steps using Power Apps:
Either create a new Business scenario choice or use an existing choice.
Either create a new Document type choice or use an existing choice.
Add a document definition.
Add a new document record to the Document definition (msfsi_documentdefinition) table and save it.
a. Go to New > More > Other > Document definition.
b. Set the value of Is automatic flow to No.
c. Select the document type that you defined earlier.
d. Select the relevant business scenarios.
e. Select Save.
Remove a document flow
Removing a document flow means that the automatic flow is deactivated, but the document definition exists and becomes a document for manual review with no automatic insights.
In Power Apps, go to the custom solution.
Select the relevant document definition record in the solution to open the record's form.
Change the value of Is automatic flow to No.
Deactivate the related pipeline step definitions and the step field definition.
Turn off the related custom pipeline.
Remove a document definition
Removing a document definition from the business scenario deactivates the particular document definition record. You can't create a new document request from this document type.
In Power Apps, go to the custom solution.
Select the relevant document definition record in the solution to open the record's form.
Deactivate the document definition.