Configure the Azure DevOps mapping during code migration
This tutorial shows how to map your development box to the Azure DevOps project after the Lifecycle Services (LCS) code upgrade service has completed.
The LCS code upgrade service automatically checks your upgraded code into Azure DevOps. You will then need to map your development box to the upgrade folder/branch in your Azure DevOps project (The name of the upgrade folder/branch depends on the version you migrated to). Within your upgraded folder, you will find three folders:
- Export
- Metadata
- Projects
Key concepts
- Export is the project that contains the XML files after exporting from Microsoft Dynamics AX 2012. This project is your metadata in XML format before it is upgraded. This project is only relevant if you are upgrading from Dynamics AX 2012.
- Metadata is your upgraded code (metadata XML file).
- Projects are solutions that you can use during upgrade. One solution, CodeMergeSolution, is the solution that contains projects with the elements that have conflicts and need to be resolved. Another solution, UpgradedSolution, contains a collection of projects, one for each upgraded model.
Map Azure DevOps to your development box
- In Visual Studio, open the Team Explorer window by selecting View > Team Explorer from the top menu.
- In the Team Explorer window, select Connect, and then select Manage Connections > Connect to a Project.
- Follow the prompts to connect. From the list of available projects for your account, choose the project that you want to work on. Select Connect.
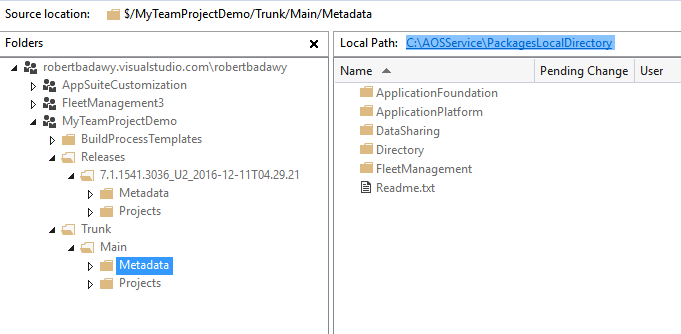
- Now you need to map your workspace to the Azure DevOps folders. Go to the Source Code Explorer and do this mapping:
- Projects >
- Select a folder where you plan to save your projects, or use the default Visual Studio folder: C:\Users\<username>\source\repos
- Metadata > C:\AOSService\PackagesLocalDirectory
- On cloud VMs, this folder is located on the I:\, J:\ or K:\ drive
- Important:
- If you are migrating from Dynamics AX 2012 R3 or earlier, you will be mapping to the metadata folder under the Main branch.
- If you are migrating between two product versions, you will be mapping to the metadata folder under one of the Releases branch.
- Projects >
After you have mapped these folders, you can synchronize the code to your local box. Right-click Metadata and select Get latest. Similarly synchronize the Projects folder. After synchronizing the metadata folder, refresh your models in Visual Studio from Finance and operations > Model Management > Refresh Models.  You are now ready to open your projects, resolve conflicts, build, test, and complete your code migration.
Feedback
Coming soon: Throughout 2024 we will be phasing out GitHub Issues as the feedback mechanism for content and replacing it with a new feedback system. For more information see: https://aka.ms/ContentUserFeedback.
Submit and view feedback for