Engineering change management feature walkthrough
This article provides an end-to-end walkthrough that shows how to work with engineering change management. It goes through each of the most important scenarios:
- Basic feature configuration
- How an engineering company creates a new engineering product
- How an engineering company releases an engineering product to a local company
- How a local company can review and accept a product that has been released to it by an engineering company
- How a local company can use an engineering product in standard transactions
- How to add an engineering product to a sales order
- How to request changes to an engineering product by creating an engineering change request
- How to schedule and implement requested changes by creating an engineering change order
- How to release a product that has been changed
All the exercises in this article use the standard sample data that is provided for Microsoft Dynamics 365 Supply Chain Management. Additionally, each exercise builds on the previous exercise. Therefore, we recommend that you work through the exercises in order, from beginning to end, especially if you've never used the engineering change management feature before. In this way, you will gain a complete understanding of the feature.
Set up for the sample scenario
To follow the sample scenario that is provided in this article, you must first prepare the feature by making demo data available and adding a few custom records.
Before you try to do any of the exercises in the rest of this article, follow the instructions in all the following subsections. These subsections also introduce several important settings pages that you will use when you set up engineering change management for your own organization.
Make standard demo data available
Work on a system where the standard demo data is installed. The standard demo data adds data for several demo legal entities (companies and organizations). As you work through the exercises, you will use the company picker on the right side of the navigation bar to switch between one company (DEMF) that is set up as an engineering organization and another company (USMF) that is set up as an operational organization.
Set up an engineering organization
An engineering organization owns the engineering data, and is responsible for product design and product changes. To set up your engineering organizations, follow these steps.
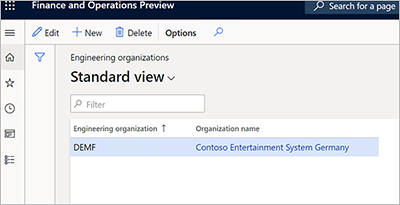
Go to Engineering change management > Setup > Engineering organizations.
Select New to add a row to the grid, and set the following values for it:
- Engineering organization: DEMF
- Organization name: Contoso Entertainment System Germany
Set up the version product dimension group
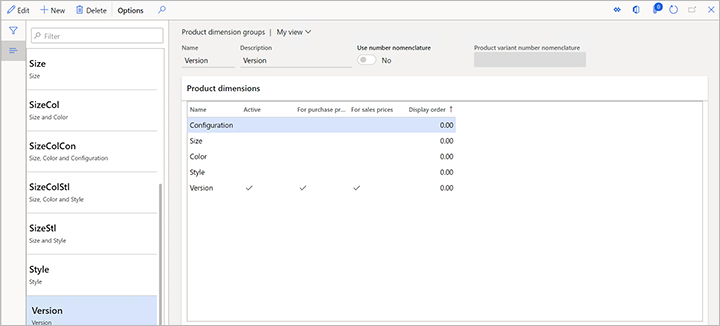
Go to Product information management > Setup > Dimensions and variant groups > Product dimension groups.
Select New to create a product dimension group.
Set the Name field to Version.
Select Save to save the new dimension and load values onto the Product dimensions FastTab.
On the Product dimensions FastTab, set Version as an active product dimension.
Set up product lifecycle states
As an engineering product goes through its lifecycle, it's important that you be able to control which transactions are allowed for each lifecycle state. To set up the product lifecycle states, follow these steps.
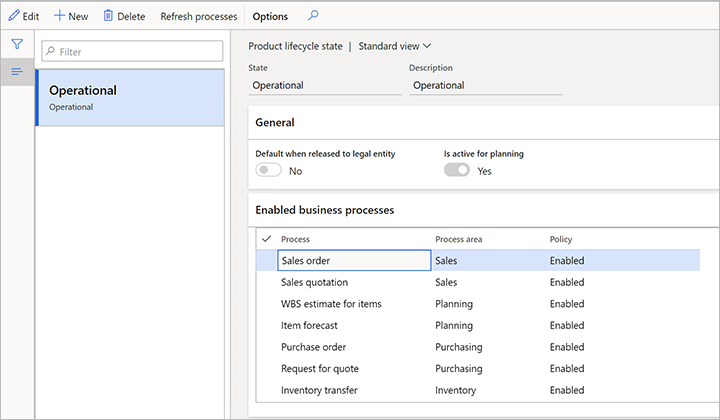
Go to Engineering change management > Setup > Product lifecycle state.
Select New to add a lifecycle state, and set the following values for it:
- State: Operational
- Description: Operational
Select Save to save the new lifecycle state and load values onto the Enabled business processes FastTab.
On the Enabled business processes FastTab, select the business processes that should be available. For this example, leave the Policy field set to Enabled for all business processes.
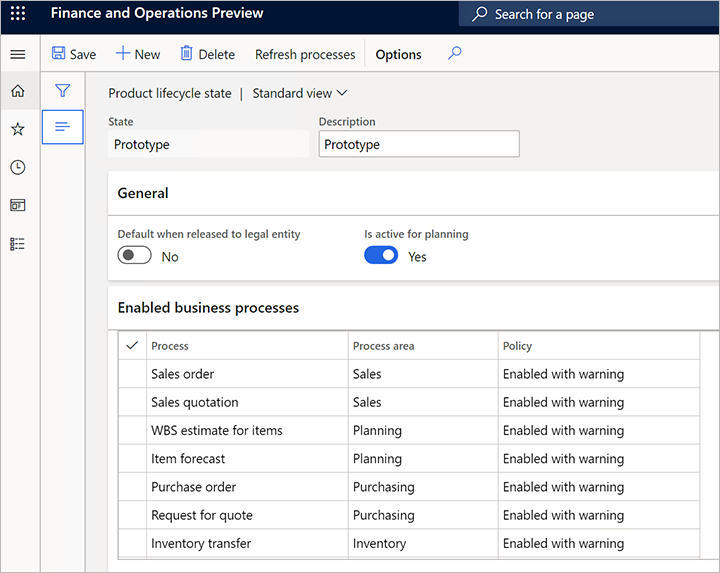
Select New to add another lifecycle state, and set the following values for it:
- State: Prototype
- Description: Prototype
Select Save to save the new lifecycle state and load values onto the Enabled business processes FastTab.
On the Enabled business processes FastTab, select the business processes that should be available. For this example, set the Policy field to Enabled with warning for all business processes.
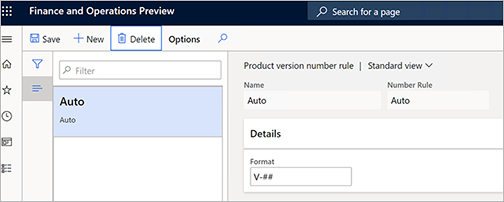
Set up a version number rule
Go to Engineering change management > Setup > Product version number rule.
Select New to add a rule, and set the following values for it:
- Name: Auto
- Number rule: Auto
- Format: V-##
Set up a product release policy
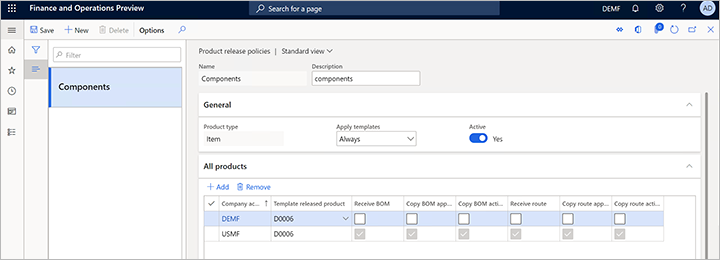
Go to Engineering change management > Setup > Product release policies.
Select New to add a release policy, and set the following values for it:
- Name: Components
- Description: Components
On the General FastTab, set the following values:
- Product type: Item
- Apply templates: Always
- Active: Yes
On the All products FastTab, select Add to add a line, and set the following values for it:
- Company: DEMF
- Template released product: D0006
Select Add to add another line, and set the following values for it:
- Company accounts ID: USMF
- Template released product: D0006
- Receive BOM: Select this check box.
- Copy BOM approval: Select this check box.
- Copy BOM activation: Select this check box.
- Receive route: Select this check box.
- Copy route approval: Select this check box.
- Copy route activation: Select this check box.
Set up an engineering product category
Engineering product categories provide the basis for creating engineering products (that is, products that are versioned and controlled through engineering change management). To set up engineering product categories, follow these steps.
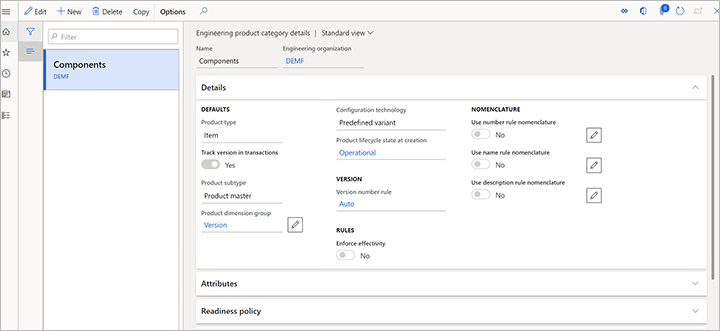
Go to Engineering change management > Engineering product category details.
Select New to create a category.
On the Details FastTab, set the following values:
- Name: Components
- Engineering organization: DEMF
- Product type: Item
- Track version in transactions: Yes
- Product dimension group: Version
- Product lifecycle state at creation: Operational
- Version number rule: Auto
- Enforce effectivity: No
- Use number rule nomenclature: No
- Use name rule nomenclature: No
- Use description rule nomenclature: No
On the Release policy FastTab, set the Product release policy field to Components.
Select Save.
Set up product acceptance conditions
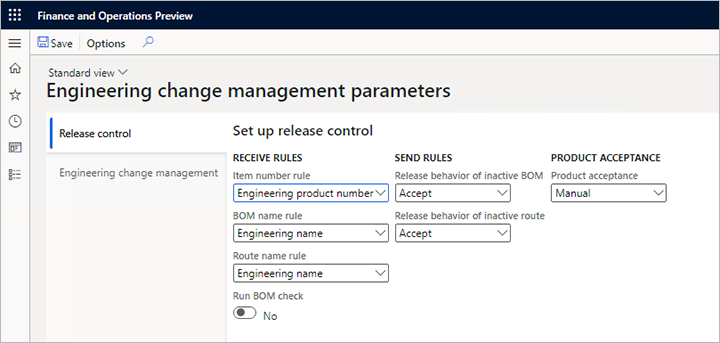
Use the company picker on the right side of the navigation bar to switch to the USMF legal entity (company).
Go to Engineering change management > Setup > Engineering change management parameters.
On the Release control tab, in the Product acceptance section, set the Product acceptance field to Manual.
Create a new engineering product
An engineering product is a product that is versioned and controlled through engineering change management. In other words, you can control the changes during its life, and the change information will be saved using engineering change orders. To create engineering products, follow these steps.
Make sure that you're in the legal entity of your engineering organization (DEMF for this example). Use the company picker on the right side of the navigation bar as required.
Open the Released products page by following one of these steps:
- Go to Product information management > Products > Released products.
- Go to Engineering change management > Common > Released products.
On the Action Pane, on the Product tab, in the New group, select Engineering product.
In the New product dialog box, set the following values:
- Engineering Product Category: Components
- Product number: Z0001
- Product name: Speaker set
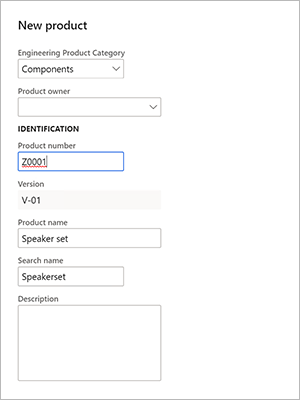
Note that the Version field is automatically set by using the product version number rule that you set up earlier.
Select OK to create the product and close the dialog box.
The details page for the new product is opened. Notice that values are already filled in for some fields, such as Storage dimension group, Tracking dimension group, and/or Item model group. These fields were automatically set because the product is being released in the DEMF legal entity and uses the Components product release policy, which is associated with the Components engineering product category. Because you previously used item D0006 as a template to set up a line for the DEMF legal entity, the values that were filled in were taken from item D0006.
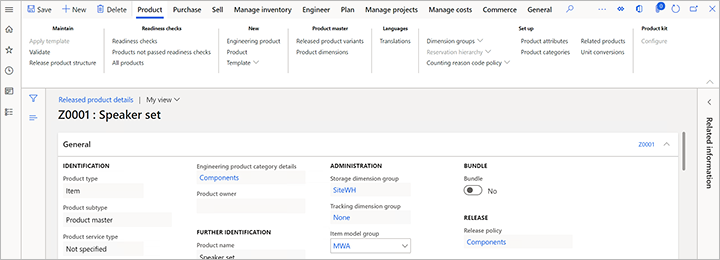
On the Action Pane, on the Engineer tab, in the Engineering change management group, select Engineering versions to view the versions of the product.
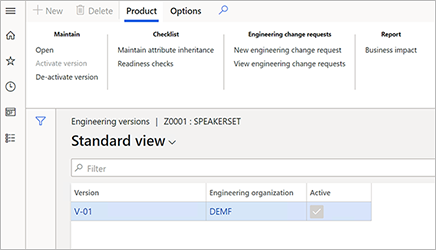
On the Engineering versions page, notice that there is only one version for the product, and it's active.
Select the version to view its details.
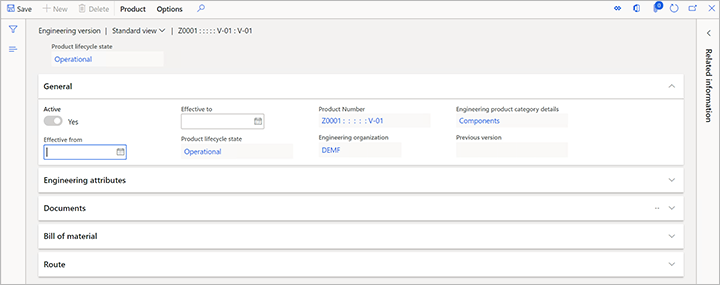
On the Engineering version page, on the Bill of material FastTab, select Create BOM.
In the Create BOM dialog box, set the following values:
- BOM number: Z0001
- Name: Speaker set
- Site: 1
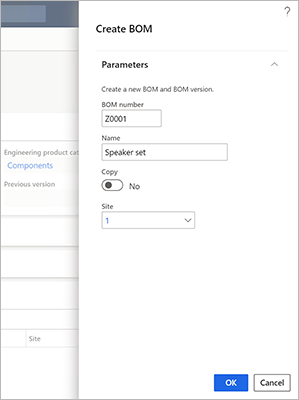
Select OK to add the BOM and close the dialog box.
On the Bill of materials FastTab, select Bill of material.
On the Bill of materials page, on the Bill of materials lines FastTab, add three lines, one each for item numbers D0001, D0003, andD0006.

Select Save.
Close the page.
On the Engineering version page, on the Bill of material FastTab, select Approve.
In the dialog box that appears, select OK.
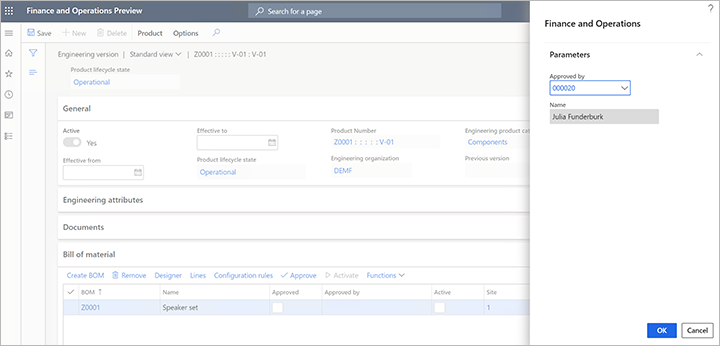
On the Engineering version page, on the Bill of material FastTab, select Activate.
Notice that the Active and Approved check boxes are selected for the BOM.
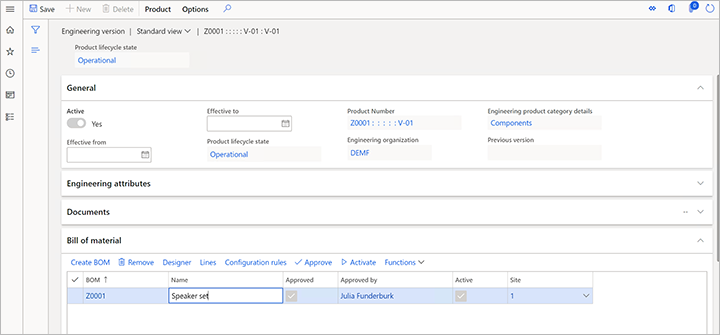
Close the page.
Release an engineering product to a local company
The product has now been designed by the Engineering department. For this example, the product is a prototype that engineering has designed for a customer. Because the customer is a customer of the USMF legal entity, the product must be released to that legal entity.
Keep the legal entity set to DEMF. (Use the company picker on the right side of the navigation bar as required.)
Go to Product information management > Products > Released products.
Select product Z0001.
On the Action Pane, on the Product tab, in the Maintain group, select Release product structure to open the Release products wizard.
On the Select engineering products to release page, select the Select check box for product Z0001.
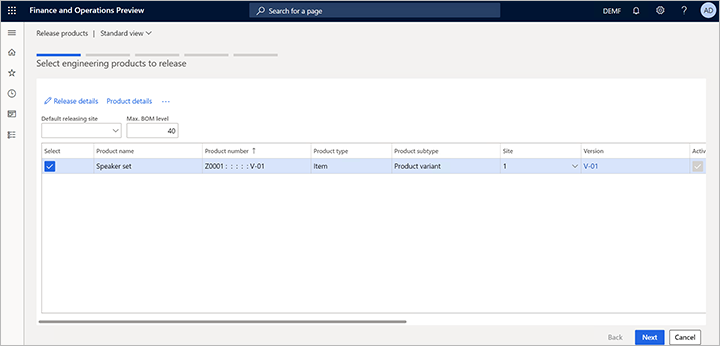
Select Release details.
The Product release details page appears, where you can review the details of the product that will be released, and its product structure. Notice that the Send BOM option is set to Yes. Therefore, both product Z0001 and all its child items from the BOM will be released.
You can select any child item in the left pane to review its details. If any child item has a BOM, you can also select to release the BOM of that child item.
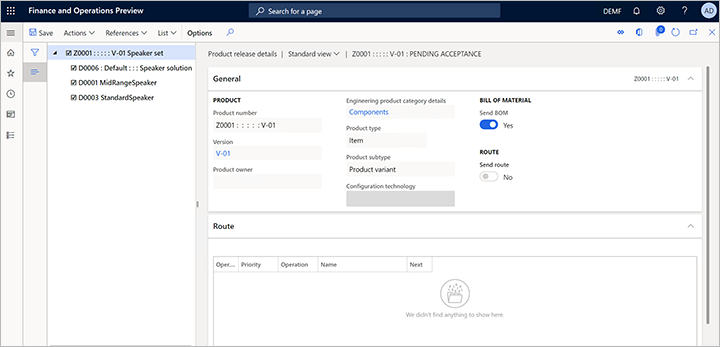
Close the page to return to the Release products wizard.
Select Next to open the Select products to release page. If you had selected any standard (non-engineering) products, they would appear on this page. Note that when you release a standard product by selecting Release product structure, its BOM and route are also released.
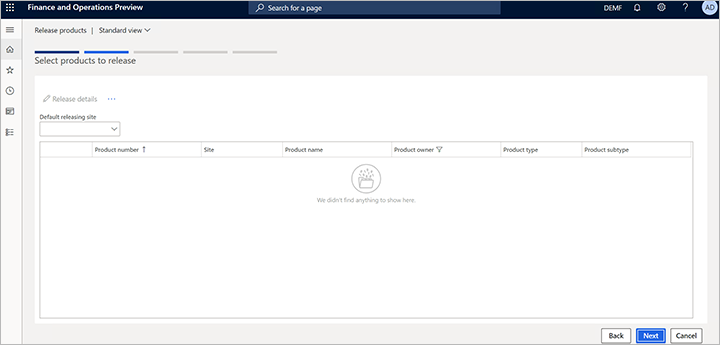
Select Next to open the Select product variants to release page. For this example, there aren't any variants.
Select Next to open the Select companies page.
Select the companies that the product should be released to. For this example, select the check box for USMF.
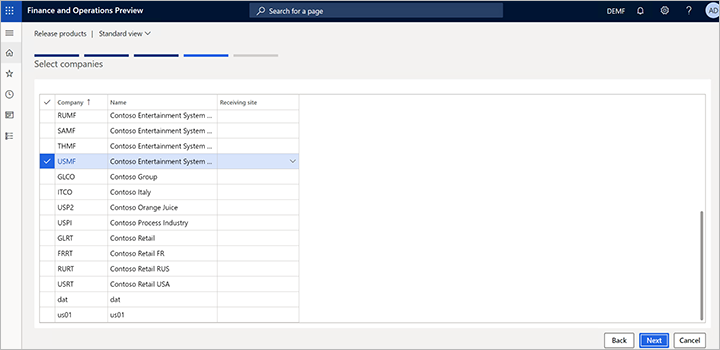
Select Next to open the Confirm selection page.
Select Finish.
Review and accept the product before you release it in the local company
The Engineering department has now released the information to the local companies where the product will be used. For this example, the local company is USMF.
Because you set the Product acceptance field to Manual on the Engineering change management parameters page for the USMF company, products must be manually accepted before they are released to that company. In other words, they must be reviewed and accepted before they become released products.
To review the product and release it in the USMF company, follow these steps.
Set the legal entity to USMF. (Use the company picker on the right side of the navigation bar.)
Go to Engineering change management > Common > Product releases > Open product releases.
The Open product releases page shows product Z0001, which has a status of Pending acceptance.

Select the value in the Product number column to open the Product release details page. Notice the following details:
- The General FastTab shows information about the product release, such as the releasing company (DEMF for this example), the releasing site (1), and the receiving site (1). Because you didn't specify a receiving site in the Release products wizard, the releasing site value is copied to the receiving site.
- The Release details FastTab shows information about the product and the version that was released. Here, you can modify settings such as the effectivity dates.
- The Route FastTab shows the route of the product. However, for this example, you didn't release any routes.
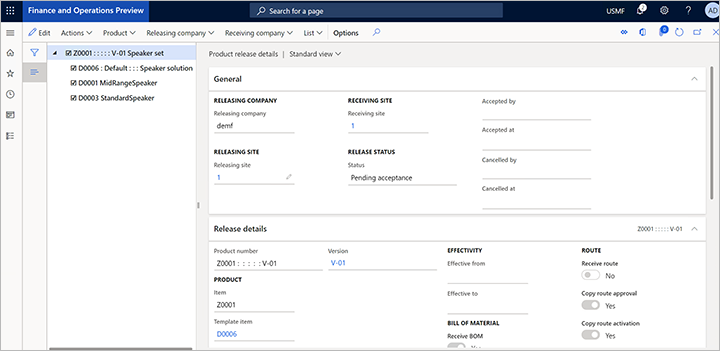
When you've finished reviewing the information, you're ready to accept the product and, in this way, release it in the USMF company. On the Action Pane, select Actions > Accept.
The product is now released in the USMF company. Go to Product information management >Products > Released products. You should see item Z0001.
Use the product in transactions in the local company
The master data manager for the USMF company wants to make sure that the product is in a Prototype state, to ensure that users will be warned if they accidentally add it to processes that they are working on.
Go to Product information management > Products > Released products.
Select product Z0001 to open its details page. (You can use the filter to find the product.)
On the Action Pane, on the Engineer tab, in the Engineering change management group, select Engineering versions.
On the Engineering versions page, select version number V-01 to open its details page.
On the Action Pane, on the Product tab, in the Lifecycle state group, select Change lifecycle state.
In the Change lifecycle state drop-down dialog box, set the State field to Prototype, and then select OK.

Add the engineering product to a sales order
The product can now be sold to a customer. To add the product to a sales order, follow these steps.
Go to Sales and marketing > Sales orders > All sales orders.
On the Action Pane, select New.
In the Create sales order dialog box, set the Customer account field to US-0002, and then select OK.
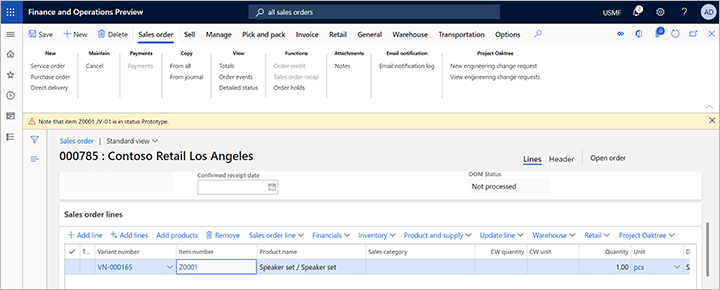
The new sales order is opened. On the Sales order lines FastTab, add a row, and set the Item number field to Z000 for it.
On the Action Pane, select Save.
You receive a warning message that informs you that the item has a status of Prototype. However, because the message is just a warning, the sales order was still created.
Request changes in the engineering product
The product was sent to a customer, but the customer wasn't completely satisfied and provides feedback that includes suggestions for improvement. While the customer is speaking with a sales clerk on the phone, the sales clerk can request the changes that the customer is describing.
Go to Sales and marketing > Sales orders > All sales orders.
Find and open the sales order that you created in the previous exercise.
On the Sales order lines FastTab, select Engineering change management > New engineering change request.

Fill in the engineering change request, based on the customer's feedback. For this example, set the following values:
- Change request: 555
- Title: Z0001 customer change
- Priority: low
- Category: set change
- Severity: Medium
On the Information FastTab, select New > Note to add a note to the grid.
In the Description field for the new note, indicate that item D0003 should be deleted from the BOM. If you must add more information for the note, you can enter text in the Notes field.
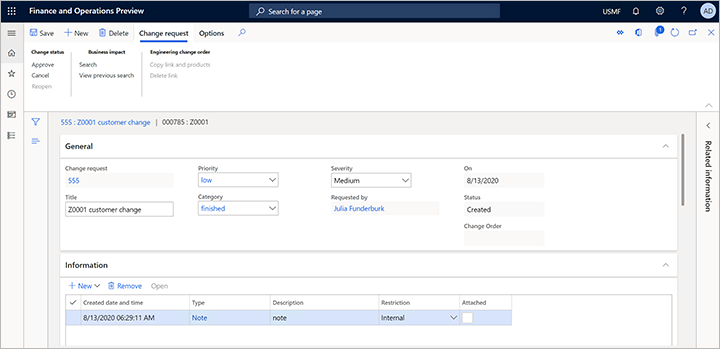
On the Action Pane, select Save.
Notice that the item has automatically been added on the Products FastTab, and that the source of the engineering change request (the sales order) has been added on the Source FastTab.
Make changes to the product by using an engineering change order
The sales clerk knows that the product is important and was designed especially for the customer. Therefore, the sales clerk calls an engineer in the DEMF company to notify them about the change request. In this way, the engineer can speed up the process.
The engineer now reviews the request from the customer and creates a change order for the product.
Because the engineer works in the DEMF company, set the legal entity to DEMF. (Use the company picker on the right side of the navigation bar.)
Go to Engineering change management > Common > Engineering change requests.
Open change request 555.
Review the information, and then approve the change. On the Action Pane, on the Change request tab, in the Change status group, select Approve.
Go to Engineering change management > Common > Engineering change orders.
On the Action Pane, select New to create a change order, and set the following values for it:
- Change order: 555
- Title: Z0001 customer change
- Category: Customer change
- Priority: Low
- Severity: Medium
On the Impacted products FastTab, select New > Add existing product to add a row to the grid, and set the following values for it:
- Product: Z0001
- Impact: New version
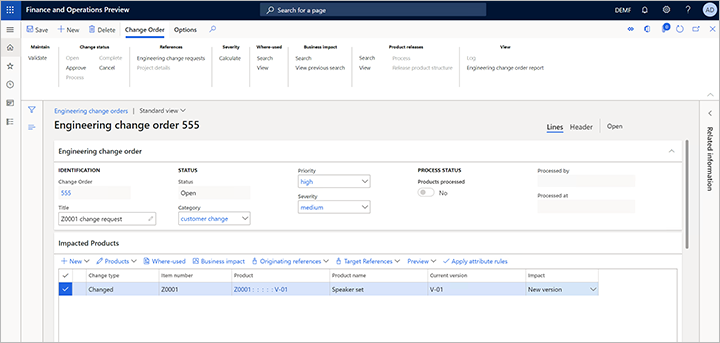
Notice that, because you set the Impact field to New version, the New version field on the Details tab of the Product details FastTab shows what the new version number will be (V-02 for this example).

On the Action Pane, select Save.
On the Product details FastTab, on the Bill of material tab, select Lines to open the BOM for version V-01 of product Z0001.

Select the line for item number D0003, and then, on the Action Pane, select Delete. The value of the Change type field for this line changes to Deleted.
On the Action Pane, select Save.

Close the BOM line page to return to the Engineering change order page.
On the Product details FastTab, on the Bill of material tab, notice that the value of the Change type field for BOM Z0001 is now Changed.

The order must now be approved before the changes can be processed. When the changes are processed, the products are updated with the changes that are included in the engineering change order. For this example, the person who creates the engineering change order has been specified as the approver.
On the Action Pane, on the Change order tab, in the Change status group, select Approve.
Select Process to update the product's information.
Release the changed product
The product can now be released again to the USMF company and then sent to the customer. To release the product directly from the engineering change order, follow these steps.
- Open the engineering change order that you created in the previous exercise, if it isn't already open.
- On the Action Pane, on the Change order tab, in the Product releases group, select Search.
- The search results show which companies the affected products have been released to. Close the search results.
- On the Action Pane, on the Change order tab, in the Product releases group, select View to open the Releases dialog box, where you can view the results of the previous search.
- Select each company that you want to release products to.
- Select OK to close the Releases dialog box and return to the change order.
- On the Action Pane, on the Change order tab, in the Product releases group, select Process to release the affected products to the selected companies. Alternatively, select Release product structure to start the release process.
Complete the change order
To mark the change order as completed, which indicates that no further actions remain, select Complete on the Action Pane.
Feedback
Coming soon: Throughout 2024 we will be phasing out GitHub Issues as the feedback mechanism for content and replacing it with a new feedback system. For more information see: https://aka.ms/ContentUserFeedback.
Submit and view feedback for