Events
Power BI DataViz World Championships
Feb 14, 4 PM - Mar 31, 4 PM
With 4 chances to enter, you could win a conference package and make it to the LIVE Grand Finale in Las Vegas
Learn moreThis browser is no longer supported.
Upgrade to Microsoft Edge to take advantage of the latest features, security updates, and technical support.
Important
This feature is currently in public preview. This feature is comprised of the following components:
You need to enable automated Entity store refresh before enabling Data Lake integration.
Go to System administration > Set up > Entity store.
On the Entity store page, a message indicates that you can switch to the Automated Entity store refresh option. This option is managed by the system. An admin doesn't have to schedule or monitor the Entity store refresh.
Select Switch now.
Important
This action isn't reversible. After you switch to the Automated Entity store refresh option, you can't revert to the old user interface (UI) experience.
Select Yes to continue.
You now see the new experience.

After the new experience is turned on, you can define the refresh for each aggregate measurement. The following refresh options are available:
In addition, an admin can refresh any aggregate measurement on demand by selecting the Refresh button. Additional options are added in future platform updates. These options include options for real-time refresh.
Important
When the automated refresh is enabled, in some cases the system may disable refresh of Aggregate measurements. You must revisit aggregate measurements and validate that appropriate refresh intervals have been applied by the system.
Important
This feature is currently in public preview. Do not enable this feature in production environments.
When this feature is turned on, Entity store data isn't populated in the relational Entity store database in the Microsoft subscription. Instead, it's populated in an Azure Data Lake Storage Gen2 account in your own subscription. You can use the full capabilities of PowerBI.com and other Azure tools to work with Entity store.
Before you start, you must complete these tasks in the Azure portal.
The following sections describe each task in more detail.
In the Azure portal, create a new storage account.
In the Create storage account dialog box, provide values for the following parameter fields:
In the Advanced options dialog box, you see the Data Lake storage Gen2 option. Select Enable under the Hierarchical namespaces feature. If you disable this option, you can't consume data written by finance and operations apps with services such as Power BI data flows.
Select Review and create. When the deployment is completed, the new resource are shown in the Azure portal.
Select the resource, and then select Settings > Access keys.
Make a note of the connection string value, because you have to provide it later.
In the Azure portal, select Microsoft Entra, and then select App registrations.
Select New registration at the top of the menu, and enter the following information:
After the application is created, select API permissions.
In the dialog box that appears, select Add a permission.
You see a dialog box with a list of APIs. In the list, select Azure Key Vault.
Select the Delegated permissions box, select user_impersonation, and then select Add permissions to save your changes.
Select the Certificates & secrets menu on the left navigation pane, and then select New client secret.
In the Description field, enter a name and choose an expiry period. Select Add.
A secret is generated and shown in the Value field.
Immediately copy the secret to the clipboard, because it disappears within one or two minutes. You have to provide this key to the application later.
In the Azure portal, open Key Vault that you created earlier.
Select Access policies, and then select Add to create a new access policy.
In the Select principal field, select the name of the application that you previously registered.
In the Key permissions field, select Get and List permissions.
In the Secret permissions field, select Get and List permissions.
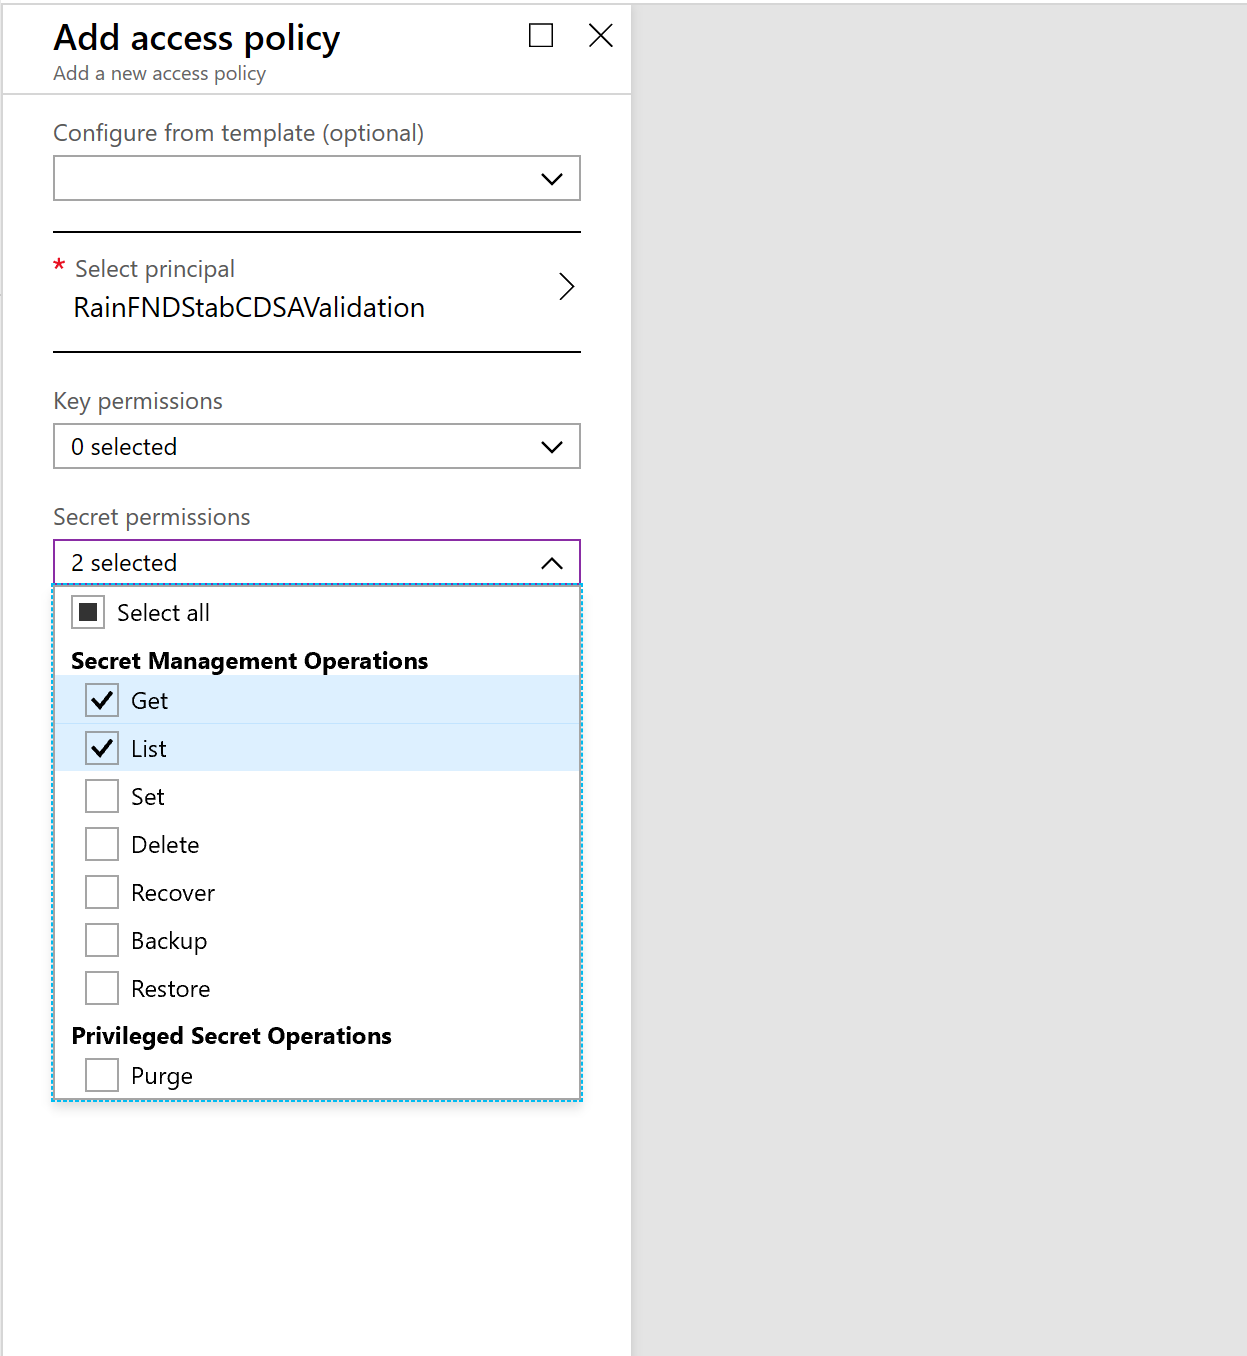
Select Save.
Go to System administration > Set up > System parameters.
On the Data connections tab, enter the following information that you made a note of earlier in this article:
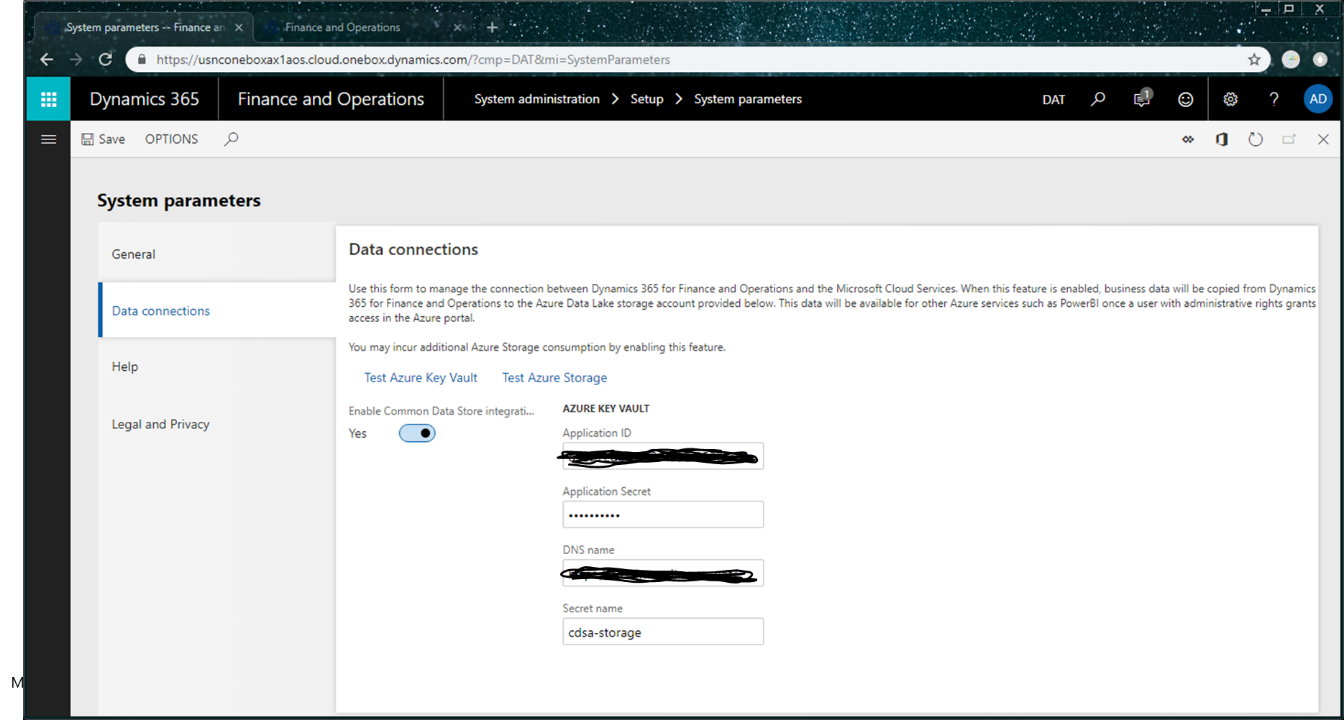
Select the Test Azure Key Vault and Test Azure Storage links to validate that system can access the configuration information that you provided.
Select the Enable data connection check box.
Entity store data should now be populated in the storage location that you provided, not in the relational Entity store database.
The aggregate measurements and refresh options that you select in the Entity store UI should now apply to data that is copied to Data Lake.
Events
Power BI DataViz World Championships
Feb 14, 4 PM - Mar 31, 4 PM
With 4 chances to enter, you could win a conference package and make it to the LIVE Grand Finale in Las Vegas
Learn moreTraining
Module
Link your Dataverse environment to Microsoft Fabric - Training
Learn how to link your Dataverse environment to Microsoft Fabric.
Certification
Microsoft Certified: Azure Data Engineer Associate - Certifications
Demonstrate understanding of common data engineering tasks to implement and manage data engineering workloads on Microsoft Azure, using a number of Azure services.