Register an application with the Microsoft identity platform
For your app to use the identity and access management (IAM) capabilities of Microsoft Entra ID, including accessing protected resources, you must register it first. Then the Microsoft identity platform performs the IAM functions for the registered applications. This article shows you how to register a web application in the Microsoft Entra admin center. You can learn more about app types you can register in the Microsoft identity platform.
Tip
To register an application for Azure AD B2C, follow the steps in Tutorial: Register a web application in Azure AD B2C.
Prerequisites
- A Microsoft Entra ID tenant. If you don't have a tenant, create a free Azure account to get free subscription.
- An account that has at least the Cloud Application Administrator role.
Register an application
Registering your application establishes a trust relationship between your app and the Microsoft identity platform. The trust is unidirectional: your app trusts the Microsoft identity platform, and not the other way around. Once created, the application object can't be moved between different tenants.
Sign in to the Microsoft Entra admin center.
If you have access to multiple tenants, use the Settings icon in the top menu to switch to the tenant in which you want to register the application from the Directories + subscriptions menu.
Browse to Identity > Applications > App registrations and select New registration.
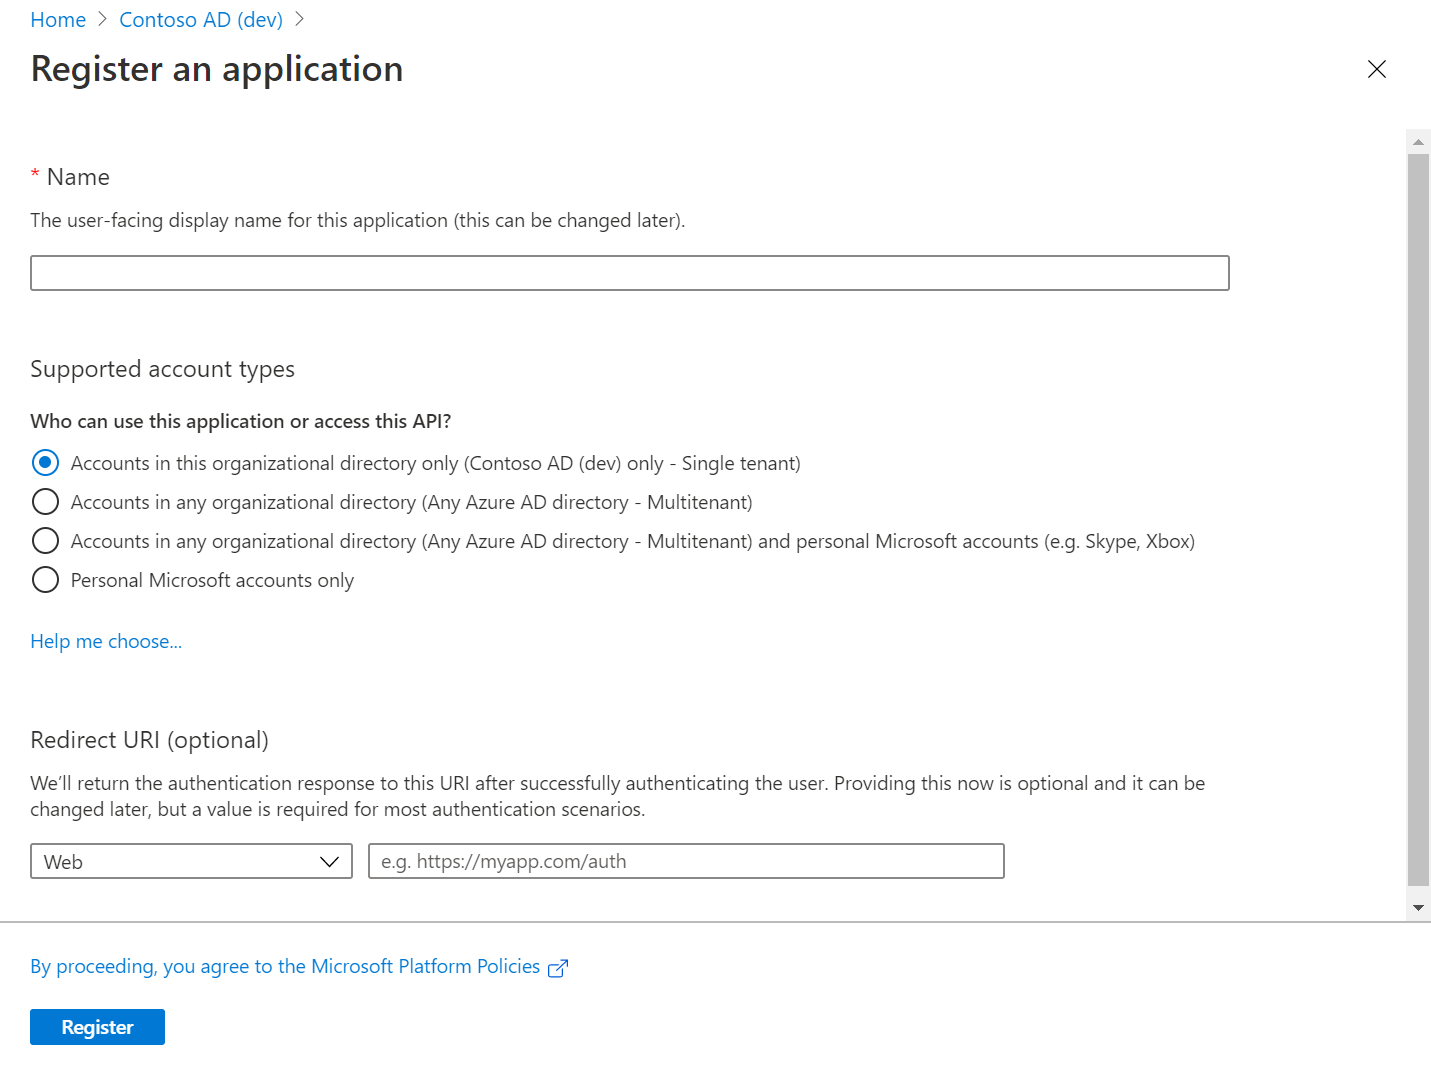
Enter a display Name for your application.
Specify who can use the application in the Supported account types section.
Supported account types Description Accounts in this organizational directory only Select this option if you're building an application for use only by users (or guests) in your tenant.
Often called a line-of-business (LOB) application, this app is a single-tenant application in the Microsoft identity platform.Accounts in any organizational directory Select this option if you want users in any Microsoft Entra tenant to be able to use your application. This option is appropriate if, for example, you're building a software-as-a-service (SaaS) application that you intend to provide to multiple organizations.
This type of app is known as a multitenant application in the Microsoft identity platform.Accounts in any organizational directory and personal Microsoft accounts Select this option to target the widest set of customers.
By selecting this option, you're registering a multitenant application that can also support users who have personal Microsoft accounts. Personal Microsoft accounts include Skype, Xbox, Live, and Hotmail accounts.Personal Microsoft accounts Select this option if you're building an application only for users who have personal Microsoft accounts. Personal Microsoft accounts include Skype, Xbox, Live, and Hotmail accounts. Don't enter anything for Redirect URI (optional). You'll configure a redirect URI in the next section.
Select Register to complete the initial app registration.
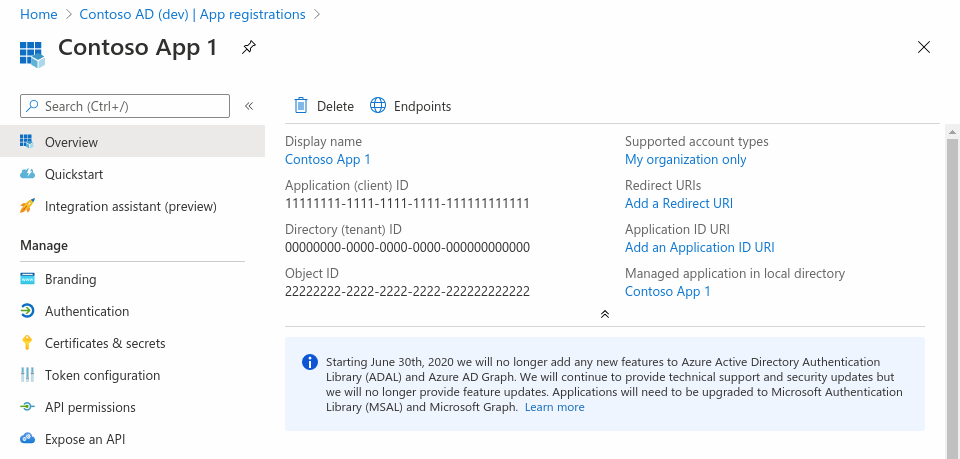
When registration finishes, the Microsoft Entra admin center displays the app registration's Overview pane. On this page, the app was assigned values for:
- Application (client) ID which uniquely identifies your application in the Microsoft cloud ecosystem, across all tenants.
- Object ID which uniquely identifies your application in your tenant.
Configure platform settings
Platform settings include redirect URIs, specific authentication settings, or fields specific to the application's platform, for example, Web and Single-page applications.
Under Manage, select Authentication.
Under Platform configurations, select Add a platform.
Under Configure platforms, select the tile for your application type (platform) to configure its settings.
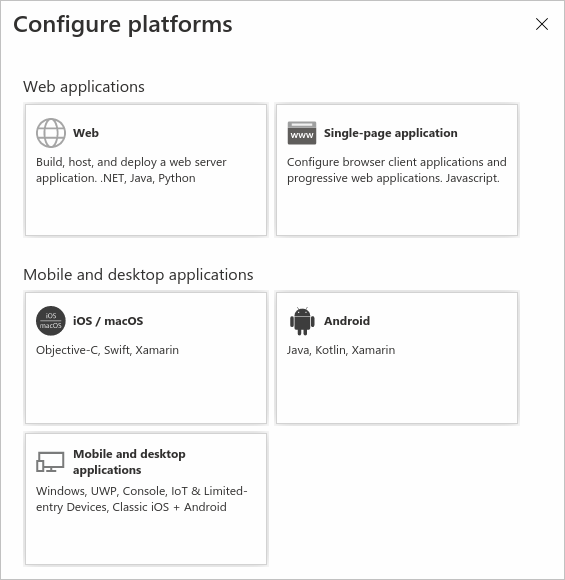
Platform Settings option Web Enter a Redirect URI for your app. This URI is the location where the Microsoft identity platform redirects a user's client and sends security tokens after authentication.
You can also configure Front-channel logout URL and Implicit grant and hybrid flows properties.
Select this platform for standard web applications that run on a server.Single-page application Enter a Redirect URI for your app. This URI is the location where the Microsoft identity platform redirects a user's client and sends security tokens after authentication.
You can also configure Front-channel logout URL and Implicit grant and hybrid flows properties.
Select this platform if you're building a client-side web app by using JavaScript or a framework like Angular, Vue.js, React.js, or Blazor WebAssembly.iOS / macOS Enter the app Bundle ID. Find it in Build Settings or in Xcode in Info.plist.
A redirect URI is generated for you when you specify a Bundle ID.Android Enter the app Package name. Find it in the AndroidManifest.xml file. Also generate and enter the Signature hash.
A redirect URI is generated for you when you specify these settings.Mobile and desktop applications Select one of the suggested Redirect URIs. Or specify on or more Custom redirect URIs.
For desktop applications using embedded browser, we recommendhttps://login.microsoftonline.com/common/oauth2/nativeclient
For desktop applications using system browser, we recommendhttp://localhost
Select this platform for mobile applications that aren't using the latest Microsoft Authentication Library (MSAL) or aren't using a broker. Also select this platform for desktop applications.Select Configure to complete the platform configuration.
Redirect URI restrictions
There are some restrictions on the format of the redirect URIs you add to an app registration. For details about these restrictions, see Redirect URI (reply URL) restrictions and limitations.
Add credentials
Credentials are used by confidential client applications that access a web API. Examples of confidential clients are web apps, other web APIs, or service-type and daemon-type applications. Credentials allow your application to authenticate as itself, requiring no interaction from a user at runtime.
You can add certificates, client secrets (a string or password), or federated credentials as credentials to your confidential client app registration.
Option 1: Add a certificate
Sometimes called a public key, a certificate is the recommended credential type because they're considered more secure than client secrets. For more information about using a certificate as an authentication method in your application, see Microsoft identity platform application authentication certificate credentials.
- Select Certificates & secrets > Certificates > Upload certificate.
- Select the file you want to upload. It must be one of the following file types: .cer, .pem, .crt.
- Select Add.
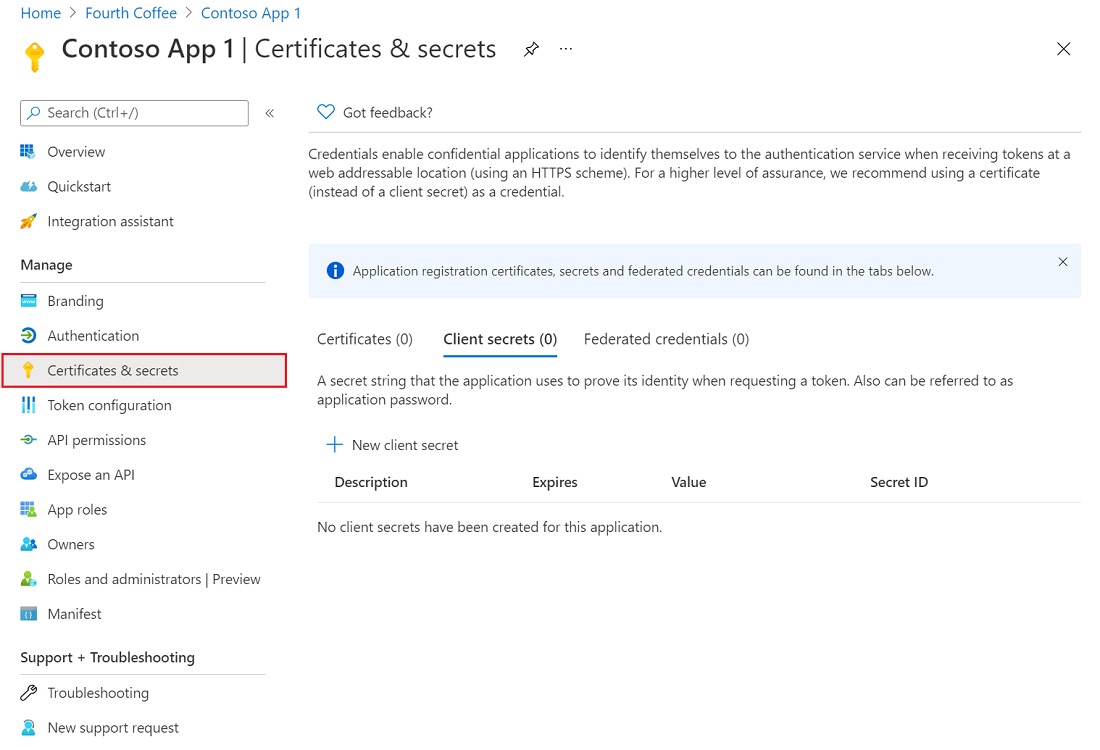
Option 2: Add a client secret
Sometimes called an application password, a client secret is a string value your app can use in place of a certificate to identity itself.
Client secrets are considered less secure than certificate credentials. Application developers sometimes use client secrets during local app development because of their ease of use. However, you should use either certificate credentials or federated credentials for applications that are running in production.
- Select Certificates & secrets > Client secrets > New client secret.
- Add a description for your client secret.
- Select an expiration for the secret or specify a custom lifetime.
- Client secret lifetime is limited to two years (24 months) or less. You can't specify a custom lifetime longer than 24 months.
- Microsoft recommends that you set an expiration value of less than 12 months.
- Select Add.
- Record the secret's value for use in your client application code. This secret value is never displayed again after you leave this page.
For application security recommendations, see Microsoft identity platform best practices and recommendations.
If you're using an Azure DevOps service connection that automatically creates a service principal, you need to update the client secret from the Azure DevOps portal site instead of directly updating the client secret. Refer to this document on how to update the client secret from the Azure DevOps portal site: Troubleshoot Azure Resource Manager service connections.
Option 3: Add a federated credential
Federated credentials are a type of credential that allows workloads, such as GitHub Actions, workloads running on Kubernetes, or workloads running in compute platforms outside of Azure, to access Microsoft Entra ID-protected resources without needing to manage secrets. Federated credentials use workload identity federation.
To add a federated credential, follow these steps:
Select Certificates & secrets > Federated credentials > Add credential.
In the Federated credential scenario drop-down box, select one of the supported scenarios, and follow the corresponding guidance to complete the configuration.
- Customer managed keys for encrypt data in your tenant using Azure Key Vault in another tenant.
- GitHub actions deploying Azure resources to configure a GitHub workflow to get tokens for your application and deploy assets to Azure.
- Kubernetes accessing Azure resources to configure a Kubernetes service account to get tokens for your application and access Azure resources.
- Other issuer to configure an identity managed by an external OpenID Connect provider to get tokens for your application and access Azure resources.
For more information about how to get an access token with a federated credential, see Microsoft identity platform and the OAuth 2.0 client credentials flow.
Other resources
- Learn more about permissions and consent in the Microsoft identity platform or how permissions work in Microsoft Graph.
- Choose a quick start that walks you through adding core identity and access management (IAM) features to your applications and best practices for keeping your apps secure and available.
- Learn more about the two Microsoft Entra objects that represent a registered application and the relationship between them: Application objects and service principal objects.
Next step
Use the app to Get access on behalf of a user or Get access without a user
Feedback
Coming soon: Throughout 2024 we will be phasing out GitHub Issues as the feedback mechanism for content and replacing it with a new feedback system. For more information see: https://aka.ms/ContentUserFeedback.
Submit and view feedback for