Run Microsoft Learn training exercises in your own subscription
To make experimentation and learning as easy as possible, Microsoft Learn training utilizes multiple sandbox environments. For example, the Azure Sandbox lets you perform specific Azure tasks for free without an Azure account. However, it also makes it difficult to save your work, repurpose it for later use, or to extend it outside the boundaries of the given training exercise. For these scenarios, you can run the lab in your own subscription if you prefer.
You can also use this approach if the training Sandbox environment is unavailable for some reason.
Important
Remember that if you use your own subscription, you will be charged for any active resources. We recommend you monitor your costs carefully using the cost analysis features in the product portals, de-allocate any VMs when not in use, and select pricing plans carefully to avoid unexpected charges.
Azure training exercises
If the training exercise has a button to activate a Sandbox, you should perform the following steps instead of activating a new Sandbox environment.
- Open a Cloud Shell window (only necessary if the exercise uses the command-line).
- Create a resource group.
- Make sure to sign into the correct subscription and directory.
- Use the resource group in the exercise.
- Delete the resources when you're finished with them.
The following provides more details about each step.
Open a Cloud Shell
Some training exercises use an integrated Cloud Shell. The integrated Cloud Shell won’t be available if you don’t activate the Sandbox. However, you can open a new Azure Cloud Shell tab or window with the URL https://shell.azure.com, or by launching the Azure portal and using the Cloud Shell icon in the top toolbar as shown below.
![]()
Make sure to sign in using your subscription credentials. All the commands for the exercise can then be run in this shell. You can select either bash or PowerShell as part of the experience and even switch between them as needed.
Create a resource group
A resource group is a container that holds related resources for an Azure solution. The Sandbox creates a resource group automatically. You’ll need to create your own persistent group to hold the resources in your subscription. You can create a new resource group using the Azure CLI, PowerShell, or Azure portal.
Azure CLI
Sign into the Azure CLI using the az login command. Make sure to use credentials with access to the subscription you plan to use. Then, use the command below in the Azure CLI to create a new resource group. Replace the {resourceGroupName} with a unique name that is easily identifiable to you. The {location} should be an Azure region close to you. You can get a list of available regions with the az account list-locations command.
az group create --name {resourceGroupName} --location {location}
PowerShell
PowerShell is similar – you'll need the Azure PowerShell module, and will need to sign in to your Azure subscription with the Connect-AzAccount cmdlet. Then you can create a new resource group with the New-AzResourceGroup cmdlet as shown below.
New-AzResourceGroup -Name {resourceGroupName} -Location {location}
Azure portal
Finally, you can use the Azure portal to create a resource group. In many cases, you can create new resource groups as part of the resource creation itself by selecting “New” as part of the resource create screens. Alternatively, you can create a new resource group with the following steps:
- Sign into the Azure portal.
- Select + Create a resource from the left sidebar.
- Type “Resource group” in the search box and select it from the results.
- Select Create on the description page.
- Select your subscription, give the new resource group a name, and pick the location (region) you want to create the group in.
- Select Review + Create and finalize the creation of the group.
Verify the selected Azure subscription and directory
If you use the Azure portal during the training exercise, make sure to use the correct subscription credentials. In some cases, the link in the instructions might try to put you into the Microsoft Learn directory. This directory won’t work because you won’t have the permissions to create resources.
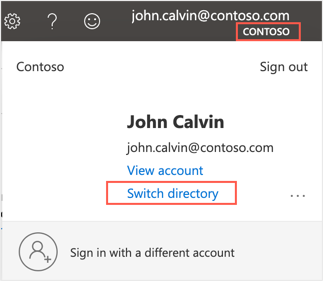
Once you’re signed in, check your current account in the top-right corner of the Azure portal. If you don’t see the correct company name under your name, you're likely in the wrong directory. Select your name and then select Switch Directory to change the current directory.
Using the resource group
Throughout the training exercise instructions, you’ll find references to this pre-created group, often listed as "[sandbox resource group name]" in the exercise steps or code samples. This placeholder value is replaced with a real name once you activate the Sandbox. You’ll need to replace this value each time you see it with your own resource group name. For example, if you created a resource group named learn-rg, then make sure to use that name each time you see the placeholder.
Important
Make sure to use the same resource group for all the resources you create in the exercise. This makes it easier to track the cost as well as clean them all up when you are finished with them.
Delete the resources when you're finished
Once the training exercise is completed in your subscription, the resources will all continue to live until you delete them yourself. There is no automatic deletion capability when using your own subscription. When you're ready to delete all the resources, use the following steps:
Azure CLI
Use the following command in the Azure CLI to delete the resource group and all related resources. Replace the {resourceGroupName} with the name of the resource group you created.
az group delete -n {resourceGroupName}
PowerShell
PowerShell is similar.
Remove-AzResourceGroup -Name {resourceGroupName}
Azure portal
Finally, you can use the Azure portal to delete a resource group. Use the following steps.
- Sign into the Azure portal.
- Type the name of your resource group into the Search box at the top.
- Select the resource group to show the details. You should see all your created resources.
- Select Delete resource group from the toolbar. Complete the "Are you sure" prompt and select Delete to finish the process.
Microsoft Dynamics 365 Sales, Customer Service, Field Service & Marketing training exercises
Before starting the training exercise, request a trial environment from Microsoft and use the pre-provided sample data set.
If you alter the sample data and encounter problems with subsequent labs, follow these instructions to reset your environment’s sample data.
Microsoft Dynamics 365 Finance, Supply Chain Management, and Commerce training exercises
Before starting the training exercise, request a Dynamics 365 Finance & Operations trial environment from Microsoft and use the pre-provided sample data set.
Once the module is complete, you can follow these instructions to regenerate your demo data to reset the data for the next module.