LinkedIn Learning SSO Multiple Authentication (Multi-Auth) Guide
What this Document Tells You
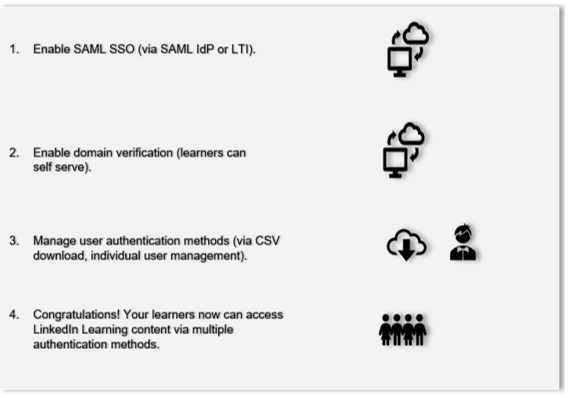
The following steps illustrate the LinkedIn Learning SSO multiple authentication process flow:
SSO Multiple Authentication Overview
LinkedIn Learning now supports multiple authentication methods for users. If you are a new user/admin integrating with LinkedIn Learning, you can allow learners to authenticate using one authentication method, like SSO, and allow other learners to authenticate using other authentication methods, like email and password, LTI, or a secondary SSO connection.
This guide walks you through the various authentication methods available during your integration, how to configure them, and how to manage the preferred authentication method for each user.
What are Multiple Authentication Methods?
LinkedIn Learning uses authentication methods to determine whether a learner should have access to its platform.
Authentication methods can be SAML Single Sign-On, LTI, or Non-SSO (username and password).
Multi-authentication means that an organization can use a combination of authentication methods based on their needs. For example:
Okta (SAML SSO) + Ping (SAML SSO)
Okta + Email Domain Verification
Okta + LTI + Email Domain Verification
Okta + Manual User Upload
Okta + Ping + Email invitation
There are three possible authentication scenarios for using multiple authentication methods:
- "I want one SSO connection, and I want it to apply to everyone".
- "I want one SSO connection, but some people won't be using SSO".
- "I want multiple SSO connections, with some people going to one and some going to another".
Single Sign-on
LinkedIn Learning currently supports two types of Single Sign-on, SAML 2.0, and LTI (1.0 and 1.1).
Add a SAML SSO Connection
To set up multiple authentication methods, you first need to configure a Single Sign-on connection. To configure a SSO, take the following steps:
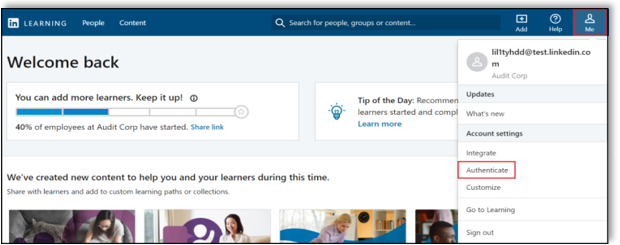
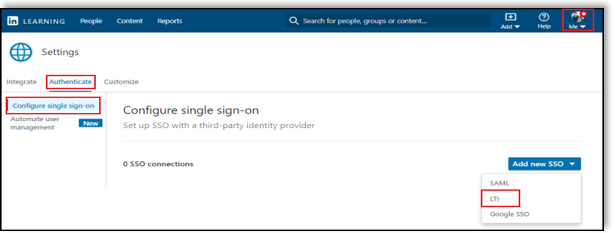
After you log in, if you are not already in the Admin screen, select Go to Admin > Me > Authenticate.
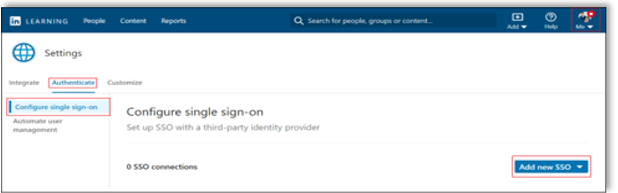
From the side navigation menu, select Configure single sign-on and click Add new SSO.
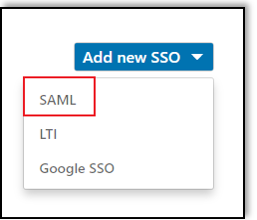
Select an SSO method (in this case, "SAML").
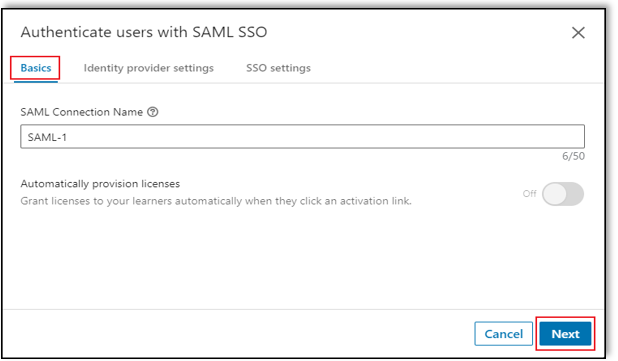
In the Authenticate users with SAML SSO screen, enter a name for your SSO connection and click Next.
For detailed information, review our LinkedIn Learning SSO Implementation Guide.
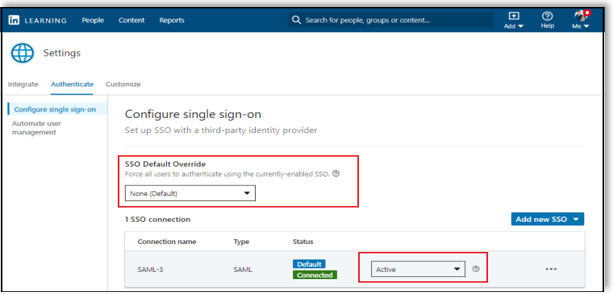
Toggle the connection status to "Active".
After setting up your SSO connection, under SSO Default Override, select "None (Default)" if you plan to give users access to your learning platform outside of SSO. This action allows the admin to choose which users must authenticate via SSO and which users must authenticate via Email Domain Verification or email invitation (manual user upload).
Add an LTI Connection
To add an LTI SSO connection, take the following steps:
After you log in, if you are not already in the Admin screen, select Go to Admin > Me > Authenticate.
From the side navigation menu, select Configure single sign-on and click Add new SSO.
Click on Add new SSO and choose "LTI".
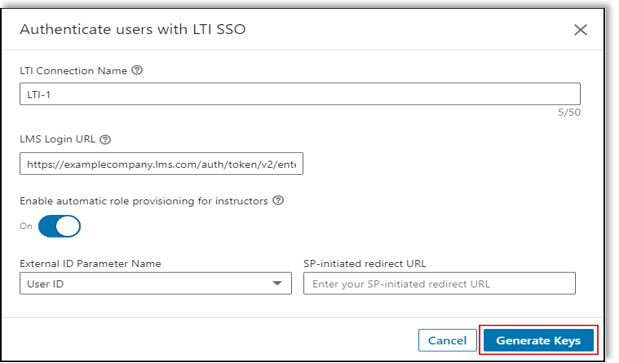
Give the SSO connection a name. Do not include spaces or special characters.
Toggle Enable automatic role provisioning for instructors to "On" if you wish to automatically provision sub-admin permissions for instructors.
In the External ID Parameter Name drop down, select the parameter you would like to use to identify users. If you are unsure which value to use, leave "User ID".
Important
The configured "User ID" value must match the value your LMS sends to LinkedIn Learning. If the values do not match, you run the risk of creating duplicate profiles. If you do not know what value to select, contact your LinkedIn Learning Customer Success Manager.
If your LMS supports Tool Provider-initiated authentication, enter your SP-initiated redirect URL. If you do not know which URL to use, leave the field blank.
Click Generate Keys. You need this information enter into your Learning Management System.
Toggle the connection status to "Active". For more information on adding an LTI connection during your integration process, review the LinkedIn Learning LTI Implementation Guide.
Add Additional SAML or LTI SSO Connections
Repeat the steps above to add additional SSO connections as needed.

Create your SSO Launch URL
When using multiple SAML SSO connections, you may want to create a unique Service Provider-initiated URL for each connection. You can use this URL to provide SSO users quick access to LinkedIn Learning. To configure a SSO launch URL, take the following steps:
Locate your Account ID from the URL in the browser. Example: https://www.linkedin.com/learning-admin/settings/global?account=2108666
Locate the SSO Connection name that you configured when setting up the connection.
To create the SP-initiated URL, use the following format:
<https://www.linkedin.com/checkpoint/enterprise/login/accountid/?application=learning&authModeName=/SSO_Connection_Name/>Example:
<https://www.linkedin.com/checkpoint/enterprise/login/2108666?application=learning&authModeName=OneLogin-Attribute_test>You can use the SP-initiated URL to activate new users if you enable automatic license provisioning.
Warning
If you change the name of the SSO connection, the SSO URL will not work.
Choose a Default SSO
You can configure as many SSO connections as you need, but only one SSO can act as the default connection. If you are integrating LinkedIn Learning content into a Learning Management System, the default SSO connection is used for all course launches.
To specify a default, identify which SSO connection should be used and select Set as default.
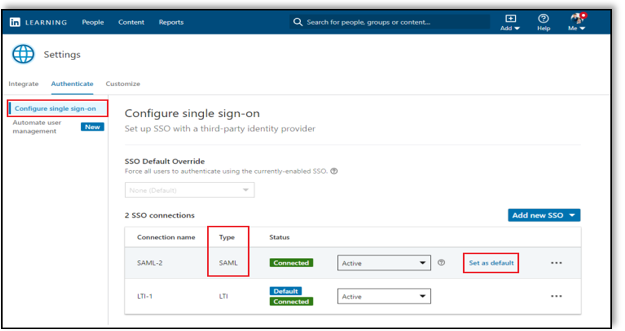
Caution
When using both SAML SSO and LTI, do not set LTI as the default authentication method. LTI does not always support SP-initiated logins and using LTI as the default can break the other authentication methods used on the account. Doing so also leaves the user no option but to log in from the LMS.
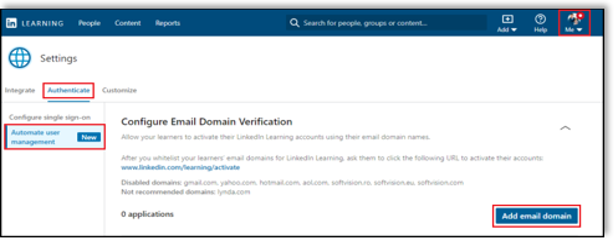
Email Domain Verification
Email domain verification allows you to specify approved email domains so learners can register themselves without needing to be manually added by an admin. Once you enable email domain verification, users can self-activate their SSOs using their work email or organization address. They receive an activation email and are either routed through SSO or prompted to create a password if SSO for domain verification is set to "No". To enable email domain verification, take the following steps:
After you log in, if you are not already in the Admin screen, select Go to Admin > Me > Authenticate.
From the side navigation menu, select Automate user management and expand Configure Email Domain Verification.
Click Add email domain.
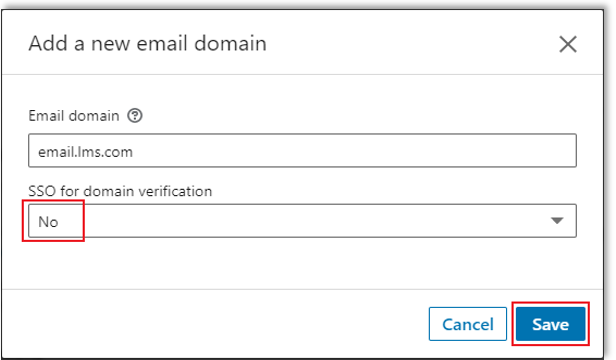
In the Add a new email domain screen, enter your email domain name (amd sub-domain names, if applicable).
In the SSO for domain verification drop down, select "No" if you plan to activate your SSO connection via email (see above). Otherwise, select the authentication method you have chosen.
Click Save.
Managing User Authentication Methods
You can specify the authentication method for users individually or in bulk via a CSV.
User List CSV Management
You can use the User List to edit the authentication method for groups of users in bulk. To manage learner authentication via User List CSV management, take the following steps:
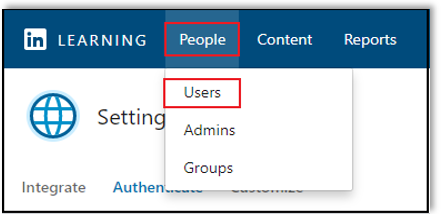
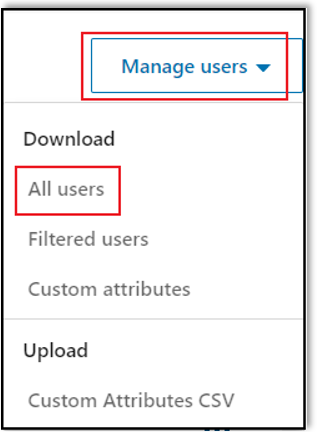
From the LinkedIn Learning Admin settings, select People > Users.
Select Manage users > Download > All users.
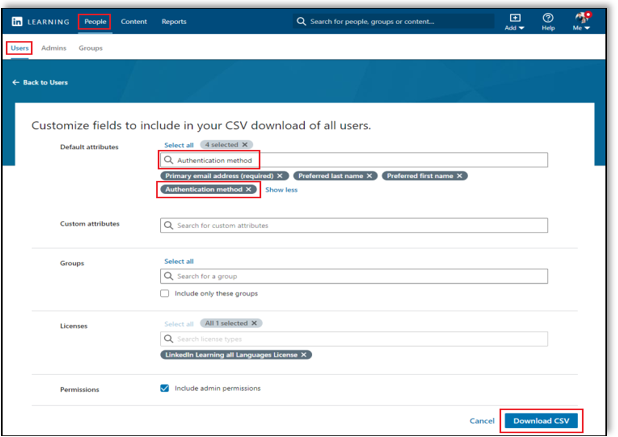
In the Customize fields to include in your CSV download of all users screen, add "Authentication method" in the Default attributes field.
Click Download CSV.
Open the downloaded CSV file.
Use the "authentication_method" column to choose which authentication method each learner should use.
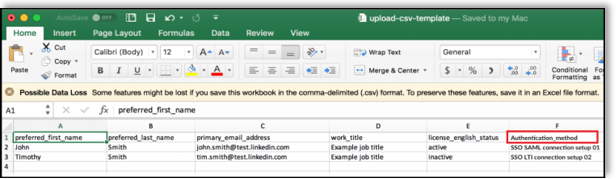
Based on the names you created for each SSO connection in steps 1-3, fill in the "authentication_method" column for each learner with the SSO connection name.
- If you leave a cell blank, that learner must use the default SSO connection you configured.
- Enter "no_sso" for any users who activate via an email invitation or email domain verification.
Save the updated CSV to your computer.
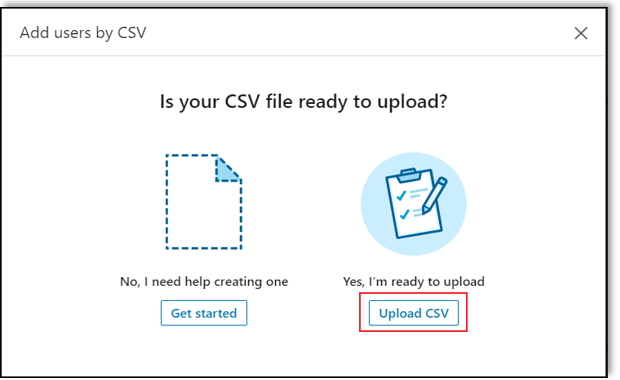
Return to the People tab and select Users > Add new users > Add users by CSV.
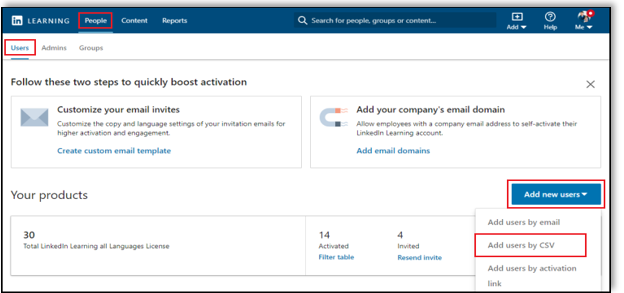
In the Add users by CSV screen, select Upload CSV.
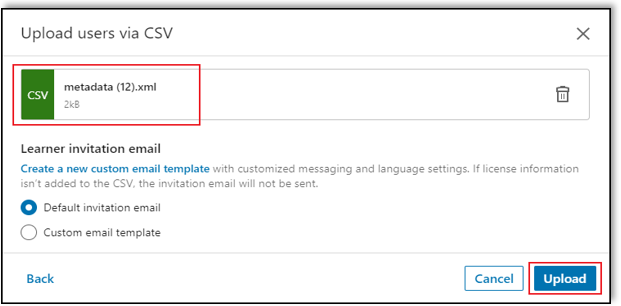
In the Upload users via CSV screen, click Upload from computer.
Select the CSV file and click Upload.
Individual User Management
To manage an individual user’s authentication method, take the following steps:
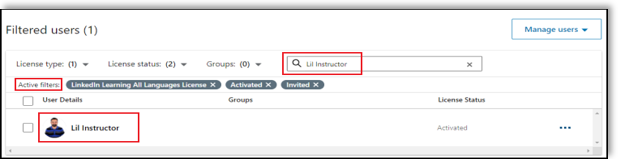
From the LinkedIn Learning Admin settings, select People > Users.
Select the filters you want to use to find the user, or search by user name.
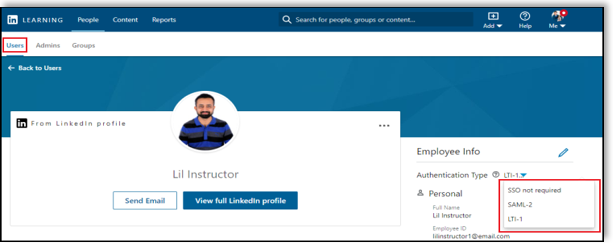
Select the Authentication Type drop down and choose the user's (new) authentication method.
Adding New Users by Email
When adding new users via email, you can set their authentication method. To add users by email, take the following steps
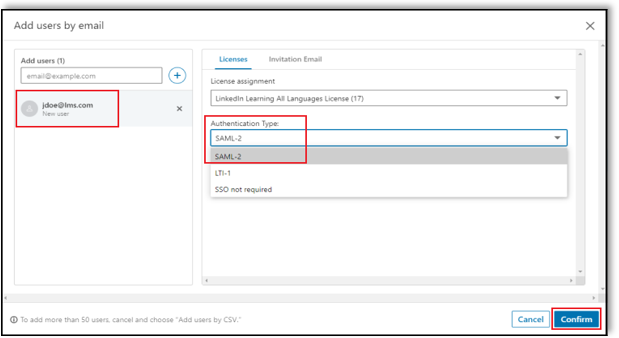
In the People tab, select Users > Add new users > Add users by email.
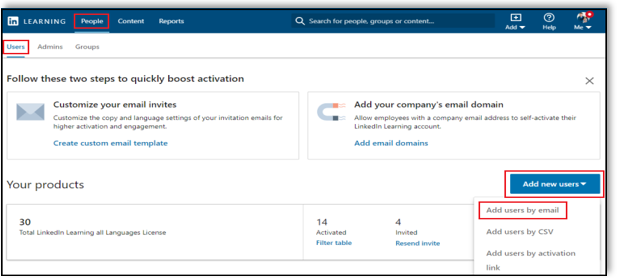
In the Add users by email screen, enter the user’s email address in the Add Users field.
Under Authentication Type, select the user's preferred authentication method.
Click Confirm. The system sends the user an activation email to log in directly or via the selected SSO method.
Congratulations! Your learners now can access LinkedIn Learning content via multiple SSO authentication methods.
Support
Below you can find supporting documentation and other resources.
Supporting Documentation
Technical Issues
If you have technical issues with your multiple SSO configuration, contact your account team or application support team through the LinkedIn Learning Help Center.
LinkedIn's Privacy and Data Security Policy
https://www.linkedin.com/legal/privacy-policy
LinkedIn Security Contacts
If you have any security questions or you would like to report a security issue, write to us at security@linkedin.com.
Questions
If you need further support, please contact your dedicated Customer Success Manager.
Feedback
Coming soon: Throughout 2024 we will be phasing out GitHub Issues as the feedback mechanism for content and replacing it with a new feedback system. For more information see: https://aka.ms/ContentUserFeedback.
Submit and view feedback for