LinkedIn Learning - Adding Learner Data Administration Guide
What this Document Tells You
The following steps outline the process for adding learner data via LinkedIn Learning org sync:

Overview
This document provides information about your options for adding employee data to LinkedIn Learning, including both manual and automated methods for integrating HR data. You can also learn about updating or modifying existing employee data.
Accessing the Account Center
In the LinkedIn Learning Account Center, you can manage learner data, curate content, and gain learner progress insights.
Configure your CSV File
If you are adding learners via CSV upload, take the following steps to configure your CSV file:
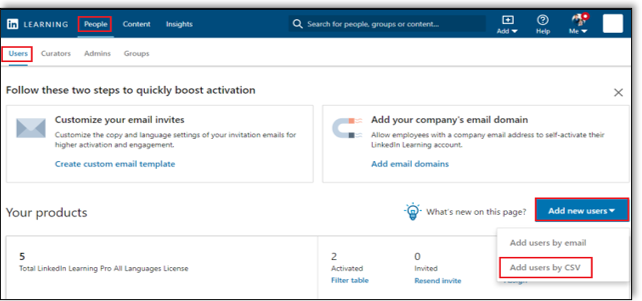
After you log in, from the Admin screen, select People > Users.
Select Add new users > "Add users by CSV".
In the Add users by CSV screen, below No, I need help creating one, click Get started.
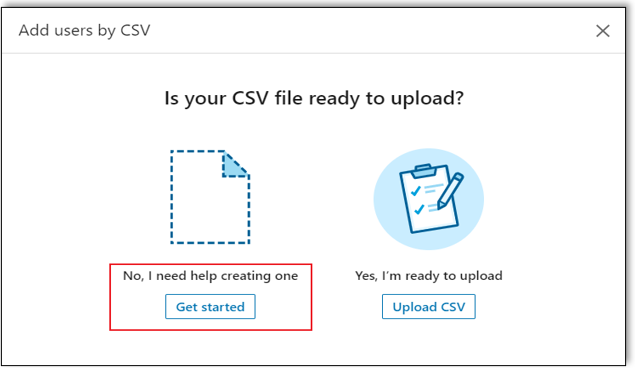
Click Download the CSV template, then select "Add user only" or "Add users and admin permissions", depending on your requirements.
Click Next, then open the downloaded template in Microsoft Excel or a text editor application such as Microsoft Notepad. You then can replace/enter information for each user you want to add.

After completing your CSV file, save it to your computer. Make sure to save your CSV with the file format as Comma Delimited or Comma Separated Value (
.csv). If you use special characters, save the CSV file asUTF-8.
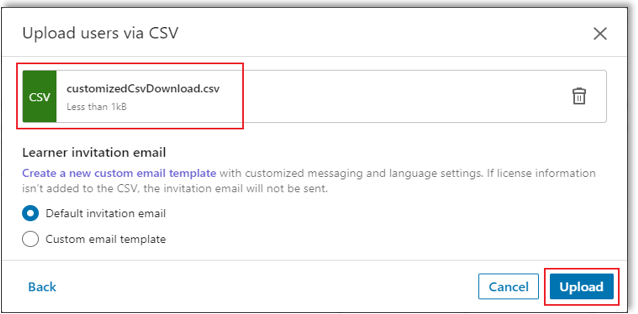
In the Upload users via CSV screen, click Upload from computer, navigate to the CSV file, and click Open.
Adding Learners to LinkedIn Learning
To add learners to LinkedIn Learning, take the following steps:
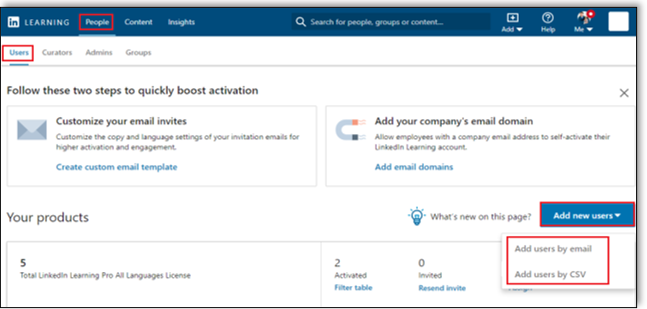
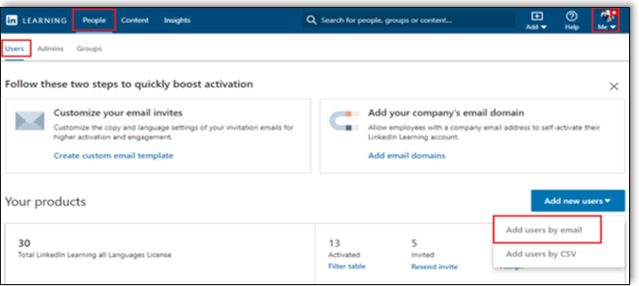
After you log in, from the Admin screen, select People > Users.
Select Add new users and select one of the two following methods:
Add users by email
Add users by CSV
Add Learners by Email
To add learners by email, take the following steps:
From the Add new users drop-down menu, select "Add users by email".
In the Add users by email screen, enter the user's email address in the Add users field. You can add multiple email addresses, separated by commas.

Click Confirm.
To learn more detail about how to manage the emails learners and admins receive from LinkedIn Learning, click here.
Add Learners via Bulk CSV Upload
You can use the CSV file upload to add new learners, and to update existing learners in your LinkedIn Learning account. Any changes you make affects only the information that appears in your LinkedIn Learning account. Your changes do not alter your learners' personal LinkedIn profiles (for example, their names).
Note
It is critical to the success of your user management workflow that you complete one of the following tasks to ensure your language license aligns with your selected product. (If the language license is incorrect, the CSV file upload will fail.)
- Download the CSV template (in which the language license header is pre-populated per your product).
- Update the language license header to reflect your organization's product (see below).
Review your CSV file to ensure you do not leave any fields blank or you may encounter an error. To remove or grant access to a learner, include the "Default_license_learning_proAllLanguages_status" (or the language license name aligned with your product) field heading.
- To grant access to a learner, enter "active" under the language license heading.
- To remove access for a learner, enter "inactive" under the language license heading.

Review how to add learners via bulk CSV upload in LinkedIn Learning in more detail.
Learner Information
Make sure you have reviewed the following criteria when creating your CSV file:
- You must provide at a minimum the learners' email addresses.
- Names are optional, but highly recommended.
- Work titles are optional, but highly recommended (so that you can group and recommend content to your learners).
- If you are not using the CSV template and creating your own file, make sure you use the following headers (The headers are case sensitive and must be all lowercase to avoid errors.):
- preferred_first_name
- preferred_last_name
- primary_email_address
- work_title
- Default_license_learning_proAlllanguages_status (or the language license name aligned with your product)
- Add a line for each learner you’d like to add and use commas to separate their values.
CSV File Best Practices
The following tips will make a seamless, error-free CSV org sync process more likely:
- Break large files into smaller sizes.
- If you encounter an error, download the Results CSV for failure information. If possible, correct the file based on error messaging.
- Update information for existing users by downloading a CSV file of existing users, making edits, and uploading the updated file to LinkedIn Learning.
- Make sure you use the correct column headers and the headers are lowercase.
- Do not include duplicate field headers.
- Include a value for every learner for the fields you are providing.
- Make sure to include a "primary_email" field, and that every learner has an email value.
Groups
You can specify whether a learner is in a group. In the CSV file you downloaded, provide the group name preceded by "group/" as a field heading. Enter a zero (0) to indicate that the learner is not in the group or a one (1) if the learner is in the group. If the group does not yet exist, LinkedIn Learning creates the group and adds the learner.
Advanced Fields
- To change the email addresses for your learners, you have the option of adding the "unique_user_id" field heading and then adding a unique value for the learners in your CSV. After assigning a unique ID to your learners, you can change their email addresses.
- If you attempt to change the email address of existing learners without first adding "unique_user_id", they are treated as new users.
- You can upload learners without providing their names; however, it is a best practice to include your learners' names so LinkedIn can personalize their welcome email. In addition, learners might appear in your user list and reports without a name.
Examples
In the following example, John Doe and Jane Smith belong to an account and can access LinkedIn Learning once they activate their profiles. John belongs to the Engineering group and Jane to the HR group. The Excel file is saved as a CSV file.
Note
Make sure your language license aligns with your selected product. (If the language license is incorrect, the CSV file upload will fail.)
Excel file view

In the following example, Jane Smith is removed from the HR group in your administrator groups. In the CSV file, John Doe's first name now shows up as Jonathan instead of John, but only in your administrator experience.
Excel file

CSV file

Access Status
To control learner access to LinkedIn Learning in your CSV file, take the following steps:
To specify whether you want your learners to have access to LinkedIn Learning, include the language license header.
To grant access to LinkedIn Learning, enter "active". If you do not want a learner to have access, enter "inactive".
- You can always change a learner's access from your administrator account.
- If you do not include the language license column, the learners is added to your account, but is not assigned a license. Their status shows up in your user list as "unassigned".
- To grant a learner access to LinkedIn Learning, in your list of Learners on the site, select the More Options icon ("...") > Assign License from the menu next to the learner's name.
Upload your CSV via HTTPS Org Sync
Please review how to automate the uploading of CSV files via HTTPS org sync in LinkedIn Learning.
Upload your CSV via SFTP Org Sync
Please review how to automate the uploading of CSV files via SFTP org sync in LinkedIn Learning.
What Happens Next
The post-CSV upload workflow includes the following processes:
LinkedIn Learning processes the file and checks for errors. If there are errors processing your file, a dialog appears and provides a link to a Results CSV file detailing the issues found. Update your file to correct the errors and upload again.
LinkedIn Learning sends an email to your added learners with instructions on how to activate their accounts. If a learner has been added as "inactive", that learner does not receive a welcome email.
Your newly-added learners appear in the People tab of your administrator account. Initially their status is "Invited". After they have registered and activated their accounts, their status changes to "Activated". If you have uploaded the learner as "Inactive", they appear in the user list as "Unassigned".
Support
Use the following resources if you need assistance adding employee data to LinkedIn Learning.
Supporting Documentation
LinkedIn’s Privacy and Data Security Policy
https://www.linkedin.com/legal/privacy-policy
LinkedIn Security Contacts
If you have any security questions or you would like to report a security issue, write to us at security@linkedin.com.
Feedback
Coming soon: Throughout 2024 we will be phasing out GitHub Issues as the feedback mechanism for content and replacing it with a new feedback system. For more information see: https://aka.ms/ContentUserFeedback.
Submit and view feedback for