Features in Configuration Manager technical preview version 2002
Applies to: Configuration Manager (technical preview branch)
This article introduces the features that are available in the technical preview for Configuration Manager, version 2002. Install this version to update and add new features to your technical preview site.
Review the technical preview article before installing this update. That article familiarizes you with the general requirements and limitations for using a technical preview, how to update between versions, and how to provide feedback.
The following sections describe the new features to try out in this version:
Evaluate software updates after a servicing stack update
Configuration Manager now detects if a servicing stack update (SSU) is part of an installation for multiple updates. When an SSU is detected, it's installed first. After install of the SSU, a software update evaluation cycle runs to install the remaining updates. This change allows a dependent cumulative update to be installed after the servicing stack update. The device doesn't need to restart between installs, and you don't need to create an additional maintenance window. SSUs are installed first only for non-user initiated installs. For instance, if a user initiates an installation for multiple updates from Software Center, the SSU might not be installed first.
Microsoft 365 updates for disconnected software update points
You can use a new tool to import Microsoft 365 updates from an internet connected WSUS server into a disconnected Configuration Manager environment. Previously when you exported and imported metadata for software updated in disconnected environments, you were unable to deploy Microsoft 365 updates. Microsoft 365 updates require additional metadata downloaded from an Office API and the Office CDN, which isn't possible for disconnected environments.
Prerequisites
- An internet connected WSUS server running a minimum of Windows Server 2012.
- The WSUS server needs connectivity to these two internet endpoints:
officecdn.microsoft.comconfig.office.com
- Copy the OfflineUpdateExporter tool and its dependencies to the internet connected WSUS server.
- The tool and its dependencies are in the <ConfigMgrInstallDir>/tools/OfflineUpdateExporter directory.
- The user running the tool must be part of the WSUS Administrators group.
- The directory created to store the Office update metadata and content should have appropriate access control lists (ACLs) to secure the files.
- This directory must also be empty.
- Data being moved from the online WSUS server to the disconnected environment should be moved securely.
- Review the Known Issues.
Synchronize then decline unneeded Microsoft 365 updates
- On your internet connected WSUS, open the WSUS console.
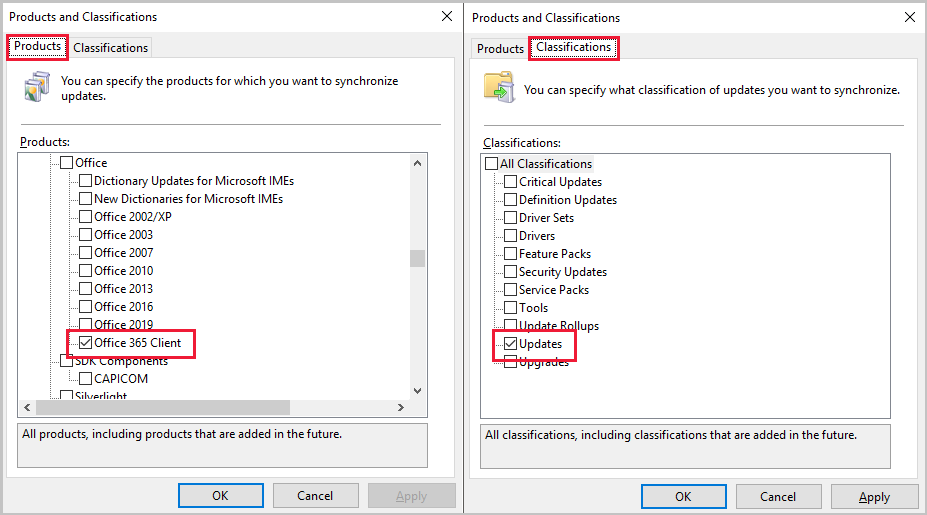
- Select Options then Products and Classifications.
- In the Products tab, select Office 365 Client and select Updates in the Classifications tab.
- Go to Synchronizations and select Synchronize Now to get the Microsoft 365 updates into WSUS.
- When the synchronization completes, decline any Microsoft 365 updates that you don't want to deploy with Configuration Manager. You don't need to approve Microsoft 365 updates in order for them to be downloaded.
- Declining unwanted Microsoft 365 updates in WSUS doesn't stop them from being exported during a WsusUtil.exe export, but it does stop the OfflineUpdateExporter tool from downloading the content for them.
- The OfflineUpdateExporter tool does the download of Microsoft 365 updates for you. Other products will still need to be approved for download if you're exporting updates for them.
- Create a new update view in WSUS to easily see and decline unneeded Microsoft 365 updates in WSUS.
- If you're approving other product updates for download and export, wait for the content download to complete before running WsusUtil.exe export and copying the contents of the WSUSContent folder. For more information, see Synchronize software updates from a disconnected software update point

Exporting the Microsoft 365 updates
Copy the OfflineUpdateExporter folder from Configuration Manager to the internet connected WSUS server.
- The tool and its dependencies are in the <ConfigMgrInstallDir>/tools/OfflineUpdateExporter directory.
From a command prompt on the internet connected WSUS server, run the tool with the following usage: OfflineUpdateExporter.exe -O -D <destination path>
OfflineUpdateExporter Parameter Description -O -Office. Specifies product for updates export is Microsoft 365 -D -Destination. Destination is a required parameter and the entire path to the destination folder is needed. - The OfflineUpdateExporter tool does the following:
- Connects to WSUS
- Reads the Microsoft 365 update metadata in WSUS
- Downloads the content and any additional metadata needed by the Microsoft 365 updates to the destination folder
- The OfflineUpdateExporter tool does the following:
At the command prompt on the internet connected WSUS server, navigate to the folder that contains WsusUtil.exe. By default, the tool is located in %ProgramFiles%\Update Services\Tools. For example, if the tool is located in the default location, type cd %ProgramFiles%\Update Services\Tools.
- If you're using Windows Server 2012, ensure KB2819484 is installed on the WSUS servers.
- The user that runs the WsusUtil tool must be a member of the local Administrators group on the server.
Type the following to export the software updates metadata to a GZIP file:
WsusUtil.exe export packagename logfile
For example:
WsusUtil.exe export export.xml.gz export.log
Copy the export.xml.gz file to the top-level WSUS server on the disconnected network.
If you approved updates for other products, copy the contents of the WSUSContent folder to the top-level disconnected WSUS server's WSUSContent folder.
Copy the destination folder used for the OfflineUpdateExporter to the top-level Configuration Manager site server on the disconnected network.
Import the Microsoft 365 updates
On the disconnected top-level WSUS server, import the update metadata from the export.xml.gz you generated on the internet connected WSUS server.
For example:
WsusUtil.exe import export.xml.gz import.log
By default, the WsusUtil.exe tool is located in %ProgramFiles%\Update Services\Tools.
Once the import is complete, you'll need to configure a site control property on the disconnected top-level Configuration Manager site server. This configuration change points Configuration Manager to the content for Microsoft 365. To change the property's configuration:
- Copy the O365OflBaseUrlConfigured PowerShell script to the top-level disconnected Configuration Manager site server.
- Change
"D:\Office365updates\content"to the full path of the copied directory containing the Office content and metadata generated by OfflineUpdateExporter. - Save the script as
O365OflBaseUrlConfigured.ps1 - From an elevated PowerShell window on the disconnected top-level Configuration Manager site server, run
.\O365OflBaseUrlConfigured.ps1. - Restart the SMS_Executive service on the site server.
In the Configuration Manager console, navigate to Administration > Site Configuration > Sites.
Right-click on your top-level site, then select Configure Site Components > Software Update Point.
In the Classifications tab, select Updates. In the Products tab, select Office 365 Client.
Synchronize software updates for Configuration Manager
When the synchronization completes, use your normal process to deploy Microsoft 365 updates.
Known issues
- Proxy configuration isn't natively built into the tool. If proxy is set in the Internet Options on the server where the tool is running, in theory it will be used and should function properly.
- From a command prompt, run
netsh winhttp show proxyto see the configured proxy.
- From a command prompt, run
- Only local paths work for the O365OflBaseUrlConfigured property.
- Currently, content will be downloaded for all Microsoft 365 languages. Each update can have approximately 10 GB of content.
Modify O365OflBaseUrlConfigured property
# Name: O365OflBaseUrlConfigured.ps1
#
# Description: This sample sets the O365OflBaseUrlConfigured property for the SMS_WSUS_CONFIGURATION_MANAGER component on the top-level site.
# This script must be run on the disconnected top-level Configuration Manager site server
#
# Replace "D:\Office365updates\content" with the full path to the copied directory containing all the Office metadata and content generated by the OfflineUpdateExporter tool.

$PropertyValue = "D:\Office365updates\content"

# Don't change any of the lines below
$PropertyName = "O365OflBaseUrlConfigured"

# Get provider instance
$providerMachine = Get-WmiObject -namespace "root\sms" -class "SMS_ProviderLocation"

if($providerMachine -is [system.array])
{
    $providerMachine=$providerMachine[0]
}

$SiteCode = $providerMachine.SiteCode

$component = gwmi -ComputerName $providerMachine.Machine -namespace root\sms\site_$SiteCode -query 'select comp.* from sms_sci_component comp join SMS_SCI_SiteDefinition sdef on sdef.SiteCode=comp.SiteCode where sdef.ParentSiteCode="" and comp.componentname="SMS_WSUS_CONFIGURATION_MANAGER"'
$properties = $component.props

Write-host "Updating $PropertyName property for site " $SiteCode

foreach ($property in $properties)
{
  if ($property.propertyname -eq $PropertyName)
  {
    Write-host "Current value for $PropertyName is $($property.value2)"
    $property.value2 = $PropertyValue
    Write-host "Updating value for $PropertyName to $($property.value2)"
    break
  }
}

$component.props = $properties
$component.put()
Improvements to Orchestration Groups
Create orchestration groups to better control the deployment of software updates to devices. An orchestration group gives you the flexibility to update devices based on a percentage, a specific number, or an explicit order. You can also run a PowerShell script before and after the devices run the update deployment.
Orchestration Groups are the evolution of the "Server Groups" feature. They were first introduced in the technical preview for Configuration Manager, version 1909. We improved upon Orchestration groups in technical preview 2001 and technical preview 2001.2. In this technical preview, we've added the following improvements to Orchestration Groups:
- Clear the state, such as *Complete or Failed, for an Orchestration Group member so you can rerun the orchestration.
- Right-click on the Orchestration Group member and select Reset Orchestration Group Member.
- Start some basic operations like Resource Explorer and Enable Verbose Logging for selected members.
- Updates requiring restarts now work with orchestration.

Try it out!
Try to complete the tasks. Then send Feedback with your thoughts on the feature.
Prerequisites
To see all of the orchestration groups and updates for those groups, your account needs to be a Full Administrator.
Enable the Orchestration Groups feature. For more information, see Enable optional features.
Note
When you enable Orchestration Groups, the site disables the Server Groups feature. This behavior avoids any conflicts between the two features.
Create an orchestration group
In the Configuration Manager console, go to the Assets and Compliance workspace, and select the Orchestration Group node.
In the ribbon, select Create Orchestration Group to open the Create Orchestration Group Wizard.
On the General page, give your orchestration group a Name and optionally a Description. Specify your values for the following items:
- The Orchestration Group timeout (in minutes): Time limit for all group members to complete update installation.
- Orchestration Group member timeout (in minutes): Time limit for a single device in the group to complete the update installation.
On the Member Selection page, first specify the Site code. Then select Add to add device resources as members of this orchestration group. Search for devices by name, and then Add them. You can also filter your search to a single collection by using Search in Collection. Select OK when you finish adding devices to the selected resources list.
- When selecting resources for the group, only valid clients are shown. Checks are made to verify the site code, that the client is installed, and that resources aren't duplicated.
On the Rule Selection page, select one of the following options:
Allow a percentage of the machines to be updated at the same time, then select or enter a number for this percentage. Use this setting to allow for future flexibility of the size of the orchestration group. For example, your orchestration group contains 50 devices, and you set this value to 10. During a software update deployment, Configuration Manager allows five devices to simultaneously run the deployment. If you later increase the size of the orchestration group to 100 devices, then 10 devices update at once.
Allow a number of the machines to be updated at the same time, then select or enter a number for this specific count. Use this setting to always limit to a specific number of devices, whatever the overall size of the orchestration group.
Specify the maintenance sequence, then sort the selected resources in the proper order. Use this setting to explicitly define the order in which devices run the software update deployment.
On the PreScript page, enter a PowerShell script to run on each device before the deployment runs. The script should return a value of
0for success, or3010for success with restart. Specify a Script timeout (in seconds) value, which fails the script if it doesn't complete in the specified time.On the PostScript page, enter a PowerShell script to run on each device after the deployment runs and a Script timeout (in seconds) value. The behavior is otherwise the same as the PreScript.
Complete the wizard.
You can change the settings of an existing Orchestration Group using Properties for the group.
To delete the orchestration group, select it then select Delete in the ribbon.
View orchestration groups and members
From the Assets and Compliance workspace, select the Orchestration Group node. To view members, select an orchestration group and select Show Members in the ribbon. For more information about the available columns for the nodes, see Monitor orchestration groups and members.
Start Orchestration
- Deploy software updates to a collection that contains the members of the orchestration group.
- Orchestration starts when any client in the group tries to install any software update at deadline or during a maintenance window. It starts for the entire group, and makes sure that the devices update by following the orchestration group rules.
- You can manually start orchestration by selecting it from the Orchestration Group node, then choosing Start Orchestration from the ribbon or right-click menu.
Tip
- Orchestration groups only apply to software update deployments. They don't apply to other deployments.
- You can right-click on an Orchestration Group member and select Reset Orchestration Group Member. This allows you to rerun orchestration.
Monitoring
Monitor your orchestration groups and members through the Configuration Manager console and the log files.
Monitor orchestration groups
From the Assets and Compliance workspace, select the Orchestration Group node. Add any of the following columns to get information about the groups:
Orchestration Name: The name of your orchestration group.
Site Code: Site code for the group.
Orchestration Type: is one of the following types:
- Number
- Percentage
- Sequence
Orchestration Value: How many members or the percentage of members that can get a lock simultaneously. Orchestration Value is only populated when Orchestration Type is either Number or Percentage.
Orchestration State: In progress during orchestration. Idle when not in progress.
Orchestration Start Time: Date and time that the orchestration started.
Current Sequence Number: Indicates for which member of the group orchestration is active. This number corresponds with the Sequence Number for the member.
Orchestration Timeout (in minutes): Value of The Orchestration Group timeout (in minutes) set on the General page when creating the group, or the General tab when editing the group.
Orchestration Group Member Timeout (in minutes): Value of Orchestration Group member timeout (in minutes) set on the General page when creating the group, or the General tab when editing the group.
Orchestration Group ID: ID of the group, The ID is used in logs and the database.
Orchestration Group Unique ID: Unique ID of the group, The Unique ID is used in logs and the database.
Monitor orchestration group members
In the Orchestration Group node, select an orchestration group. In the ribbon, select Show Members. You can see the members of the group, and their orchestration status. Add any of the following columns to get information about the members:
- Name: Device name of the orchestration group member
- Current State: Gives you the state of the member device.
- In progress during orchestration.
- Waiting: Indicates the client is waiting on the lock for its turn to install updates.
- Idle when orchestration is complete or not running.
- State Code: You can right-click on the Orchestration Group member and select Reset Orchestration Group Member. This reset allows you to rerun orchestration. States include:
- Idle
- Waiting, the device is waiting its turn
- In progress, installing an update
- Failed
- Reboot pending
- Lock Acquired Time: Locks are requested by the client based on its policy. Once the client acquires a lock, orchestration is triggered on it.
-Last State Reported Time: Time the member last reported a state. - Sequence Number: The client's location in the queue for installing updates.
- Site Code: The site code for the member.
- Client Activity: Tells you if the client is active or inactive.
- Primary User(s): Which users are primary for the device.
- Client Type: What type of device the client is.
- Currently Logged on User: Which user is currently logged on to the device.
- OG ID: ID of the orchestration group the member belongs to.
- OG Unique ID: Unique ID of the orchestration group the member belongs to.
- Resource ID: Resource ID of the device.
Log files
Use the following log files on the site server to help monitor and troubleshoot:
Site server
- Policypv.log: shows that the site targets the orchestration group to the clients.
- SMS_OrchestrationGroup.log: shows the behaviors of the orchestration group.
Client
- MaintenanceCoordinator.log: Shows the lock acquisition, update installation, pre and post scripts, and lock release process.
- UpdateDeployment.log: Shows the update installation process.
- PolicyAgent.log: Checks if the client is in an orchestration group.
Orchestration group known issues
- Don't add a machine to more than one orchestration group.
Improvements to Microsoft Edge management
You can now create a Microsoft Edge application that's set up to receive automatic updates rather than having automatic updates disabled. This change allows you to choose to manage updates for Microsoft Edge with Configuration Manager or allow Microsoft Edge to automatically update. When creating the application, select Allow Microsoft Edge to automatically update the version of the client on the end user's device on the Microsoft Edge Settings page.

Proxy support for Microsoft Entra discovery and group sync
The site system's proxy settings, including authentication, are now used by:
- Microsoft Entra user discovery
- Microsoft Entra user group discovery
- Synchronizing collection membership results to Microsoft Entra groups
Log files
- SMS_AZUREAD_DISCOVERY_AGENT.log
Improvements to BitLocker management
The BitLocker management policy now includes additional settings, including policies for fixed and removable drives:
Global policy settings on the Setup page:
- Prevent memory overwrite on restart
- Validate smart card certificate usage rule compliance
- Organization unique identifiers
OS drive settings:
- Allow enhanced PINS for startup
- Operating system drive password policy
- Reset platform validation data after BitLocker recovery
- Pre-boot recovery message and URL
- Encryption policy enforcement settings
Fixed drive settings:
- Fixed data drive encryption
- Deny write access to fixed drives not protected by BitLocker
- Allow access to BitLocker fixed data drives from earlier versions of Windows
- Fixed data drive password policy
- Encryption policy enforcement settings
Removable drive settings:
- Removable drive data encryption
- Deny write access to removable drives not protected by BitLocker
- Allow access to BitLocker protected removable drives not protected by BitLocker
- Removable drive password policy
Client management settings:
- User exemption policy
- Customer experience improvement program
For more information on these settings, see the MBAM documentation.
BitLocker management known issues
The following new settings don't work in this technical preview version:
- Fixed drive settings: Deny write access to fixed drives not protected by BitLocker
- Removable drive settings: Deny write access to removable drives not protected by BitLocker
- Client management policy: Customer experience improvement program
BitLocker reports don't work in this release
Additional improvements to task sequence progress
Based on continued feedback from the community, this release includes further improvements to task sequence progress. Now the count of total steps doesn't include the following items in the task sequence:
Groups. This item is a container for other steps, not a step itself.
Instances of the Run task sequence step. This step is a container for other steps, so are no longer counted.
Steps that you explicitly disable. A disabled step doesn't run during the task sequence, so is no longer counted.
Note
Enabled steps in a disabled group are still included in the total count.
For more information, see the following articles:
- 2001 features - Improvements to task sequence progress
- 2001.2 features - Additional improvement to task sequence progress
Improvements to the ConfigMgr PXE Responder
The ConfigMgr PXE Responder now sends status messages to the site server. This change makes troubleshooting operating system deployments easier.
Token-based authentication for cloud management gateway
This feature appears in the What's New workspace of the Configuration Manager console for the technical preview branch version 2002, but it released with version 2001.2. For more information, see 2001.2 features.
General known issues
Can't delete collections
In this version of the technical preview branch, you can't delete collections.
To work around this issue, use the following Configuration Manager PowerShell cmdlet to delete collections:
Next steps
For more information about installing or updating the technical preview branch, see Technical preview.
For more information about the different branches of Configuration Manager, see Which branch of Configuration Manager should I use?.
Feedback
Coming soon: Throughout 2024 we will be phasing out GitHub Issues as the feedback mechanism for content and replacing it with a new feedback system. For more information see: https://aka.ms/ContentUserFeedback.
Submit and view feedback for