Remote Help on macOS with Microsoft Intune
Note
This capability is available as an Intune add-on. For more information, see Use Intune Suite add-on capabilities.
Overview
Remote Help is a cloud-based solution for secure help desk connections with role-based access controls. With this connection, your support staff can remotely connect to a user's device and view their display.
In this article, users who provide help are referred to as helpers, and users that receive help are referred to as sharers as they share their session with the helper.
Remote Help is available for macOS as both a native application, and as a Web App that runs within the user's web browser. The native application is required on the helpers machines to perform the Full control capability.
| Capability | Client requirement | Helper app |
|---|---|---|
| Screen sharing: View the remote screen. | ✔️Web app✔️Native app | ✔️Web app |
| Full control: View the display and control the devices mouse and keyboard. | ✔️Native app | ✔️Web app |
Remote Help capabilities
The Remote Help web app supports the following capabilities on macOS:
Use Remote Help with unenrolled devices: Disabled by default, you can choose to allow help to devices that aren't enrolled with Intune.
Conditional access: Administrators can now utilize conditional access capability when setting up policies and conditions for Remote Help. For more information on setting up conditional access, see Setup Conditional Access for Remote Help.
Compliance Warnings: Remote Help will show non-compliance warnings if the device the helper is connecting to isn't compliant with its assigned policies. This warning doesn't block access but provides transparency about the risk of using sensitive data like administrative credentials during the session.
Enrollment status: If the user's device that the helper is trying to connect to isn't enrolled, the helper sees a prompt notifying them of the device status.
Chat functionality: Remote Help includes enhanced chat that maintains a continuous thread of all messages. This chat supports special characters and other languages including Chinese and Arabic. For more information on languages supported, see Languages supported.
Remote Help Native macOS App
Most organizations install the Remote Help application for macOS on their users' devices. Remote Help for macOS provides the helper with view only and full control capabilities where they can control the Sharer's mouse and keyboard.
Remote Help Web App
In situations where the Sharer needs assistance but is unable to install the native application for macOS, the Sharer can use the Web App to share their screen to a helper. This web app provides view only capabilities to the helper, allowing them to guide the user through resolving issues.
Helpers always use the Remote Help Web App to provide support to a Sharer that is on macOS. For more details, go to Remote Help Web app.
Authentication and Permissions
Both helpers and sharers sign in to your organization using Microsoft Entra ID, which ensures that proper trusts are established for the Remote Help sessions.
Remote Help uses Intune role-based access controls (RBAC) to set the level of access a helper is allowed. Through RBAC, you determine which users can provide help and the level of help they can provide.
For details about configuring and setting up of permissions, go to Using Remote Help.
Remote Help requirements
General prerequisites for Remote Help are listed here Prerequisites for Remote Help.
Remote Help Native macOS App supported operating systems
- macOS 12 (Monterey)
- macOS 13 (Ventura)
- macOS 14 (Sonoma)
Remote Help Web App supported browsers
- Safari (version 16.4.1+)
- Chrome (version 109+)
- Edge (version 109+)
- Firefox (version 122+)
Note
Virtual Machines (VMs) are currently not supported.
Network considerations
Both the helper and sharer must be able to reach specific endpoints over port 443. For more information, see Network endpoints for Remote Help.
Requirements if Remote Help is restricted to enrolled devices
If your organization, restricts Remote Help to enrolled devices only there are two extra requirements:
- Single sign-on (SSO). For more information, see Use Enterprise SSO Plug-in on macOS.
- Open and sign in to Company Portal. The user must open and sign into Company Portal for Remote Help to recognize the device is enrolled.
Note
Company Portal isn't supported on devices enrolled without user affinity. To use Remote Help on these devices, you need to change your tenant settings to set Remote Help to unenrolled devices to Allowed.
Native app operating system permissions
On macOS, applications that access and control the screen require permission. By default, users must accept these permissions. macOS allows some control capabilities for each type of privacy setting using Privacy Preferences Policy Control.
| Permission | MDM control capabilities |
|---|---|
| Accessibility | ✔️Allow✔️Allow Standard User To Set System ServicemacOS allows this property to be set on behalf of the user to Allow, reducing the number of steps required to use the Remote Help native client |
| Screen sharing | ✔️Allow Standard User To Set System ServiceThis permission by default requires administrator privileges to allow it. macOS doesn't allow this property to be set to Allow by MDM but you can enable the ability for standard users to accept this permission. |
With settings catalog, we can streamline the end users experience for allowing these permissions.
Sign in to the Intune admin center and go to Devices > Configuration > Create > macOS > Settings catalog
Enter a name and description for the profile. For example, "macOS Remote Help privacy permissions" and select Next
Select Add settings and in the settings picker, navigate to Privacy > Privacy Preferences Policy Control > Services
- Under Accessibility select:
- Authorization
- Code Requirement
- Identifer
- Identifer type
- Static code
- Under Screen Capture select:
- Authorization
- Code Requirement
- Identifer
- Identifer type
- Static code
Close the Add settings pane and select + Edit instance under Accessibility and configure the following settings:
Name Configuration Authorization Allow Code Requirement identifier "com.microsoft.remotehelp" and anchor apple generic and certificate 1[field.1.2.840.113635.100.6.2.6] /* exists */ and certificate leaf[field.1.2.840.113635.100.6.1.13] /* exists */ and certificate leaf[subject.OU] = UBF8T346G9Identifier com.microsoft.remotehelp Identifier type bundle ID Static Code False Select Save and select + Edit instance under Screen Capture and configure the following settings:
Name Configuration Authorization Allow Standard User To Set System Service Code Requirement identifier "com.microsoft.remotehelp" and anchor apple generic and certificate 1[field.1.2.840.113635.100.6.2.6] /* exists */ and certificate leaf[field.1.2.840.113635.100.6.1.13] /* exists */ and certificate leaf[subject.OU] = UBF8T346G9Identifier com.microsoft.remotehelp Identifier type bundle ID Static Code False Select Next, configure scope tags as required, assign the profile to groups as required, review settings and Create the policy.
Supported Languages
Remote Help is supported in the following languages:
- Arabic
- Bulgarian
- Chinese (Simplified)
- Chinese (Traditional)
- Croatian
- Czech
- Danish
- Dutch
- English
- Estonian
- Finnish
- French
- German
- Greek
- Hebrew
- Hungarian
- Italian
- Japanese
- Korean
- Latvian
- Lithuanian
- Norwegian
- Polish
- Portuguese
- Romanian
- Russian
- Serbian
- Slovak
- Slovenian
- Spanish
- Swedish
- Thai
- Turkish
- Ukrainian
Install and update Remote Help native app
The Remote Help native app is available to download from Microsoft and must be installed on the device you're trying to help before that device can be used to participate in a Remote Help session.
Tip
The native app is only required if full control of the helpers device is required, otherwise you can use Remote Help web app.
Download Remote Help
Download the latest version of Remote Help directly from Microsoft at https://aka.ms/downloadremotehelpmacos.
The most recent version of Remote Help is 1.0.2404171.
Deploy Remote Help
For enrolled devices, you can streamline the user experience by installing Remote Help on behalf of your users.
For more information on installing Remote Help through Intune as a required install, see Add an unmanaged macOS PKG app to Microsoft Intune.
For more information on making Remote Help available in Company Portal for the user to install, see How to add macOS line-of-business apps to Microsoft Intune.
Update Remote Help
Remote Help receives the latest versions through the Microsoft AutoUpdate (MAU) application. Users can opt in for automatic updates to ensure Remote Help is up to date.
Request help
This section covers the steps for using the macOS native app to request Remote Help.
Tip
If you can't just want to share your screen and don't need the helper to be able to control your screen or you can't install the native app, you can use the web app. For more information on using the web app to request help, see Remote Help web app
To request help, you must reach out to your support staff to request assistance, and enter a code they provide to start the session.
When you as the sharer and your helper are ready to begin the session:
Open Remote Help app on the device Finder > Applications > Microsoft Remote Help.
When opening Remote Help for the first time, you must allow Remote Help access to control and share your screen. Click on each of the required permissions to open Settings and ensure the permission is allowed for Microsoft Remote Help.
- Accessibility (also available to set in Settings > Privacy & Security > Accessibility)
- Screen and System Audio Recording (also available to set in Settings > Privacy & Security > Screen and System Audio Recording)
If prompted, sign in with your organization credentials to authenticate. to your organization.
Enter the 8-digit security code provided by the helper. After entering the code, select Share screen to continue.
When the session connection begins, a trust screen is displayed with the Helpers information including their full name, job title, company, profile picture, and verified domain. At this time, the helper requests a session with Full control of your device or View Only screen sharing. You can either choose to Allow or to Decline the request.
You might see a prompt to allow
remotehelp.microsoft.comto use your microphone.- Select Don't Allow as this permission isn't needed for screen sharing.

- Select Don't Allow as this permission isn't needed for screen sharing.
Select Share screen to continue. You might see a prompt to allow
remotehelp.microsoft.comshare your screen. Select Allow to continue.macOS displays a dialogue menu in the top right corner as one of two options:
- Green camera icon: Choose Screen, and then move your mouse to select the screen share.
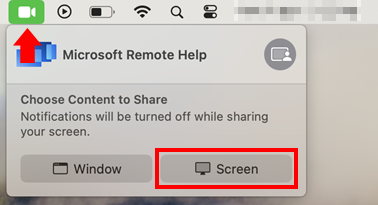
- Yellow microphone icon (if you selected to allow the microphone permission): Select the microphone icon, then to the right of the application name Microsoft Remote Help, select the grey icon, and then Screen. Move your cursor to the screen you want to share and select Share this screen.
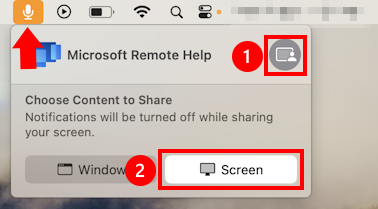
- Green camera icon: Choose Screen, and then move your mouse to select the screen share.
After the session is established, the helper can then help in resolving any issues on the device.
Note
If Remote Help wasn't installed by your administrator you can install Remote Help yourself by following the download instructions in the Install and update Remote Help section.
Provide help
As a helper, you can provide remote assistance to their device by providing them with a code to start the session. The web app can be started from any supported browser on Windows or macOS.
Navigate to the device you're trying to help from the Microsoft Intune admin center:
Sign into Microsoft Intune admin center and go to Devices > All devices and select the macOS device on which assistance is needed.
From the remote action bar across the top of the device view, select New remote assistance session and select Remote Help, and then Continue.
Copy and share the 8-digit session code with the sharer that you're trying to help, before selecting Start to launch a new Remote Help session.
When Remote Help opens in a new tab for the first time, you must sign in to authenticate to your organization.
After the sharer navigates to the Remote Help session, as the helper you'll see information about the sharer, including their full name, job title, company, profile picture, and verified domain. The sharer sees similar information about you.
At this time, you can request a session with full control of the sharer's device or choose only screen sharing. The sharer can choose to Allow or to Decline the request.
Note
- Remote Help displays a Compliance Warning if the sharer's device fails to meet the conditions of its assigned compliance policies.
- If the tenant is configured to allow Remote Help on unenrolled devices, you will receive a warning when connecting to unenrolled devices. This warning doesn't block access but provides transparency about the risk of using sensitive data like administrative credentials during the session.
Known Issues
If the sharer exits from a Remote Help session early, the helper might not be notified for 60+ seconds.
If using Edge, the sharer might have to sign in to Edge before starting a session or the device reports as Unenrolled.
Verify that your browser is up to date.
If you're screen sharing using another application like Teams or recording during the session, it might take longer for the session to connect.
Feedback
Coming soon: Throughout 2024 we will be phasing out GitHub Issues as the feedback mechanism for content and replacing it with a new feedback system. For more information see: https://aka.ms/ContentUserFeedback.
Submit and view feedback for