Deploy your frontline operational hierarchy
Overview
Important
This feature will start rolling out for public preview in November 2023. If you would like to provide feedback and improve this feature while in preview, please fill out this form.
Setting up your frontline operational hierarchy enables you to map your organization’s structure of frontline teams and locations to a hierarchy in the Teams admin center. You can organize your organization’s teams by country, region, area, city, district, and so on. Using a CSV file, you can connect each of your frontline teams and locations to parent teams to build this hierarchy. Admins can also define metadata in the CSV file that ranges from department information to brand information metadata for each team and location.
The operational hierarchy coupled with this metadata will enable numerous frontline apps and experiences in the future, like task publishing and additional frontline capabilities that are coming soon. Start setting up your operational hierarchy today to get the full value of these upcoming features as they're released.
Important
If your organization already set up and uploaded a hierarchy through PowerShell to support task publishing, you should continue to use PowerShell to make updates to your hierarchy for task publishing. Using the Teams admin center isn't supported yet. Soon, you'll be able to define, manage, and update your hierarchy for task publishing in the Teams admin center, along with PowerShell.
Terminology
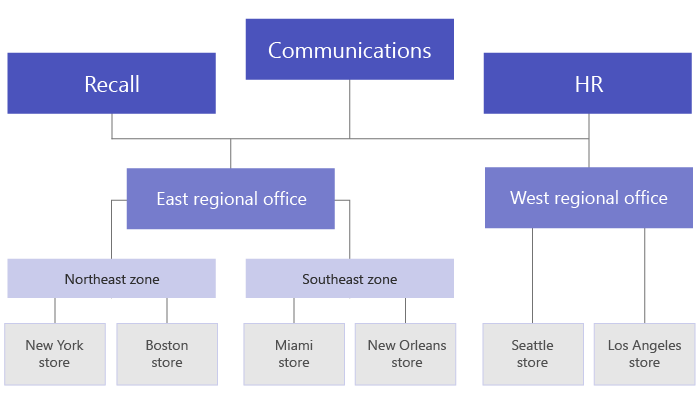
It's important to understand the following terms as you navigate hierarchies. Teams are referred to as nodes.
- Root nodes are the top-most nodes in the hierarchy. Root nodes can be your organization’s headquarters.
- Parent nodes and child nodes are terms that represent a relationship between two connected nodes. In the example, the Boston store is a child node of Northeast zone.
- A node with no children is called a leaf node. They are at the bottom of a hierarchy.
Example hierarchy
Set up your hierarchy
In the left navigation of the Teams admin center, choose Teams > Manage frontline teams.
Go to the Operational hierarchy tab.

Choose Get started. The Operational hierarchy pane opens, and from here, you can upload your hierarchy CSV file or download a CSV template to create one.

If you haven't already created a hierarchy CSV file, select Download the CSV template to get started.


Create your hierarchy
The schema that defines your hierarchy is based on a CSV file. The file must be in UTF-8 format. Each row in the CSV file corresponds to one node within the hierarchy of teams. Each row contains information that names the node within the hierarchy, links it to a team, and includes attributes that can be used to filter teams in apps that support it.
Add required columns
The CSV file must contain the following three columns, in the following order, starting at the first column.
Important
If you created your frontline teams through the deploy frontline dynamic teams at scale experience, the DisplayName and TeamId values of your frontline teams are pre-populated in the CSV template. Otherwise, you'll need to manually add your teams and team IDs to these columns in the template.
| Column name | Required | Description |
|---|---|---|
| DisplayName | Yes | The name of the node. The name can be up to 100 characters long and contain only the characters A-Z, a-z, and 0-9. Node names must be unique. |
| ParentName | Yes | The name of the parent node. The value you specify here must match the value in the DisplayName field of the parent node exactly. If you want to add more than one parent node, separate each parent node name with a semicolon (;). You can add up to 25 parent nodes, and each parent node name can be up to 2500 characters long. A node can have multiple parent nodes only if the parent nodes are root nodes. IMPORTANT Be careful not to create a loop where a parent higher up in the hierarchy references a child node lower in the hierarchy. This structure isn't supported. |
| TeamId | Yes, if the team is a leaf node. | The ID of the team you want to link a node to. Each node must refer to a unique team, so each TeamId value can appear only one time in the hierarchy file. |
Note
To get a list of all teams in your organization, along with the DisplayName and TeamId values of each team, run the following PowerShell command: Get-Team | Export-Csv TeamList.csv.
Add attribute columns
After you add the three required columns, you can add optional attribute columns, which represent metadata for each of your store locations. These attributes can be used to filter teams that will enable experiences like targeted communications, task publishing, and others in the future.
There are two ways to define your attributes, depending on whether values for that attribute are mutually exclusive.
| Ways to add attributes | Description | Example |
|---|---|---|
| If the values for an attribute are mutually exclusive, the column name you specify becomes the name of the attribute. | Each row can contain one value for that attribute, and each attribute column can have up to 50 unique values. Each value can be up to 100 characters long. | You want users to be able to filter stores by layout. The values for this attribute are mutually exclusive because a store can have only one layout. To add an attribute to filter stores by layout, add a column named Store layout. In this example, values for the Store layout attribute are Compact, Standard, and Large. |
| If you need to indicate multiple values for an attribute and the values aren't mutually exclusive, use the AttributeName:UniqueValue format for the column names. IMPORTANT Make sure you use the English-only colon (:) as unicode isn't supported as an attribute column delimiter. |
The text string before the colon (:) becomes the name of the attribute. All columns that contain the same text string before the colons (:) are grouped together into a section in the filtering menu. Each of the strings after the colon become the values for that section. Each row can have a value of 0 (zero) or 1 for that attribute. A value of 0 means that the attribute doesn't apply to the node and a value of 1 means that the attribute applies to that node. |
You want users to be able to filter stores by department. A store can have multiple departments and so the values for this attribute aren't mutually exclusive. In this example, we add Departments:Clothing, Departments:Electronics, Departments:Foods, Departments:Home and Garden, Departments:Sporting goods as attribute columns. Departments becomes the attribute name and users can filter by the Clothing, Electronics, Foods, Home and Garden, and Sporting goods departments. |
When you add an attribute column, keep the following things in mind:
- The column name you specify or the column name that you specify before the colon (:) becomes the name of the attribute. This value will be displayed in the Teams apps that use the hierarchy.
- You can have up to 100 attribute columns in your hierarchy.
- The column name can be up to 100 characters long and contain only the characters A-Z, a-z, and 0-9, and spaces. Column names must be unique.
Upload your hierarchy
In the Operational hierarchy pane, choose Select a file, select your hierarchy CSV file, and then choose Upload. The maximum file size is 1 MB.
Depending on the size of your file, setup might take a few minutes.

Refresh the Manage frontline teams page to check the latest status of your hierarchy setup. Make sure you’re on the Operational hierarchy tab after you refresh the page.
When setup is completed, the status in the table is updated to Success.


Manage your hierarchy
In the left navigation of the Teams admin center, choose Teams > Manage frontline teams.
Go to the Operational hierarchy tab.

To view your last successfully uploaded hierarchy CSV file, select the Last uploaded file link in the table.
To make changes to your hierarchy, select the Operational hierarchy link in the table. The Operational hierarchy pane opens, and from here, you can:
Download the last hierarchy CSV file you uploaded, and then make your changes.
Start fresh and download the template again to create a new hierarchy CSV file.
Note
If you created more frontline teams through the deploy frontline dynamic teams at scale experience since the last time you set up your hierarchy, the DisplayName and TeamId values of those frontline teams are added and pre-popluated in the CSV template.
When you're ready, upload your hierarchy CSV file.

Troubleshoot errors
If an error occurred during setup, the status in the table shows as Error after you refresh the Manage frontline teams page.

You can download a CSV file that lists the errors, along with details that include the row and column in which the error occurred. Use this information to make the necessary changes to resolve the errors. In the table, select the View errors link to download the error CSV.
Delete your hierarchy
To delete your hierarchy, upload a blank CSV file.
Feedback
Coming soon: Throughout 2024 we will be phasing out GitHub Issues as the feedback mechanism for content and replacing it with a new feedback system. For more information see: https://aka.ms/ContentUserFeedback.
Submit and view feedback for