Get started with WebView2 in WinUI 3 (Windows App SDK) apps
This article covers how to set up your development tools and create an initial WebView2 app for WinUI 3 (Windows App SDK), and learn about WebView2 concepts along the way.
In this tutorial, you use the Blank App, Packaged (WinUI in Desktop) Visual Studio project template to create a blank WinUI 3 project. That project template uses the WindowsAppSDK, which includes the WebView2 SDK. You add a WebView2 control. You then add an address bar and logic to display a warning dialog when the user tries to navigate to a URL with an http:// prefix.
Completed project
A completed version of this tutorial project (as of 2020) is available in the WebView2Samples repo:
- Sample name: WinUI3_GettingStarted
- Repo directory: WinUI3_GettingStarted
- Solution file: WinUI_Sample.sln
The present tutorial is updated and only creates a single project, not a second, "(Package)" project like in 2020.
Step 1 - Install Visual Studio and the Windows App SDK
Even if you have Visual Studio installed, read the following page and possibly update your software and install project templates.
- In a new window or tab, open the page Install tools for the Windows App SDK and then follow the steps on that page, to install Microsoft Visual Studio, such as Visual Studio 2022.
- If needed, in a new window or tab, see Install Visual Studio in Set up your Dev environment for WebView2.
Return from that page and continue the steps below.
For this sample, you don't need to separately install the WebView2 SDK. Below, you'll select the project template Blank App, Packaged (WinUI in Desktop), which uses the WindowsAppSDK, which includes the WebView2 SDK.
Step 2 - Install a preview channel of Microsoft Edge
- Install the WebView2 Runtime on devices that have Windows 10 version 1803 (build 17134) or later, by installing from either location:
- To directly download just the Runtime, use the Download the WebView2 Runtime section of the Microsoft Edge WebView2 page at
developer.microsoft.com. - To download and install a Microsoft Edge preview channel (Beta, Dev, or Canary), go to Become a Microsoft Edge Insider. The preview channels are also called Insider channels. The preview channels include the WebView2 Runtime.
Then continue with the steps below.
Step 3 - Create a blank WinUI 3 project
To create a WebView2 app, start by creating a basic desktop project, to create a desktop app that contains a single main window:
If Visual Studio is not running, start Visual Studio (not Visual Studio Code). In the Visual Studio startup window, click the Create a new project card. The Create a new project window opens.
Or, if Visual Studio is running, select File > New > Project. The Create a new project dialog opens.
Turning on Developer Mode: When Visual Studio opens at some point during the present article's steps, you might be prompted to turn on Developer Mode for your computer. For more information, if needed, see Enable your device for development, at Build desktop apps for Windows.
In the Create a new project dialog, in the Search for templates field, enter WinUI 3 in Desktop:
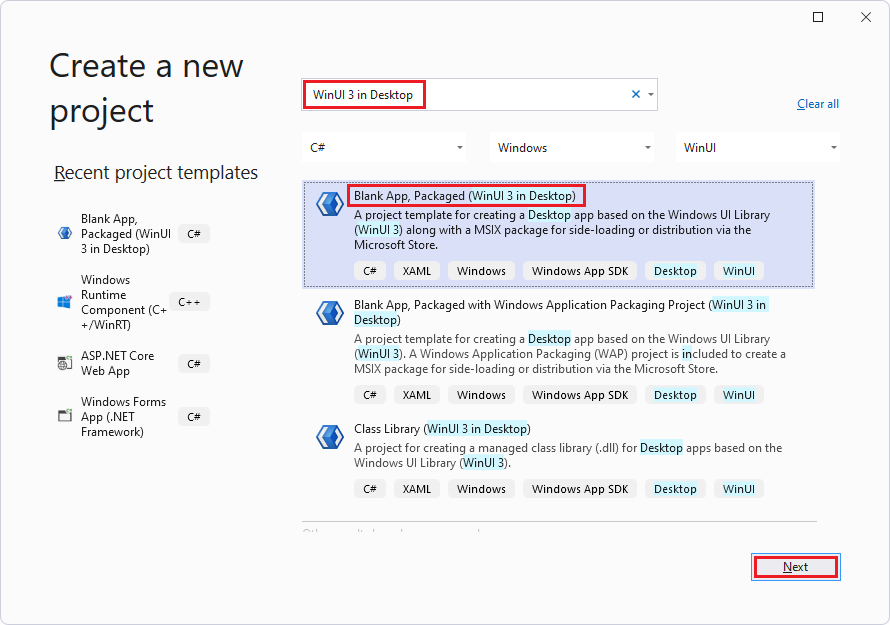
Click the Blank App, Packaged (WinUI in Desktop) card to select it, and then click the Next button.
If WinUI templates aren't listed, you need to install project templates as mentioned above, from Install tools for the Windows App SDK. Additional tips to get the template to appear:
After installing "default" options for Visual Studio 2022 Community edition, in Visual Studio Installer, click the .NET card, then on the right, select the checkbox Windows App SDK C# Templates.
If the correct project template still doesn't appear: in the Visual Studio Installer, click the UWP card to select it, select the v143 C++ tools checkbox on the right, and then click the Modify button.
The Configure your new project dialog appears.
In the Project name text box, enter a project name, such as MyWebView2WinUI3:
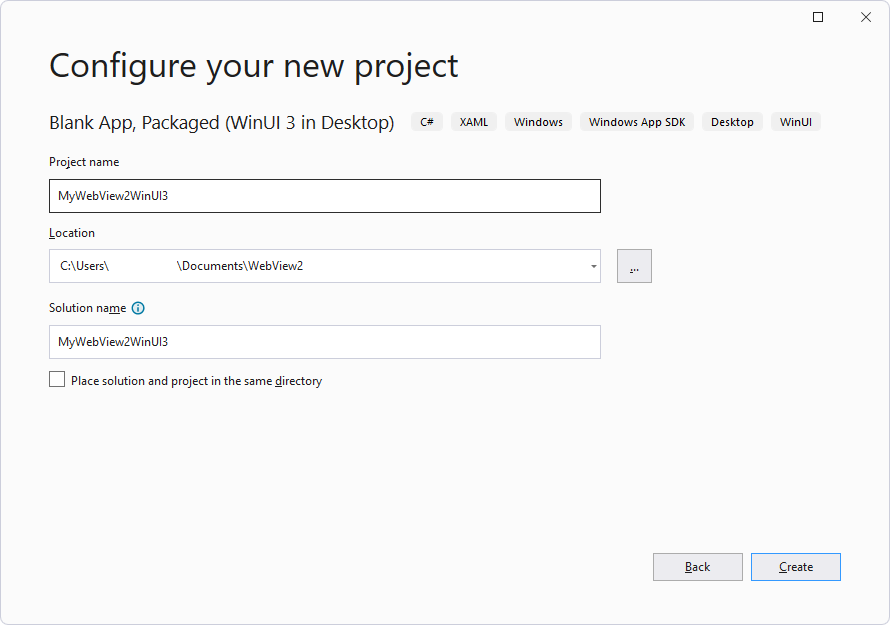
In the Location text box, enter or navigate to a location, such as
C:\Users\username\Documents\WebView2.Click the Create button.
The new WinUI 3 project opens in Solution Explorer in Visual Studio:
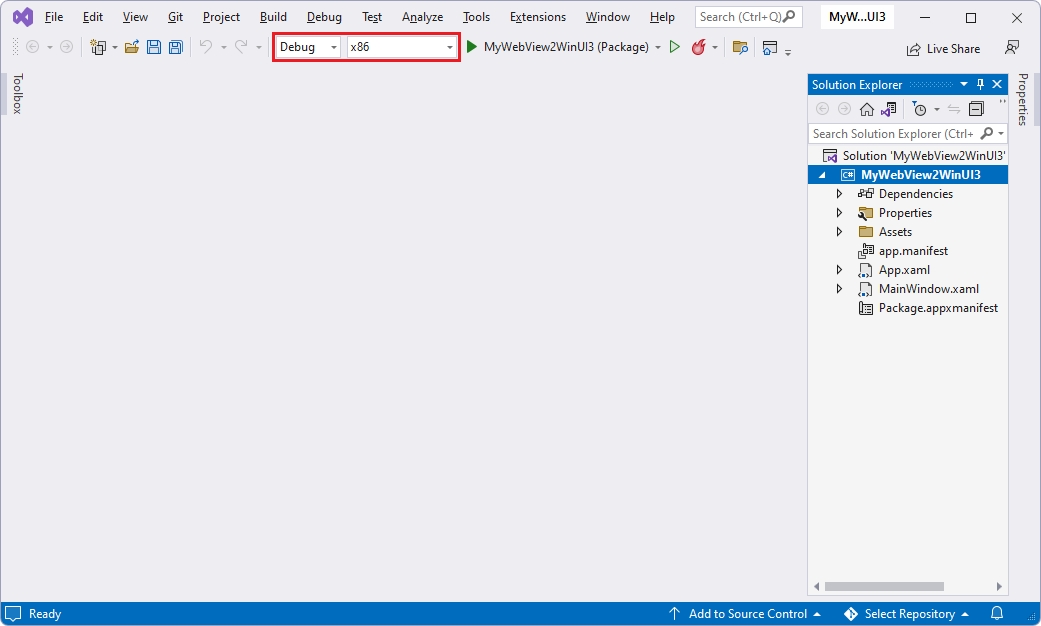
The
App.xaml.csfile defines anApplicationclass that represents your app instance.The
MainWindow.xaml.csfile defines aMainWindowclass that represents the main window displayed by your app instance. The classes derive from types in theMicrosoft.UI.Xamlnamespace of WinUI.
In the Solution Configurations dropdown list (in the middle of the top of the window), select Debug.
In the Solution Platforms dropdown list, select a platform, such as x64.
Select File > Save All (Ctrl+Shift+S) to save the project.
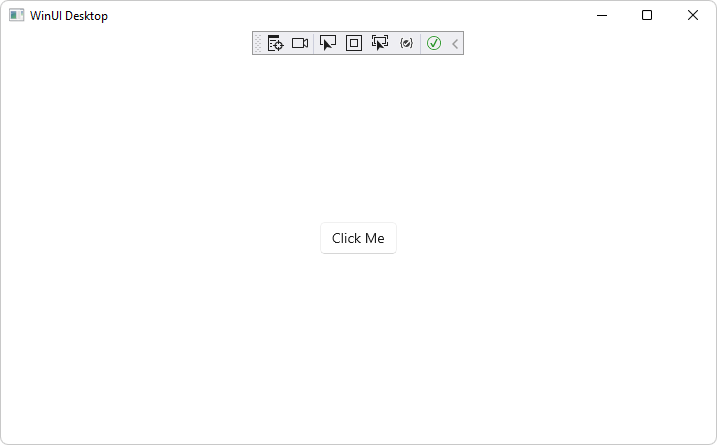
Press F5 to build and run the project. The blank WinUI Desktop app opens, with no WebView2 control added yet:
Close the app.
Updating target version numbers
For the build step above: If you're updating a previous project, you might need to update the version numbers for Target version and Minimum version. To do this, in Solution right-click the project and then select Edit Project File. Your .csproj file opens. Make sure the values are updated as follows, and then save any changes and build the project.
    <TargetFramework>net6.0-windows10.0.19041.0</TargetFramework>
    <TargetPlatformMinVersion>10.0.17763.0</TargetPlatformMinVersion>
The above values represent:
- Target version: Windows 10, version 2004 (build 19041) or later.
- Minimum version: Windows 10, version 1809 (build 17763).
Step 4 - Add a WebView2 control
This tutorial project is based on the project template Blank App, Packaged (WinUI in Desktop). This project template uses the WindowsAppSDK, which includes the WebView2 SDK.
Edit the MainWindow.xaml and MainWindow.xaml.cs files to add a WebView2 control to the blank WinUI 3 app project, as follows:
In Visual Studio, in Solution Explorer, double-click
MainWindow.xamlto open it in the code editor.Add the WebView2 XAML namespace by inserting the following attribute inside the
<Window>start tag:xmlns:controls="using:Microsoft.UI.Xaml.Controls"Make sure your code in
MainWindow.xamlis similar to the following:<Window x:Class="MyWebView2WinUI3.MainWindow" xmlns="http://schemas.microsoft.com/winfx/2006/xaml/presentation" xmlns:x="http://schemas.microsoft.com/winfx/2006/xaml" xmlns:local="using:MyWebView2WinUI3" xmlns:d="http://schemas.microsoft.com/expression/blend/2008" xmlns:mc="http://schemas.openxmlformats.org/markup-compatibility/2006" mc:Ignorable="d"> <StackPanel Orientation="Horizontal" HorizontalAlignment="Center" VerticalAlignment="Center"> <Button x:Name="myButton" Click="myButton_Click">Click Me</Button> </StackPanel> </Window>To add the WebView2 control, replace the entire
<StackPanel>element with the following<Grid>code. TheSourceproperty, near the bottom, sets the initial URI that's displayed in the WebView2 control (https://www.microsoft.com):<Grid> <Grid.RowDefinitions> <RowDefinition Height="Auto"/> <RowDefinition Height="*"/> </Grid.RowDefinitions> <Grid.ColumnDefinitions> <ColumnDefinition Width="*"/> <ColumnDefinition Width="Auto"/> </Grid.ColumnDefinitions> <controls:WebView2 x:Name="MyWebView" Grid.Row="1" Grid.ColumnSpan="2" Source="https://www.microsoft.com" HorizontalAlignment="Stretch" VerticalAlignment="Stretch"/> </Grid>In Solution Explorer, expand
MainWindow.xamland then openMainWindow.xaml.cs.In
MainWindow.xaml.cs, comment out the following line, as shown:// myButton.Content = "Clicked";Select File > Save All (Ctrl+Shift+S) to save the project.
Press F5, to build and run the project.
The app is a WebView2 host app that includes the WebView2 control. The WebView2 control displays the website
https://www.microsoft.com: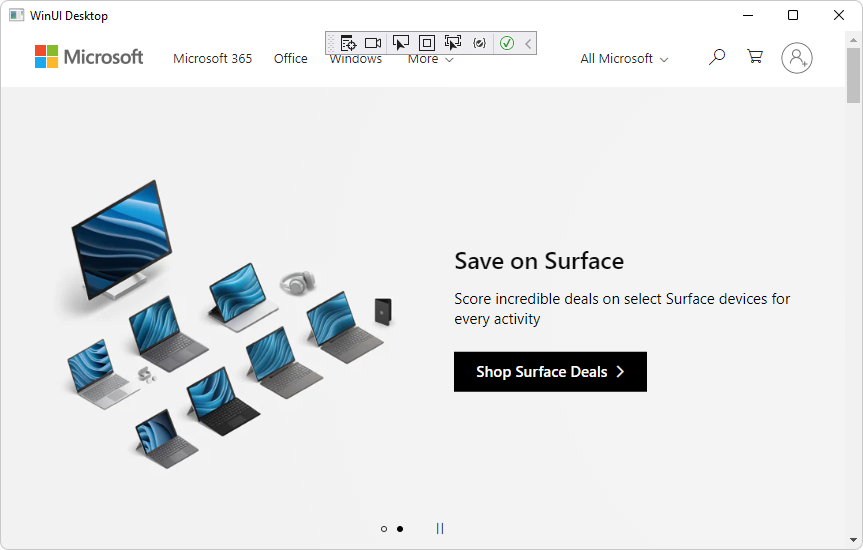
Close the app.
WinAppSDK supports custom WebView2 environments
WinAppSDK supports custom WebView2 environments, starting with WinAppSDK 1.5 (1.5.0-experimental2). For more information, see WinUI3 WebView2 with a custom CoreWebView2Environment.
To instantiate a custom WebView2 environment, initialize WebView2 with one of the overrides of WebView2.EnsureCoreWebView2Async (listed below), and pass in your custom CoreWebView2Environment (and, optionally, custom CoreWebView2ControllerOptions):
public IAsyncAction EnsureCoreWebView2Async (CoreWebView2Environment environment)
public IAsyncAction EnsureCoreWebView2Async (CoreWebView2Environment environment, CoreWebView2ControllerOptions controllerOptions)
Also see the example code in Disabling SmartScreen navigation, below.
API Reference:
- WebView2.EnsureCoreWebView2Async
- CoreWebView2ControllerOptions
- CoreWebView2Environment
- CoreWebView2EnvironmentOptions
Step 5 - Add navigation controls
To allow users to control which webpage is displayed in the WebView2 control, add an address bar to the app, as follows:
In
MainWindow.xaml, paste the following code inside the<Grid>element that contains the<controls:WebView2>element:<TextBox Name="addressBar" Grid.Column="0"/> <Button x:Name="myButton" Grid.Column="1" Click="myButton_Click">Go</Button>Make sure the resulting
<Grid>element in theMainWindow.xamlfile matches the following:<Grid> <Grid.RowDefinitions> <RowDefinition Height="Auto"/> <RowDefinition Height="*"/> </Grid.RowDefinitions> <Grid.ColumnDefinitions> <ColumnDefinition Width="*"/> <ColumnDefinition Width="Auto"/> </Grid.ColumnDefinitions> <TextBox Name="addressBar" Grid.Column="0"/> <Button x:Name="myButton" Grid.Column="1" Click="myButton_Click">Go</Button> <controls:WebView2 x:Name="MyWebView" Grid.Row="1" Grid.ColumnSpan="2" Source="https://www.microsoft.com" HorizontalAlignment="Stretch" VerticalAlignment="Stretch"/> </Grid>In
MainWindow.xaml.cs, paste the following code intomyButton_Click, overwriting the existingmyButton_Clickmethod (which is nearly empty). This code navigates the WebView2 control to the URL entered in the address bar.private void myButton_Click(object sender, RoutedEventArgs e) { try { Uri targetUri = new Uri(addressBar.Text); MyWebView.Source = targetUri; } catch (FormatException ex) { // Incorrect address entered. } }Select File > Save All (Ctrl+Shift+S) to save the project.
Press F5 to build and run the project.
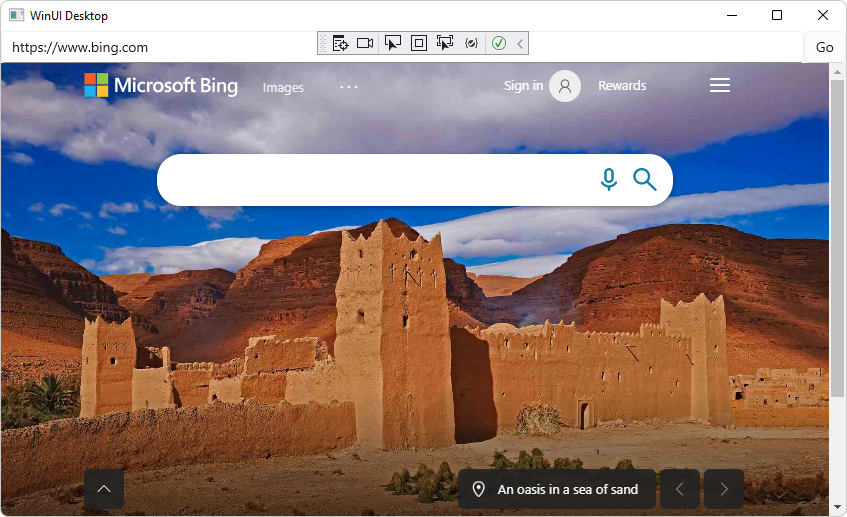
Enter a new complete URL in the address bar, such as https://www.bing.com, and then click the Go button.
The WebView2 control in the app displays the Bing website. The address bar displays the URL, such as
https://www.bing.com:Enter an incomplete URL in the address bar, such as
bing.com, and then click the Go button.An
ArgumentExceptionexception is thrown, and appears after you close the app, because the URL doesn't start withhttp://orhttps://.Close the app.
Step 6 - Navigation events
In this section, you add code to import the WebView2 Core library.
In
MainWindow.xaml.cs, add the following line at the top, above the otherusingstatements:using Microsoft.Web.WebView2.Core;Apps that host WebView2 controls listen for the following events that are raised by WebView2 controls during webpage navigation:
NavigationStartingSourceChangedContentLoadingHistoryChangedNavigationCompleted
If an HTTP redirect occurs, there are multiple
NavigationStartingevents in a row.For more information, see Navigation events for WebView2 apps.
When errors occur, the following events are raised, and an error webpage might be displayed:
SourceChangedContentLoadingHistoryChanged
As an example of how to use the events, register a handler for
NavigationStartingthat cancels any non-HTTPS requests, as follows:In
MainWindow.xaml.cs, in the constructor, add the followingNavigationStartingline, to register theEnsureHttpsmethod:public MainWindow() { this.InitializeComponent(); MyWebView.NavigationStarting += EnsureHttps; }In
MainWindow.xaml.cs, below the constructor, add the followingEnsureHttpsmethod:private void EnsureHttps(WebView2 sender, CoreWebView2NavigationStartingEventArgs args) { String uri = args.Uri; if (!uri.StartsWith("https://")) { args.Cancel = true; } else { addressBar.Text = uri; } }Select File > Save All (Ctrl+Shift+S) to save the project.
Press F5 to build and run the project.
In the app, in the Address bar, enter an HTTP URL, such as
http://bing.com, and then click the Go button.Nothing happens, because navigation is blocked to HTTP sites, and we haven't yet added a dialog to provide feedback.
Enter an HTTPS URL, such as
https://bing.com, and then click the Go button.The app navigates to the specified page, because navigation is allowed for HTTPS sites.
Close the app.
Step 7 - Scripting
You can use host apps to inject JavaScript code into WebView2 controls at runtime. You can task WebView2 to run arbitrary JavaScript or add initialization scripts. The injected JavaScript applies to all new top-level documents and any child frames until the JavaScript is removed. The injected JavaScript is run with specific timing, to either:
Run the injected JavaScript after the creation of the global object.
Run the injected JavaScript before running any other script that's included in the HTML document.
As an example, next, you add scripts that send an alert when a user tries to open non-HTTPS sites. To do this, you inject a script into the web content that uses ExecuteScriptAsync.
In the
EnsureHttpsmethod, add the followingExecuteScriptAsyncline:private void EnsureHttps(WebView2 sender, CoreWebView2NavigationStartingEventArgs args) { String uri = args.Uri; if (!uri.StartsWith("https://")) { MyWebView.ExecuteScriptAsync($"alert('{uri} is not safe, try an https link')"); args.Cancel = true; } else { addressBar.Text = uri; } }Select File > Save All (Ctrl+Shift+S) to save the project.
Press F5 to build and run the project.
In the app's Address bar, enter a non-HTTPS URL, such as
http://www.bing.com, and then click the Go button.The app's WebView2 control displays an alert dialog for non-HTTPS websites, saying that the non-HTTPS
uriis not safe:
Close the app.
Congratulations, you built your first WebView2 app!
WinUI 3 WebView2 special considerations
Disabling SmartScreen navigation
WebView2 sends URLs that are navigated to in your application to the SmartScreen service, to ensure that your customers stay secure. If you want to disable this navigation, use a custom CoreWebView2Environment, as follows:
CoreWebView2EnvironmentOptions environmentOptions = new CoreWebView2EnvironmentOptions();
environmentOptions.AdditionalBrowserArguments = "--disable-features=msSmartScreenProtection";

string browserFolder = null; // Use null to get default browser folder
string userDataFolder = null; // Use null to get default user data folder
CoreWebView2Environment environment = await CoreWebView2Environment.CreateWithOptionsAsync(
    browserFolder, userDataFolder, environmentOptions);

// ...

this.WebView2.EnsureCoreWebView2Async(environment);
Disabling SmartScreen by using an environment variable
We no longer recommend using an environment variable. Use the above API code-based approach instead.
Environment.SetEnvironmentVariable("WEBVIEW2_ADDITIONAL_BROWSER_ARGUMENTS", "--disable-features=msSmartScreenProtection");
This environment variable must be set prior to CoreWebView2 creation, which occurs when the WebView2.Source property is initially set or the WebView2.EnsureCoreWebView2Async method is initially called.
Setting DefaultBackgroundColor
In WebView2 for WinUI 3, the DefaultBackgroundColor setting exists on the WebView2 XAML object. For example:
public MainWindow()
{
    this.InitializeComponent();
    MyWebView.DefaultBackgroundColor = Colors.LightBlue;
}
Transparency
WinUI 3 doesn't support transparent backgrounds. See Transparent background support for WebView2? · Issue #2992.
WinAppSDK support for custom WebView2 environments
See WinAppSDK supports custom WebView2 environments, above.
See also
- WebView2 API Reference
- Introduction to Microsoft Edge WebView2 - overview of features.
- Manage user data folders
- Sample Code for WebView2 - a guide to the
WebView2Samplesrepo. - Development best practices for WebView2 appsDevelopment best practices
developer.microsoft.com:
- Microsoft Edge WebView2 - initial introduction to WebView2 features at developer.microsoft.com.
GitHub:
- Getting Started with WebView2 in WinUI3
- Spec: The WebView2 Xaml control - the WinUI 3.0 version of the WebView2 control.
- microsoft-ui-xaml repo > Issues - to enter WinUI-specific feature requests or bugs.
Feedback
Coming soon: Throughout 2024 we will be phasing out GitHub Issues as the feedback mechanism for content and replacing it with a new feedback system. For more information see: https://aka.ms/ContentUserFeedback.
Submit and view feedback for