Initiate actions with message extensions
Important
The articles in this section are based on the v3 Bot Framework SDK. If you're looking for current documentation (version 4.6 or later version of the SDK), see the Task-oriented interactions with Message Extensions section.
Action-based message extensions allow your users to trigger actions in external services while in Teams.
Add a message extension to your app
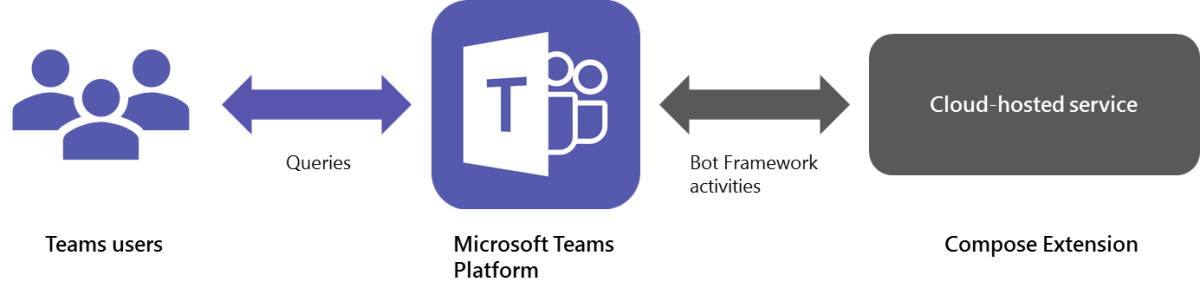
A message extension is a cloud-hosted service that listens to user requests and responds with structured data, such as a card. You integrate your service with Microsoft Teams via Bot Framework Activity objects. Our .NET and Node.js extensions for the Bot Builder SDK can help you add message extension functionality to your app.
Register in the Bot Framework
If you haven’t done so already, you must first register a bot with the Microsoft Bot Framework. The Microsoft app ID and callback endpoints for your bot, as defined there, will be used in your message extension to receive and respond to user requests. Remember to enable the Microsoft Teams channel for your bot.
Take note of your bot app ID and app password, you'll need to provide the app ID in your app manifest.
Update your app manifest
As with bots and tabs, you update the manifest of your app to include the message extension properties. These properties govern how your message extension appears and behaves in the Microsoft Teams client. Message extensions are supported beginning with manifest v1.0.
Declare your message extension
To add a message extension, include a new top-level JSON structure in your manifest with the composeExtensions property. Currently, you're limited to creating a single message extension for your app.
Note
The manifest refers to message extensions as composeExtensions. This is to maintain backward compatibility.
The extension definition is an object that has the following structure:
| Property name | Purpose | Required? |
|---|---|---|
botId |
The unique Microsoft app ID for the bot as registered with the Bot Framework. This should typically be the same as the ID for your overall Teams app. | Yes |
scopes |
Array declaring whether this extension can be added to personal or team scopes (or both). |
Yes |
canUpdateConfiguration |
Enables Settings menu item. | No |
commands |
Array of commands that this message extension supports. You're limited to 10 commands. | Yes |
Define commands
Your message extension should declare one command, which appears when the user selects your app from the More options (⋯) button in the compose box.

In the app manifest, your command item is an object with the following structure:
| Property name | Purpose | Required? | Minimum manifest version |
|---|---|---|---|
id |
Unique ID that you assign to this command. The user request will include this ID. | Yes | 1.0 |
title |
Command name. This value appears in the UI. | Yes | 1.0 |
description |
Help text indicating what this command does. This value appears in the UI. | Yes | 1.0 |
type |
Set the type of command. Possible values include query and action. If not present, the default value is set to query. |
No | 1.4 |
initialRun |
Optional parameter, used with query commands. If set to true, indicates this command should be executed as soon as the user chooses this command in the UI. |
No | 1.0 |
fetchTask |
Optional parameter, used with action commands. Set to true to fetch the adaptive card or web url to display within the task module. This is used when the input to the action command is dynamic as opposed to a static set of parameters. Note that if set to true, the static parameter list for the command is ignored. |
No | 1.4 |
parameters |
Static list of parameters for the command. | Yes | 1.0 |
parameter.name |
The name of the parameter. This is sent to your service in the user request. | Yes | 1.0 |
parameter.description |
Describes this parameter’s purposes and example of the value that should be provided. This value appears in the UI. | Yes | 1.0 |
parameter.title |
Short user-friendly parameter title or label. | Yes | 1.0 |
parameter.inputType |
Set to the type of input required. Possible values include text, textarea, number, date, time, toggle. Default is set to text. |
No | 1.4 |
context |
Optional array of values that defines the context the message action is available in. Possible values are message, compose, or commandBox. Default is ["compose", "commandBox"]. |
No | 1.5 |
Action type message extensions
To initiate actions from a message extension, set the type parameter to action. A single message extension can have up to 10 different commands and include multiple search-based and action-based commands.
Note
justInTimeInstall functions when you upload an app to the app catalog but fails when you upload a custom app.
Complete app manifest example
The following code is an example of a manifest with a search and a create command:
{
  "$schema": "https://developer.microsoft.com/json-schemas/teams/v1.8/MicrosoftTeams.schema.json",
  "manifestVersion": "1.5",
  "version": "1.0",
  "id": "57a3c29f-1fc5-4d97-a142-35bb662b7b23",
  "developer": {
    "name": "John Developer",
    "websiteUrl": "http://todobotservice.azurewebsites.net/",
    "privacyUrl": "http://todobotservice.azurewebsites.net/privacy",
    "termsOfUseUrl": "http://todobotservice.azurewebsites.net/termsofuse"
  },
  "name": {
    "short": "To Do",
    "full": "To Do"
  },
  "description": {
    "short": "Find or create a new task in To Do",
    "full": "Find or create a new task in To Do"
  },
  "icons": {
    "outline": "todo-outline.jpg",
    "color": "todo-color.jpg"
  },
  "accentColor": "#ff6a00",
  "composeExtensions": [
    {
      "botId": "57a3c29f-1fc5-4d97-a142-35bb662b7b23",
      "canUpdateConfiguration": true,
      "commands": [
        {
          "id": "searchCmd",
          "description": "Search you Todo's",
          "title": "Search",
          "initialRun": true,
          "context": ["commandBox", "compose"],
          "parameters": [
            {
              "name": "searchKeyword",
              "description": "Enter your search keywords",
              "title": "Keywords"
            }
          ]
        },
        {
          "id": "addTodo",
          "description": "Create a To Do item",
          "title": "Create To Do",
          "type": "action",
          "context": ["commandBox", "message", "compose"],
          "parameters": [
            {
              "name": "Name",
              "description": "To Do Title",
              "title": "Title",
              "inputType": "text"
            },
            {
              "name": "Description",
              "description": "Description of the task",
              "title": "Description",
              "inputType": "textarea"
            },
            {
              "name": "Date",
              "description": "Due date for the task",
              "title": "Date",
              "inputType": "date"
            }
          ]
        },
        {
          "id": "reassignTodo",
          "description": "Reassign a todo item",
          "title": "Reassign a todo item",
          "type": "action",
          "fetchTask": false,
          "parameters": [
            {
              "name": "Name",
              "title": "Title"
              "inputType": "text"
            }
          ]
        }
      ]
    }
  ],
  "permissions": [
    "identity",
    "messageTeamMembers"
  ],
  "validDomains": [
    "todobotservice.azurewebsites.net",
    "*.todobotservice.azurewebsites.net"
  ]
}
Initiate actions from messages
You can initiate actions from the compose message area and also from a message using your message extension, which allows you to send the message contents to your bot for processing. You can optionally respond to that message using the method described in Responding to submit. The response is included as a reply to the message, which users can edit before submitting.
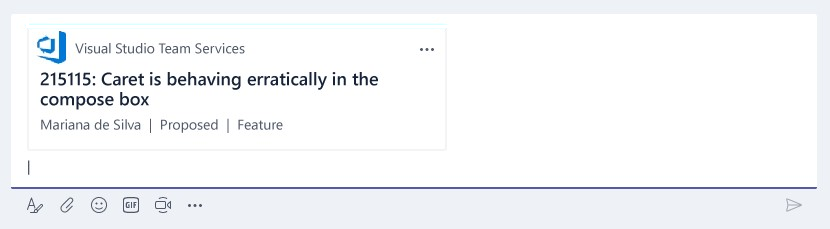
Users can access message extension from Take action option of the overflow ... menu, as shown in the following image:

To enable your message extension to work from a message, add the context parameter to your message extension's commands object in your app manifest as in the following example. Valid strings for the context array are "message", "commandBox", and "compose". The default value is ["compose", "commandBox"]. See the define commands section for complete details on the context parameter:
"composeExtensions": [
  {
    "botId": "57a3c29f-1fc5-4d97-a142-35bb662b7b23",
    "canUpdateConfiguration": true,
    "commands": [
      {
        "id": "reassignTodo",
        "description": "Reassign a todo item",
        "title": "Create To Do",
        "type": "Action",
        "context": ["message"],
        "fetchTask": true
    }]
    ...
The following code is an example of the value object containing the message details that is sent as part of the composeExtensions request to your bot:
{
  "name": "composeExtension/submitAction",
  "type": "invoke",
...
  "value": {
    "commandId": "setReminder",
    "commandContext": "message",
    "messagePayload": {
      "id": "1111111111",
      "replyToId": null,
      "createdDateTime": "2019-02-25T21:29:36.065Z",
      "lastModifiedDateTime": null,
      "deleted": false,
      "subject": "Message subject",
      "summary": null,
      "importance": "normal",
      "locale": "en-us",
      "body": {
        "contentType": "html",
        "content": "this is the message"
    },
      "from": {
        "device": null,
        "conversation": null,
        "user": {
          "userIdentityType": "aadUser",
          "id": "wxyz12ab8-ab12-cd34-ef56-098abc123876",
          "displayName": "Jamie Smythe"
        },
        "application": null
      },
      "reactions": [
        {
          "reactionType": "like",
          "createdDateTime": "2019-02-25T22:40:40.806Z",
          "user": {
            "device": null,
            "conversation": null,
            "user": {
              "userIdentityType": "aadUser",
              "id": "qrst12346-ab12-cd34-ef56-098abc123876",
              "displayName": "Jim Brown"
            },
            "application": null
          }
        }
      ],
      "mentions": [
        {
          "id": 0,
          "mentionText": "Sarah",
          "mentioned": {
            "device": null,
            "conversation": null,
            "user": {
              "userIdentityType": "aadUser",
              "id": "ab12345678-ab12-cd34-ef56-098abc123876",
              "displayName": "Sarah"
            },
            "application": null
          }
        }
      ]
    }
  ...
Test via uploading
You can test your message extension by uploading your app. For more information, see Uploading your app in a team.
To open your message extension, go to any of your chats or channels. Select the More options (⋯) button in the compose box and choose your message extension.
Collecting input from users
There are three ways to collect information from a user in Teams.
Static parameter list
In this method, all you need to do is define a static list of parameters in the manifest as shown in the "Create To Do" command. To use this method, ensure fetchTask is set to false and that you define your parameters in the manifest.
When a user chooses a command with static parameters, Teams generates a form in a task module with the defined parameters in the manifest. On hitting Submit, a composeExtensions/submitAction is sent to the bot. For more information on the expected set of responses, see Responding to submit.
Dynamic input using an Adaptive Card
In this method, your service can define a custom Adaptive Card to collect the user input. For this approach, set the fetchTask parameter to true in the manifest. If you set fetchTask to true, any static parameters defined for the command are ignored.
In this method, your service receives a composeExtensions/fetchTask event and responds with an Adaptive Card based task module response. Following is a sample response with an Adaptive Card:
{
    "task": {
        "type": "continue",
        "value": {
            "card": {
                "contentType": "application/vnd.microsoft.card.adaptive",
                "content": {
                    "body": [
                        {
                            "type": "TextBlock",
                            "text": "Please enter the following information:"
                        },
                        {
                            "type": "TextBlock",
                            "text": "Name"
                        },
                        {
                            "type": "Input.Text",
                            "spacing": "None",
                            "title": "New Input.Toggle",
                            "placeholder": "Placeholder text"
                        },
                        {
                            "type": "TextBlock",
                            "text": "Date of birth"
                        },
                        {
                            "type": "Input.Date",
                            "spacing": "None",
                            "title": "New Input.Toggle"
                        }
                    ],
                    "type": "AdaptiveCard",
                    "$schema": "http://adaptivecards.io/schemas/adaptive-card.json",
                    "version": "1.0"
                }
            }
        }
    }
}
The bot can also respond with an auth/config response if the user needs to authenticate or configure the extension before getting the user input.
Dynamic input using a web view
In this method, your service can show an <iframe> based widget to show any custom UI and collect user input. For this approach, set the fetchTask parameter to true in the manifest.
Just like in the Adaptive Card flow, your service sends a fetchTask event and responds with a URL based task module response. Following is a sample response with an Adaptive card:
{
    "task": {
        "value": {
            "url": "http://mywebapp.com/input"
        },
        "type": "continue"
    }
}
Request to install your conversational bot
If your app contains a conversation bot, ensure it's installed in the conversation before loading your task module to get more context for your task module. For example, you might need to fetch the roster to populate a people picker control, or the list of channels in a team.
To facilitate this flow, when your message extension first receives the composeExtensions/fetchTask invoke, check to see if your bot is installed in the current context. You can get this, by attempting the get roster call. For example, if your bot isn't installed, you return an Adaptive Card with an action that requests the user to install your bot. The user needs to have permission to install apps in that location. If they can’t install, the message prompts to contact the administrator.
Here's an example of the response:
{
  "type": "AdaptiveCard",
  "body": [
    {
      "type": "TextBlock",
      "text": "Looks like you haven't used Disco in this team/chat"
    }
  ],
  "actions": [
    {
      "type": "Action.Submit",
      "title": "Continue",
      "data": {
        "msteams": {
          "justInTimeInstall": true
        }
      }
    }
  ],
  "version": "1.0"
}
Once the user completes the installation, your bot receives another invoke message with name = composeExtensions/submitAction and value.data.msteams.justInTimeInstall = true.
Here's an example of the invoke:
{
  "value": {
    "commandId": "giveKudos",
    "commandContext": "compose",
    "context": {
      "theme": "default"
    },
    "data": {
      "msteams": {
        "justInTimeInstall": true
      }
    }
  },
  "conversation": {
    "id": "19:7705841b240044b297123ad7f9c99217@thread.skype"
  },
  "name": "composeExtension/submitAction",
  "imdisplayname": "Bob Smith"
}
Respond to the invoke with the same task response that you have responded with, if the bot was installed.
Responding to submit
Once a user completes entering their input, bot receives a composeExtensions/submitAction event with the command ID and parameter values set.
These are the different expected responses to a submitAction.
Task module response
Task module response is used when your extension needs to chain dialogs together to get more information. The response is same as fetchTask mentioned earlier.
Compose extensions auth/config response
Compose extensions auth/config response is used when your extension needs to either authenticate or configure to continue. For more information, see authentication section in the search section.
Compose extensions result response
Compose extensions result response is used to insert a card into the compose box as a result of the command. It's the same response that's used in the search command, but it's limited to one card or one result in the array.
{
  "composeExtension": {
    "type": "result",
    "attachmentLayout": "list",
    "preview": {
          "contentType": "application/vnd.microsoft.card.thumbnail",
          "content": {
            "title": "85069: Create a cool app",
            "images": [
              {
                "url": "https://placekitten.com/200/200"
              }
            ]
          }
        },
    "attachments": [
      {
        "contentType": "application/vnd.microsoft.teams.card.o365connector",
        "content": {
          "sections": [
            {
              "activityTitle": "[85069]: Create a cool app",
              "activityImage": "https://placekitten.com/200/200"
            },
            {
              "title": "Details",
              "facts": [
                {
                  "name": "Assigned to:",
                  "value": "[Larry Brown](mailto:larryb@example.com)"
                },
                {
                  "name": "State:",
                  "value": "Active"
                }
              ]
            }
          ]
        }
      }
    ]
  }
}
Respond with an Adaptive Card message sent from a bot
Respond to the submit action by inserting a message with an Adaptive Card into the channel with a bot. Your user can preview the message before submitting it, and potentially edit/interact with it as well. This can be useful in scenarios where you need to gather information from your users before creating an Adaptive Card response. The following scenario shows how you can use this flow to configure a poll without including the configuration steps in the channel message.
- The user selects the message extension to trigger the task module.
- The user uses the task module to configure the poll.
- After you submit the configuration task module, the app uses the information provided in the task module to craft an Adaptive Card and sends it as a
botMessagePreviewresponse to the client. - The user can then preview the Adaptive Card message before the bot inserts it into the channel. If the bot isn't already a member of the channel, clicking
Sendadds the bot. - Interacting with the Adaptive Card changes the message before sending it.
- Once the user selects
Send, the bot posts the message to the channel.
Note
- The
activityPreviewmust contain amessageactivity with exactly one Adaptive Card attachment. - Outlook doesn't support to respond with an Adaptive Card message sent from a bot.
To enable this flow your task module should respond as in the following example, which presents the preview message to the user:
{
  "composeExtension": {
    "type": "botMessagePreview",
    "activityPreview": {
      "type": "message",
      "attachments":  [
        {
          "contentType": "application/vnd.microsoft.card.adaptive",
          "content": << Card Payload >>
        }
      ]
    }
  }
}
Your message extension needs to respond to two new types of interactions, value.botMessagePreviewAction = "send" and value.botMessagePreviewAction = "edit". The following code is an example of the value object you need to process:
{
  "name": "composeExtension/submitAction",
  "type": "invoke",
  "conversation": { "id": "19:c366b75791784100b6e8b515fd55b063@thread.skype" },
  "imdisplayname": "Pranav Smith",
  ...
  "value": {
    "botMessagePreviewAction": "send" | "edit",
    "botActivityPreview": [
      {
        "type": "message/card",
        "attachments": [
          {
            "content":
              {
                "type": "AdaptiveCard",
                "body": [{<<card payload>>}]
              },
            "contentType" : "application/vnd.microsoft.card.adaptive"
          }
        ],
        "context": { "theme": "default" }
      }
    ],
  }
}
When responding to the edit request, you must respond with a task response with the values populated with the information that the user submitted. When responding to the send request, you should send a message to the channel containing the finalized Adaptive Card.
teamChatConnector.onComposeExtensionSubmitAction((
    event: builder.IEvent,
    request: teamBuilder.IComposeExtensionActionCommandRequest,
    callback: (err: Error, result: any, statusCode: number) => void) => {
        let invokeValue = (<any> event).value;

        if (invokeValue.botMessagePreviewAction ) {
            let attachment = invokeValue.botActivityPreview[0].attachments[0];

            if (invokeValue.botMessagePreviewAction === 'send') {
                let msg = new builder.Message()
                    .address(event.address)
                    .addAttachment(attachment);
                teamChatConnector.send([msg.toMessage()],
                    (error) => {
                        if(error){
                            // TODO: Handle error and callback.
                        }
                        else {
                            callback(null, null, 200);
                        }
                    }
                );
            }

            else if (invokeValue.botMessagePreviewAction === 'edit') {
              // Create the card and populate with user-inputted information.
              let card = { ... }

              let taskResponse = {
                task: {
                  type: "continue",
                  value: {
                    title: "Card Preview",
                    card: {
                      contentType: 'application/vnd.microsoft.card.adaptive',
                      content: card
                    }
                  }
                }
              }
              callback(null, taskResponse, 200);
            }

        else {
            let attachment = {
                  // Create Adaptive Card.
                };
            let activity = new builder.Message().addAttachment(attachment).toMessage();
            let response = teamBuilder.ComposeExtensionResponse.messagePreview()
                .preview(activity)
                .toResponse();
            callback(null, response, 200);
        }
    });
See also
Platform Docs
Feedback
Coming soon: Throughout 2024 we will be phasing out GitHub Issues as the feedback mechanism for content and replacing it with a new feedback system. For more information see: https://aka.ms/ContentUserFeedback.
Submit and view feedback for