Custom Blocks: Render and Lighting Options
Okay, so we can make blocks that are different shapes, which is awesome! But what if we want more cool options? How does a stained glass block work, anyhow?
Let's explore some fun effects using the render options available through the material_instances component.
Prerequisites
It's recommended that the following be completed before beginning this tutorial:
In this tutorial, we will focus on understanding how the different render methods in the material_instances component affect the rendering of our custom block. To exemplify this, we will be using the bubble fish block shown below because it has a wide range of pixel types that are affected differently by each render method.

Say "Hello" to the bubble fish!
Bubble fish is made of several blocks.
The bubble is made up of a 16x16x16 block. Then, there's an internal fish that's a 3x4x5 block with five 1x1x1 blocks added for a tail. The geometry is laid out in the UV map to correctly appear as we want it to in-game.
The bubble's texture was created in Paint3D to be able to create opaque, translucent, and transparent pixels.
You can create your own transparent block, or check out the minecraft-samples page for more information.
[!VIDEO https://www.youtube.com/embed/TIv-FsWwo8g] > Another tutorial, another excellent follow-along video!
Complete Setup in Resource Pack
This isn't our first time setting up a custom block, so this time we're giving you shortened steps. If at any point you get lost, please refer back to the previous custom block tutorials or the minecraft-samples page noted above.
- Export the file in Blockbench just as we did for the sushi block.
- Add the downloaded geometry file by navigating to custom_block_resource_pack/models/blocks and copying the file in.
{
  "format_version": "1.12.0",
  "minecraft:geometry": [
    {
      "description": {
        "identifier": "geometry.bubble_fish",
        "texture_width": 64,
        "texture_height": 64,
        "visible_bounds_width": 2,
        "visible_bounds_height": 2.5,
        "visible_bounds_offset": [0, 0.75, 0]
      },
      "bones": [
        {
          "name": "bb_main",
          "pivot": [0, 0, 0],
          "cubes": [
            { "origin": [-8, 0, -8], "size": [16, 16, 16], "uv": [0, 0] }
          ]
        },
        {
          "name": "fish",
          "pivot": [0, -14, 0],
          "cubes": [
            { "origin": [-4, 6, -1], "size": [5, 4, 3], "uv": [0, 34] },
            { "origin": [1, 7, 0], "size": [1, 1, 1], "uv": [0, 41] },
            { "origin": [2, 8, 0], "size": [1, 1, 1], "uv": [0, 41] },
            { "origin": [3, 9, 0], "size": [1, 1, 1], "uv": [0, 41] },
            { "origin": [3, 5, 0], "size": [1, 1, 1], "uv": [0, 41] },
            { "origin": [2, 6, 0], "size": [1, 1, 1], "uv": [0, 41] }
          ]
        }
      ]
    }
  ]
}
- Add the bubble fish texture in the custom_block_resource_pack/textures/blocks folder.

- Add a friendly name in terrain_texture.json by navigating to custom_block_resource_pack/textures and editing the terrain_texture.json file.
- Navigate to custom_block_resource_pack/texts/en_US.lang and add a localized named for the bubble fish.
- Finally, you can add an entry to blocks.json to give this block a sound. Remember, if you are using custom geometry and materials an entry in blocks.json is completely optional, so we did not add one for this block.
Whew, that was a lot to cover... Great work!
Behavior Pack
Create a json file for the custom block
Now it's time to create the behavior pack custom block json file.
{
  "format_version": "1.19.40",
  "minecraft:block": {
    "description": {
      "identifier": "demo:bubble_fish"
    },
    "components": {
      "minecraft:geometry": "geometry.bubble_fish",
      "minecraft:material_instances": {
        "*": {
          "texture": "bubble_fish"
        }
      }
    }
  }
}
As always, we identify the block, reference the geometry, and then include the texture. In this case, we'll use bubble_fish on all sides.
Render methods
Now we're onto the good stuff! Render methods using the material_instances component.
We'll be exploring the render_methods parameter available to textures. The default is opaque, so let's see how that renders our bubble fish block.
Opaque
  "minecraft:material_instances": {
     "*": {
      "texture": "bubble_fish",
      "render_method": "opaque"
     }
    }
As you can see, transparency and translucency are not respected. Those colors are rendered in the nearest opaque color.
Double-Sided
"minecraft:material_instances": {
  "*": {
      "texture": "bubble_fish",
      "render_method": "double_sided"
     }
}
Double-sided disables backface culling.
'Backface culling' is a rendering technique used to improve performance, where only the side of the block that you can see is rendered.
The 'opaque' render method does backface culling by default to improve performance, but if you want the backface to render, or make your block "double sided", you can use the "double_sided" render method.
However, you can only tell the difference between "opaque" and "double_sided" if your head is inside the block. For "opaque," you will NOT be able to see the inside of the block around you. For "double_sided," you WILL be able to see the inside of the block around you. But from the outside, these two render methods look identical.
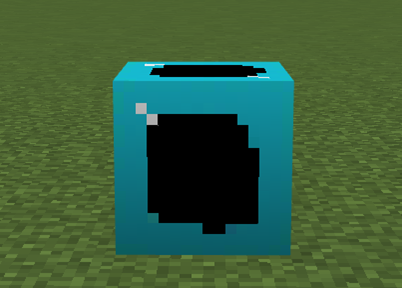
Alpha Test
"minecraft:material_instances": {
  "*": {
       "texture": "bubble_fish",
   "render_method": "alpha_test"
  }
}
Alpha test doesn't respect translucency, which affects the transparent teal pixels of this block. But it does respect transparent and opaque pixels. This render method also disables backface culling, which is why you can see the back of the bubble through the transparent parts. At least we can see the fish!
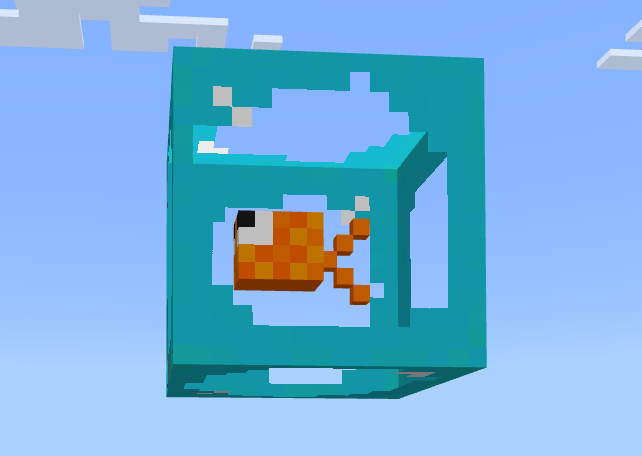
Blend
"minecraft:material_instances": {
  "*": {
    "texture": "bubble_fish",
    "render_method": "blend"
  }
}

Blend allows transparent, translucent, and opaque to show and does backface culling by default, which is why you can not see the backface through the transparent parts.
This render method is perfect for our bubble block that contains all 3 types of pixels: Transparent, translucent, and opaque!
Lighting Options
There are also two different lighting options to explore.
Ambient Occlusion
If true, shadows will be created around and underneath the block.
"minecraft:material_instances": {
     "*": {
      "texture": "bubble_fish",
      "render_method": "blend",
      "ambient_occlusion": true
     }
    }
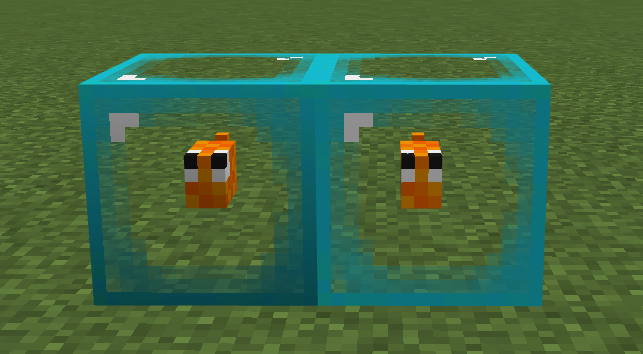
Here you can see our block on the left has ambient occlusion set to 'true,' while the block on the right has ambient occlusion set to 'false.'
Face dimming
Should the material be dimmed by the side it's facing?
"minecraft:material_instances": {
     "*": {
      "texture": "bubble_fish",
      "render_method": "blend",
      "face_dimming": true
     }
    }
Similar to our ambient occlusion example, you can see the block on the left has face dimming set to 'true,' while the right block has the option set to 'false'.
Next Steps
Wow, there's been a lot to explore! We have one more fun, new feature to check out: LARGE BLOCKS!
Feedback
Coming soon: Throughout 2024 we will be phasing out GitHub Issues as the feedback mechanism for content and replacing it with a new feedback system. For more information see: https://aka.ms/ContentUserFeedback.
Submit and view feedback for