Filter a view by using a macro in an Access app
Learn how to filter a view in an Access app by using the RequeryRecords macro action and a data macro.
Important
Microsoft no longer recommends creating and using Access web apps in SharePoint. As an alternative, consider using Microsoft PowerApps to build no-code business solutions for the web and mobile devices.
The default list view in an Access app enables you to filter the issues on values that are contained in the fields. There may be instances where you'd like to filter a view based on a set of conditions instead of by matching a value. To do that you must create a macro. This article shows you how to create a macro that filter a view to display tasks that are past due or due in the next 7 days.
Prerequisites for building an app with Access
To follow the steps in this example, you need:
- Access 2013
- A SharePoint 2013 development environment
Note
For more information about setting up your SharePoint development environment, see Set up a general development environment for SharePoint 2013. For more information about obtaining Access 2013 see Downloads and SharePoint 2013 see Downloads.
Create the app
Suppose you want to create an Access app that tracks tasks for your business. Before you start creating the tables and view, you should search for a schema template.
To create the task tracking app
Open Access and choose Custom web app.
Enter a name and the web location for your app. You can also choose a location from the Locations list and choose Create.
Type tasks into the Search box and then press ENTER.
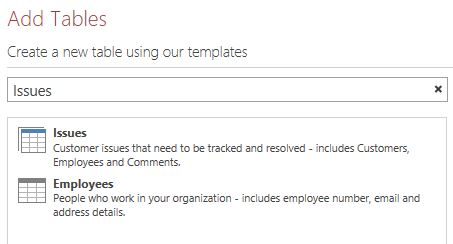
A list of templates that might be useful for tracking tasks is displayed in Figure 1.
Figure 1. Templates that match the search for tasks
Choose Tasks.
Access creates a set of tables and views.
Enter several sample tasks and employees in your app. To do this, choose Launch App to open the app in your web browser. Enter a value in the Due Date field for each task. Return to Access when you're done.
Plan the customizations
You now have an app that contains several tasks. The default view enables you to search for any tasks using items that are stored in the fields displayed in the view. For example, you can search for high-priority issues or issues in progress. Suppose you want to prioritize your work by displaying active issues that are due in the coming week. To do this, you should create a user interface (UI) macro.
The UI macro command that you can use to filter the view is the RequeryRecords Macro Action (Access custom web app). The RequeryRecords macro action filters the view based on the Where argument, which is provided in the form of a SQL WHERE clause. To filter the view, you must supply several facts in a specific format to filter the view.
The relevant facts are:
- The field or fields to compare
- How to refer to today's date
- How to refer to a particular day relative to today's date
- How to determine which on tasks are in progress
The Due Date field provides information about when a task is due. The Status field provides status information about each task. To refer to a field in a macro, use the format [TableName].[FieldName]. Use [Tasks].[Due Date] to refer to the Due Date field and [Tasks].[Status] to refer to the Status field.
The Today Function (Access custom web app) function returns today's date. The DateAdd Function (Access custom web app) function can be used to calculate a date that's a certain number of days after a specified date.
The Status field contains several possible values. A value of Completed indicates that the task is no longer active.
These facts can be combined into the following SQL WHERE clause.
[Tasks].[Due Date]<DateAdd(Day,7,Today()) AND [Tasks].[Status]<>"Completed"
This SQL WHERE clause is used in the macro to filter the view to display active issues that are due in the next 7 days or are past due.
To run the UI macro, it must be attached to an item or an event that occurs in the view. The Action Bar is a convenient place to add a custom command to the view. The Action Bar is a customizable toolbar that appears at the top of each view. By default, the Action Bar contains buttons to add, edit, save, delete, and cancel edits. You can add buttons that perform custom actions, such as filtering the view.
If the view contains records that meet the specified criteria, then RequeryRecords filters the view. However, if the view doesn't contain any records that meet the criteria, than a new, blank record is displayed. If you don't want a blank record to be displayed if no tasks are due in the next week, then you must find a method to check the tasks before you call the RequeryRecords macro action. To do this, create a data macro to check for records that meet the criteria.
The UI macro will call the data macro, which will try to find a task that's due in the next week. If the data macro finds the task then customize the app.
Customize the app
Now that you've determined the customizations, implement them. The data macro should be created first. Some data macros are attached directly to tables. However, this data macro is a stand-alone data macro.
To create the data macro
Open the app in Access.
In the Create group, choose Advanced, and then choose Data Macro.
A blank data macro is opened in macro Design View.
From the Add New Action list box, choose LookupRecord.
In the Look Up A Record In list box, choose Tasks.
In the Where Condition box, enter [Tasks].[Due Date]<DateAdd(Day,7,Today()) AND [Tasks].[Status]<>"Completed".
Choose SetReturnVar from the Add New Action list box.
Note
You'll see two Add New Action list boxes, one within the LookupRecord block, and another outside the LookupRecord block. You should choose the Add New Action list box within the LookupRecord block, as shown in Figure 1.
Figure 1. Add New Action list box

In the Name box, enter TaskFound.
In the Expression box, enter "Yes".
Choose Save. Enter TasksDueSoon in the Macro Name box and then choose OK.
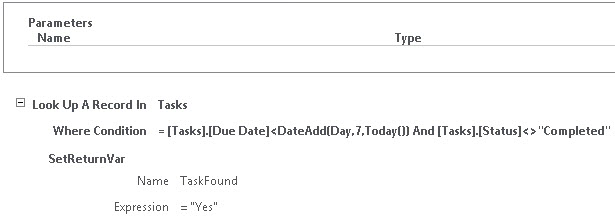
The macro should resemble the macro shown in Figure 2.
Figure 2. TasksDueSoon data macro
Close macro Design View.
Now, we're ready to add a custom button to the Action Bar.
To add a custom button to the Action Bar
Choose the Tasks table. This chooses the Tasks List form.
In the View selector, choose List, choose the Settings/Action icon, and then choose Edit.
The view is opened in Design View.
Now, we're ready to add a custom button to the Action Bar. To do this, choose Add custom action as shown in Figure 3.
Figure 3. Add custom action button

The new action is displayed as a button with a star icon as shown in Figure 4.
Figure 4. New Action Bar button

Choose the custom Action Bar Button, and then choose the Data icon.
The Data dialog box appears.
In the Control Name box, enter FilterTasks.
In the Tooltip box, enter Display tasks past due or due in the next week.
Now, we're ready to create the UI macro that will filter the view.
To create the UI macro to filter the view
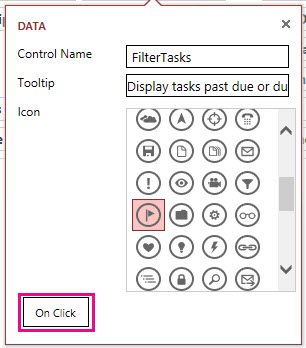
In the Data dialog box, choose On Click as shown in Figure 5.
Figure 5. Data dialog box
A blank UI macro is opened in macro Design View.
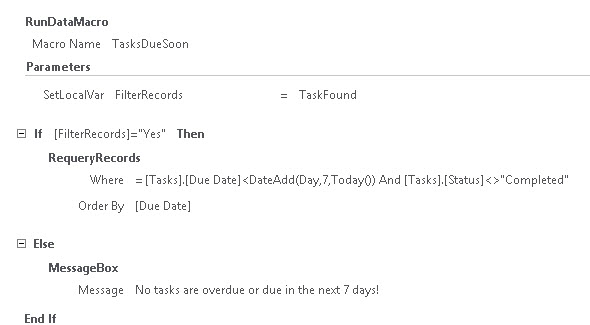
From the Add New Action list box, choose RunDataMacro.
In the Macro Name box, enter TasksDueSoon.
In the SetLocalVar box, enter FilterRecords.
The RunDataMacro action calls the TasksDueSoon data macro we created earlier and stores its result in a variable named FilterRecords.
From the Add New Action list box, choose If.
In the If box, enter [FilterRecords]="Yes".
From the Add New Action list box, choose RequeryRecords.
Note
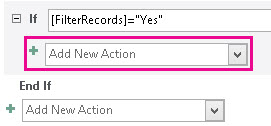
You'll see two Add New Action list boxes, one within the If block, and another outside the If block. You should choose the Add New Action list box within the If block, as shown in Figure 6.
Figure 6. Add New Action list box
In the Where box, enter [Tasks].[Due Date]<DateAdd(Day,7,Today()) AND [Tasks].[Status]<>"Completed".
In the Order By box, enter [Due Date].
Choose the Add Else link that appears to the right side of the Add New Action box as shown in Figure 7.
Figure 7. Add Else link

An Else clause is added to the If block.
From the Add New Action list box, choose MessageBox.
In the Message box, enter No tasks are overdue or due in the next 7 days!.
Choose Save.
The macro should resemble the macro shown in Figure 8.
Figure 8. UI macro to filter the view
Close macro Design View.
At this point, we've created the UI macro that filters the Tasks List view to display the urgent tasks. It wouldn't be polite to leave the view in a filtered state without providing a method to remove the filter. To do this, add another Action Bar button and UI Macro.
To add an Action Bar Button to remove the filter
Choose Add custom action.
The new action is displayed as a button with a star icon
Choose the custom Action Bar button, and then choose the Data icon.
The Data dialog box appears.
In the Control Name box, enter RemoveFilter.
In the Tooltip box, enter Remove all filter applied to the view.
Now, we're ready to create the UI macro that will remove the filter form the view.
To create the UI macro to remove the filter from the view
In the Data dialog box, choose On Click.
A blank UI macro is opened in macro Design View.
From the Add New Action list box, choose RequeryRecords.
This time, we'll leave the Where and Order By boxes empty. Then the RequeryRecords action is called without any parameters, all filters are removed from the view.
Choose Save.
Close macro Design View.
Close the Tasks List view. Choose Yes when you are prompted to save your changes.
Now, we're ready to text the customization. Choose Launch App to open the app in your web browser and then choose the custom FilterTasks Action Bar button. Any tasks past due or due in the next 7 days are displayed. A message is displayed if the app contains no urgent tasks.
Conclusion
You can use the RequeryRecords macro action in a UI macro to filter the view based on the criteria that you choose. Depending on the behavior that you want, you may want to create a data macro to verify that a record meets the criteria before you use the RequeryRecords macro action.