Convert an add-in to use the unified manifest for Microsoft 365
To add Teams capabilities to an add-in that uses the XML manifest, or to just future proof the add-in, you need to convert it to use the unified manifest for Microsoft 365.
There are three basic tasks to converting an add-in project from the XML manifest to the unified manifest.
- Ensure that your add-in is ready to convert.
- Convert the XML manifest itself to the JSON format of the unified manifest.
- Package the new manifest and the two icon image files into a zip file for sideloading or deployment.
Note
Office Add-ins that use the unified manifest for Microsoft 365 are directly supported in Office on the web, in new Outlook on Windows (preview), and in Office on Windows connected to a Microsoft 365 subscription, Version 2304 (Build 16320.00000) or later.
When the app package that contains the unified manifest is deployed in AppSource or the Microsoft 365 Admin Center then, if the manifest has a valid "alternateIcons" property, an XML manifest is generated from the unified manifest and stored. This XML manifest enables the add-in to be installed on platforms that don't directly support the unified manifest, including Office on Mac, Office on mobile, subscription versions of Office on Windows earlier than 2304 (Build 16320.00000), and perpetual versions of Office on Windows.
Note
- Add-ins that use the unified manifest can be sideloaded only on Office Version 2304 (Build 16320.20000) or later.
- Projects created in Visual Studio, as distinct from Visual Studio Code, can't be converted at this time.
- If you created the project with Teams Toolkit or with the "unified manifest" option in the Office Yeoman Generator, it already uses the unified manifest.
Ensure that your add-in is ready to convert
The following sections describe conditions that must be met before you convert the manifest.
Ensure that you have the two image files
When you've added the files to the project, add <IconUrl> and <HighResolutionIconUrl> (in that order) to the XML manifest just below the <Description> element. The following is an example.
<OfficeApp xmlns="http://schemas.microsoft.com/office/appforoffice/1.1" xmlns:xsi="http://www.w3.org/2001/XMLSchema-instance" xsi:type="MailApp">
  <Id>01234567-89ab-cdef-0123-4567-89abcdef0123</Id>
  <Version>1.0</Version>
  <ProviderName>Contoso</ProviderName>
  <DefaultLocale>en-us</DefaultLocale>
  <DisplayName DefaultValue="Great Add-in"/>
  <Description DefaultValue="A great add-in."/>
  <IconUrl DefaultValue="https://localhost:3000/assets/icon-64.png" />
  <HighResolutionIconUrl DefaultValue="https://localhost:300/assets/icon-128.png" />

  <!-- Other markup omitted -->
Ensure that your function command names are short enough
If your manifest has any <FunctionName> elements, make sure their values have fewer than 65 characters. The value of this element must exactly match the name of a function in a JavaScript or TypeScript file. If you change it in the manifest, be sure to change it in the code file too.
Conversion tools and options
There are several ways to carry out the remaining tasks, depending on the IDE and other tools you want to use for your project, and on the tool you used to create the project.
- Convert the project with Teams Toolkit
- Projects created with the Office Yeoman Generator (aka "Yo Office")
- NodeJS and npm projects that aren't created with Yeoman Generator
Convert the project with Teams Toolkit
The easiest way to convert is to use Teams Toolkit.
Prerequisites
- Install Visual Studio Code
- Install Teams Toolkit
Import the add-in project to Teams Toolkit
Open Visual Studio Code and select the Teams Toolkit icon on the Activity Bar.

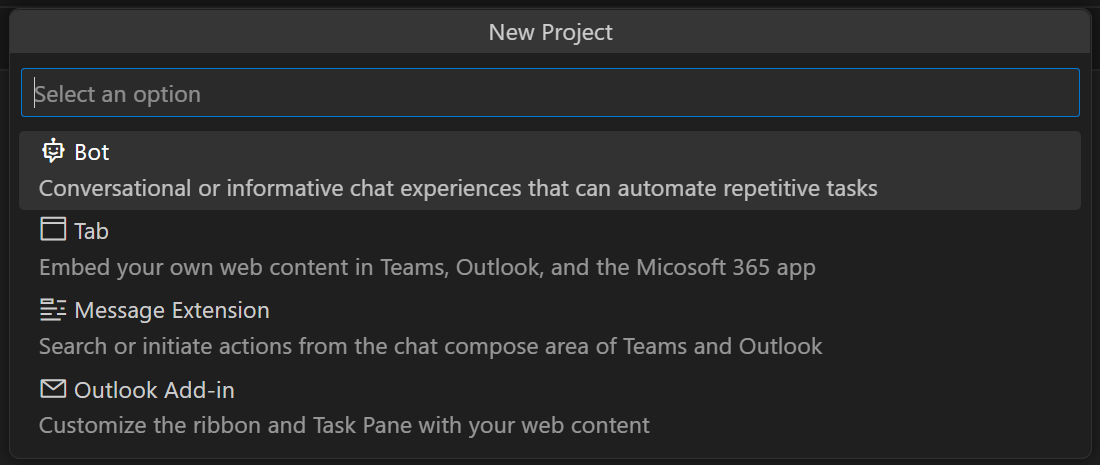
Select Create a new app.
In the New Project drop down, select Outlook Add-in.
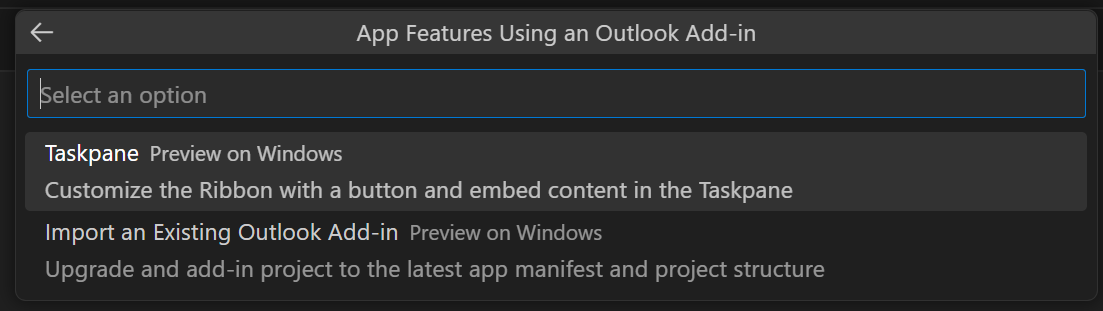
In the App Features Using an Outlook Add-in drop down, select Import an Existing Outlook Add-in.
In the Existing add-in project folder drop down, browse to the root folder of the add-in project.
In the Select import project manifest file drop down, browse to the XML manifest file.
In the Workspace folder dialog, select the folder where you want to put the converted project.
In the Application name dialog, give a name to the project (with no spaces). Teams Toolkit creates the project with your source files and scaffolding. It then opens the project in a second Visual Studio Code window. Close the original Visual Studio Code window.
Sideload the add-in in Visual Studio Code
You can sideload the add-in using the Teams Toolkit or in a command prompt, bash shell, or terminal.
Sideload with the Teams Toolkit
- First, make sure Outlook desktop is closed.
- In Visual Studio Code, open the Teams Toolkit.
- In the ACCOUNTS section, verify that you're signed into Microsoft 365.
- Select View | Run in Visual Studio Code. In the RUN AND DEBUG drop down menu, select the option, Outlook Desktop (Edge Chromium), and then press F5. The project builds and a Node dev-server window opens. This process may take a couple of minutes and then Outlook desktop opens.
- You can now work with your add-in. Be sure you're working in the Inbox of your Microsoft 365 account identity.
Sideload with a system prompt, bash shell, or terminal
- First, make sure Outlook desktop is closed.
- Open a system prompt, bash shell, or the Visual Studio Code TERMINAL, and navigate to the root of the project.
- Run the command
npm run start:desktop. The project builds and a Node dev-server window opens. This process may take a couple of minutes then Outlook desktop opens. - You can now work with your add-in.
Projects created with the Office Yeoman Generator (aka "Yo Office")
If the project was created with the Office Yeoman Generator and you don't want to use the Teams Toolkit, convert it using the following steps.
In the root of the project, open a command prompt or bash shell and run the following command. This converts the manifest and updates the package.json to specify current tooling packages. The new unified manifest is in the root of the project and the old XML manifest is in a backup.zip file. For details about this command, see Office-Addin-Project.
npx office-addin-project convert -m <relative-path-to-XML-manifest>Run
npm install.To sideload the add-in, run
npm run start:desktop. This command puts the unified manifest and the two image files into a zip file and sideloads it to the Office application. It also starts server in a separate NodeJS window to host the add-in files on localhost.
NodeJS and npm projects that aren't created with Yeoman Generator
If you don't want to use the Teams Toolkit and your project wasn't created with the Office Yeoman generator, use the office-addin-manifest-converter tool.
In the root of the project, open a command prompt or bash shell and run the following command. This command puts the unified manifest in a subfolder with the same name as the filename stem of the original XML manifest. For example, if the manifest is named MyManifest.xml, the unified manifest is created at .\MyManifest\MyManifest.json. For more details about this command, see Office-Addin-Manifest-Converter.
npx office-addin-manifest-converter convert -m <relative-path-to-XML-manifest>
Once you have the unified manifest created, there are two ways to create the zip file and sideload it. They are described in the next two subsections.
Sideload with the Office-Addin-Debugging tool
To sideload the add-in, run the following command. This command puts the unified manifest and two default icon image files into a zip file and sideloads it to the Office application. It also starts a server in a separate NodeJS window to host the add-in files on localhost. Note that you pass the path to the unified manifest that you created in the previous step. For more details about this command, see Office-Addin-Debugging.
npx office-addin-debugging start <relative-path-to-unified-manifest> desktopWhen you use office-addin-debugging to start an add-in, always stop the session with the following command. Closing the server window doesn't reliably stop the server and closing the Office application doesn't reliably cause Office to unacquire the add-in.
npx office-addin-debugging stop <relative-path-to-unified-manifest>
Sideload with the Teams Toolkit CLI (command-line interface)
Manually create the zip package using the following steps.
- Open the unified manifest and scroll to the "icons" property. Note the relative path of the two image files.
- Use any zip utility to create a zip file that contains the unified manifest and the two image files. The image files must have the same relative path in the zip file as they do in the project. For example, if the relative path is "assets/icon-64.png" and "assets/icon-128.png", then you must include the "assets" folder with the two files in the zip package.
- If the folder contains other files, such as image files used in the Office ribbon, remove these from the zip package. It should have only the two image files specified in the "icons" property (in addition to the manifest in the root of the zip package).
In the root of the project, open a command prompt or bash shell and run the following commands.
npm install -g @microsoft/teamsfx-cli

teamsfx m365 sideloading --file-path <relative-path-to-zip-file>
Office Add-ins
Feedback
Coming soon: Throughout 2024 we will be phasing out GitHub Issues as the feedback mechanism for content and replacing it with a new feedback system. For more information see: https://aka.ms/ContentUserFeedback.
Submit and view feedback for