Sideload Office Add-ins for testing from a network share
You can test an Office Add-in in an Office client that's on Windows by publishing the manifest to a network file share (instructions follow). This deployment option is intended to be used when you've completed development and testing on a localhost and want to test the add-in from a non-local server or cloud account.
Important
Deployment by network share isn't supported for production add-ins. This method has the following limitations.
- The add-in can only be installed on Windows computers.
- If a new version of an add-in changes the ribbon, such as by adding a custom tab or custom button to it, each user will have to reinstall the add-in.
Note
If your add-in project was created with a sufficiently recent version of the Yeoman generator for Office Add-ins, the add-in will automatically sideload in the Office desktop client when you run npm start.
This article applies only to testing Word, Excel, PowerPoint, and Project add-ins and only on Windows. If you want to test on another platform or want to test an Outlook add-in, see one of the following topics to sideload your add-in.
- Sideload Office Add-ins in Office on the web for testing
- Sideload Office Add-ins on Mac for testing
- Sideload Office Add-ins on iPad for testing
- Sideload Outlook add-ins for testing
The following video walks you through the process of sideloading your add-in in Office on the web or desktop using a shared folder catalog.
Share a folder
In File Explorer on the Windows computer where you want to host your add-in, go to the parent folder, or drive letter, of the folder you want to use as your shared folder catalog.
Open the context menu for the folder you want to use as your shared folder catalog (for example, right-click the folder) and choose Properties.
Within the Properties dialog window, open the Sharing tab and then choose the Share button.

Within the Network access dialog window, add yourself and any other users and/or groups with whom you want to share your add-in. You'll need at least Read/Write permission to the folder. After you've finished choosing people to share with, choose the Share button.
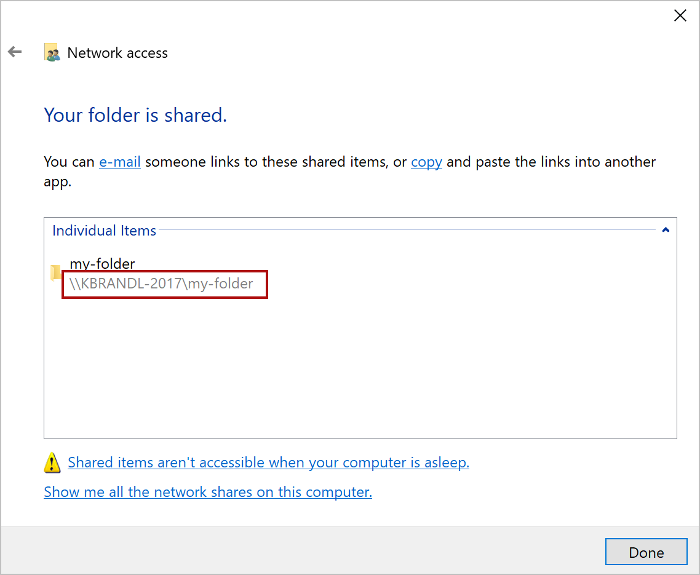
When you see the Your folder is shared confirmation, make note of the full network path that's displayed immediately following the folder name. (You'll need to enter this value as the Catalog Url when you specify the shared folder as a trusted catalog, as described in the next section of this article.) Choose the Done button to close the Network access dialog window.
Choose the Close button to close the Properties dialog window.
Specify the shared folder as a trusted catalog
There are two options for how you specify this trust. Follow the instructions for the option that works better for your setup.
Configure the trust manually
Open a new document in Excel, Word, PowerPoint, or Project.
Choose the File tab, and then choose Options.
Choose Trust Center, and then choose the Trust Center Settings button.
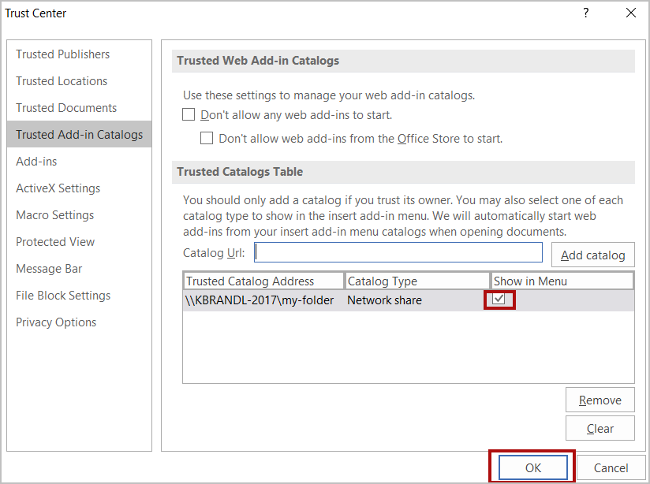
Choose Trusted Add-in Catalogs.
In the Catalog Url box, enter the full network path to the folder that you shared previously. If you failed to note the folder's full network path when you shared the folder, you can get it from the folder's Properties dialog window, as shown in the following screenshot.

After you've entered the full network path of the folder into the Catalog Url box, choose the Add catalog button.
Select the Show in Menu check box for the newly-added item, and then choose the OK button to close the Trust Center dialog window.
Choose the OK button to close the Options dialog window.
Close and reopen the Office application so your changes will take effect.
Configure the trust with a Registry script
In a text editor, create a file named TrustNetworkShareCatalog.reg.
Add the following content to the file.
Windows Registry Editor Version 5.00

[HKEY_CURRENT_USER\Software\Microsoft\Office\16.0\WEF\TrustedCatalogs\{-random-GUID-here-}]
"Id"="{-random-GUID-here-}"
"Url"="\\\\-share-\\-folder-"
"Flags"=dword:00000001
Use one of the many online GUID generation tools, such as GUID Generator, to generate a random GUID, and within the TrustNetworkShareCatalog.reg file, replace the string "-random-GUID-here-" in both places with the GUID. (The enclosing
{}symbols should remain.)Replace the
Urlvalue with the full network path to the folder that you shared previously. (Note that any\characters in the URL must be doubled.) If you failed to note the folder's full network path when you shared the folder, you can get it from the folder's Properties dialog window, as shown in the following screenshot.The file should now look like the following. Save it.
Windows Registry Editor Version 5.00

[HKEY_CURRENT_USER\Software\Microsoft\Office\16.0\WEF\TrustedCatalogs\{01234567-89ab-cedf-0123-456789abcedf}]
"Id"="{01234567-89ab-cedf-0123-456789abcedf}"
"Url"="\\\\TestServer\\OfficeAddinManifests"
"Flags"=dword:00000001
Close all Office applications.
Run the TrustNetworkShareCatalog.reg just as you would any executable, such as double-clicking it.
Sideload your add-in
Put the manifest XML file of any add-in that you're testing into the shared folder catalog. Note that you deploy the web application itself to a web server. Be sure to specify the URL in the <SourceLocation> element of the manifest file.
Important
While not strictly required in all add-in scenarios, using an HTTPS endpoint for your add-in is strongly recommended. Add-ins that are not SSL-secured (HTTPS) generate unsecure content warnings and errors during use. If you plan to run your add-in in Office on the web or publish your add-in to AppSource, it must be SSL-secured. If your add-in accesses external data and services, it should be SSL-secured to protect data in transit. Self-signed certificates can be used for development and testing, so long as the certificate is trusted on the local machine.
Note
For Visual Studio projects, use the manifest built by the project in the
{projectfolder}\bin\Debug\OfficeAppManifestsfolder.In Excel, Word, or PowerPoint, select Home > Add-ins from the ribbon, then select Get Add-ins. In Project, select My Add-ins on the Project tab of the ribbon.
Choose SHARED FOLDER at the top of the Office Add-ins dialog box.
Select the name of the add-in and choose Add to insert the add-in.
Remove a sideloaded add-in
You can remove a previously sideloaded add-in by clearing the Office cache on your computer. Details on how to clear the cache on Windows can be found in the article Clear the Office cache.
See also
Office Add-ins
Feedback
Coming soon: Throughout 2024 we will be phasing out GitHub Issues as the feedback mechanism for content and replacing it with a new feedback system. For more information see: https://aka.ms/ContentUserFeedback.
Submit and view feedback for