Force a Word document to open in edit mode from an email link
This article was written by Warren Rath, Support Escalation Engineer.
By default, when you open a Microsoft Word document from a hyperlink in an email message, Word opens the document in read-only mode. However, you can update the hyperlink to force Word to open the document in edit mode. This article describes how to make this change by using a SharePoint workflow email task.
Update a hyperlink by using a SharePoint workflow email task
In SharePoint Designer, open the Define E-mail Message dialog box.
Select the hyperlink to the document, and then click the hyperlink edit button
 .
.
Add ms-word:ofe|u| to the beginning of the hyperlink address, such as the following example:
ms-word:ofe|u|[%Task Process:Web URL%]/[%Task Process:Item URL%]

Note
You can use this method for plain hyperlinks. For example, use "ms-word:ofe|u|http://sharepointserver/library/testdocument.docx" instead of "http://sharepointserver/library/testdocument.docx".
Save and publish your workflow.
Add a "ms-word:" registry key to suppress Microsoft Outlook Security Notice
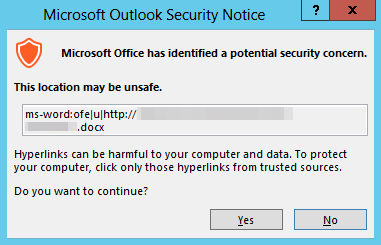
After you update the hyperlink by using the previous steps, you may receive the following warning when you use the new hyperlink:
Microsoft Outlook Security Notice
Microsoft Office has identified a potential security concern.

To suppress this notification, add the ms-word: registry key, as follows:
Important
Follow the steps in this section carefully. Serious problems might occur if you modify the registry incorrectly. Before you modify it, back up the registry for restoration in case problems occur.
Exit all Microsoft Office applications.
Start Registry Editor:
- In Windows 10, go to Start, enter regedit in the Search box, and then select regedit.exe in the search results.
- In Windows 8 or Windows 8.1, move your mouse to the upper-right corner, select Search, enter regedit in the search text box, and then select regedit.exe in the search results.
- In Windows 7, select Start, enter regedit in the Start Search box, and then select regedit.exe in the search results.
Locate and then select the following registry subkey (if the subkey does not exist, create it manually):
HKEY_CURRENT_USER\Software\Policies\Microsoft\Office\16.0\Common\Security\Trusted Protocols\All ApplicationsNote
This subkey is for Office 2016 and later versions (including Microsoft 365 Apps). If you are using Office 2013, change 16.0 to 15.0. If you are using Office 2010, change 16.0 to 14.0.
On the Edit menu, point to New, and then select Key.
Enter ms-word:, and then press Enter.
Exit Registry Editor.
Feedback
Coming soon: Throughout 2024 we will be phasing out GitHub Issues as the feedback mechanism for content and replacing it with a new feedback system. For more information see: https://aka.ms/ContentUserFeedback.
Submit and view feedback for