Outlook doesn't display more than 12 months of your own free/busy data
Original KB number: 2799216
Symptoms
When you use Microsoft Outlook 2010 or later versions to connect to a mailbox that's located on a server that's running Microsoft Exchange Server 2010 or a later version, you can see only two months of free/busy full meeting details and 10 months of free/busy data (for a total of 12 months). However, when you use Outlook Web App to view your free/busy information, you can see free/busy data beyond those 12 months. Additionally, if you use Outlook to view other users' free/busy information, you can also see their free/busy information beyond 12 months.
Cause
By default, Outlook 2010 and later versions are configured to publish two months of your full meeting details and free/busy data for the next 10 months, for a total of 12 months. Outlook uses data from the Calendar to dynamically generate a local copy of free/busy data. Outlook does not read free/busy data as a stream of data from the Schedule+ Free/Busy public folder (system folder), nor does it use the Availability service.
Workaround
To work around this issue, change the months setting for your own full-meeting details or free/busy data that you see. To do this, use one of the following methods.
Method 1 - Change the months setting in Outlook
To change the number of months for which Calendar free/busy information is published on the server, follow these steps:
In Outlook, select File, and then select Options.
Select Calendar.
In the Calendar options section, select Free/Busy Options.
Select Other Free/Busy.
Change the months setting for publishing Calendar free/busy information. To do this, follow the steps for your version of Outlook.
Outlook 2019, Outlook 2016, and Outlook 2013
Note
To set the Other Free/Busy, you first have to bring back the option by creating the following registry entry.
Registry subkey Type Value HKCU\Software\Microsoft\Office\16.0\Outlook\Options\Calendar\ShowLegacySharingUX REG_DWORD 1 If the Publish at location check box is not selected, select it. This makes the option active in the next step to set the number of months to publish.
Enter the number of months that you want in the Publish <months> of Calendar free/busy information box.
If the Publish at location option was previously inactive, clear the check box to make it inactive again.

Select OK.
Outlook 2010
Enter the number of months that you want in the Publish <months> of Calendar free/busy information on the server box.
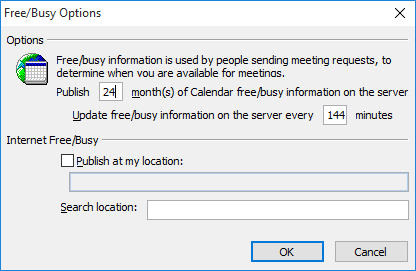
Select OK.
Select OK two more times.
Method 2 - Use the registry
Important
Follow the steps in this section carefully. Serious problems might occur if you modify the registry incorrectly. Before you modify it, back up the registry for restoration in case problems occur.
Change the registry to set the FBPublishRange value, as follows:
Start Registry Editor.
Locate and select the following registry subkey:
HKEY_CURRENT_USER\Software\Policies\Microsoft\Office\**x.0**\Outlook\PreferencesNote
- The x.0 placeholder represents your version of Office (16.0 = Office 2016 or Office 2019, 15.0 = Office 2013, 14.0 = Office 2010).
- Create the \Preferences registry subkey if it does not exist.
Add the following registry data to this subkey:
Value type: DWORD
Value name: FBPublishRange
Value data: (select Decimal, and then set the desired number of months).Exit Registry Editor.
When Outlook 2010 or a later version connects to an Exchange 2010 mailbox, Outlook reads the FBPublishRange key to determine how many months of local full meeting details data to display. The following examples describe the results of various settings:
- FBPublishRange = 2 months. Result: You see full meeting details for two months and free/busy data for the remaining 10 months, for a total of 12 months.
- FBPublishRange = 10 months. Result: You see full meeting details for 10 months, and free/busy data for the remaining two months, for a total of 12 months.
- FBPublishRange = 24 months. Result: You see full meeting details for 24 months.
Note
The number of months in the FBPublishRange key must be specified in decimal format. If you specify 24 months in decimal, it appears as 18 in Hexadecimal, as shown in the following screenshot.

Feedback
Coming soon: Throughout 2024 we will be phasing out GitHub Issues as the feedback mechanism for content and replacing it with a new feedback system. For more information see: https://aka.ms/ContentUserFeedback.
Submit and view feedback for