Add pins to 3D models in Power Apps
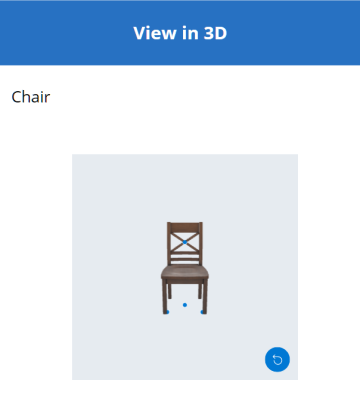
Add pins (shown as circular markers) to 3D models in your canvas apps. Users can add their own pins and view information about pins they select.
Add predefined pins to a 3D model from an Excel workbook
The easiest way to add pins to a 3D model is to load them from an Excel workbook.
The data source for the pins must be a named table in Excel. The table must have four columns. Each column corresponds to a property of the 3D object control. Each row is plotted as a pin on the model. The rows determine the placement of the pins in a three-dimensional coordinate system.
Important
The mixed-reality (MR) controls in Power Apps use a left-handed coordinate system.
| Column | Corresponds to |
|---|---|
| Label | ItemsLabels |
| X | PinsX |
| Y | PinsY |
| Z | PinsZ |
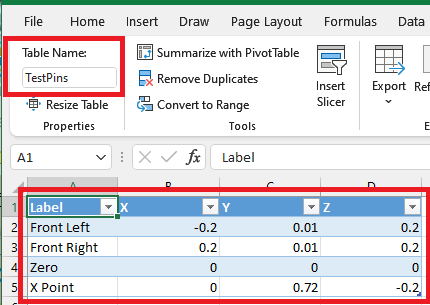
Here's an example of a table named "TestPins" that contains coordinates to place four pins on a 3D model:
To try this example, start by creating a table in Excel.
Copy the following sample data and paste it in cell A1 of a new Excel worksheet.
Label X Pins Y Pins Z Pins Front Left -0.2 0.01 0.2 Front Right 0.2 0.01 0.2 Zero 0 0 0 X Point 0 0.72 -0.2 Select one of the pasted cells. On the Home tab, select Format as Table, choose a style, and then select OK.
On the Table Design tab under Table Name, enter a name such as TestPins.
Save the workbook and close it.
Next, add the table as a data source to display pins on a 3D model.
- In Power Apps Studio, insert a 3D model or select an existing model.
- Set the 3D object control's Source property to https://raw.githubusercontent.com/microsoft/experimental-pcf-control-assets/master/chair.glb (or any other model file of your choosing).
Note
The first instance of the 3D object control is named 3DObject1 by default and that's the name we'll use in the following examples. Additional instances of the control would be referred to as ViewIn3D2, ViewIn3D3, and so on.
- On the model's Properties tab, select the Pins(Items) dropdown list.
- Type excel in the search box, and then select Import from Excel.
- Locate the Excel workbook you saved earlier and open it.
- Select the name you gave the table in Excel and then select Connect.
- On the Advanced tab, find PinsX, PinsY, and PinsZ and enter the name of the corresponding column in the table. (In this example, enter Label in ItemsLabels, X in PinsX, and so on.) Enclose the column name in quotation marks.
Pins appear on the model at the locations described by the coordinates.
Show the label and coordinates of pins on a 3D model
Use a data table to display the label and coordinates of selected pins in a canvas app.

With your app open for editing in Power Apps Studio:
Open the Insert tab and expand Layout.
Select Data table to place a table in the app screen, or drag the control to the screen to position it more precisely.
Choose to show information about all pins or only the selected pin. With the data table selected:
Show all pins: In the Properties pane, select the Pins(Items) dropdown list and select the Excel table you connected to earlier.
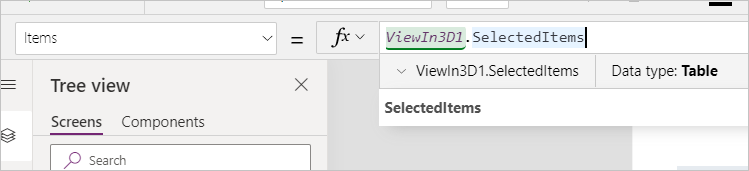
Show the selected pin only: In the Power Apps Studio expression editor, enter 3DObject1.SelectedItems.
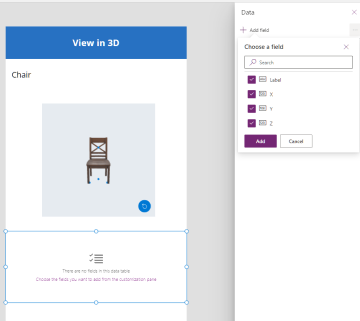
On the Properties pane, select Edit fields, and then select Add field.
Select the columns to show, and then select Add.
Show the label of a selected pin on a 3D model
Use a text box to display just the label of the selected pin in a canvas app.
With your app open for editing in Power Apps Studio:
- Open the Insert tab.
- Select Text label to place a text box in the app screen, or drag the control to the screen to position it more precisely.
- In the expression editor, enter 3DObject1.Selected.Label.
Create a collection to let users add their own pins to a 3D model
If you want to allow users to place pins on a 3D model, use a collection.
With your app open for editing in Power Apps Studio:
Open the Insert tab.
Select Text input to place a text entry box in the app screen.
Copy the text box and paste it three times to create four text input controls.
Set the Default property for each control to X, Y, Z, and Label, respectively.
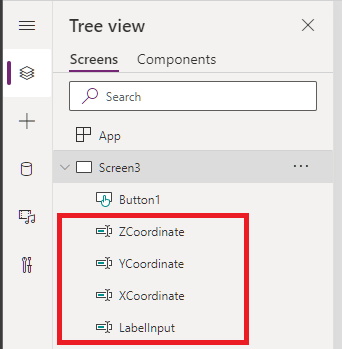
Open the Tree view tab.
Rename each control, as appropriate, to XCoordinate, YCoordinate, ZCoordinate, and LabelInput.
Next, add a button to append the user's data to the pin collection.
Open the Insert tab.
Select Button to place a button in the app screen.
Set the button's Text property to Add pin.
Enter the following code in the button's OnSelect property, exactly as shown:
Collect(
PinsCollection,
  {
    X: XCoordinate.Text,
    Y: YCoordinate.Text,
    Z: ZCoordinate.Text,
    Label: LabelInput.Text
  }
)
Now you'll change the data source of the pins from the Excel table to the new collection.
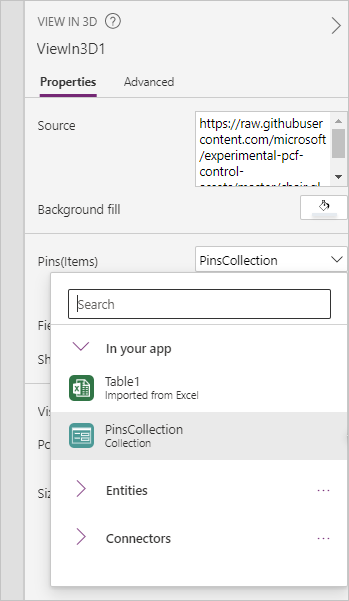
Select the 3D model.
On the Properties tab, select the Pins(Items) dropdown list, and then select PinsCollection.
On the Advanced tab, find PinsX, PinsY, and PinsZ and set them to X, Y, and Z, respectively.
When the user enters coordinates and a label and selects Add pin, a labeled pin is placed on the model at the entered coordinates.
Show information about pins as they're added to a 3D model
Finally, combine the previous examples by displaying information about the pins as the user adds them.
With your app open for editing in Power Apps Studio:
- Add a data table to the screen.
- On the Properties tab, select the Pins(Items) dropdown list and select PinsCollection.
- Select Edit fields, and then select Add field.
- Select the columns to show in the table, and then select Add.
Other mixed reality controls
- View 3D content in mixed reality with the View in MR control.
- Measure distance, area, and volume with the Measuring Camera control.
- Create and view predefined 3D shapes with the View shape in MR control.
- Paint 3D lines or draw 3D arrows to specify an area or asset in your environment with the Markup in MR control.
Feedback
Coming soon: Throughout 2024 we will be phasing out GitHub Issues as the feedback mechanism for content and replacing it with a new feedback system. For more information see: https://aka.ms/ContentUserFeedback.
Submit and view feedback for