Responding to Data Subject Rights (DSR) requests for Microsoft Dataverse customer data
The European Union (EU) General Data Protection Regulation (GDPR) gives significant rights to individuals regarding their data. Refer to the Microsoft Learn General Data Protection Regulation Summary for an overview of GDPR, including terminology, an action plan, and readiness checklists to help you meet your obligations under GDPR when using Microsoft products and services.
You can learn more about GDPR and how Microsoft helps support it and our customers who are affected by it.
- The Microsoft Trust Center provides general information, compliance best practices, and documentation helpful to GDPR accountability, such as Data Protection Impact Assessments, Data Subject Requests, and data breach notification.
- The Service Trust portal provides information about how Microsoft services help support compliance with GDPR.
This article provides examples of steps you can take to support privacy compliance when using Power Apps, Power Automate, and Dataverse. You'll learn how to use Microsoft products, services, and administrative tools to help controller customers find, access, and act on personal data in the Microsoft cloud in response to Data Subject Rights (DSR) requests.
The following actions are covered in this article:
Discover — Use search and discovery tools to more easily find customer data that may be the subject of a DSR request. Once potentially responsive documents are collected, you can perform one or more of the following DSR actions to respond to the request. Alternatively, you may determine that the request doesn't meet your organization's guidelines for responding to DSR requests.
Access — Retrieve personal data that resides in the Microsoft cloud and, if requested, make a copy of that data available to the data subject.
Rectify — Make changes or implement other requested actions on the personal data, where applicable.
Restrict — Restrict the processing of personal data, either by removing licenses for various online services or turning off the desired services where possible. You can also remove data from the Microsoft cloud and retain it on-premises or at another location.
Delete — Permanently remove personal data that resides in the Microsoft cloud.
Export — Provide an electronic copy (in a machine-readable format) of personal data to the data subject.
Dataverse customer data
Important
Applies to both Dataverse and the previous version of Dataverse.
Dataverse and the previous version of Dataverse have separate processes for interacting with personal data.
You can identify which type of environment you have by logging into Power Apps and following these steps:
In the Environment drop-down list, select your environment.
In the navigation pane, select Dataverse, and then select Tables.
Your environment is Dataverse if you see the following tables listed:

After you determine which type of environment you have, follow the steps in the following sections to identify personal data.
Note
You may have some environments in Dataverse and others in the previous version of Dataverse, so you'll need to repeat the processes outlined below for each environment in your organization.
User personal data in Dataverse
Prerequisites
You must create users in the Microsoft 365 admin center and assign them an appropriate user license and security role before they can access and use Dataverse.
Standard user personal data (for example, UserName, UserID, Phone, Email, and Address) is kept and maintained in the Microsoft 365 admin center. System administrators can update this personal data only in the Microsoft 365 admin center, and the data is then automatically synced to the Dataverse system User table in all environments. System administrators can also create custom attributes to capture additional user personal data within the Dataverse system User table, and then manually maintain and manage these attributes.
To avoid interruption to business applications that may be critical to your organization's operations, a user's rows are not automatically removed from the Dataverse system User table when that user is deleted from within the Microsoft 365 admin center. The user's status is set to Disabled in Dataverse, but a Dataverse System Administrator must locate and remove the user's personal data from Dataverse within the application.
Only Global admin and Dataverse System Administrators can perform the discover, rectify, export, and delete actions listed below.
Discover
System Administrators can create multiple environments. These environments can be used for trial, development, or production purposes. Each of these environments has a copy of the system User table with any custom attributes that may have been added by the system administrator, as well as the user personal data synced from the Microsoft 365 admin center.
System administrators can find a list of all the environments by navigating to the Microsoft Power Platform admin center.
You can find personal data from Dataverse users within the following resources:
| Resource | Purpose | Website access | Programmatic access |
|---|---|---|---|
| Table row | Known as the system User table, it stores a user's personal data. | Power Platform admin center | Through the Web API |
| Audit history | Allows customers to identify resources that users created, accessed, changed, or deleted at an table level. | Power Platform admin center | Through the Web API |
User
User personal data is stored in the Microsoft Entra and is automatically synced to all environments with a Dataverse database. System administrators cannot update this personal data directly in Dataverse while the user is active—they must update the data from within the Microsoft 365 admin center. System administrators can add personal data (for example, custom attributes) directly to Dataverse, but they must manually manage this data.
To find a user and their personal data, go to the Power Platform admin center and do the following:
Select Environments, and then select an environment from the list.
Go to Settings > Users + permissions > Users.
Enter the name of the user in the Search box, and select Enter.
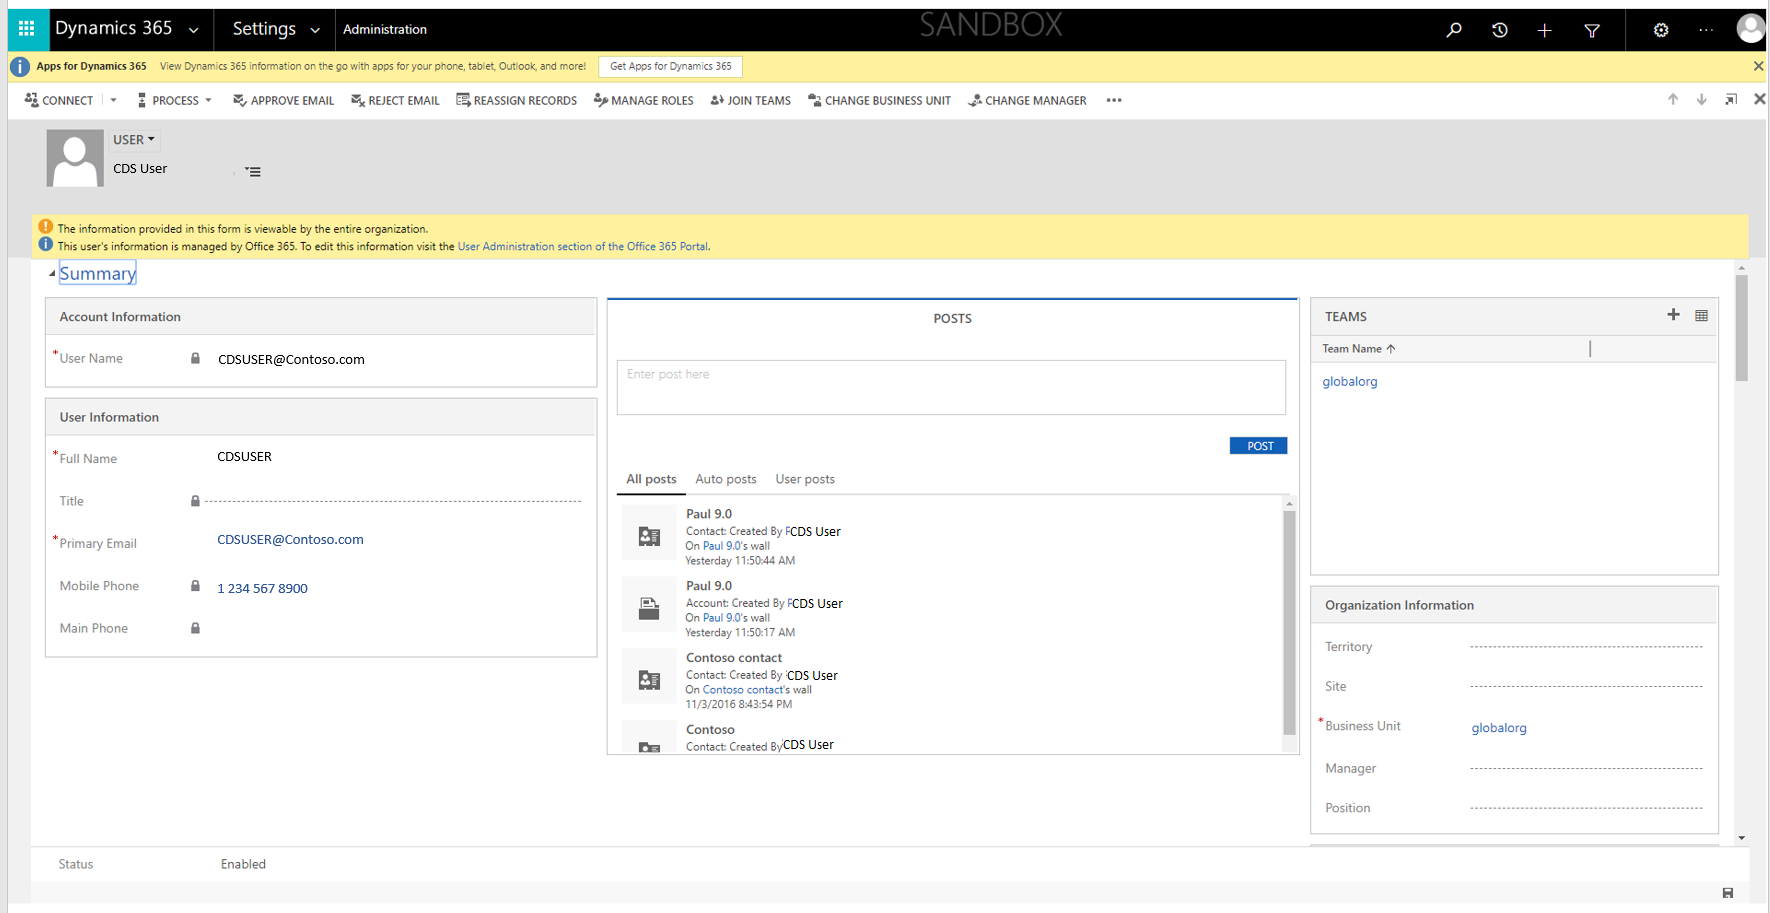
To view the user's personal data, select the user's name by clicking or double-tapping.
To make changes to the Contact Information, expand on the ellipse and click Manage user in Dynamics 365
Audit history
When audit tracking is enabled for a table in Dataverse, a user's personal data is logged in the audit history along with the actions that the user performs.
Rectify
If a data subject asks you to rectify the personal data that resides in your organization's data, you and your organization must determine whether it's appropriate to honor the request. Rectifying data may include editing, redacting, or removing personal data from a document or other type of item.
You can use Microsoft Entra to manage the identities (personal data) of your users within Dataverse. Enterprise customers can manage DSR rectify requests by using the limited editing features within a given Microsoft service. As a data processor, Microsoft does not offer the ability to correct system-generated logs, because they reflect factual activities and constitute a historical record of events within Microsoft services.
Once a user row is deleted from Microsoft Entra ID, System Administrators can then remove any remaining personal data related to that user (such as custom attributes) from all the environments.
Export
System user
You can export a user's personal data stored in the system User table to Excel from the user list within the administration center.
From the Power Platform admin center, do the following:
Select Environments, and then select an environment from the list.
Select Open environment.
Go to Settings > Security, and then select Enabled Users View.
Select Export to Excel.
Audit history
You can take screenshots of the audit history from within the administration center.
From the Power Platform admin center, do the following:
Select Environments, and then select an environment from the list.
Select Open environment.
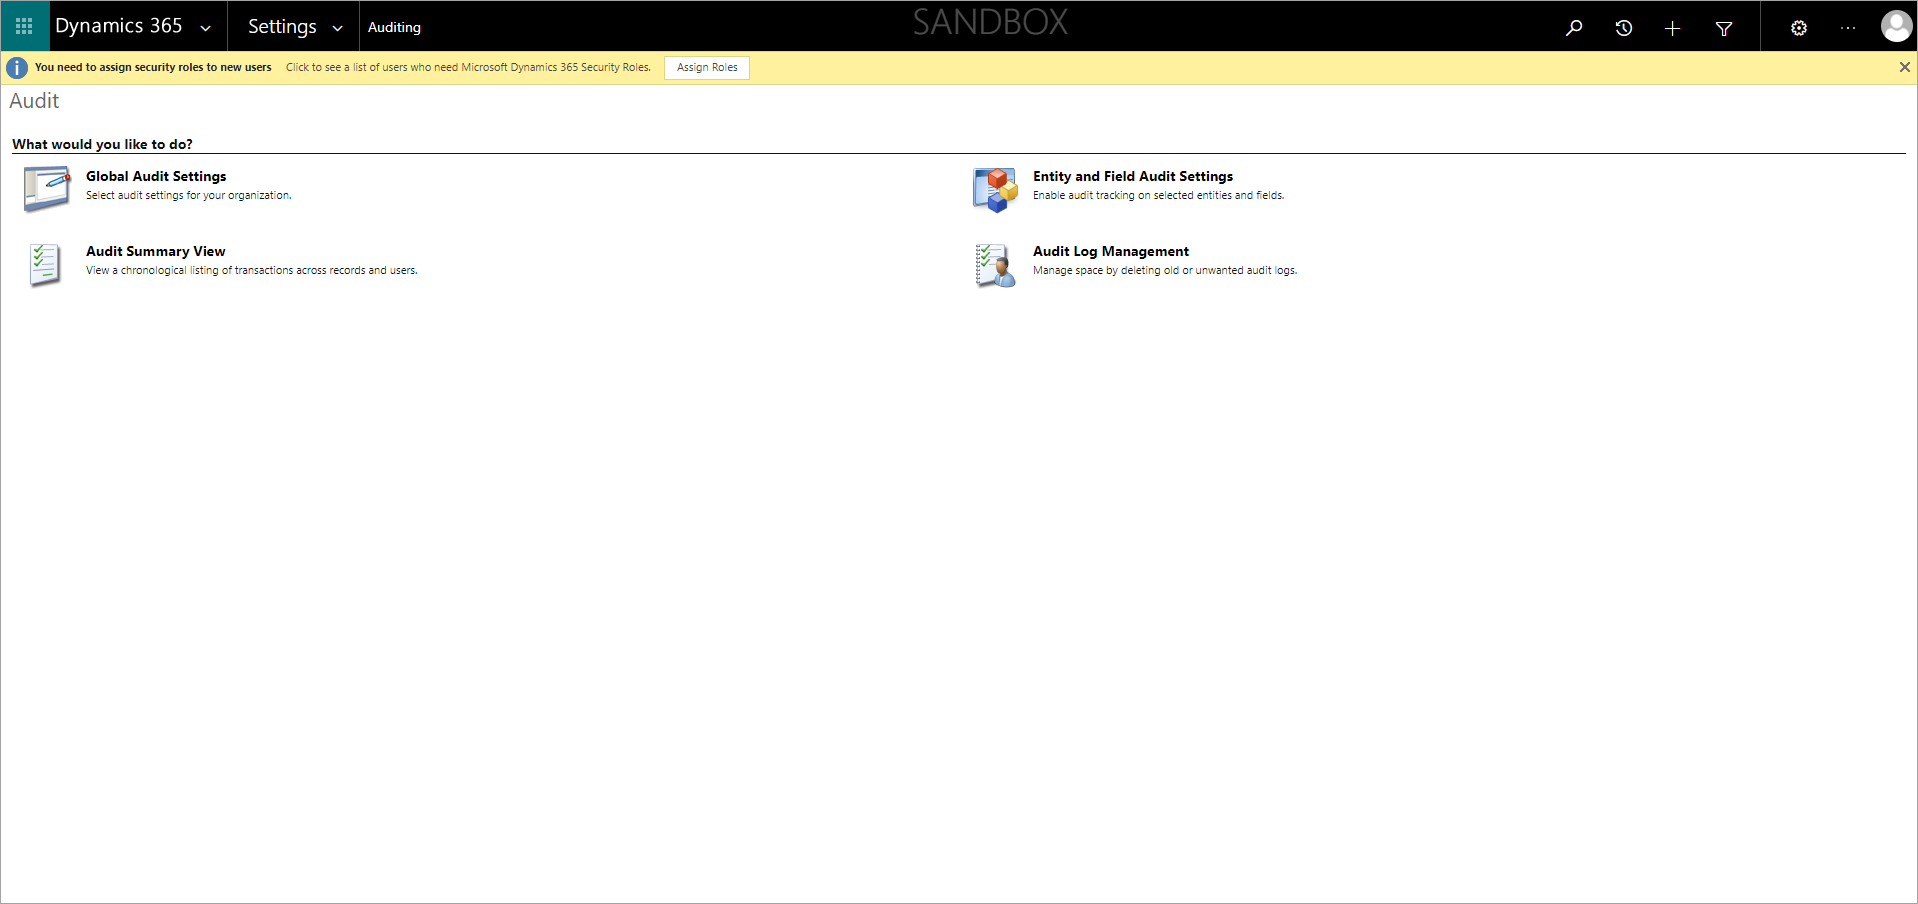
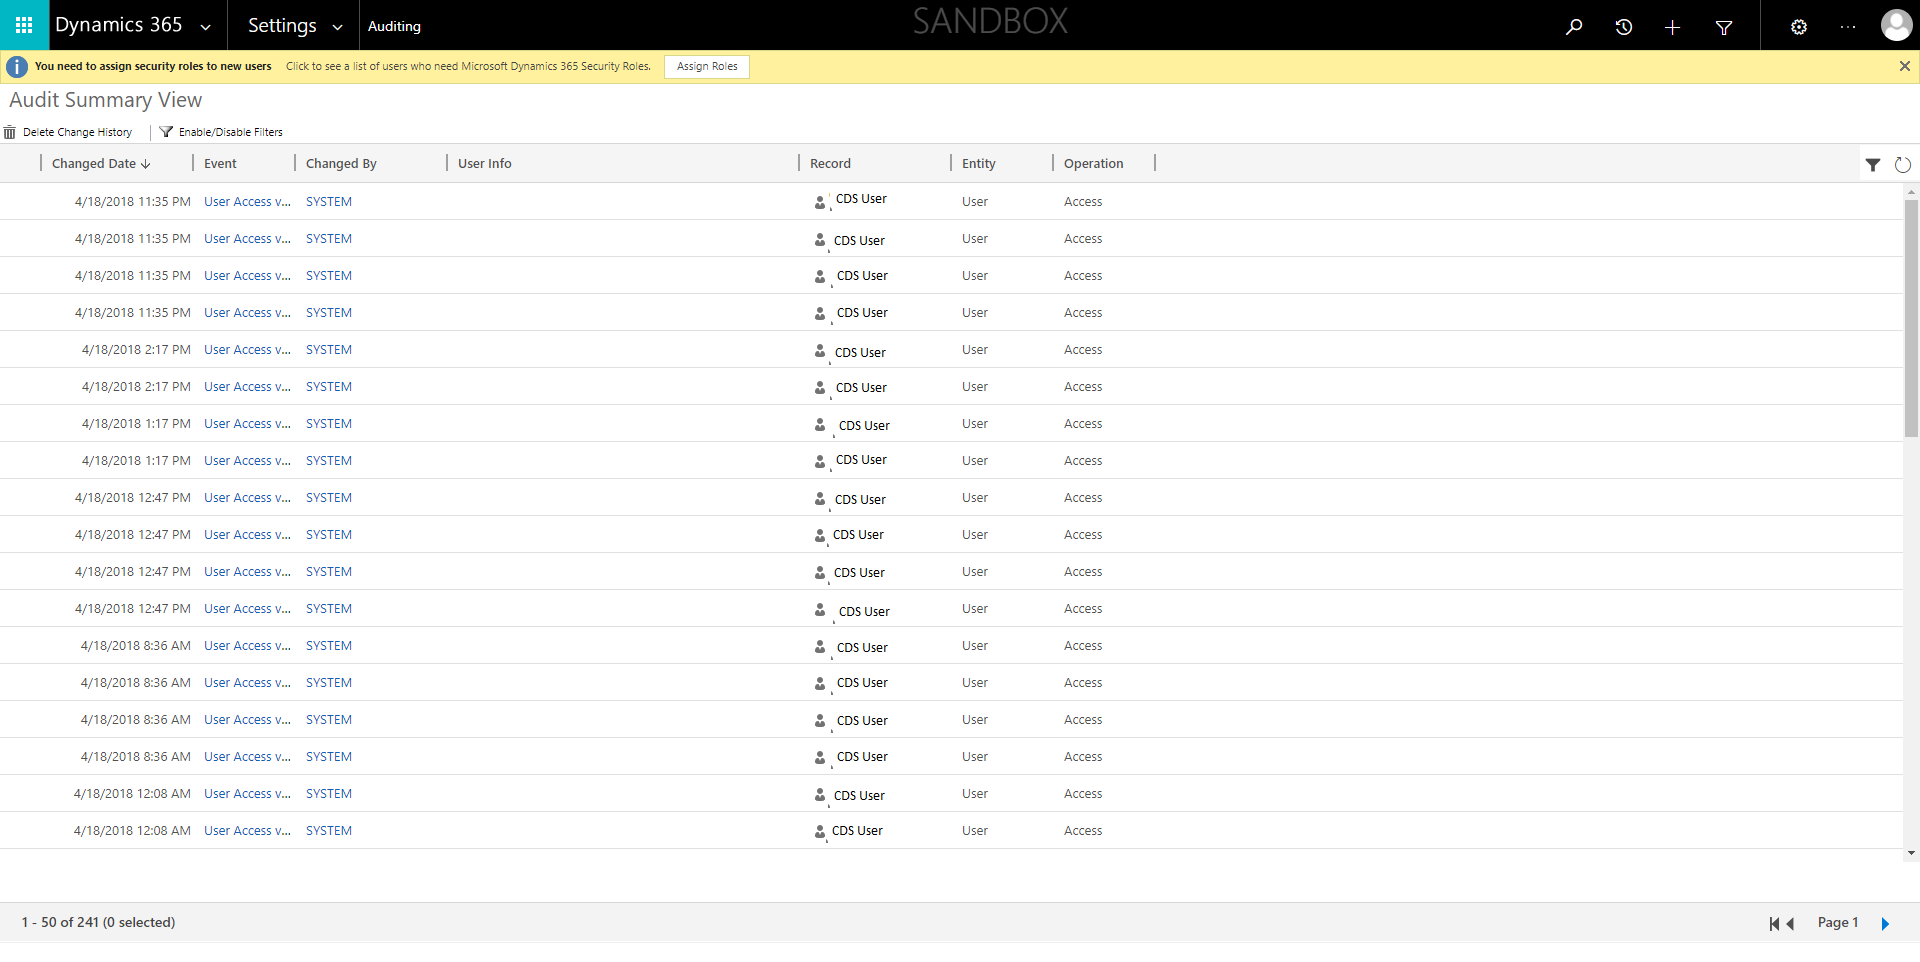
Go to Settings > Audit and logs, and then select Audit Summary View.
Locate the user audit record, and then press Alt+PrtScn to take the screenshot.
Save the screenshot to a file, which you can then send to the DSR requestor.
Delete
User
To avoid interruption to business applications that may be critical to your organization's operations, a user's records are not automatically removed from the Dataverse system User table when that user is deleted from within the Microsoft 365 admin center. The user's status is set to Disabled in Dataverse, but a Dataverse System Administrator must locate and remove the user's personal data from Dataverse within the application or delete the user from each environment. You can remove the user's personal data or permanently delete the user.
Remove a user's personal data from the user's Summary page
When a user record is deleted from the Microsoft Entra, the following message is displayed on the user's Summary page:
This user's information is no longer managed by Office 365. You can update this record to respond to DSR requests by removing or replacing all personal data associated with this user.
From the Power Platform admin center, do the following:
Select Environments, and then select an environment from the list.
Select Open environment.
Go to Settings > Security > Users, and then select Disabled Users View.
Enter the name of the user in the Search box, and then select Search.
Double-click the user's name in the search results list.
On the user's Summary page, remove all personal data, and then select Save.
Remove a user's personal data by using Excel
From the Power Platform admin center, do the following:
Select Environments, and then select an environment from the list.
Select Open environment.
Go to Settings > Security > Users, and then select Disabled Users View.
Create and download an Excel template file from the user's personal data. For step-by-step instructions, see Create a new Excel template.
Open the downloaded Excel template file, remove the user's personal data, and then save the file.
Return to the Disabled Users View page and select Import Data.
Select the Excel template file in the Upload data file dialog box and make all the necessary changes in the Map Fields window.
Select Next, and then select Submit.
Permanently delete user
You can either remove user's personal data or permanently delete the user record from the Datavese user table. More information: Permanently delete users in Power Platform.
When the user record is permanently deleted, the user's name in all records where the deleted user was the creator or last modified by and in the audit logs will show as No Name.
Remove audit history from the Audit Summary View page
From the Power Platform admin center, do the following:
Select Environments, and then select an environment from the list.
Select Open environment.
Go to Settings > Audit and logs, and then select Audit Summary View.
Locate the user's change history, select the check box next to the row(s), and then select Delete Change History.
Personal data stored in databases of Dataverse
Prerequisites
You may be storing personal data from individuals (such as your own customers) within your Dataverse tables.
Dataverse System Administrators are responsible for maintaining an inventory of where personal data is being stored within various tables for each individual so that they can locate that data in response to any DSR requests.
Personal data can then be exported, rectified, or deleted in a table using the in-product functionality.
Discover
When Dataverse System Administrators receive a DSR request from an individual, they must identify which environments/environments with a Dataverse database contain personal data for that individual. Personal data is typically stored in key tables (for example, Account, Contact, Lead, Opportunity, etc.), but it's your responsibility to develop policies and procedures for maintaining an inventory of where you store each individual's personal data so you're prepared to respond to DSR requests.
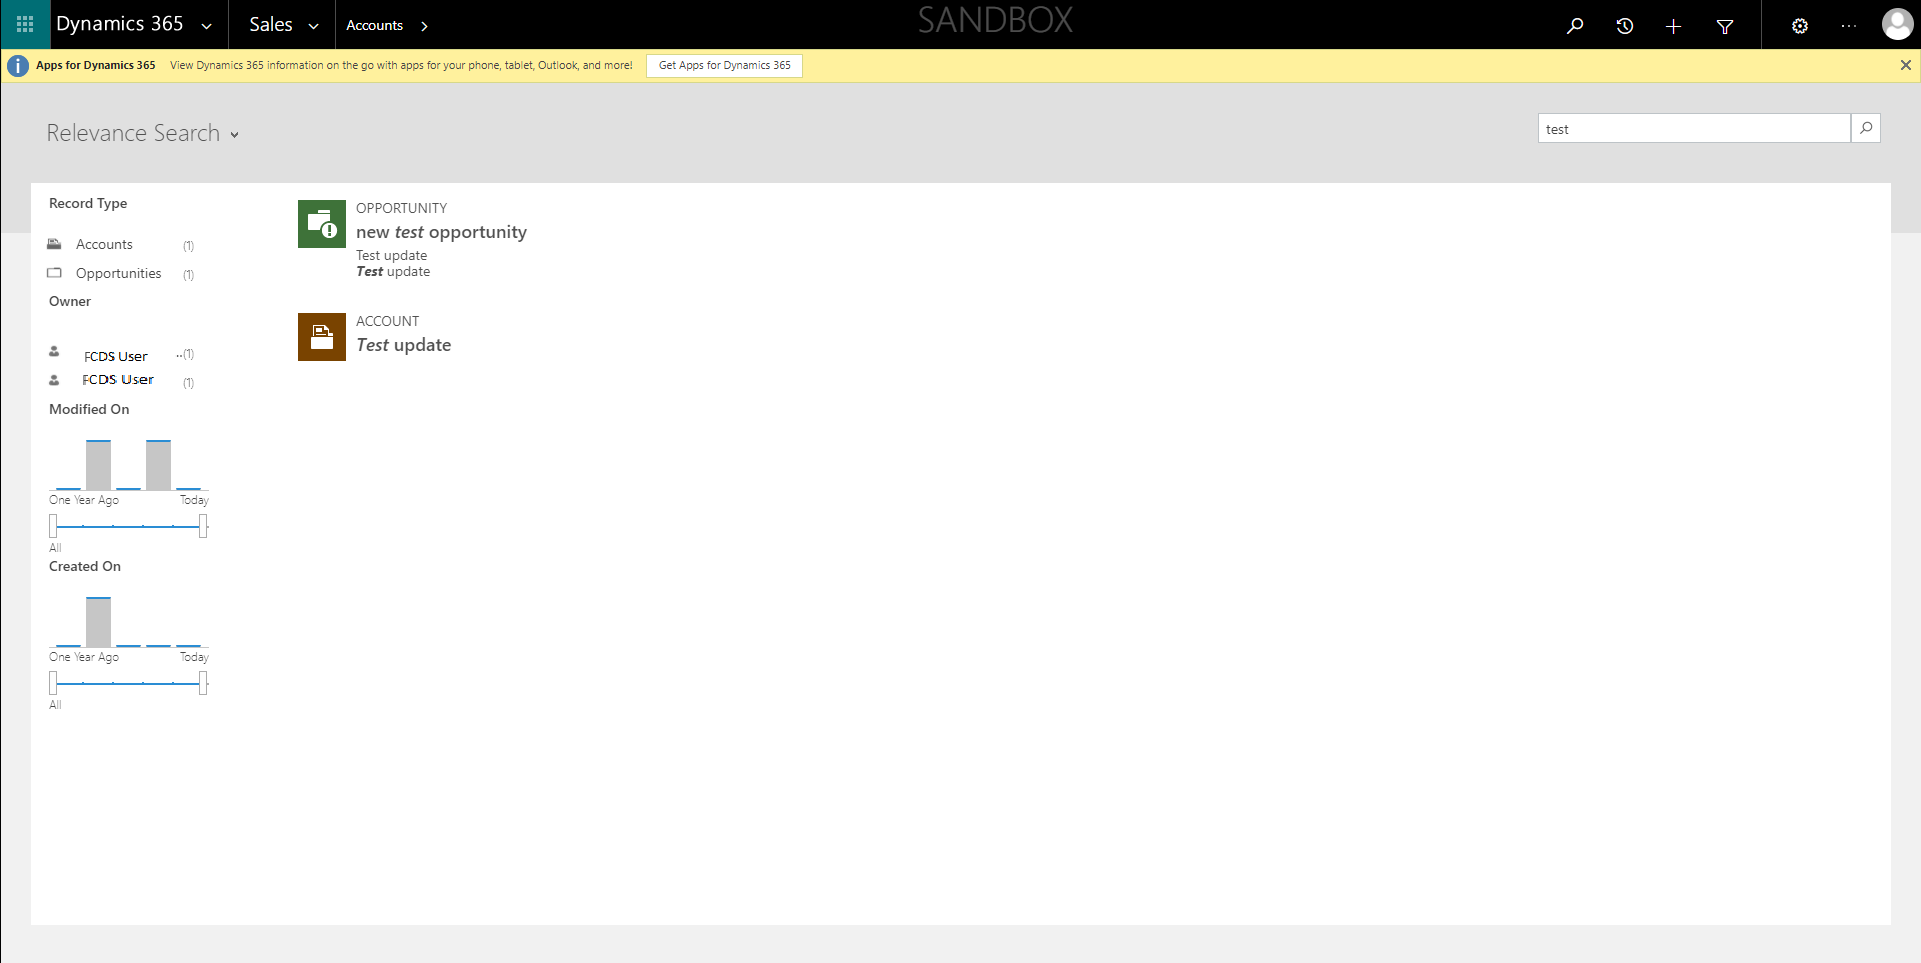
Using an inventory, Dataverse System Administrators can configure the search tables and fields and then access the environment to discover personal data. For more information, see Configure Relevance Search.
From the Power Platform admin center, do the following:
Select Environments, and then select an environment from the list.
Select Open environment.
Select Dataverse search.
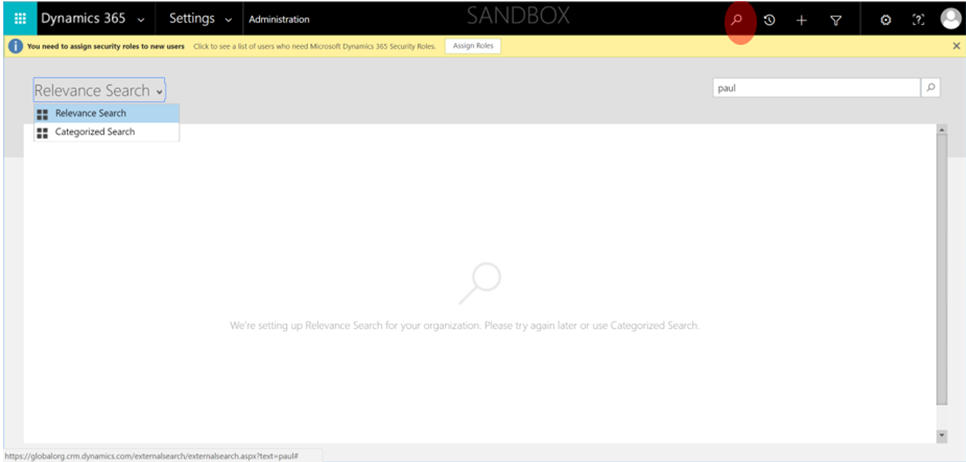
Enter the individual's personal data in the search box, and then select Search.
Rectify
Dataverse System Administrators can update an individual's personal data by using the list of results from the Dataverse search. However, an individual's personal data may also be stored in other custom tables. Dataverse System Administrators are responsible for maintaining an inventory of these other custom tables and making the appropriate updates to an individual's personal data.
From the Dataverse search results, do the following:
Select an item that contains the individual's personal data.
Update the individual's personal data where appropriate, and then select Save.
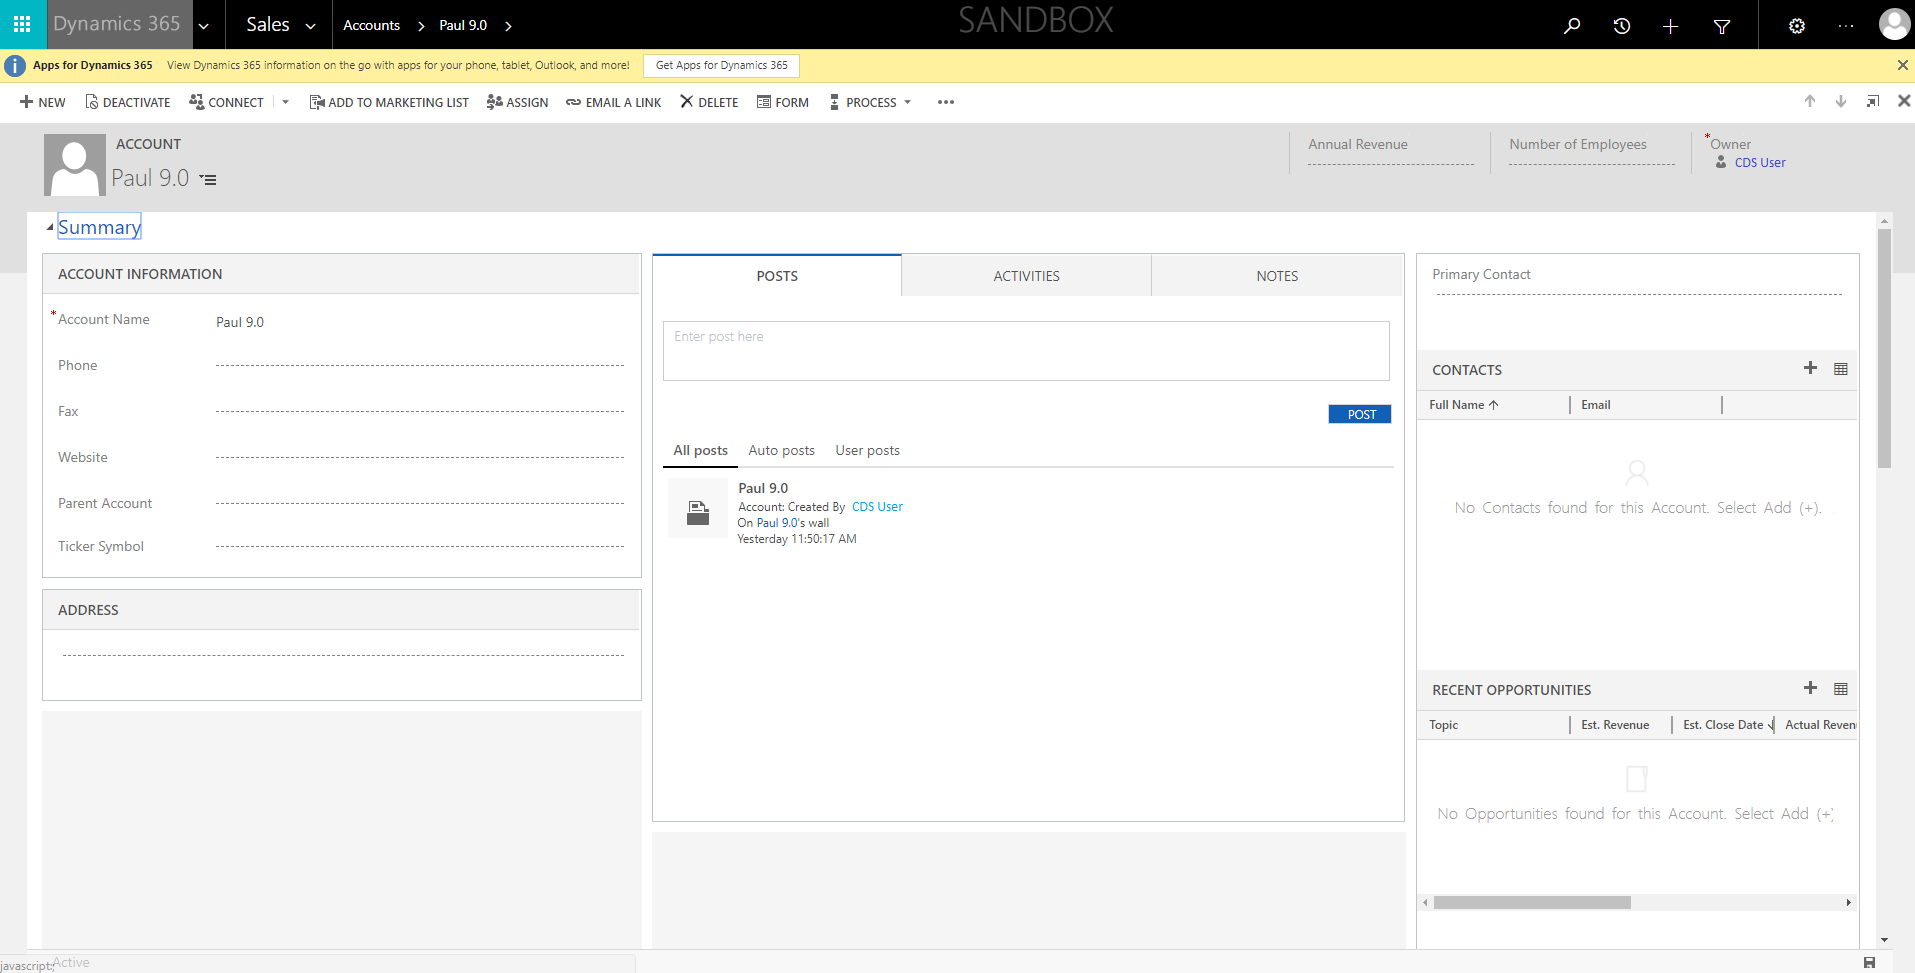
Export
You can take a screenshot of the data and share it with your DSR requestor.
From the Power Platform admin center, do the following:
Select Environments, and then select an environment from the list.
Select Open environment.
Select Dataverse search.
Enter the individual's personal data in the search box, and then select Search.
Double-click the item in the search results list.
Press Alt+PrtScn to take the screenshot.
Save the screenshot to a file, which you can then send to the DSR requestor.
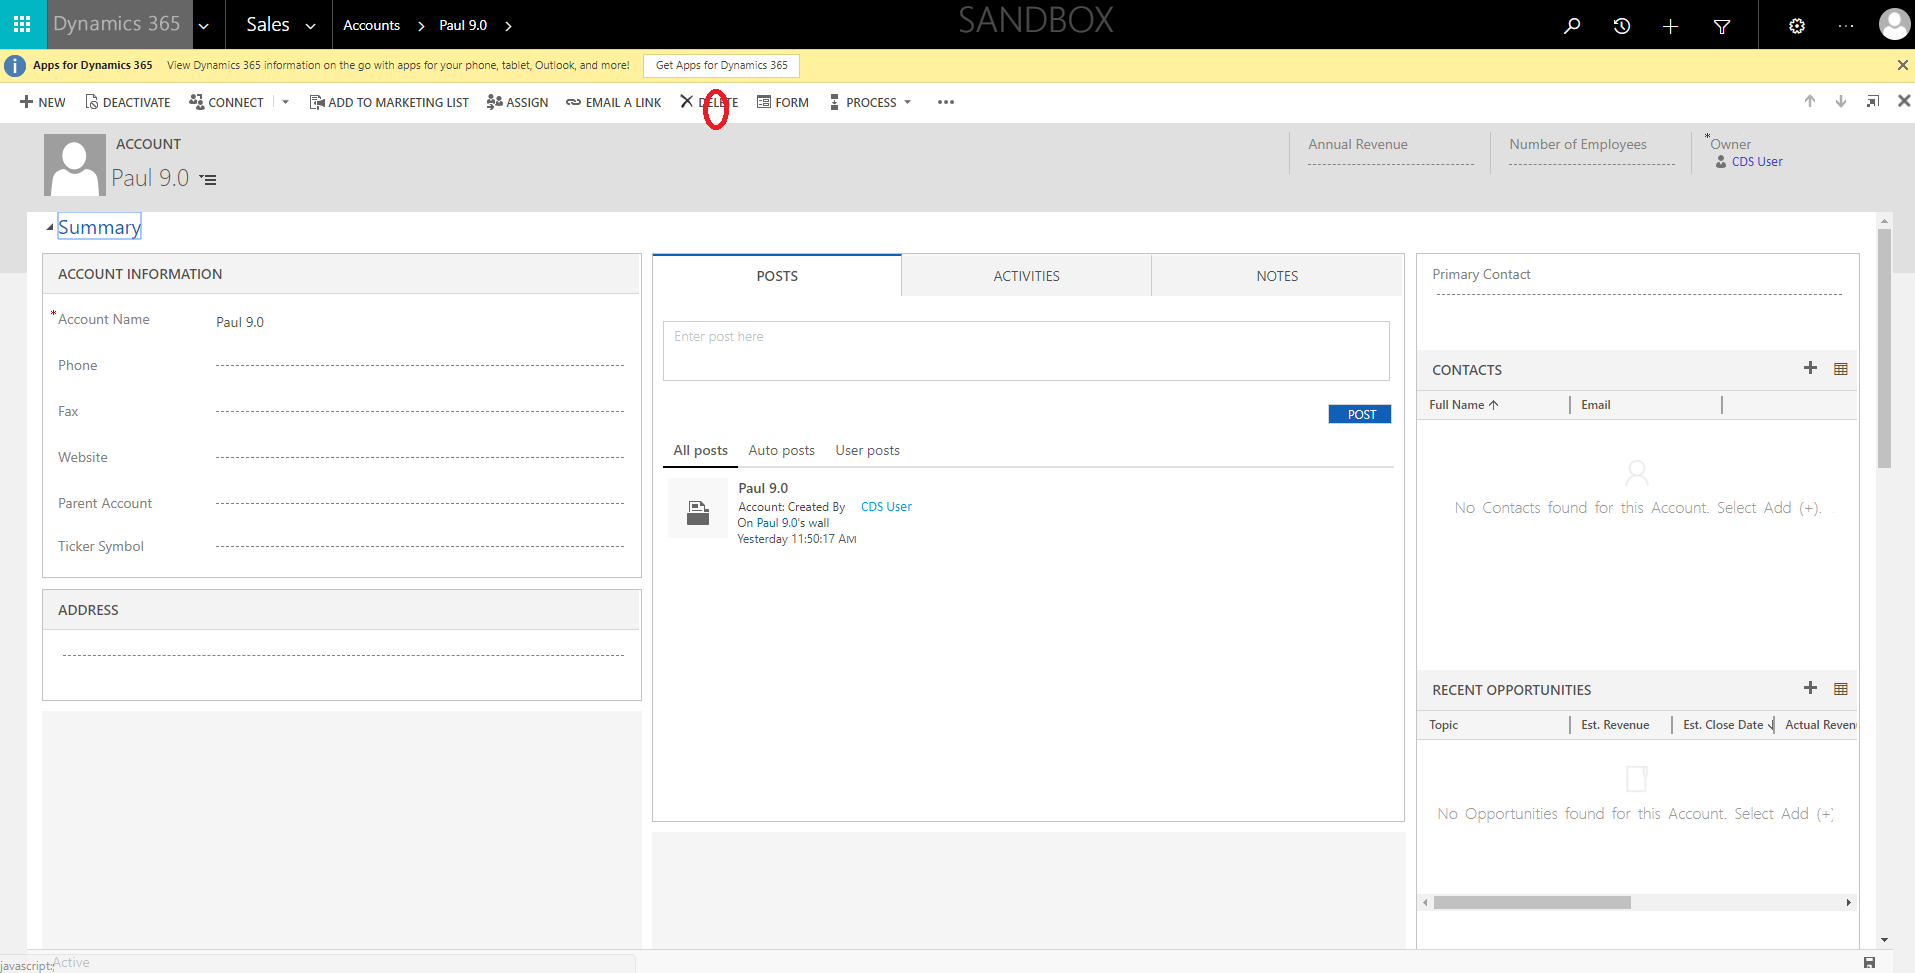
Delete
Dataverse System Administrators can delete an individual's personal data from records where that data is stored. The Dataverse System Administrator can choose to either delete the record where the personal data is stored, or remove the contents of the personal data from the record.
Note
Dataverse administrators can customize an environment to prevent a record from being deleted from an table. If configured in this way, you'll have to remove the contents of the personal data from the record rather than delete the record itself.
From the Dataverse search results, to the following:
Select an item that contains the individual's personal data.
In the ribbon, select Delete. (Note that Delete is disabled if the record cannot be deleted).
Personal data stored in databases of the previous version of Dataverse
Prerequisites
You may be storing personal data from individuals (such as your own customers) within your Dataverse tables.
Dataverse System Administrators are responsible for maintaining an inventory of where personal data is being stored within various tables for each individual so that they can locate that data in response to any DSR requests.
Personal data can then be exported, rectified, or deleted in an table using the in-product functionality.
Discover
When Dataverse System Administrators receives a DSR request from an individual, they must identify which environments/environments with a Dataverse database contain personal data from that individual. Personal data is typically stored in key tables (for example, Account, Contact, Lead, Opportunity, etc.), but it's your responsibility to develop policies and procedures for maintaining an inventory of where you store each individual's personal data so you're prepared to respond to DSR requests.
You can find personal data from users of the previous version of Dataverse within the following resources:
| Resource | Purpose | Website access | Programmatic access |
|---|---|---|---|
| Table rows | Captures business transactions in the respective business table. | Power Apps | No |
Table rows
An individual's personal data can be stored in any business table.
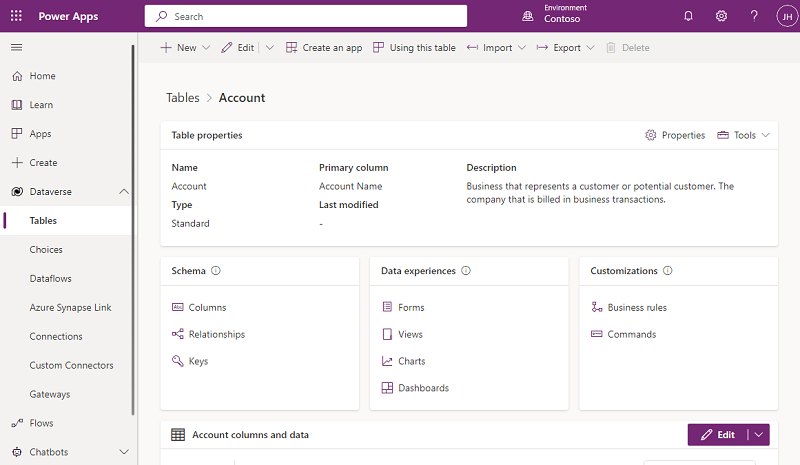
This version of the Dataverse contains its own database schema and infrastructure. It has its own tables, and you manage these tables in Power Apps.
To see a list of your tables, do the following:
In the Environment drop-down list, select your environment.
In the navigation pane, select Dataverse, and then select Tables.
From the list of tables, select a table (for example, the Account table), as shown below.
On the menu bar, select Export > Export data.
When the export is complete, select Download exported data.
When the export is complete, select the .zip file in the Downloads folder and extract the file. Open the .csv file.
Select the search button, enter the individual's personal data in the search box, and then select Search.
Using your inventory list, repeat the above steps for each of the business tables to discover all of the individual's personal data.
Rectify
If a data subject asks you to rectify the personal data that resides in your organization's data, you and your organization must determine whether it's appropriate to honor the request. Rectifying data may include editing, redacting, or removing personal data from a document or other type of item.
You can use Microsoft Entra to manage the identities (personal data) of your users within the previous version of Dataverse. Enterprise customers can manage DSR rectify requests by using the limited editing features within a given Microsoft service. As a data processor, Microsoft does not offer the ability to correct system-generated logs, because they reflect factual activities and constitute a historical record of events within Microsoft services.
To rectify personal data that resides in the environment, you can export the table data into an Excel spreadsheet, update it, and then import the updates back to the database.
Dataverse System Administrators are responsible for identifying all tables that contain personal data for an individual and repeating the following steps for each of those tables.
From Power Apps, do the following:
In the navigation pane, select Dataverse, and then select Tables.
From the list of tables, select a table (for example, the Account table), as shown below.
On the menu bar, select Export > Export data.
When the export is complete, select Download exported data.
When the export is complete, select the .zip file in the Downloads folder and extract the file. Open the .csv file.
In the menu bar, select File, select Save As, and then select a location in which to save the file.
Make the necessary personal data updates and save the spreadsheet.
In Power Apps, go back to the selected table, and then select Import > Import data.
Select Search, and then select and open the Excel spreadsheet that you just updated.
Select Import.
Export
You can export personal data from each table into an Excel spreadsheet and view it.
From Power Apps, do the following:
In the navigation pane, select Dataverse, and then select Tables.
From the list of tables, select a table (for example, the Account table), as shown below.
On the menu bar, select Export > Export data.
When the export is complete, select Download exported data.
When the export is complete, select the .zip file in the Downloads folder and extract the file. Open the .csv file.
Delete
You can delete personal data that's stored in tables by using the Export/Import data feature.
Dataverse System Administrators are responsible for identifying all tables that contain personal data for an individual and repeating the following steps for each of those tables.
From Power Apps, do the following:
In the navigation pane, select Dataverse, and then select Tables.
From the list of tables, select a table (for example, the Account table), as shown below.
On the menu bar, select Export > Export data.
When the export is complete, select Download exported data.
When the export is complete, select the .zip file in the Downloads folder and extract the file. Open the .csv file.
In the menu bar, select File, select Save As, and then select a location in which to save the file.
Delete the rows containing the personal data that you want to remove from the table and save the spreadsheet.
In Power Apps, go back to the selected table, and then select Import > Import data.
Select Search, and then select and open the Excel spreadsheet that you just updated.
Select Import.
Feedback
Coming soon: Throughout 2024 we will be phasing out GitHub Issues as the feedback mechanism for content and replacing it with a new feedback system. For more information see: https://aka.ms/ContentUserFeedback.
Submit and view feedback for