Configure date settings for demo data
Use the information below to automatically keep your demo environment data current.
Before you begin
Download the Configuration Migration Tool. The Configuration Migration tool is available as a NuGet package. To download the tool, see Download tools from NuGet. Follow the steps on this page to extract the DataMigrationUtility.exe tool.
You can set the values of datetime fields to automatically move forward by a specified duration. This allows you to keep your demo data recent without the need to make manual updates. It will also work when using Configuration Migration Utility files with the Package Deployer tool.
Note
This option is to keep data recent in your demo environments. It is not intended for production use.
Start the Configuration Migration tool. Double-click DataMigrationUtility.exe in the folder: [your folder]\Tools\ConfigurationMigration\
On the main screen, click Create schema, and click Continue.
On the Login screen, provide authentication details to connect to your environment from where you want to export data. If you have multiple organizations and want to select the organization from where to export the data, select the Always display list of available orgs check box. Click Login.
If you have multiple organizations, and you selected the Always display list of available orgs check box, the next screen lets you choose the organization that you want to connect to. Select an organization to connect to.
On the next screen, select the schema file to be used for the data export or build a new schema.
Click Tools, and then click Configure Date Settings.
Choose the default date mode and select an entity to apply the settings to.
- Select Absolute. Dates are not modified during import if you do not want dates to move forward by default.
Note
You can still select individual fields to move forward at import. In the below example, only fields marked as Relative will be automatically moved.

- Alternatively, select Relative. Dates are renewed during import if you want all date values to auto-move by default.
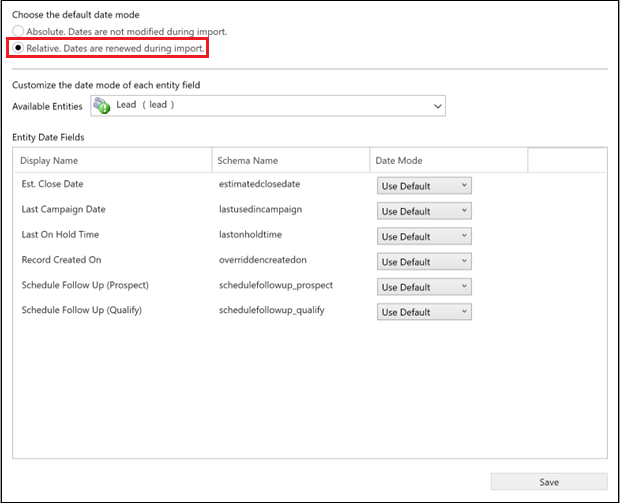
Note
This option will set dates to auto-move for all datetime fields on all entities. You may change this at the field level by selecting Absolute.

Verify your selections for all fields on all entities in your schema.
Click Save and Export.
Specify the name and location of the data file to be exported.
Click Yes on the prompt: The schema save is complete. Would you like to export the data?
Specify the name and location of the data file to be exported.
Click Export Data. The screen displays the export progress status and the location of the exported file at the bottom of the screen once the export is complete.
Click Exit to close the tool.
Note
Date values will be moved forward in one week increments at the time of import. The amount moved is based on the date/time of export and the date/time of import. The timestamp attribute in the header of the data.xml file contains the date and time of export.
Formula: Imported date = exported date + (date of data import – date of data export)
Example: To move dates forward by 3 months, and import the data on 10/1/2017: change the timestamp in the data.xml file to 7/1/2017.
See also
Download tools from NuGet
Modify a schema
Manage your configuration data
Import configuration data
Feedback
Coming soon: Throughout 2024 we will be phasing out GitHub Issues as the feedback mechanism for content and replacing it with a new feedback system. For more information see: https://aka.ms/ContentUserFeedback.
Submit and view feedback for